About this Document
Last updated: 10 February 2026
This document describes the features and functionalities that administrators can manage on the Cisco Broadworks solution using the Netaxis Fusion for Broadworks (F4B) solution. This guide demonstrates how F4B enables Go-To-Market (GTM) offers built on the Cisco Broadworks platform, by providing a robust framework for intuitive self care capabilities and the ability to create customized content. The perceived platform is presented to end customer users and administrators through the Self Care Portal (SCP) of the F4B solution.
The content of this document is extracted and based on a Netaxis hosted platform, which means this document:
- is branded with the Netaxis logo, colors, and fonts. These may differ from the Service Provider's branding.
- covers all features and integrations currently supported on the latest F4B solution release (Release 4.1).
- contains reference data (e.g., license names, usernames, group names) that are specific to the Netaxis platform for informational purposes, which can differ from the reference data at the Service Providers' instance.
About the Self Care Portal (SCP)
The Self Care Portal (SCP) for F4B is branded and called UC Control Hub (UCCH). In the rest of this document we shall refer to UCCH as the SCP. It is a web-based interface that enables UCaaS and SIP Trunking providers to offer their end customers self-service management capabilities for their hosted Unified Communications (UC) and SIP Trunking services. SCP supports service deployments across private, public, and hybrid cloud environments, empowering providers to deliver a scalable and flexible self-care experience. Administrators at all levels will use the SCP as a primary tool to manage their hosted UC and telephony system, as well as their SIP trunking services. They can use the portal to:
- Create, manage, and delete hosted users, their licenses, feature settings, and UC capabilities.
- Manage phone numbers for users (select, assign, disconnect).
- Manage number portability by porting in phone numbers from other providers.
- Set up and configure PBX services like IVRs, call queues, call centers, and hunt groups.
- Set up and configure complex call flows, call barring policies, opening hours, closing days, and more. The SCP can also be used by End Users of the Cisco Broadworks solution to manage their personal details and call services (call forwarding, call blocking, etc.). This is described in a separate End User Guide document. The SCP can be customized to meet the branding and value proposition of the customer/Service Provider. Colors, fonts, and background images can be changed, certain pages and functionalities can be hidden, labels and/or help texts can be adapted, and integrations and/or automations can be built on the backend to provide additional automation. A more exhaustive description of the SCP can be found in the product description of the Fusion for Broadworks solution.
Getting Started
Before getting started, it's important to understand the administrator hierarchy within the Cisco Broadworks platform. This framework ensures that each level of administration has the appropriate access and authority, streamlining operations and enhancing security measures. The Fusion for Broadworks solution follows this hierarchy in the SCP.
At the top of this hierarchy are the System Administrators, who have full control over the entire solution. They can access and manage all tenants created within the system, handle licenses, and manage numbers for tenants, etc. Typically, these administrators work for the Service Provider responsible for the operation and management of the Cisco Broadworks solution. System Administrators are set up during the initial provisioning process—the first step of the two-step provisioning process for the F4B solution. More detailed instructions on this process can be found in the configuration guide for the solution. Their tasks include defining various tenants and assigning a Tenant Administrator to each. For some Service Providers, this first step may be automated, but the result is the same.
Tenant Administrators operate at the tenant organization level and have access to all resources within their respective tenant. Upon logging into the SCP, they are directed to their tenant's dashboard, where they can manage resources as per organizational requirements. Depending on how the Cisco Broadworks solution has been set up (in Enterprise mode or Service Provider mode), a tenant administrator is either an Enterprise Administrator (in Enterprise mode) or a Group Administrator (in Service Provider mode). Tenant administrators can also access and manage all groups in their tenant but cannot see, access, or manage other tenants. Further down the hierarchy are the Group Administrators, also known as Site Administrators in site-based enterprise structures. Group Administrators are responsible for managing the settings and configurations specific to their assigned group or site. Upon logging into the SCP, these administrators are directed to the dashboard of their designated group or site. Group administrators cannot see, access, or manage other groups defined in the solution.
There is an optional hierarchical level, Department, within the Broadworks solution, but the SCP does not support an administrator for this level. Departments are managed by the group administrator. Lastly, there are the End Users of the Broadworks solution. They have limited access, restricted to viewing and managing settings related solely to their individual user profiles. Upon logging into the SCP, they are redirected to a user-friendly dashboard that lists the settings relevant to their profile, allowing them to navigate and customize options according to their needs.
Logging into the SCP
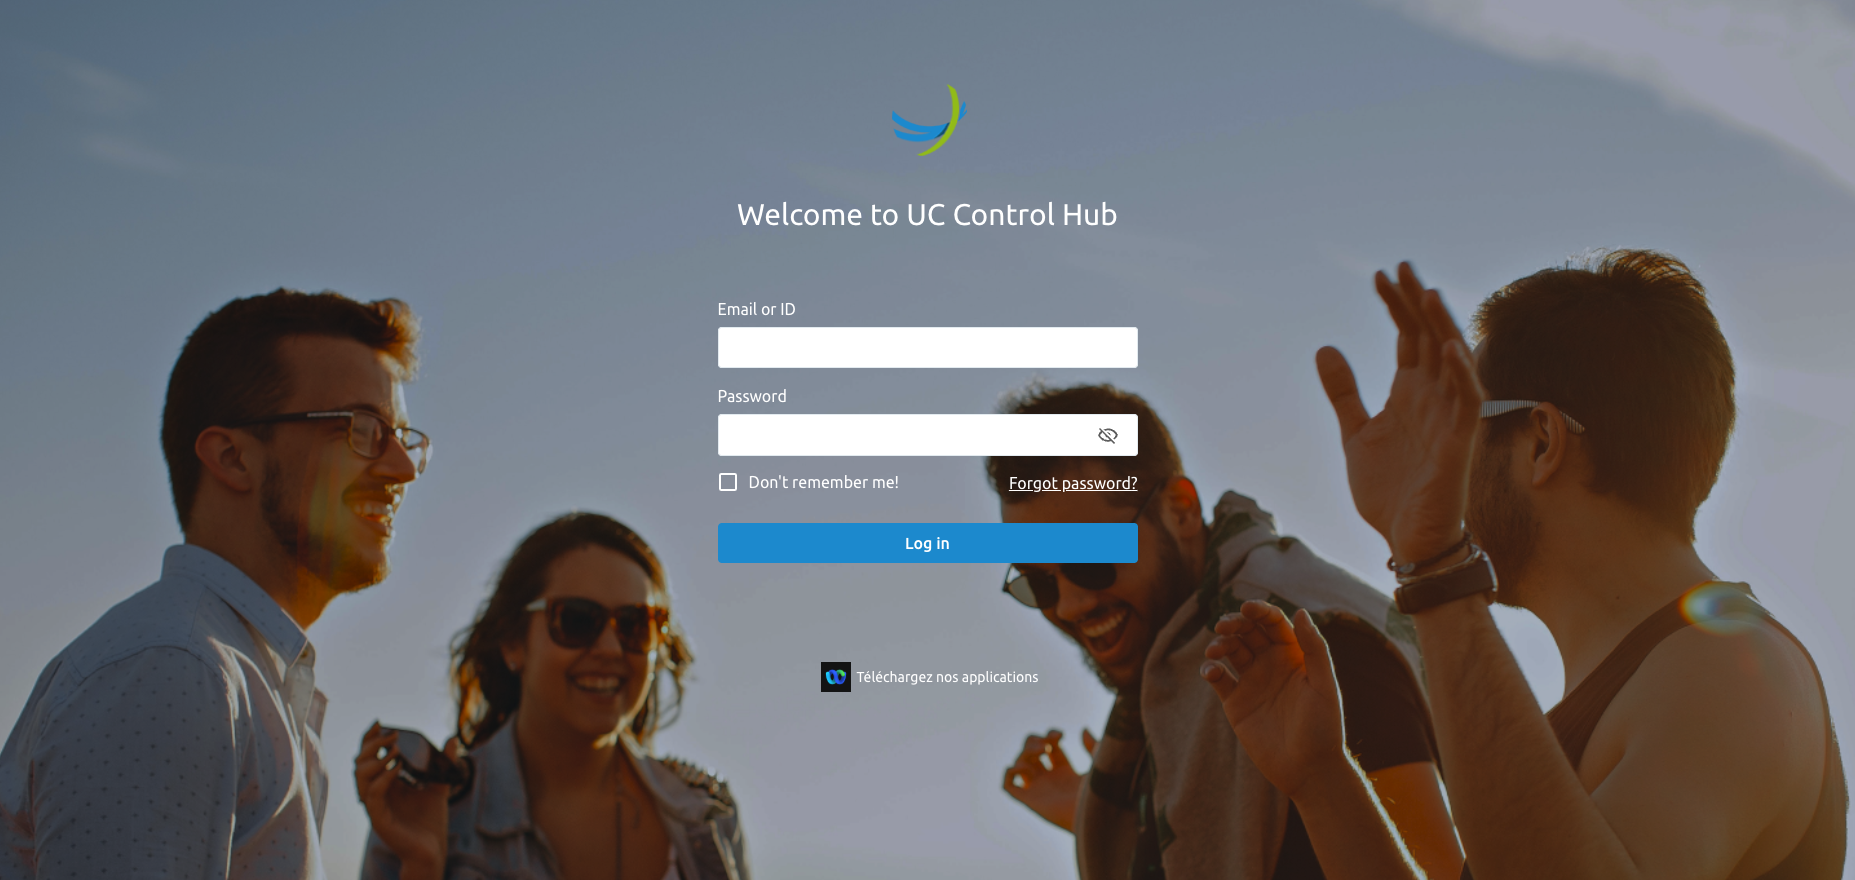
When entering the correct SCP URL, the administrator is redirected to the login page. The administrator can enter their credentials, which lead them to the appropriate page in the portal based on their administrator profile. The login page looks as follows:
There are two ways to provide initial password credentials for Tenant and Group administrators: either the initial password is handed over to the system administrator when creating the account, or the tenant/group administrator receives a welcome email containing their username and a link to set up their password.
Welcome Email
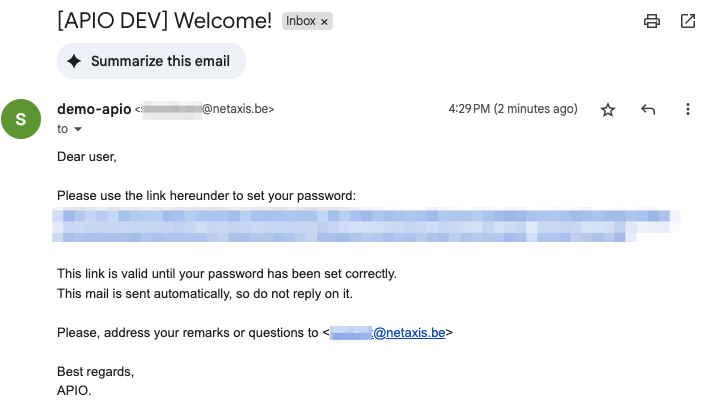
When a System Administrator creates a Tenant Administrator and activates the Send a Welcome mail flag, the new administrator will receive an email containing:
- The username to be used for logging into the SCP.
- A link to the SCP to initialize their password. Below is an example of a welcome email. In this example, the administrator's username is not included. The email body and branding can be customized to the Service Provider's preferences.
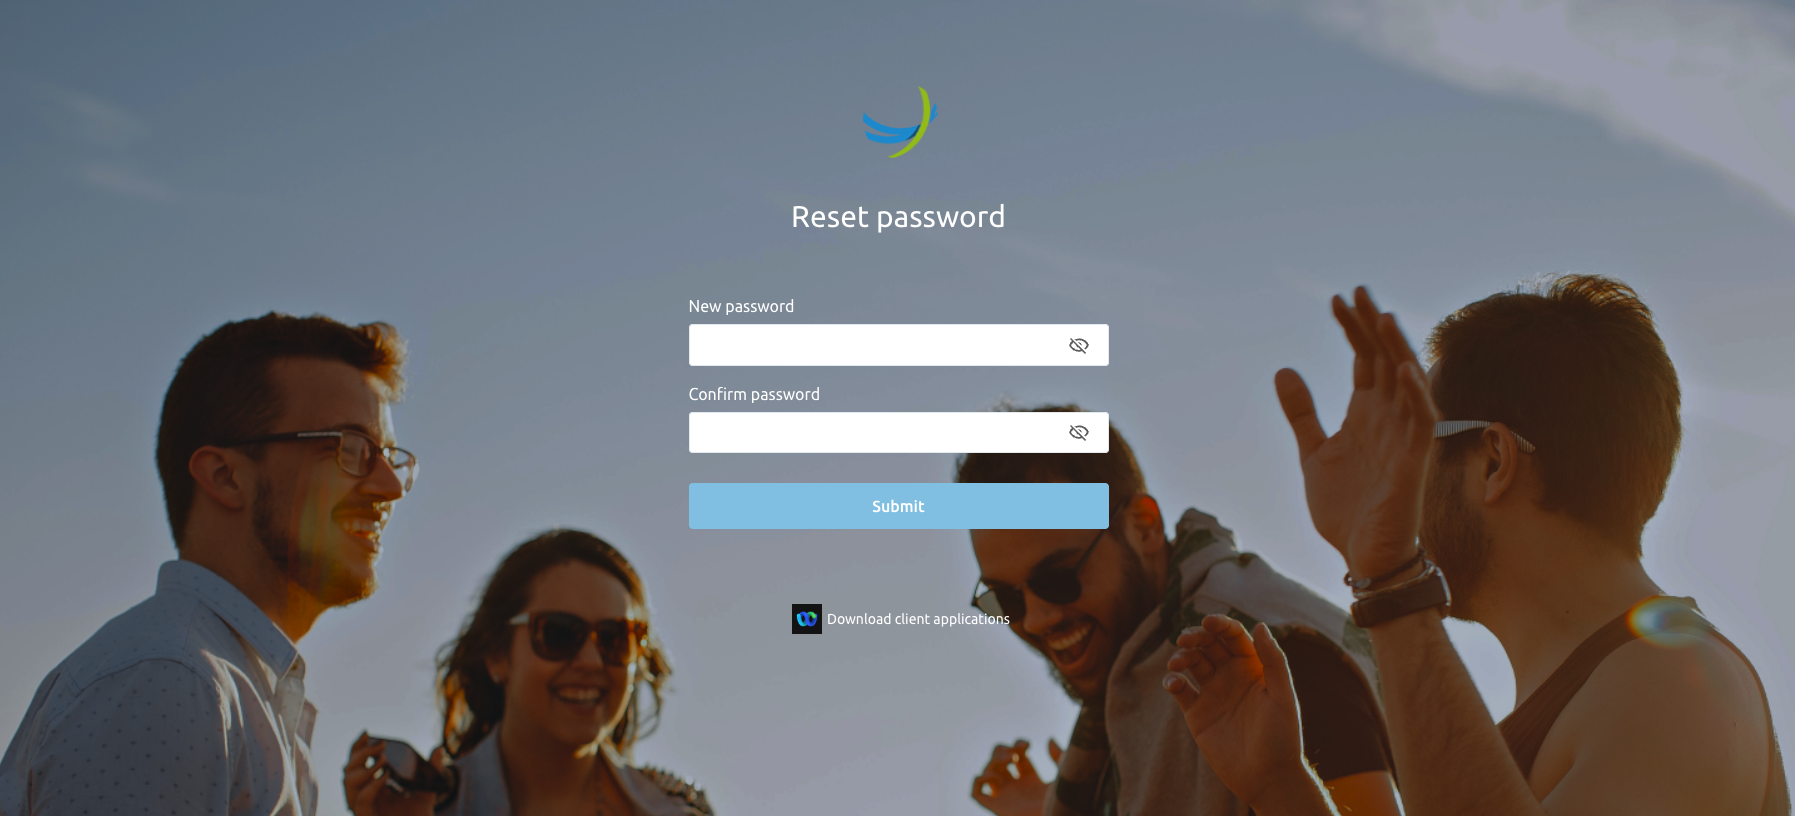
Clicking the link redirects the administrator to a page where they can initiate their password for the SCP.
After setting the password, the administrator is redirected to the login page, where they can log in using their username and the newly initialized password.
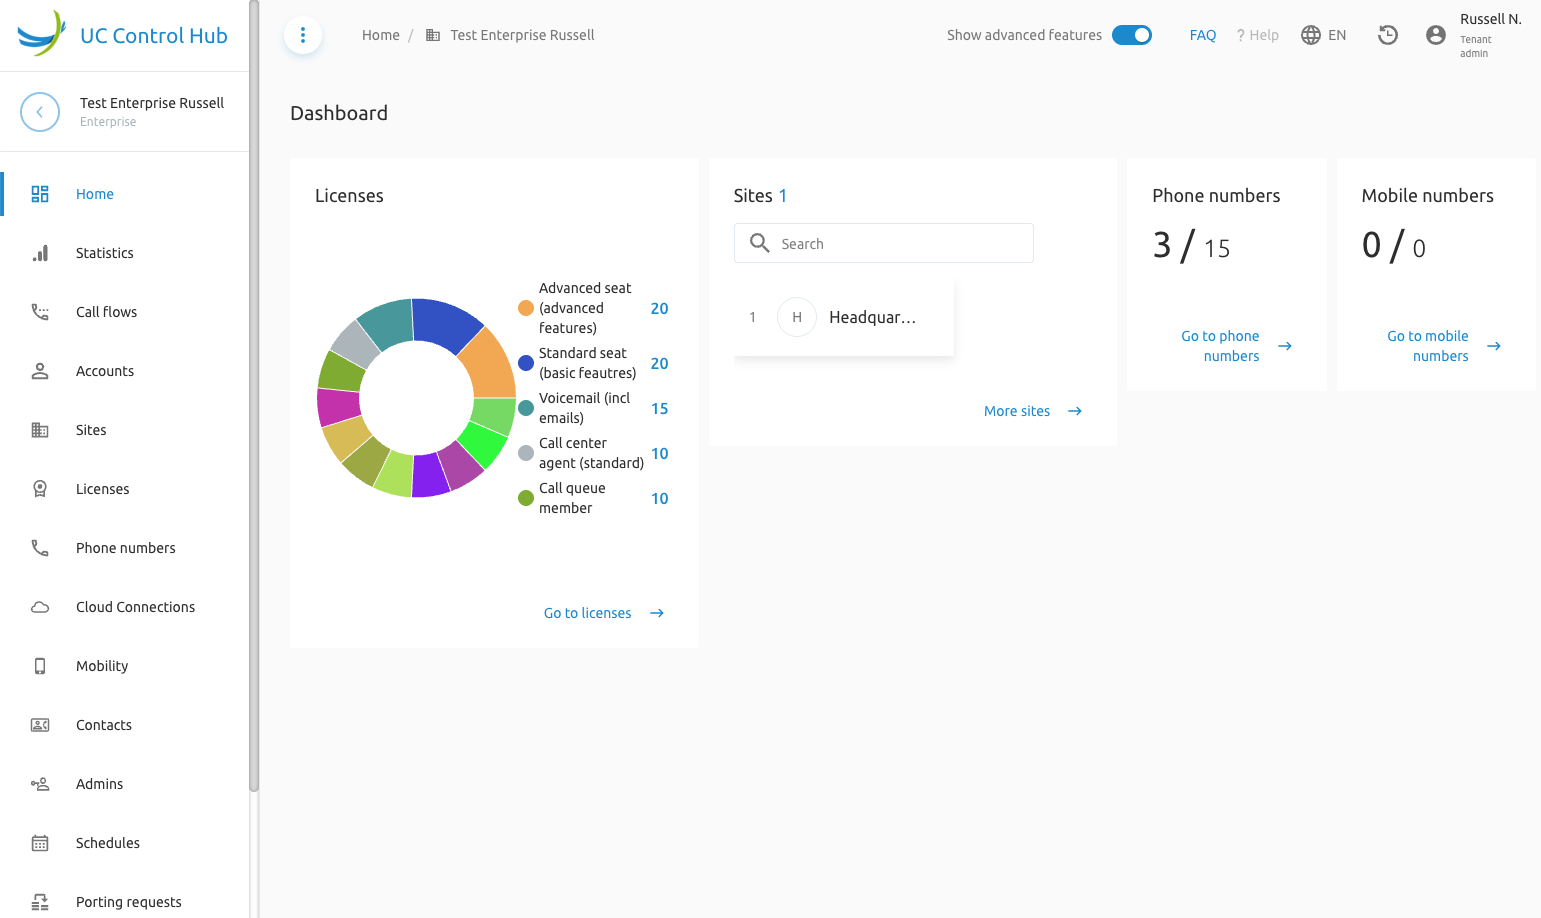
After entering credentials, the Tenant Administrator is redirected to their landing page, the Tenant dashboard. The screenshot below shows an example of this page.
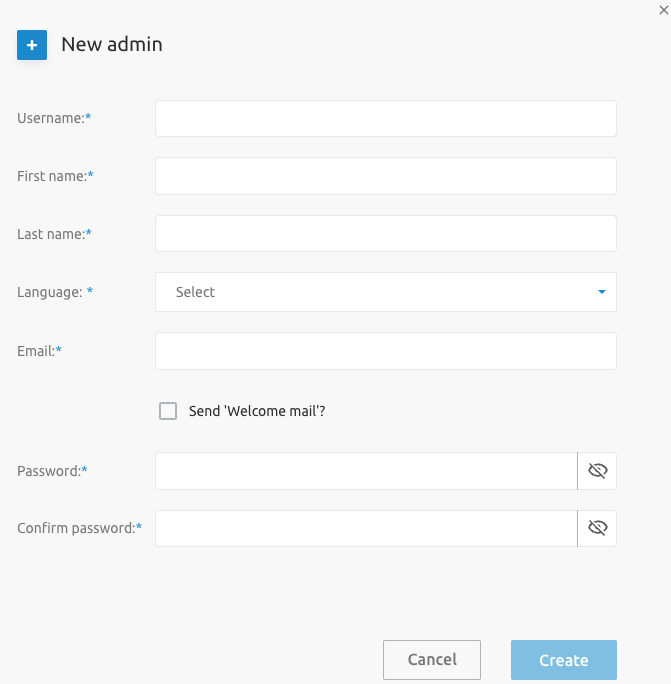
Additional Tenant Administrators can be created through the SCP by any Tenant Administrator. When adding a new administrator via the portal (by selecting the Admins service on the left and clicking the +Add button), a pop-up window offers the choice to either send a welcome email to the new administrator or to force a password set. In the latter case, securely sharing the password with the new admin is required.
NoteSome Service Providers only allow the BroadWorks System Administrator to create additional Tenant Administrators.If this is the case, the Add button can be disabled or hidden through a configuration change.
Don't Remember Me
By default, the SCP will try to keep the administrator or end user logged in, even after they have closed their browser or powered off their device. The session remains open for a certain amount of time, by default 48 hours, but this is configurable (more details in the configuration guide).
Security TIP: If you log in via a device you do not own, it is advised to select the "don't remember me!" option. This prevents you from staying logged in after closing your browser or rebooting your device, which could allow someone else to make changes on your behalf. For the same reason, the login form will not suggest saving your password.
2-Factor Authentication (2FA)
The platform supports 2-factor authentication to reduce the risk of malicious logins. The F4B solution currently supports 2FA via Email or Time-Based One-Time Password (TOTP) or Short Messaging Service (SMS).
Email-based 2FA
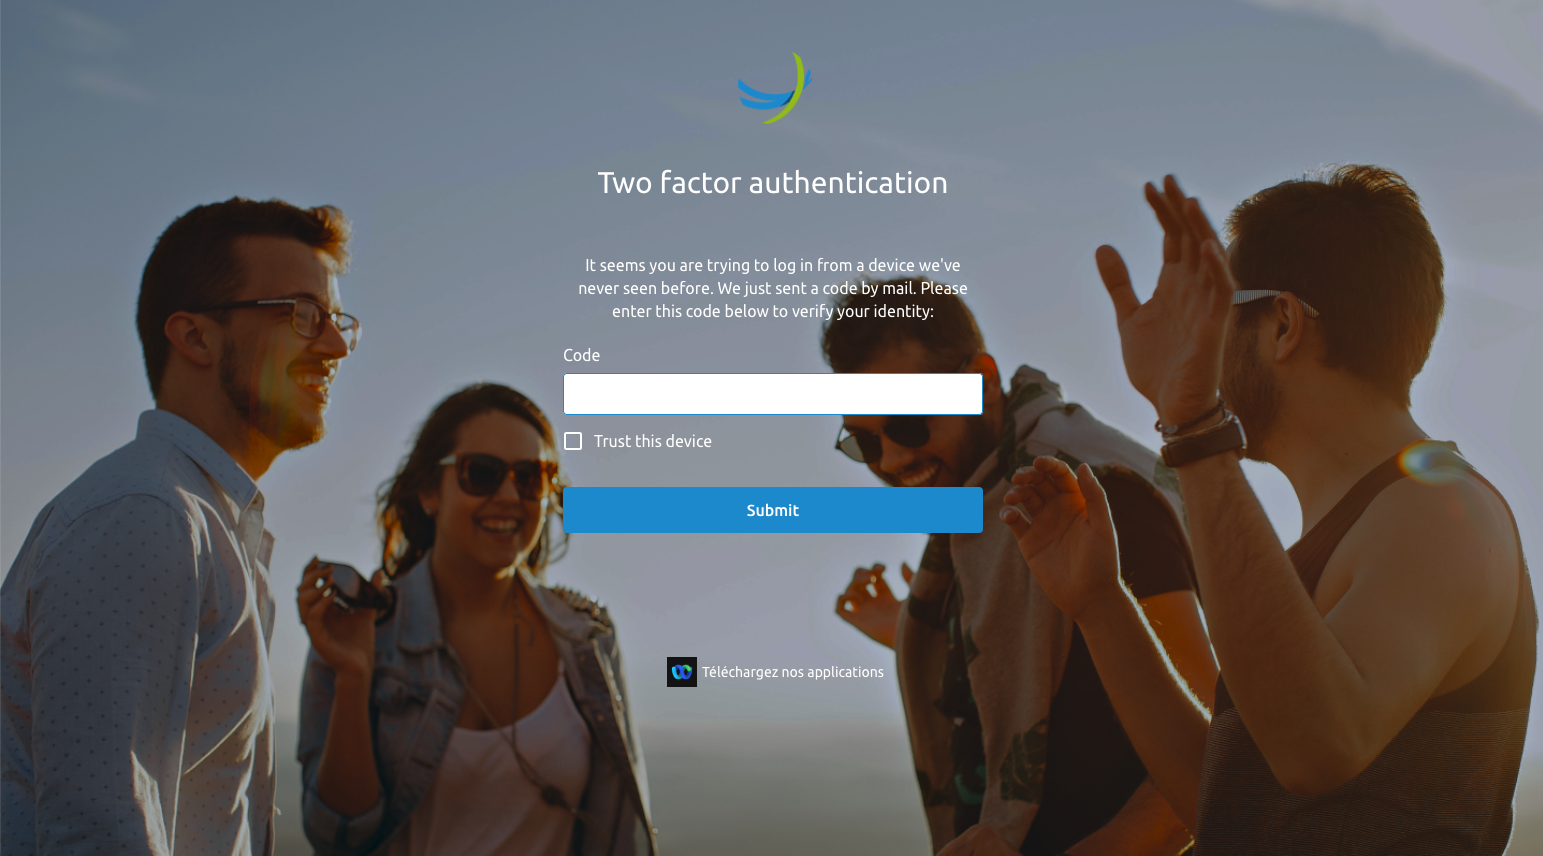
2FA via email will only be enforced if the account (administrator or end user) is set up with an email address. If so, the platform will detect when the account tries to log in and will prompt for a code (challenge) that the account will receive via email. When 2FA is activated, users will see the following page after submitting their credentials on the login page:
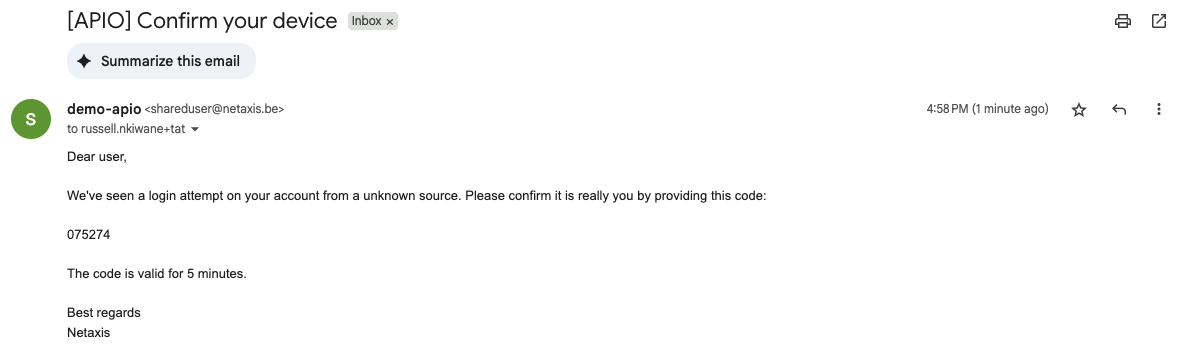
The email the user receives when 2FA via email is active may look like this: (the email body and branding can be adapted during the setup and configuration of the solution).
By activating the "Trust this device" checkbox on the 2FA page, the account will be immediately forwarded to the landing page on the next login. For a configurable amount of time (more details on setting up 2FA can be found in the configuration guide), the account will not be prompted to enter the code.
TOTP-based 2FA
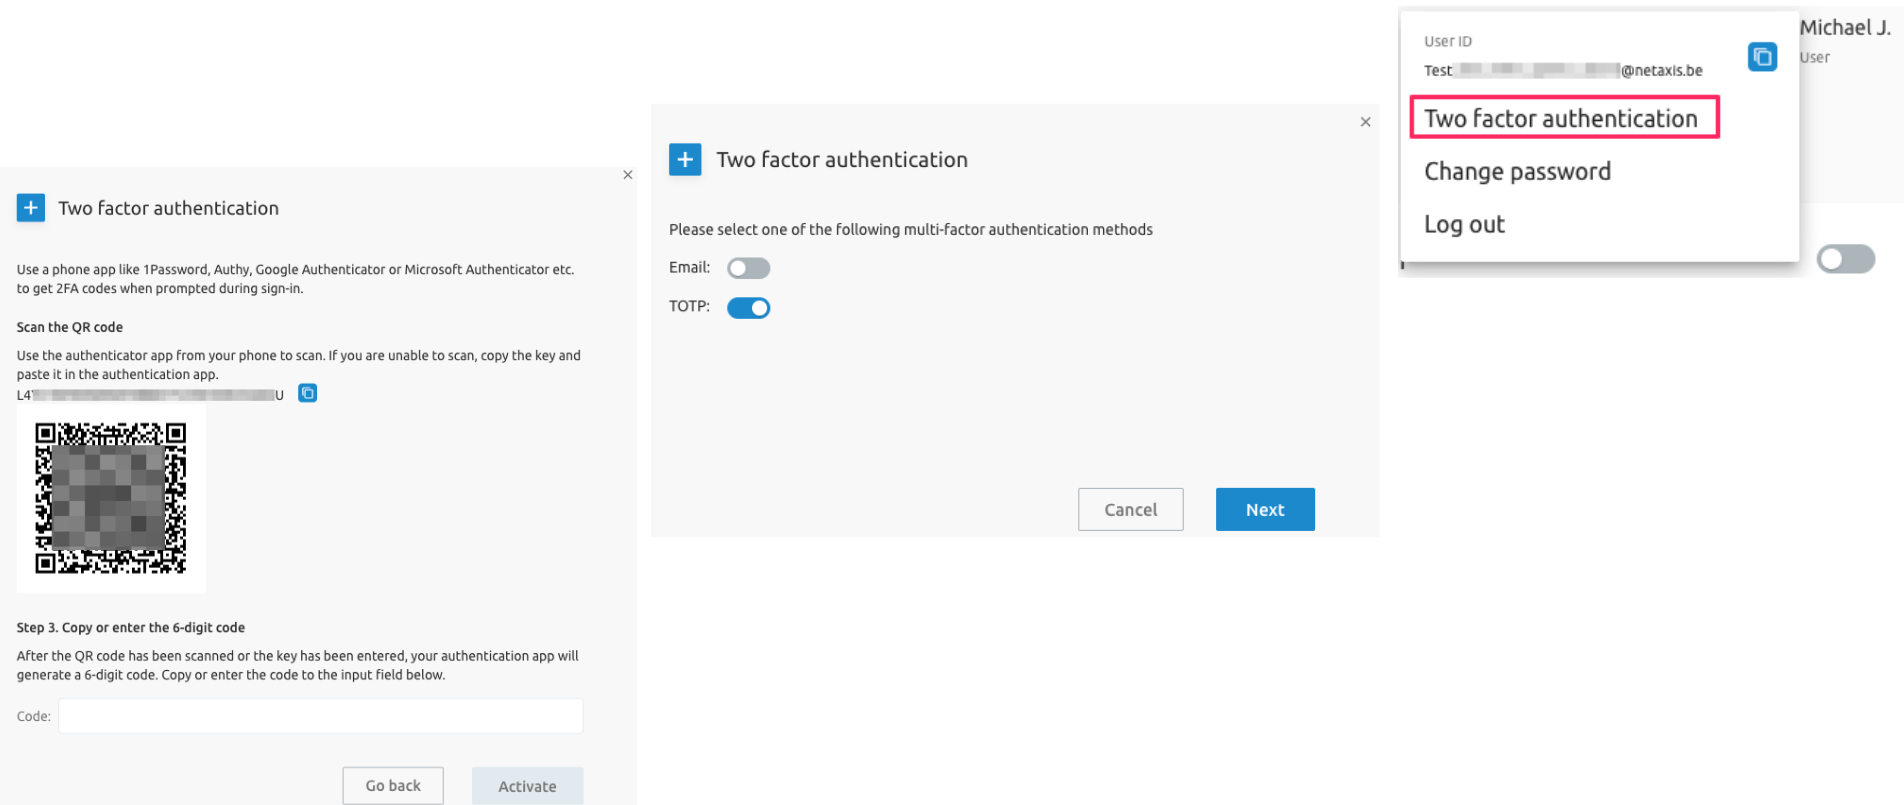
Two Factor Authentication (2FA) has now been extended with TOTP support (RFC 6238 e.g. Google/Microsoft Authenticator), with User (administrator or end user) Activated TOTP.
SMS-based 2FA
For SMS, the Service Provider must provide an SMS gateway to send verification codes to users logging into the SCP.
NoteThe mobile numbers of these users must have been entered into the system.
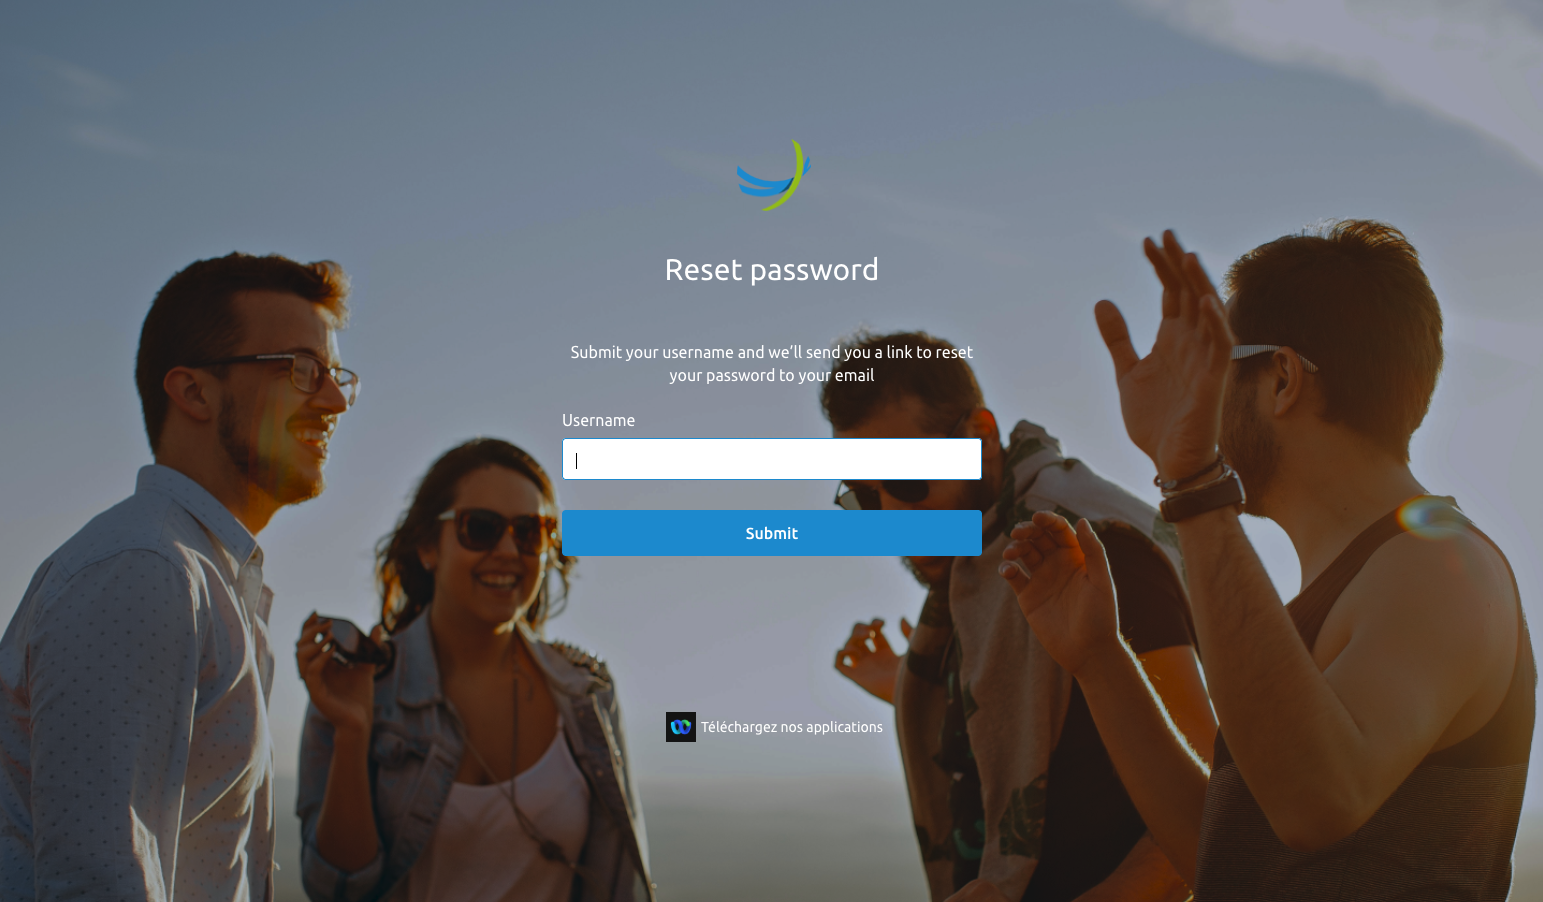
Forgot Password
The login page has a link that allows users to reset their password. Clicking this Forgot password link opens a new window that asks for the account's username. An email with a reset password link is sent to the email address linked to that account. If no email has been configured, the password reset will fail, and the old password remains valid. In this case, the administrator who created the account can reset the password.
The reset password screen looks like this:
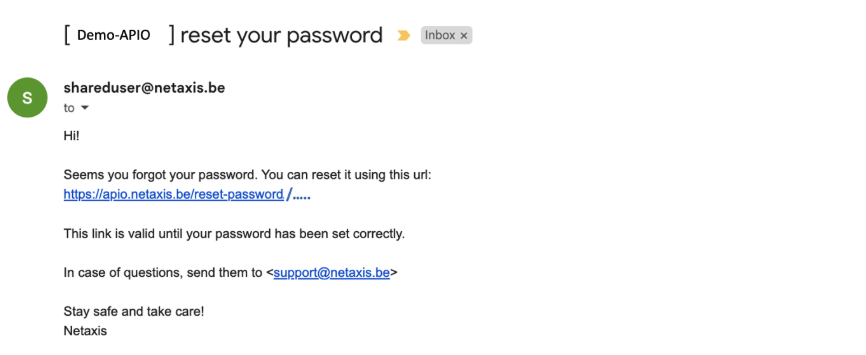
The email the user receives can look as follows: (the email body and branding can be adapted during the setup and configuration of the solution).
Getting Around the Self Care Portal (SCP)
This chapter describes the main sections of the SCP Interface after a successful login. It is applicable for the administrator view (System Admins, Tenant Admins, and Group Admins) as well as for end users.
Common Parts
The SCP has some areas on the webpage that are the same for all user types. The icons provide the same information and/or functionality to administrators and end users. The screen below shows the webpage from one of the administrators where some of the "common parts" are highlighted.
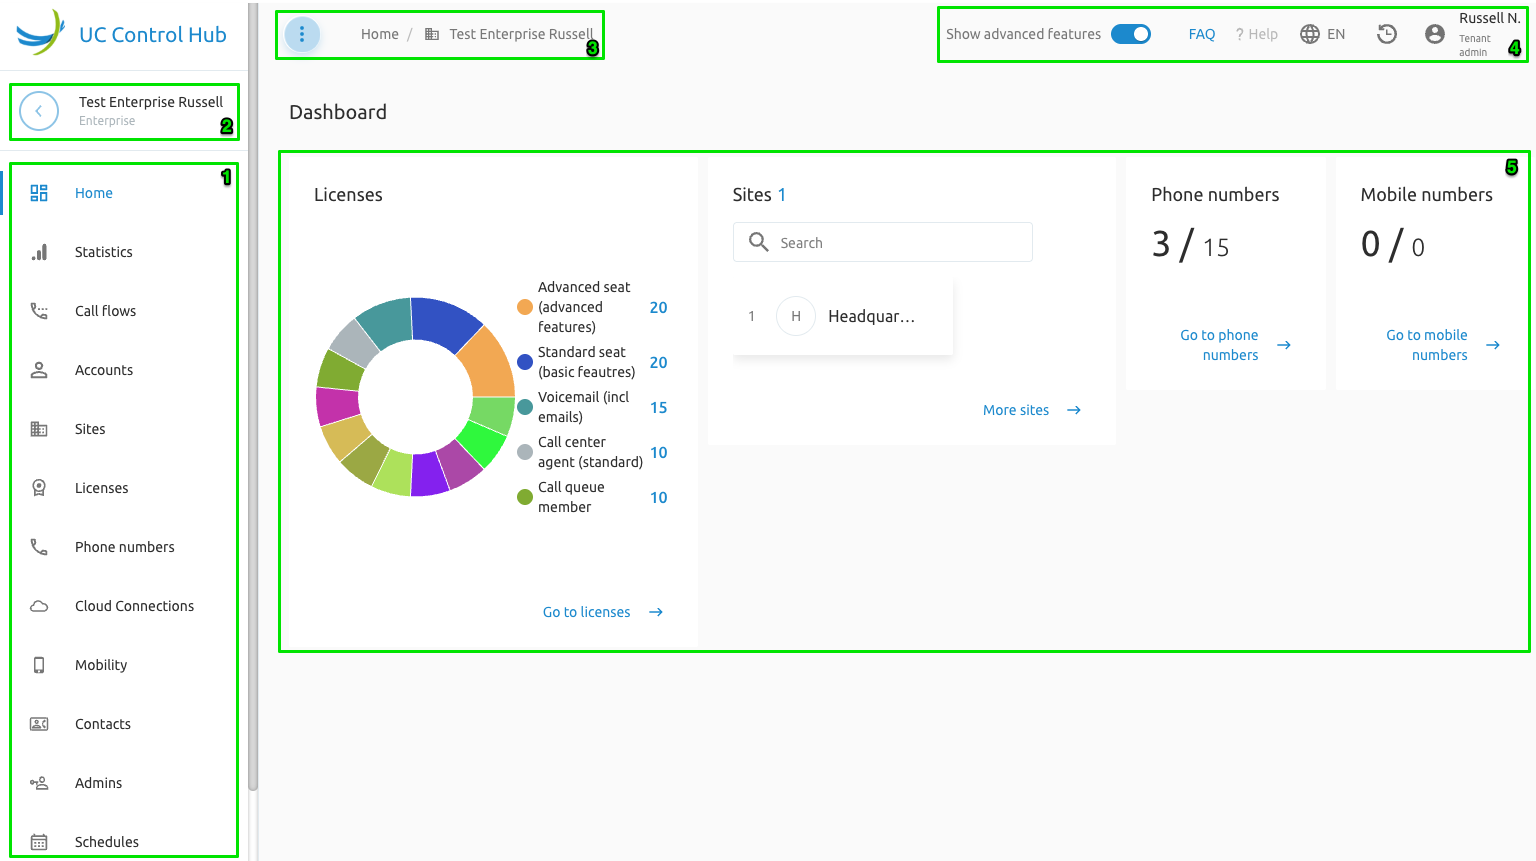
The table below provides a short description of these common areas.
| Area | Name or Function | Short description |
|---|---|---|
| 1 | Services | This left side panel displays the services that can be provisioned in the (Broadworks) system. Selecting one of these services opens a new window showing information (parameters, KPIs, configurable items, etc.) about that service. The items in this list can be customized depending on the services assigned to the service provider (services not purchased by the SP can be hidden). |
| 2 |  | Clicking this icon will take you one step back to the previous screen. |
| Name Tenant | The name of the Enterprise or Group is shown next to the "one-step-back" icon. | |
| 3 | Clicking this icon unfolds the left side panel to make the name of the service visible. Frequent users of the SCP can become familiar with the service icons and hide the names to save screen space. | |
 | These are the "breadcrumbs" that show your current location in the SCP. You can use these to go back a few steps or to a specific page by clicking on one of the words in the path. | |
| 4 |  | This switch allows end users to show or hide some services in the left side panel. Some end users only need basic features and don't need to see the advanced features. Turning OFF this switch does not disable the features; they will still be active but not shown in the list. |
 | Clicking this ?Help function at the top of the screen opens a right side panel with explanations and information for the current page. | |
 | This icon is not present in this screenshot and is only available after configuration (it is not shown by default). The FAQ functionality allows the service provider or customer to link a "Frequently Asked Questions" (FAQ) or support webpage to this icon. Clicking it redirects the user to the FAQ webpage provided by the customer or service provider. | |
 | Clicking this icon shows release information from the SCP. This icon is only available when logged in as a System Administrator. | |
 | A language is selected for the account during the configuration wizard. When logging in, the portal automatically switches to this language. This toggle provides a list of available languages if another language needs to be used. Default languages are Dutch (NL), French (FR), and English (EN). Other languages (Portuguese (PT), Arabic (AR), German (GE)) can be made available upon request through configuration. | |
 | This feature provides traceability for all changes made on an enterprise, user, or group. It is a valuable tool for technicians and support engineers when troubleshooting the solution. | |
 | Clicking this icon allows the logged-in account to change its password and log out of the Self-Care Portal (SCP). The icon also exposes User-Activated Two-Factor Authentication (2FA) options, which may include TOTP and/or Email-based verification, provided the relevant portal parameters are configured to enable these features for the SCP. | |
| 5 | Dashboard | The dashboard includes a number of cards showing relevant information for the account. Some cards contain a link to easily go to the page for further consultation or configuration. The cards can be hidden through configuration and are linked to the services used within the Broadworks solution. For example, if the customer does not have any Call Center services, the Call Center cards will not be shown. |
The Landing Page
The landing page is the first page the account (administrator or end user) is redirected to after the login procedure. Depending on the account's authorization level, this landing page may differ slightly. By default, the landing page is the Dashboard or the Details page on the Home service. For Group Administrators, another landing page can be configured during the setup of the F4B solution. Below is a short description of the landing pages for the different administrator profiles of the SCP.
System Administrator View
When logging in with System Administrator credentials, the SCP landing page looks like this:
Tenant Administrator View
When logging in with Enterprise Administrator credentials, the SCP landing page looks like this.
NoteA configurable background image (through branding) is possible for the Tenant (Enterprise) Dashboard page, which is accessible by both System and Tenant Administrators.
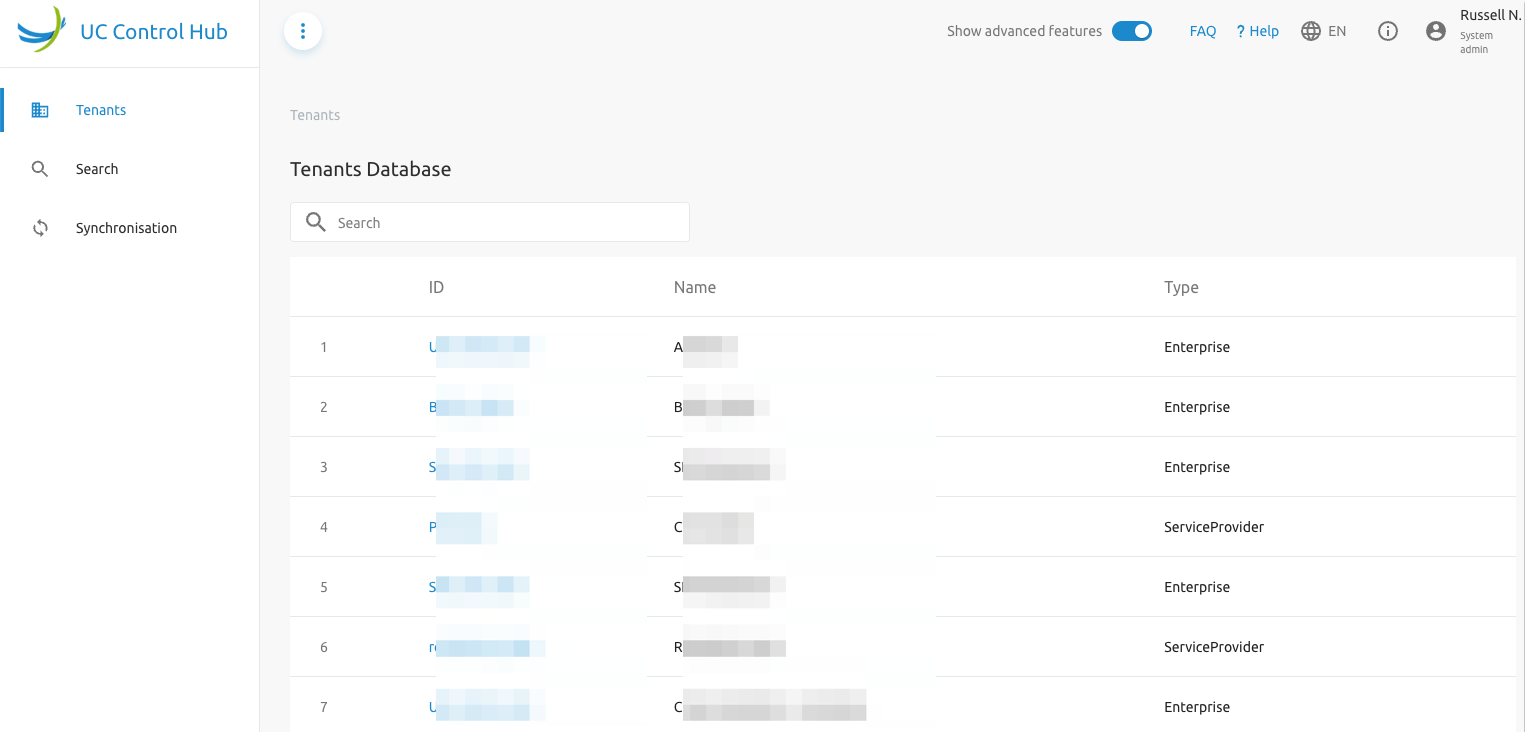
Home Service
The Home service shows the Tenant Database. This includes all tenants created on the Broadworks platform, along with their ID, name, and setup mode (Enterprise or Service Provider mode).
Selecting the ID of a tenant redirects the System Administrator to that tenant's landing page, the Dashboard. The System Administrator will then have the same view as a Tenant Administrator.
The Search bar allows the System Administrator to search for a specific tenant.
Search Service
The System Administrator has an additional, more advanced, search capability based on:
- User information:
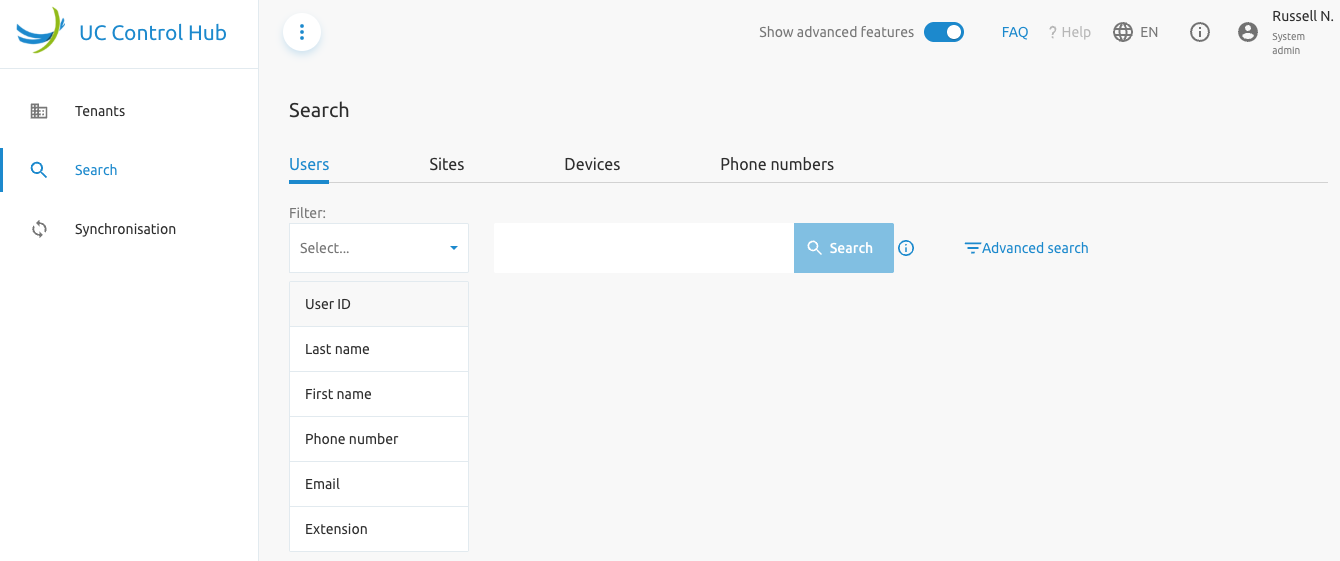
...with an *Advanced search* field showing more options:

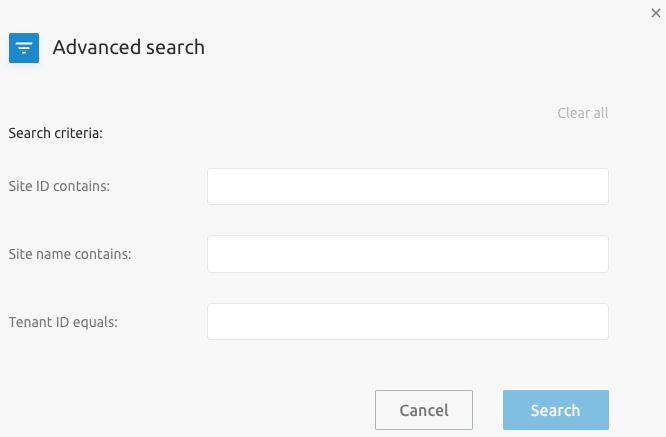
- Site information:
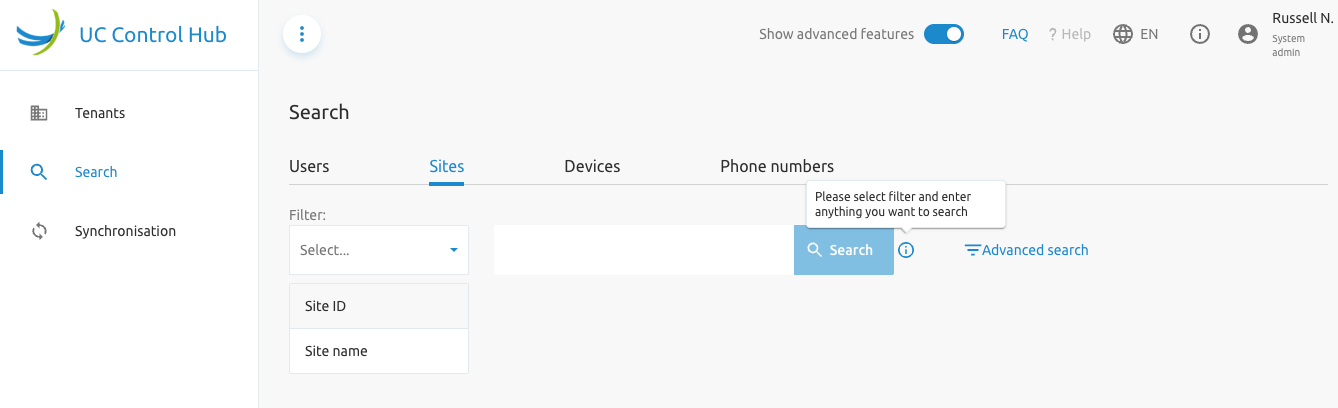
...also with an *Advanced search* field showing more search options:
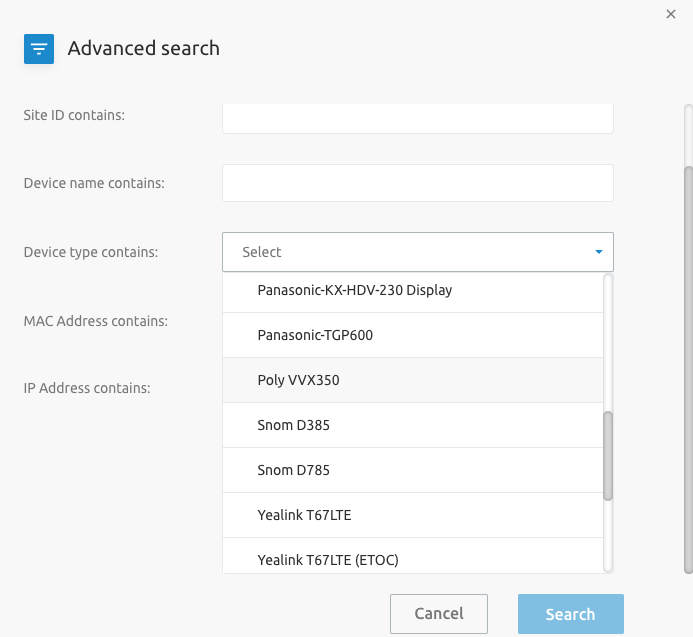
- Device information:
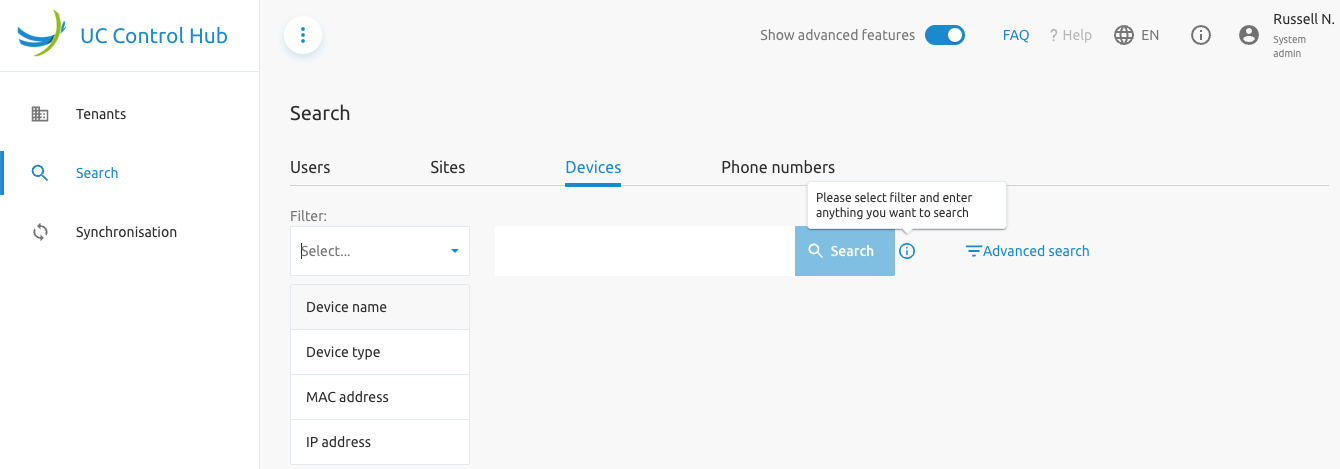
...again with *Advanced search* options:
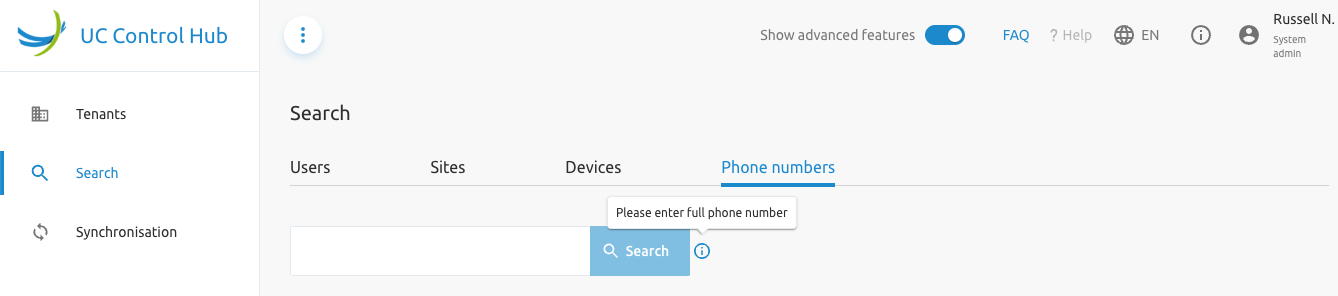
- Phone numbers information:
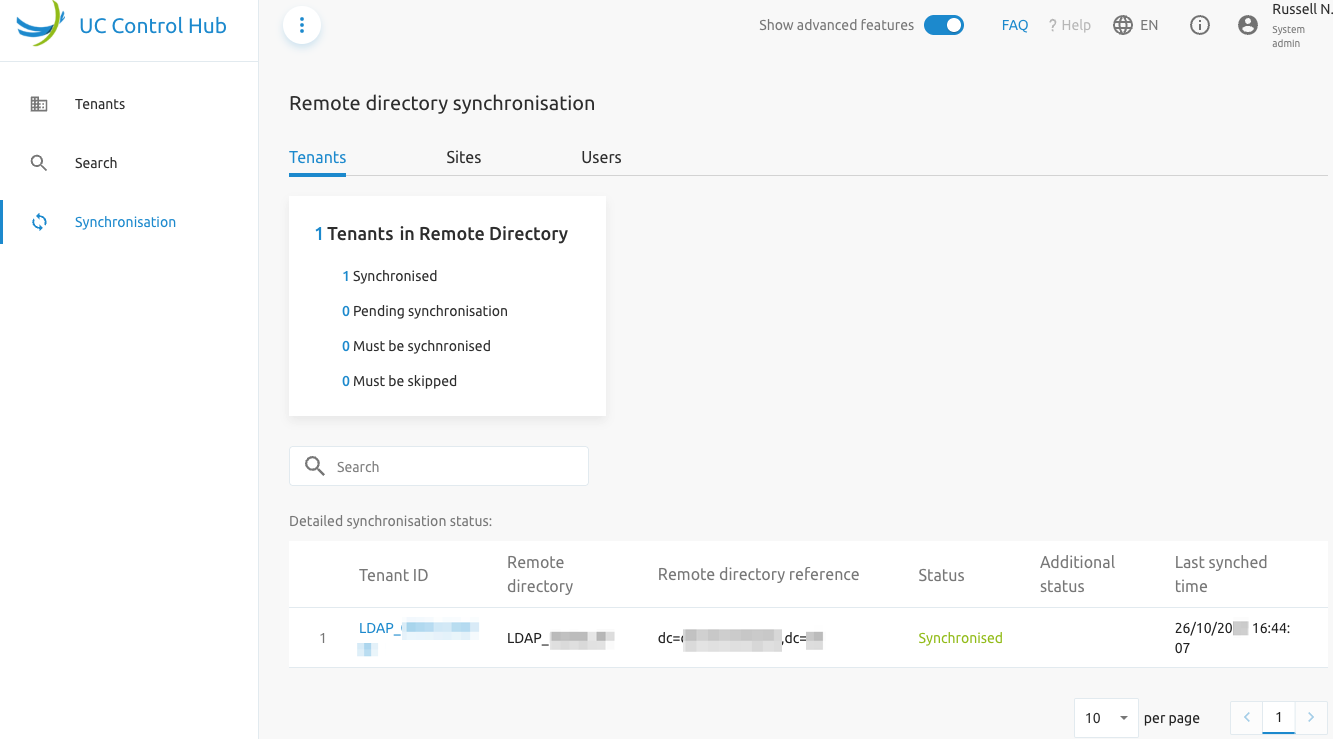
Synchronisation Service
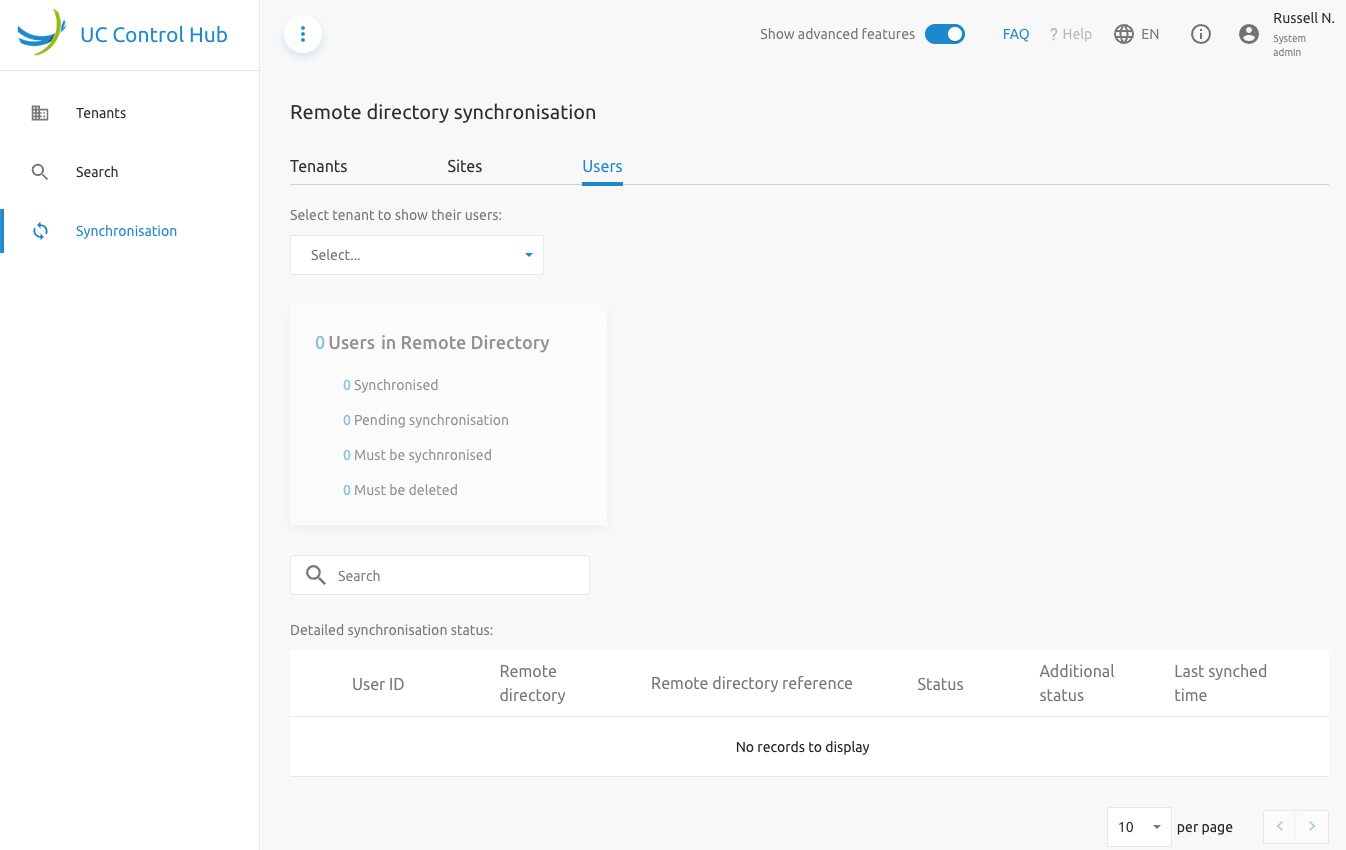
On the synchronisation service, the System Administrator can view the results of an LDAP or Active Directory (AD) synchronisation service (if one has been set up and configured).
The screenshots below show the default page when no LDAP/AD synchronisation is configured, based on a:
- Tenant synchronisation: The example below shows the result of a Tenant synchronisation. The Tenant ID, Remote directory name, synchronised reference, status, and last synced time are displayed.
- Site (or Group) synchronisation:
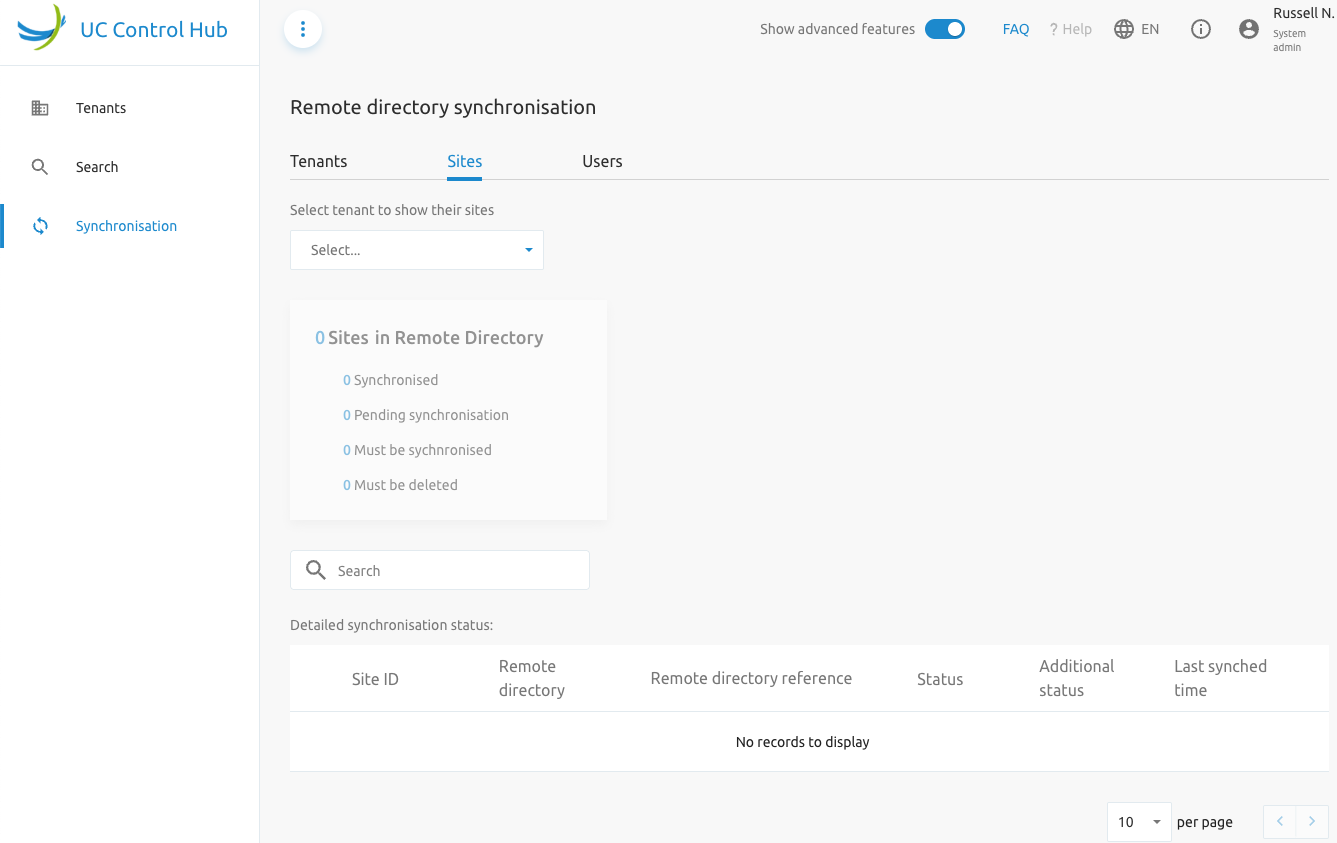
- User synchronisation:
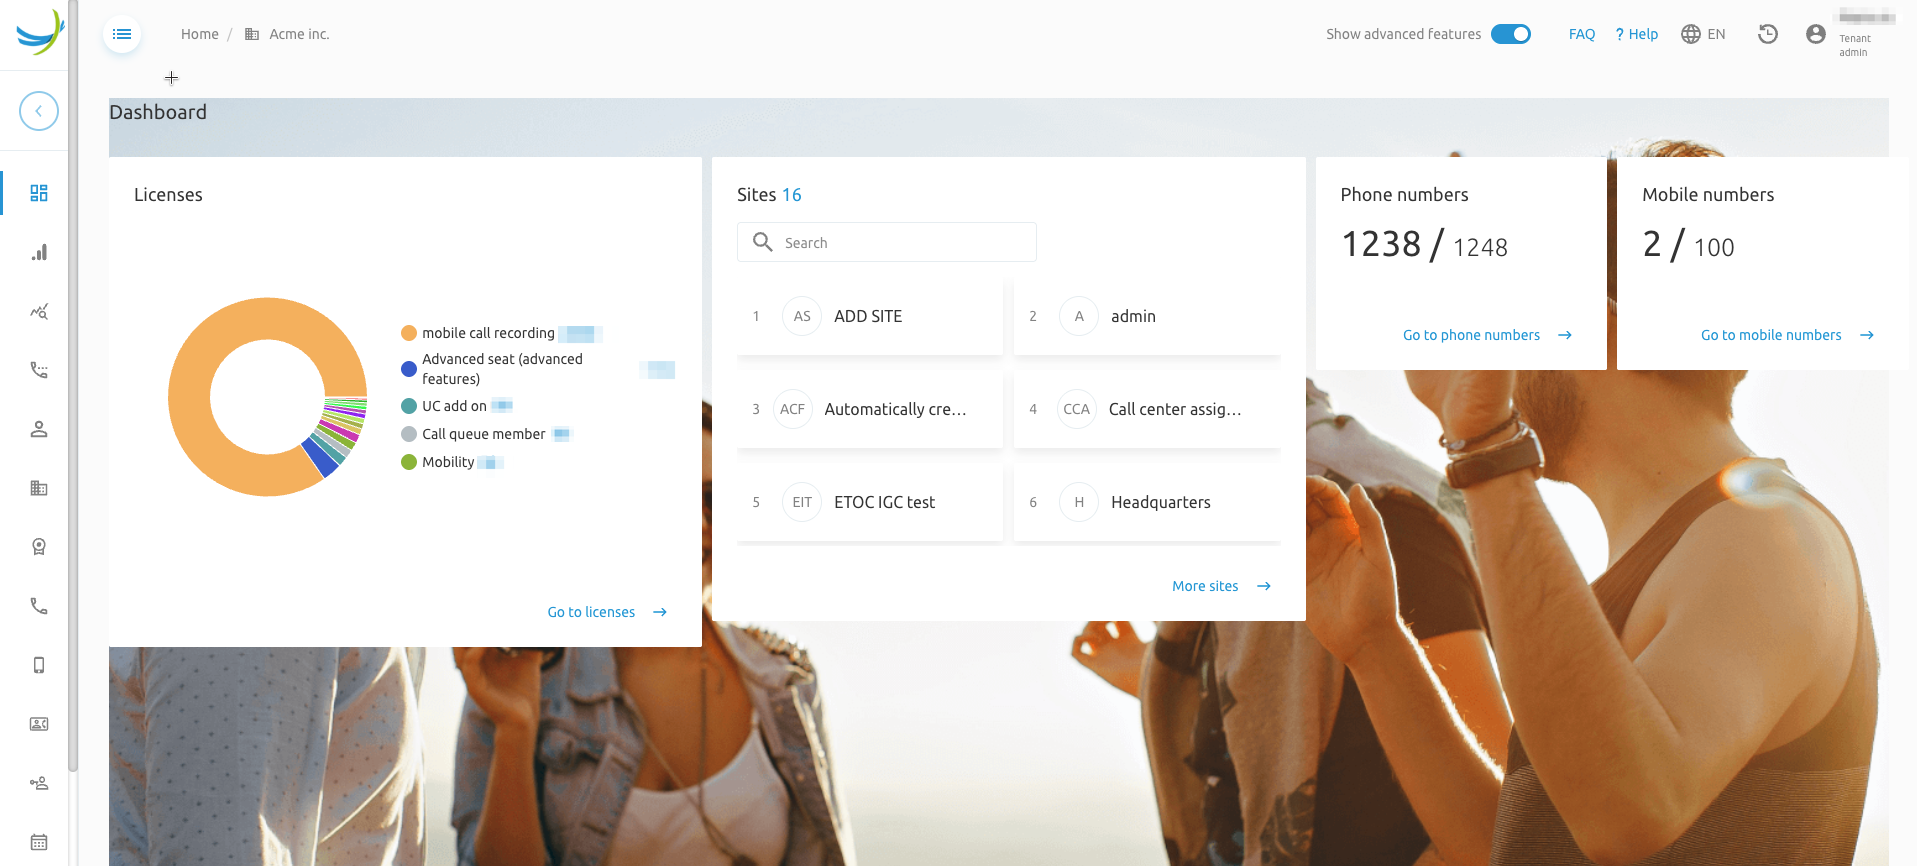
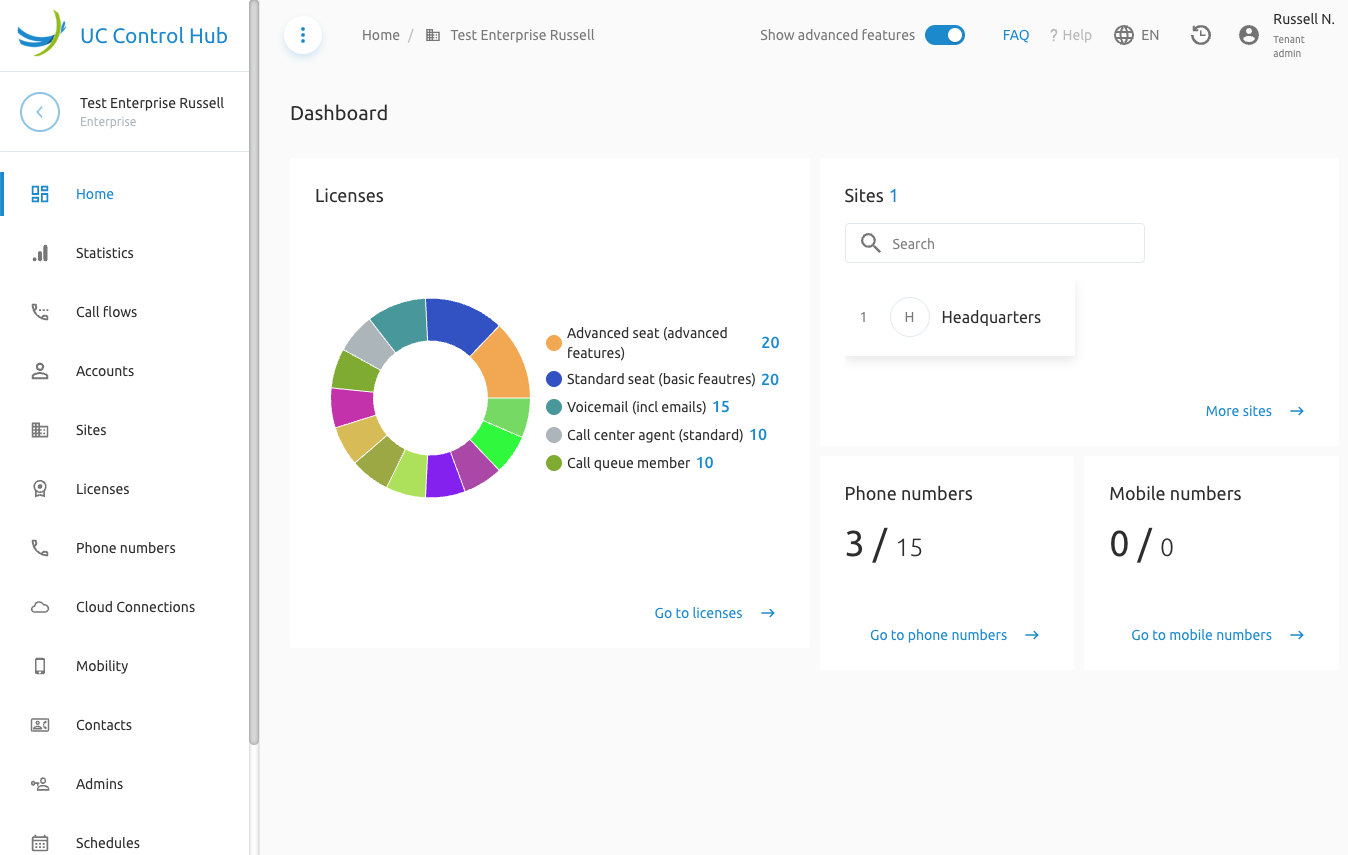
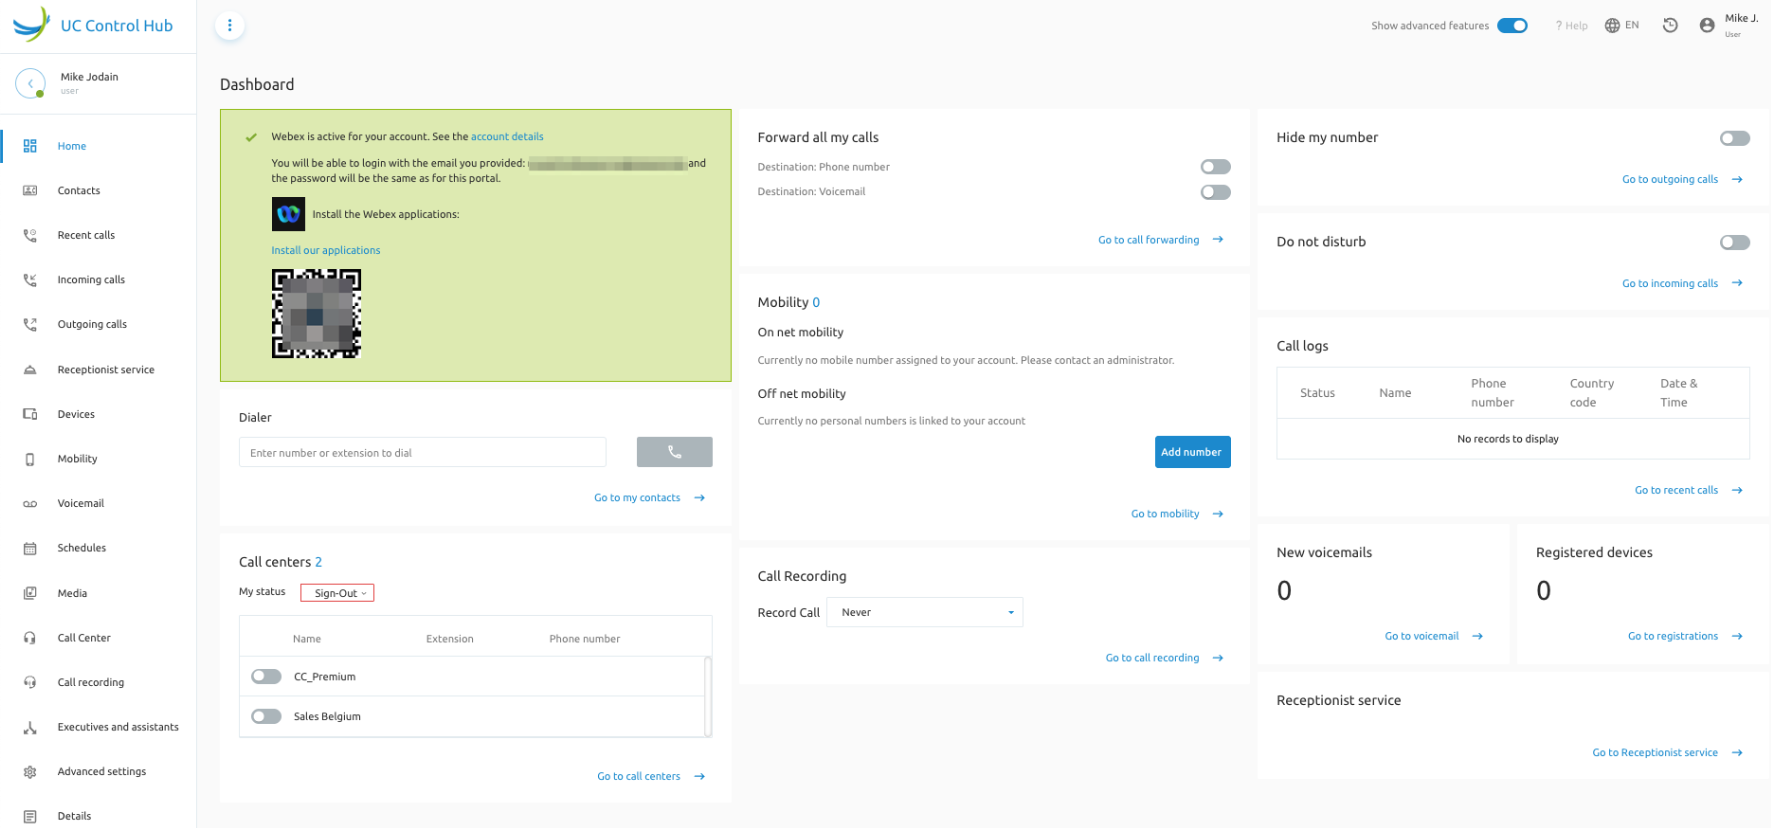
Tenant Administrator Landing Page
The Tenant Administrator dashboard provides a view of:
- The licenses used within the tenant, along with an indication of the number of licenses in use.
- A card showing the different sites or Groups within that tenant.
- The number of phone numbers in use.
- The number of mobile numbers in use.
Each of these cards contains a shortcut link to "Go to" the specific service for further configuration or consultation. These services can also be found via the left side panel.
The example below shows a view of the Tenant Administrator dashboard.
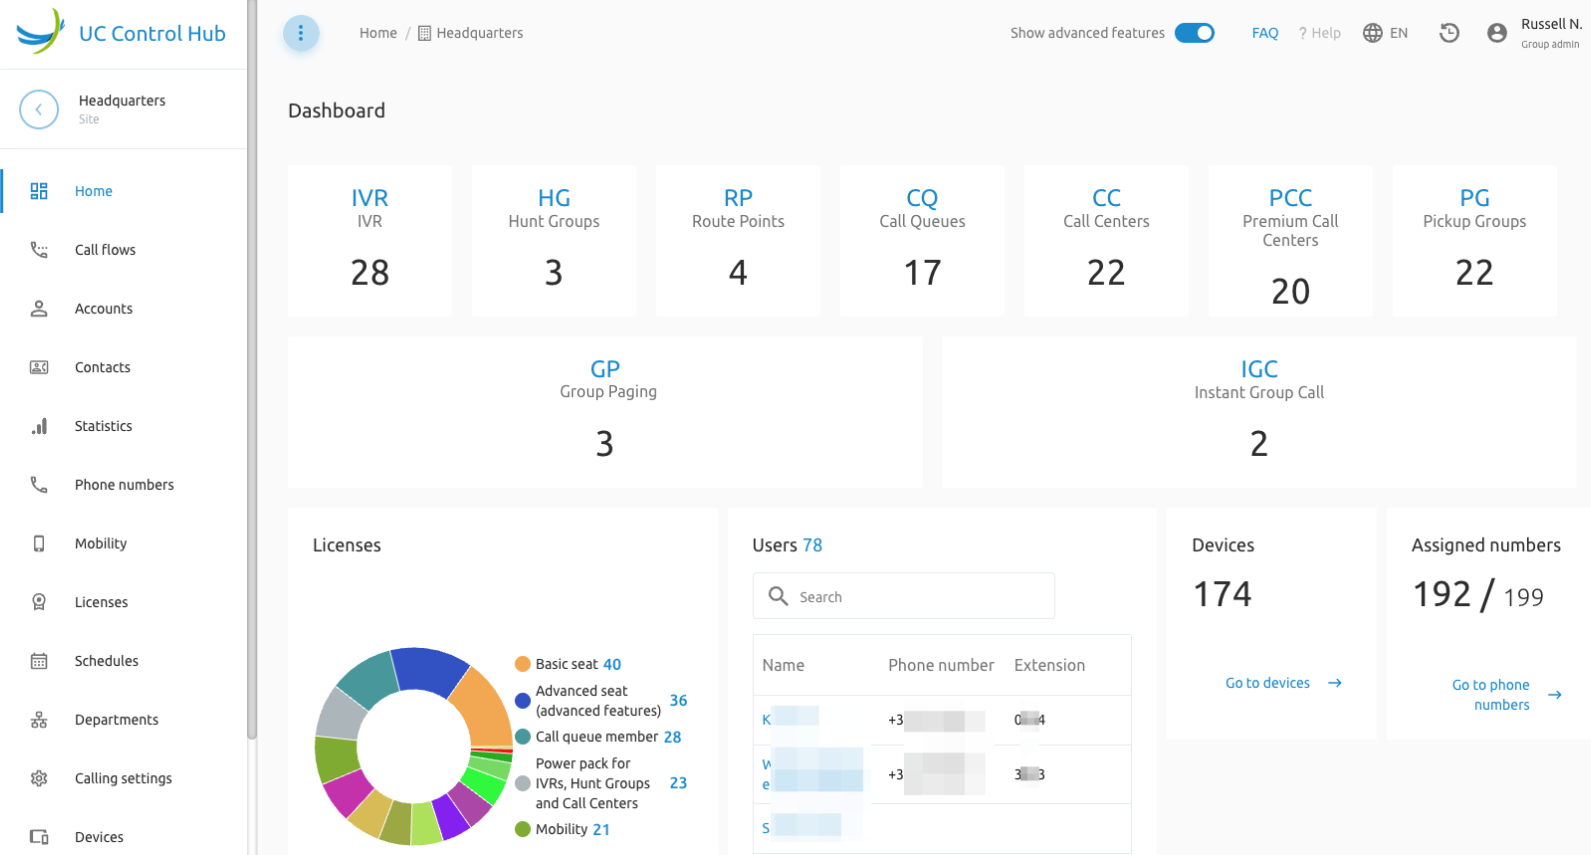
Group Administrator Landing Page
The Group Administrator dashboard shows:
- The call flows assigned to this group (or site) and an indication of the number of different call flows. Some call flows are attached to a Service Pack in Broadworks, so the view of the call flow cards may differ from customer to customer.
- A view of the licenses used within this group (or site), along with an indication of the number of licenses in use.
- A list of users created in this group/site with some user information.
- The number of devices created in the group/on the site.
- The number of assigned phone numbers in the group/on this site.
Again, these cards contain a shortcut link to "Go to" the specific service for further configuration or consultation. These services can also be found via the left side panel.
As of the 3.3 release, it's possible to configure a landing page for Group Administrators other than the Dashboard or Details page. The example below shows a view of the Group Administrator dashboard.
The End User Landing Page
The end user landing page is shown below and fully described in the End User guide.
Administrator Service Mapping
The table below shows where the services available to different administrators in the SCP differ. Administrators can configure additional services via the portal, which are described in the Services section.
| Feature or Service | System Admin | Tenant Admin | Group Admin |
|---|---|---|---|
| License management on Tenant level | - (*) | - | - |
| License management on Group Level | X | X | - |
| Administrator management on tenant level | X | X | - |
| Administrator management on Group level | X | X | X |
| User Management on Tenant level | X | X | - |
| User Management on Group level | X | X | X |
| Number management on Tenant level (**) | X | X | - |
| Number management on Group level (**) | X | X | X |
(*) License management on the Tenant level cannot be done via the SCP due to its billable aspect. It must be done via the Provisioning User Interface (ProvUI) on the APIO Core or via an automatic OSS process.
(**) If the Netaxis Number Inventory Management System (NIMS) is included in the solution, administrators (System, Tenant, Group) can manage numbers via the SCP. The admins can request numbers from the NIMS solution with the rights shown in the table. If NIMS is not used, and the customer uses their own number management system, administrators cannot manage numbers in the SCP. In this case, the System Administrator must assign numbers using the ProvUI on the APIO Core or via an automatic OSS process. This is also due to the billable aspect.
In general, with a few exceptions like voicemail and account-based call logs, an administrator "A" at a higher level can perform all the actions of an administrator "B" at a lower level, plus the actions available at their own level.
Services
This section describes the different services and their configuration available on the SCP. In many cases, service configuration through the portal is self-explanatory. Additional explanations may be provided by the online "?Help" service at the top right of the SCP page. The order of services in the left side panel may differ from customer to customer. This order can be changed as a configurable item when customizing the SCP for the customer. Tenant Administrators and Group Administrators have largely the same services available. In some cases, the configuration items within a service are different, but the concept remains the same. If a service is only available for Tenant or Group Administrators, it will be mentioned in the service description.
Administration and Management
This section covers services related to managing users, licenses, groups, and contacts.
Home Service
This service is already described above in the "Getting Started" section.
Accounts
The Accounts service displays end users (hosted extensions), virtual extensions (Speed-Dials aka Virtual On-Net Enterprise extensions) and trunk users (business trunking users). Accounts are always linked to a Group, as linking users directly to a tenant is not possible in the Broadworks architecture. However for trunk users there is a virtual concept of enterprise trunk user, but the trunk user is linked to a group.
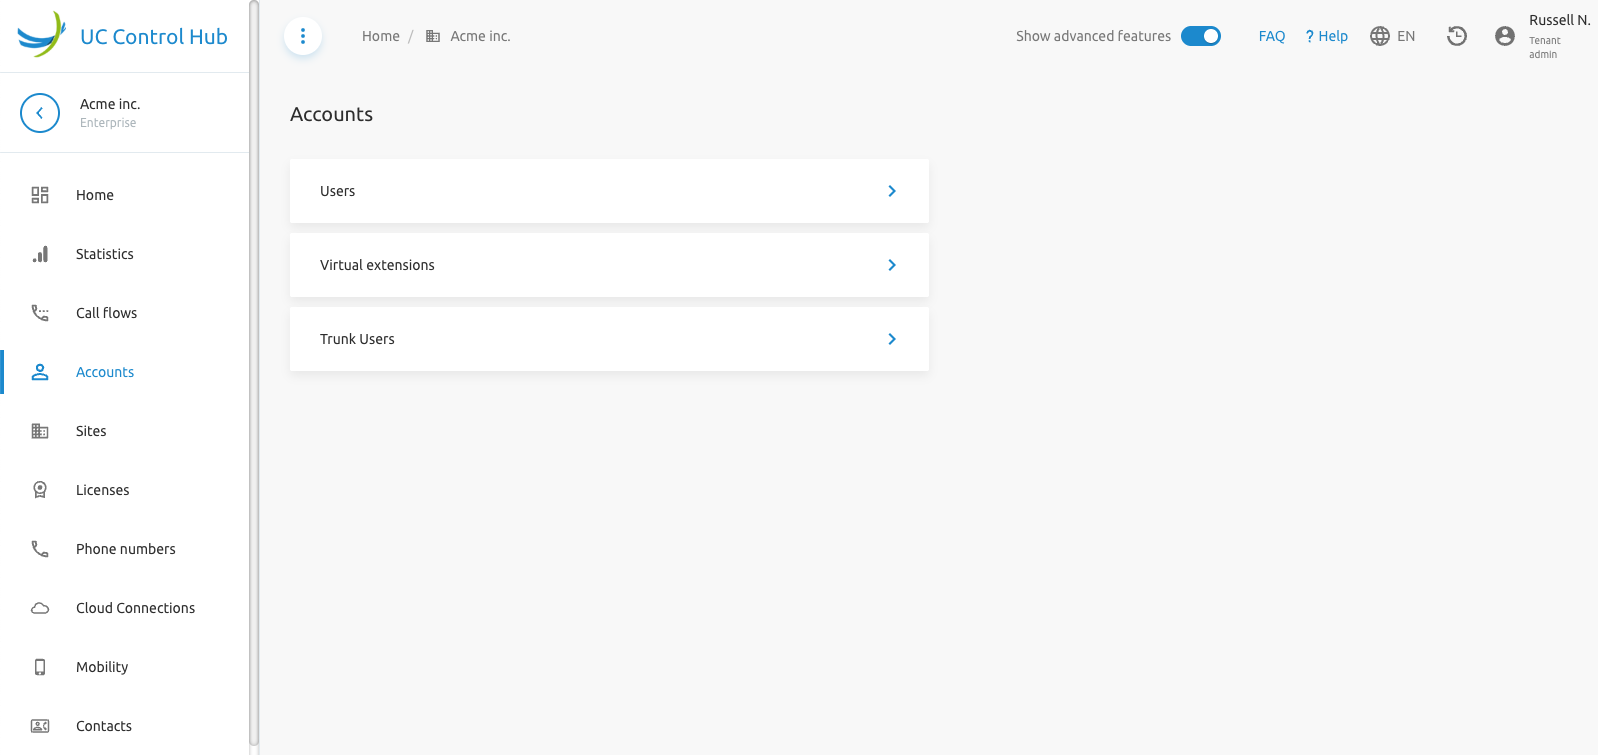
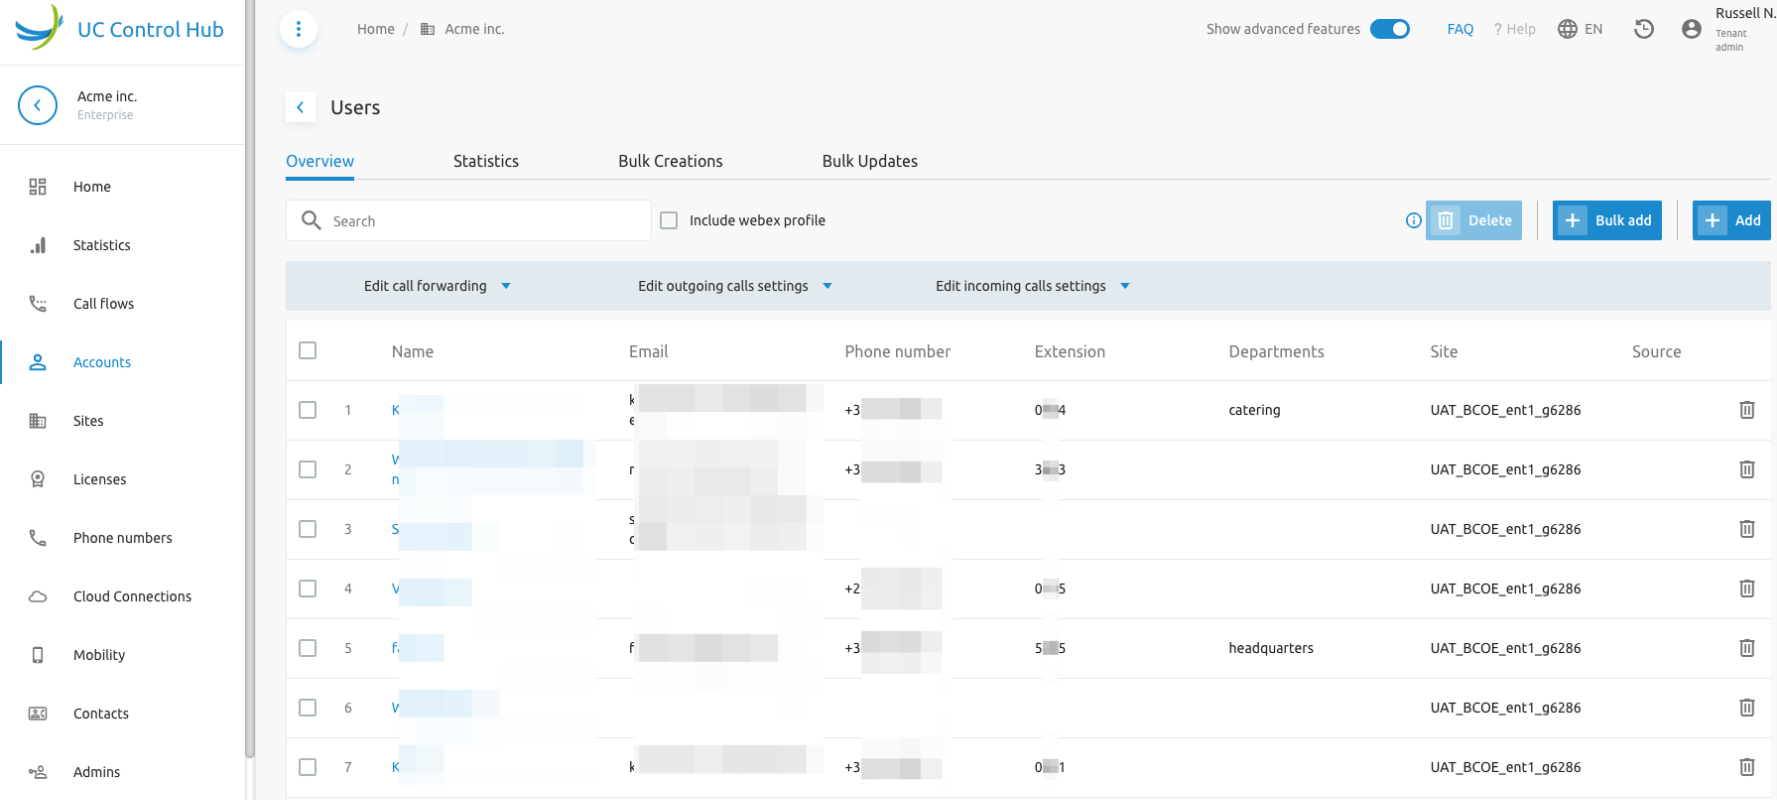
Selecting one of the cards on the tenant-level accounts page, for example, Users, shows a list of all users from that specific tenant (Acme).
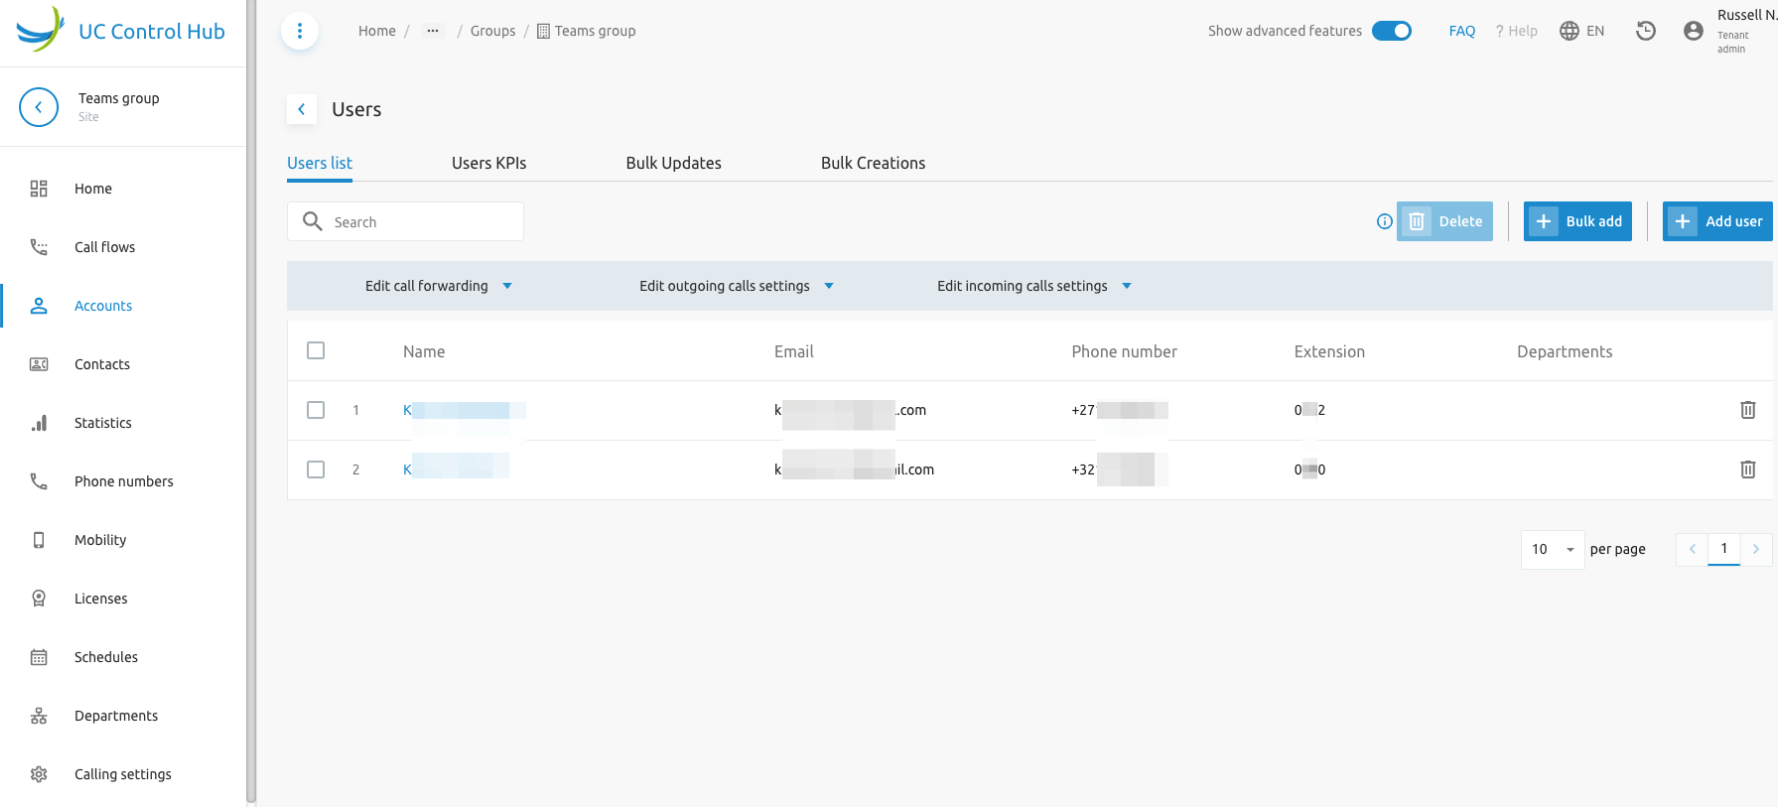
Selecting one of the cards on the group-level accounts page, for example, Users, shows a list of all users from that specific group (Acme / Teams group).
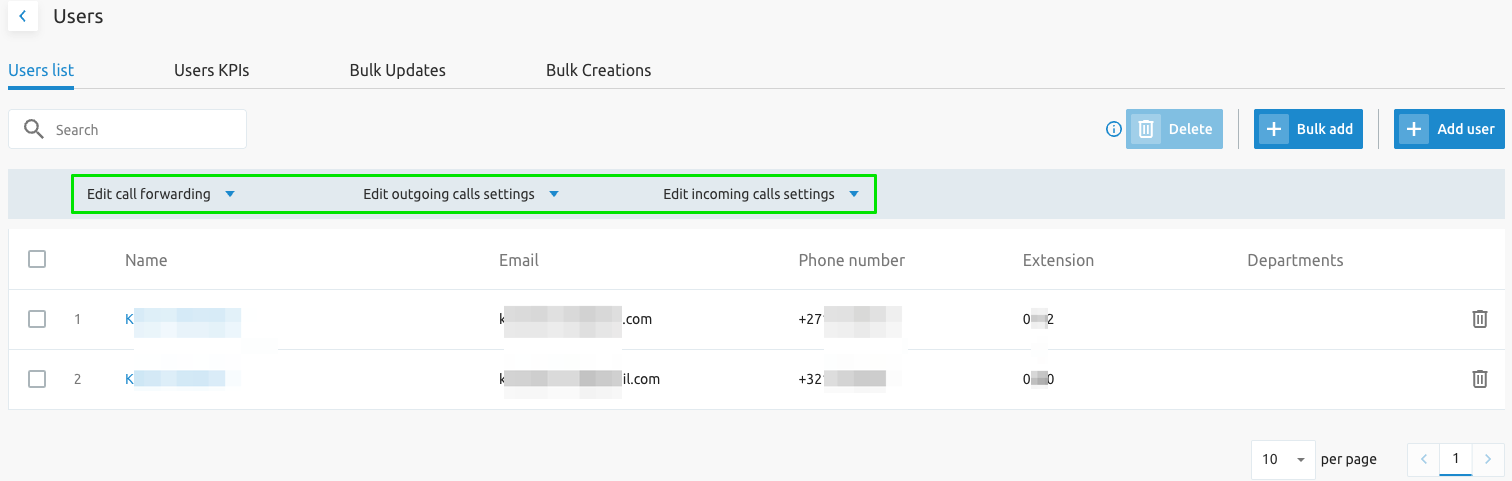
On this page, an administrator can perform several actions via the action buttons:
- Delete: Deletes the selected user(s).
- Bulk add: Allows adding a number of users in bulk.
- Add user: Adds one user at a time.
The different tabs on the screen provide the following information:
- Users KPIs: If the Call Statistics service is enabled, it shows some call statistics about the users.
- Bulk Updates: Shows the result of "Bulk updates" performed on users.
- Bulk creations: Shows the result of creating new users via a bulk upload (the result of using the "+Bulk add" button).
The next sections provide more clarification on some of the action buttons and/or tabs on the screen.
Bulk Add
It is possible to create users in bulk in the same group by filling in and uploading an Excel template. This is useful during the initial setup of a tenant or group. On the group where users need to be added, click on the Bulk Add action. This opens a new window explaining the steps to upload a list of users in bulk.
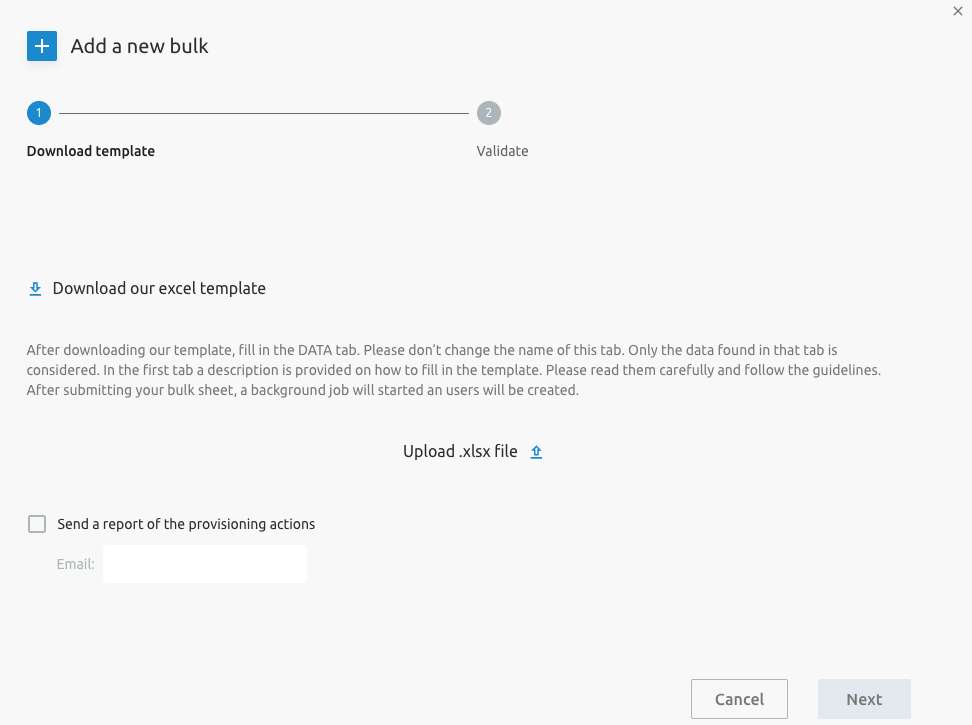
The template file has three tabs:
- The Instructions tab describes how to fill in the template.
- The DATA tab is where you enter user information for the users to be created, one user per line.
- The ref_data tab contains reference data, such as available Service Packs or devices, and should not be modified. When filling in the DATA tab, it is important to note:
- Some fields, like the user's first and last name, are mandatory. They are shown in a specific color as specified in the Instructions tab.
- The values entered in some fields, such as the user's device type, are controlled by a drop-down list.
- The phone number and extension can be specified or automatically selected from available resources.
- Additional services like Mobility, Broadworks Anywhere, and Hoteling Host/Guest can also be configured. However, in certain cases, this might lead to a user creation rollback. For example, trying to enable Hoteling Host for a user without assigning the required license will cause the user creation to roll back.
More information can be found in the instructions tab of the Excel file.
Once the file is filled in and saved, upload it to the portal and click next. You can also choose to receive a report of the bulk provisioning actions by email.
The list of users in the template is presented for data validation.
NoteIf "auto-select" was chosen for some data (e.g., phone number and extension), the corresponding fields will not be populated at this step.
To proceed with the bulk creation, click on Save. A notification is sent (shown) that the request was added. This means the bulk job has started, not that the users were successfully created. The bulk job will appear in the table with a global status:
- Active: The bulk creation is still running.
- Closed in success: The bulk job is finished. You can open the details to see the status of each user creation.
- Closed in error: The bulk job could not be executed.
Bulk Actions
The Bulk Action service allows setting some configuration parameters for several users via the account/user list overview. Three services are configurable via this Bulk Actions:
- Call forwarding service
- Outgoing call settings service
- Incoming call settings service
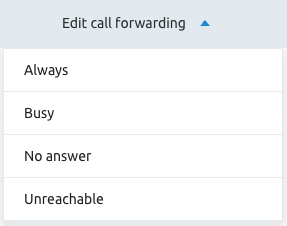
Opening the Call Forwarding service shows the configuration items that can be selected.
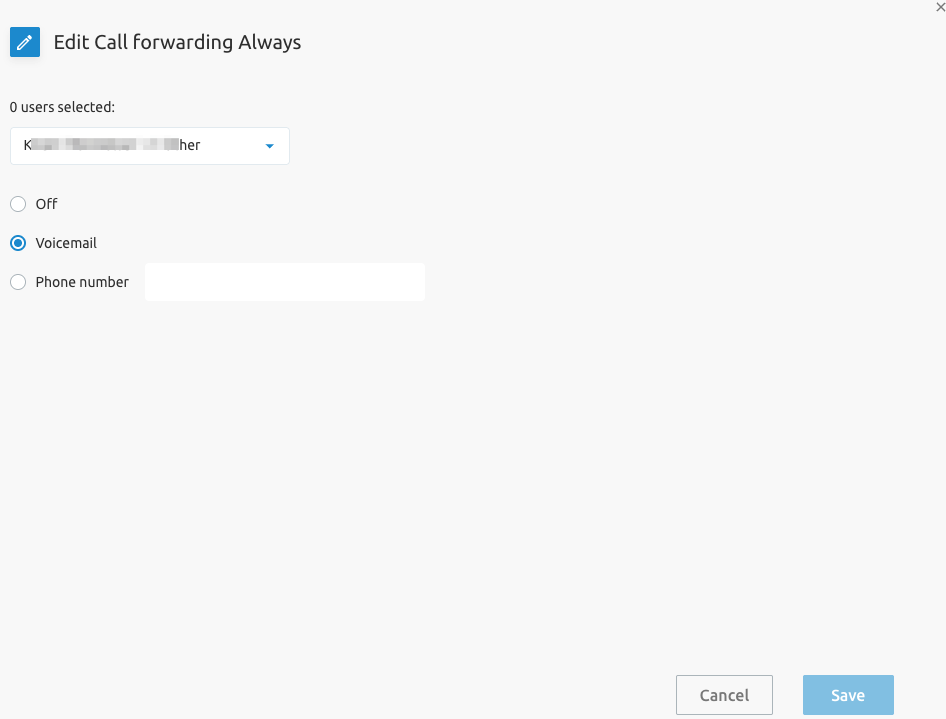
When, for example, Call Forwarding Always is selected, a new window opens where:
- Users can be selected to be configured (all at once).
- One of the configuration options can be set.
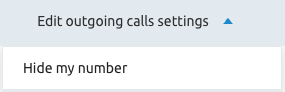
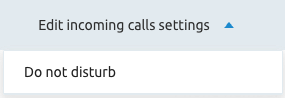
The same logic applies to the Outgoing calls service (setting the Hide my number feature for several users) and the Incoming calls service (setting the Do not disturb feature for selected users). The figure below shows the Outgoing calls service available through a "Bulk Action."
The figure below shows the Incoming Calls service.
Bulk Updates
The Bulk Updates tab shows the result of the Bulk actions. On this tab, you can see if the Bulk Actions were successful. The screenshot below shows an example of this page.
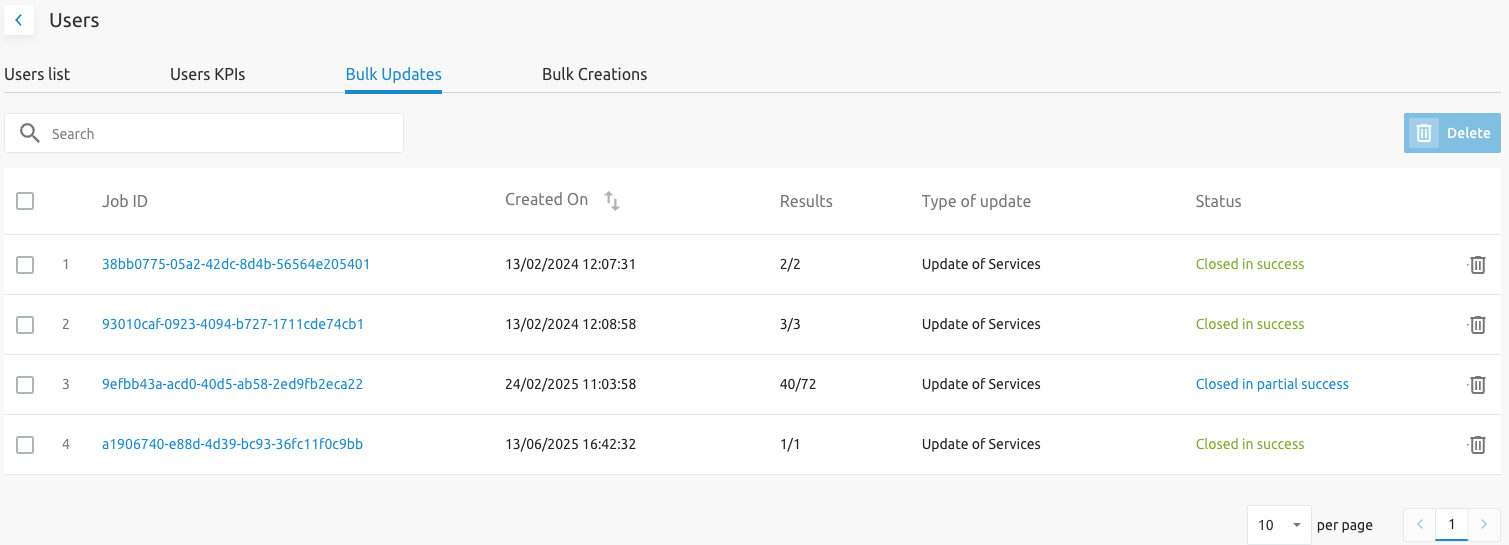
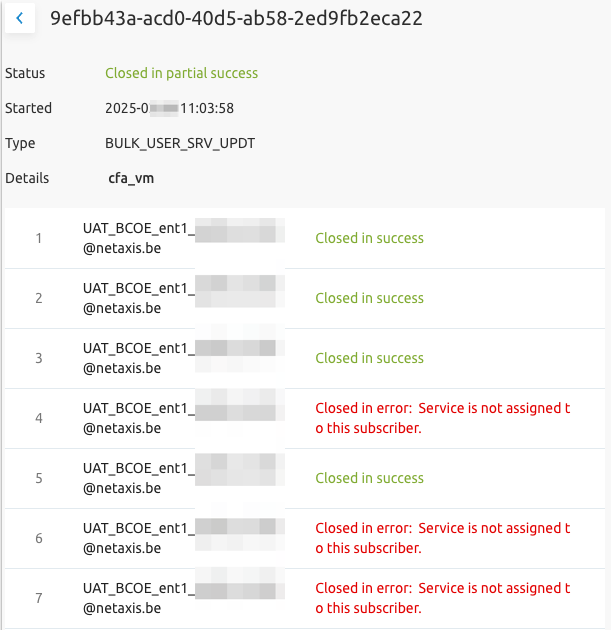
Clicking on the Job ID provides more details about that specific update.
User Receptionist Service
The Receptionist Service can be assigned to an User. The screenshot below shows how to assign the Receptionist service to a user
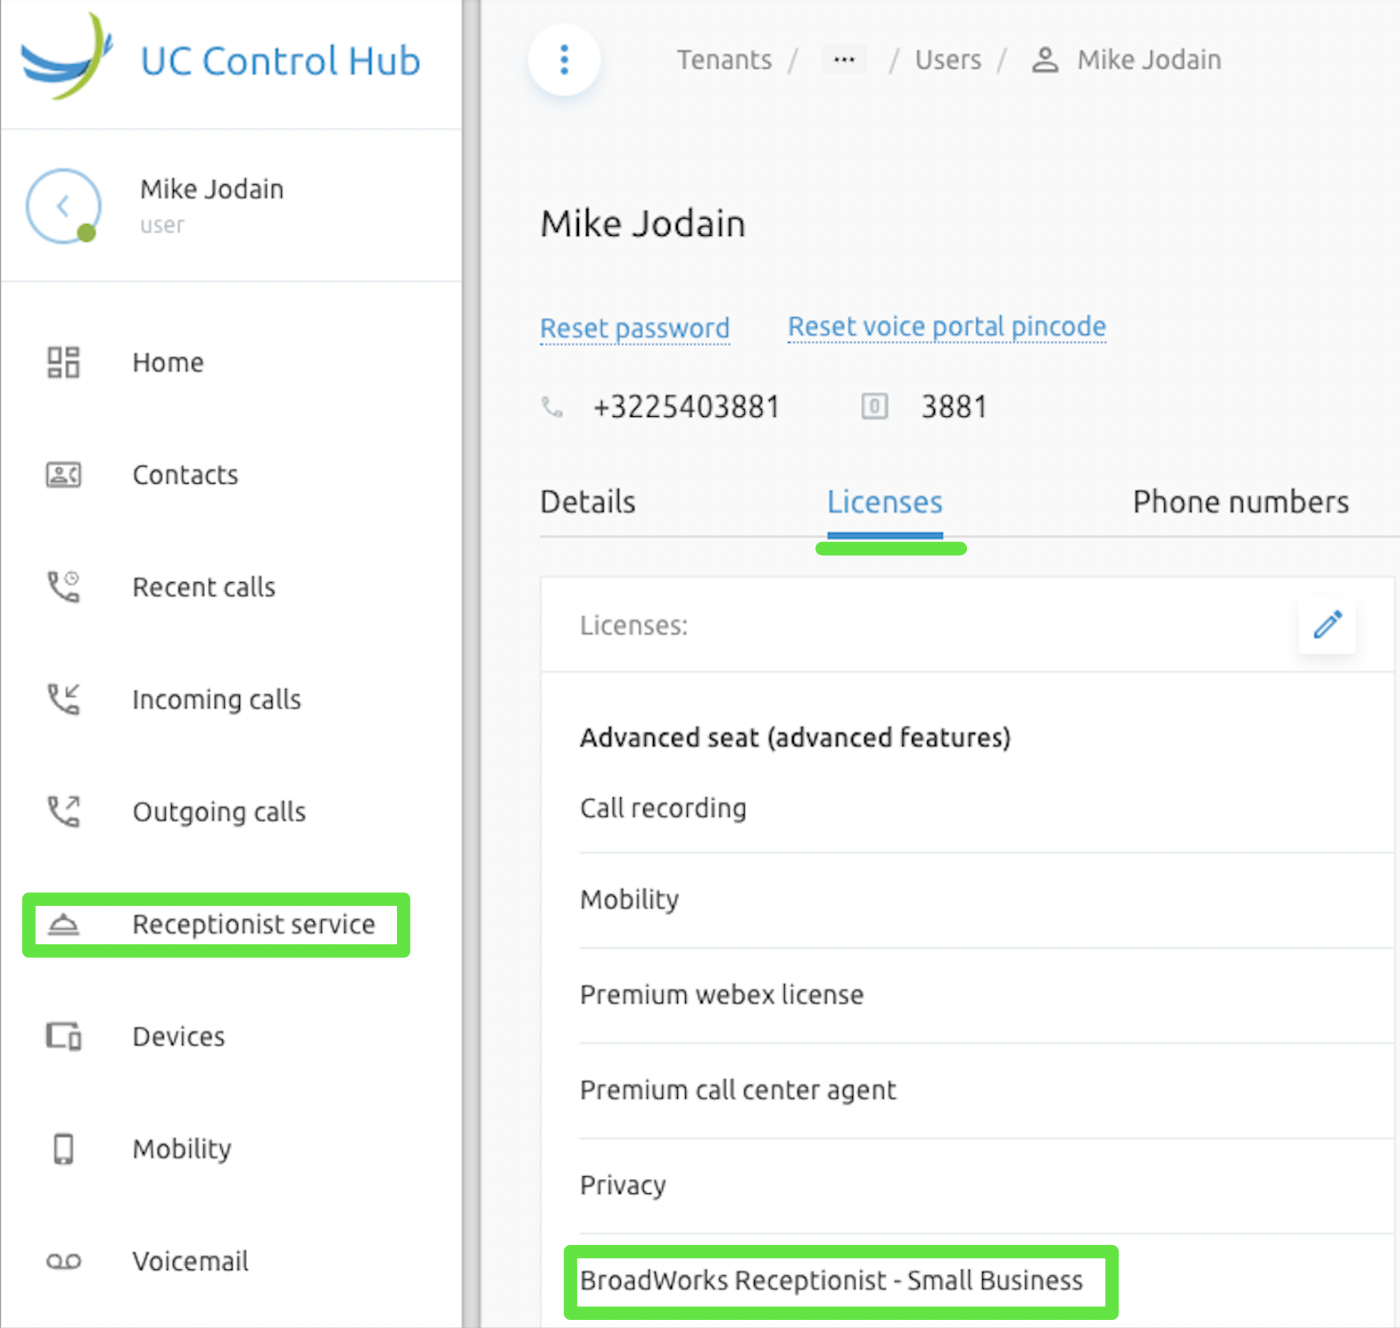
The list of users monitored by a BroadWorks Receptionist is configurable by:
- System, Tenant and Group Administrators
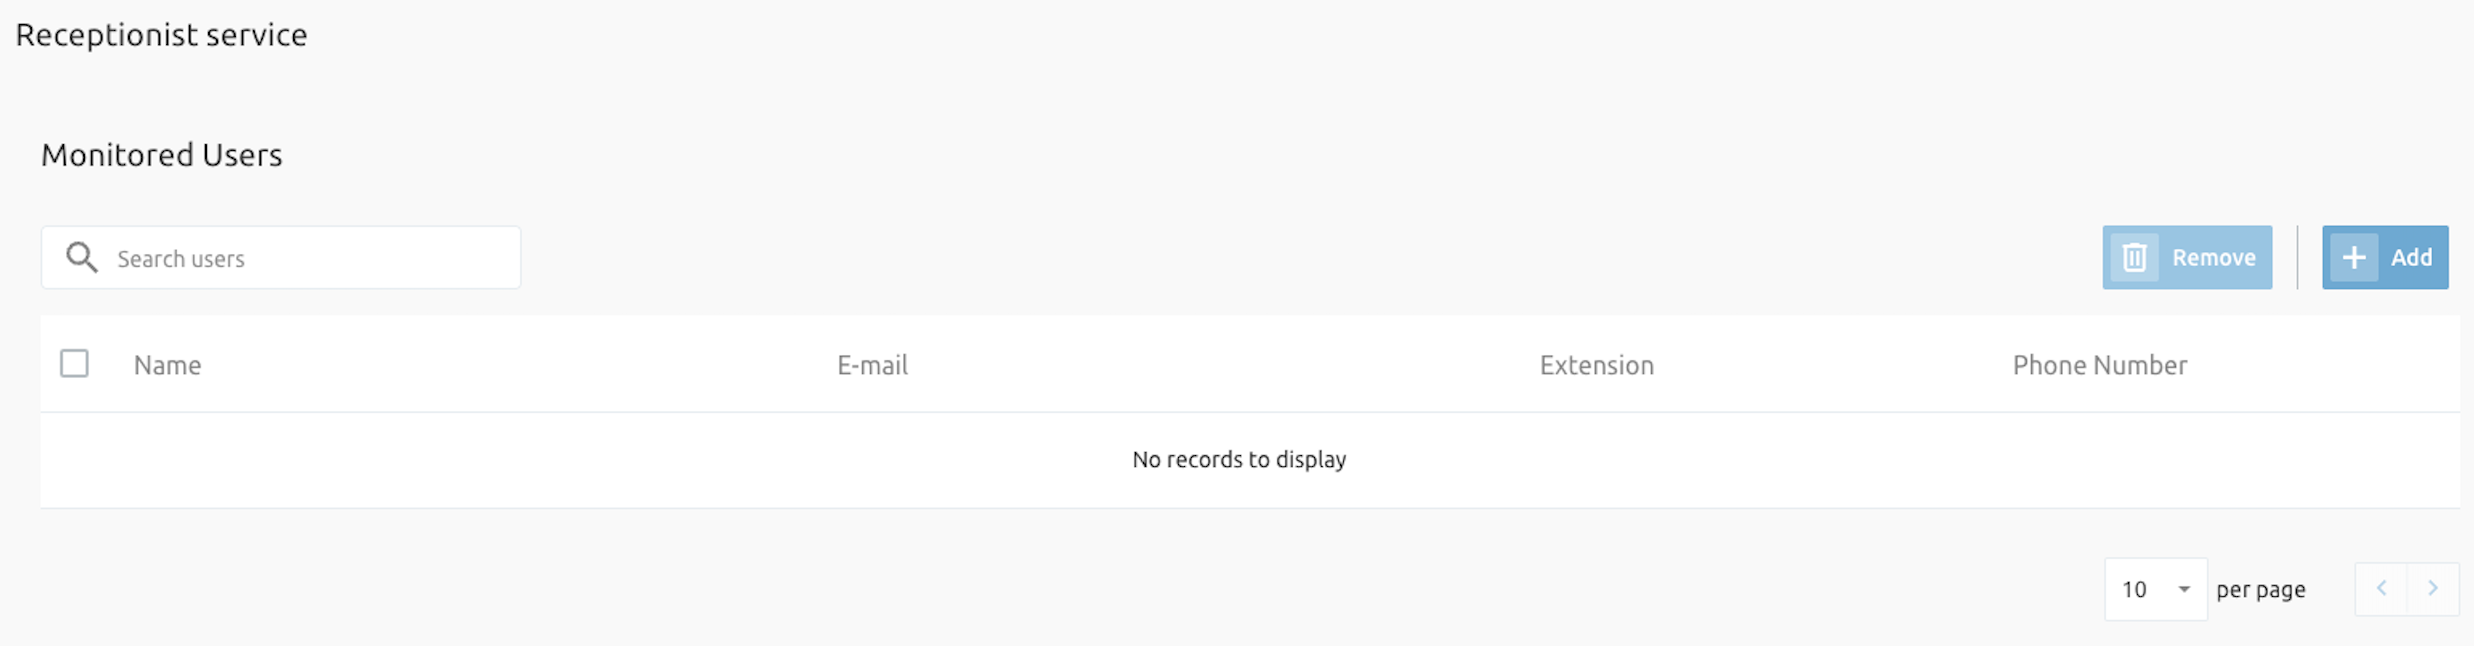
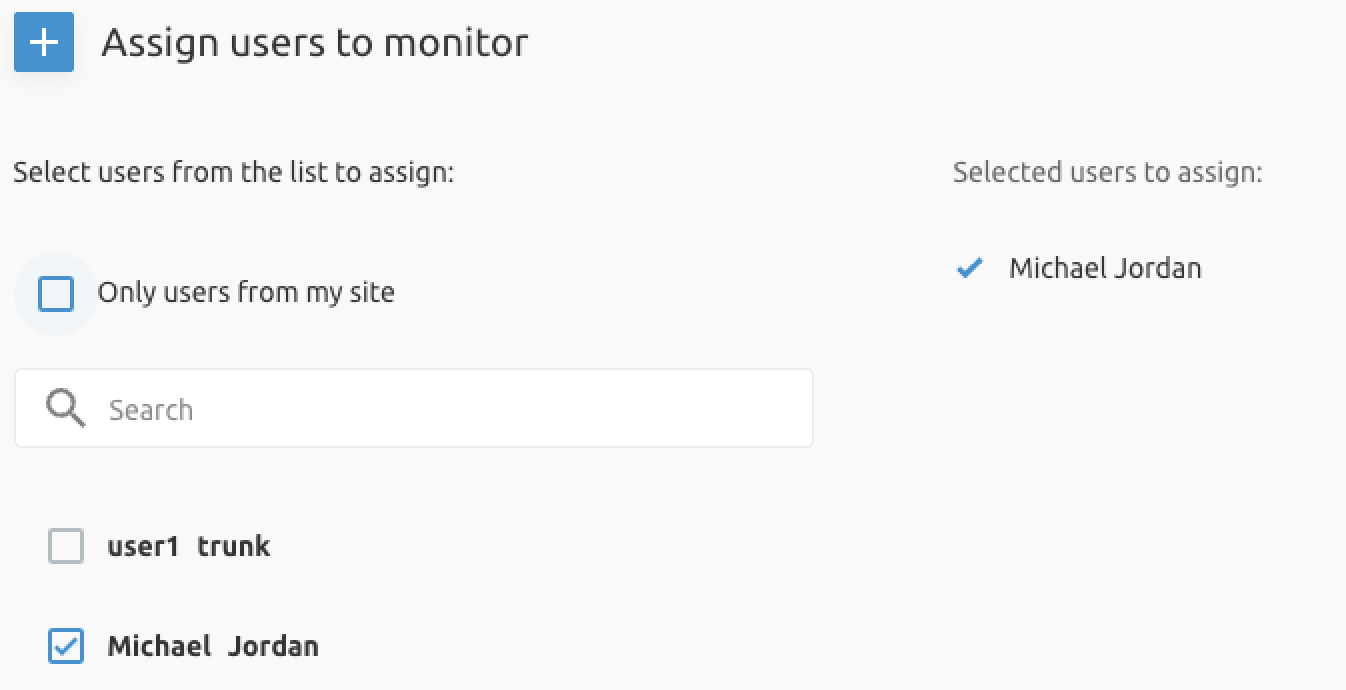
- User with Receptionist Client license
Admins
The Admins service allows creating additional administrators on different levels:
- On Tenant level, the service creates additional Tenant Administrators.
- On Group level, the service creates additional Group Administrators.
Clicking the Add button opens a new window where the new administrator's information must be entered.
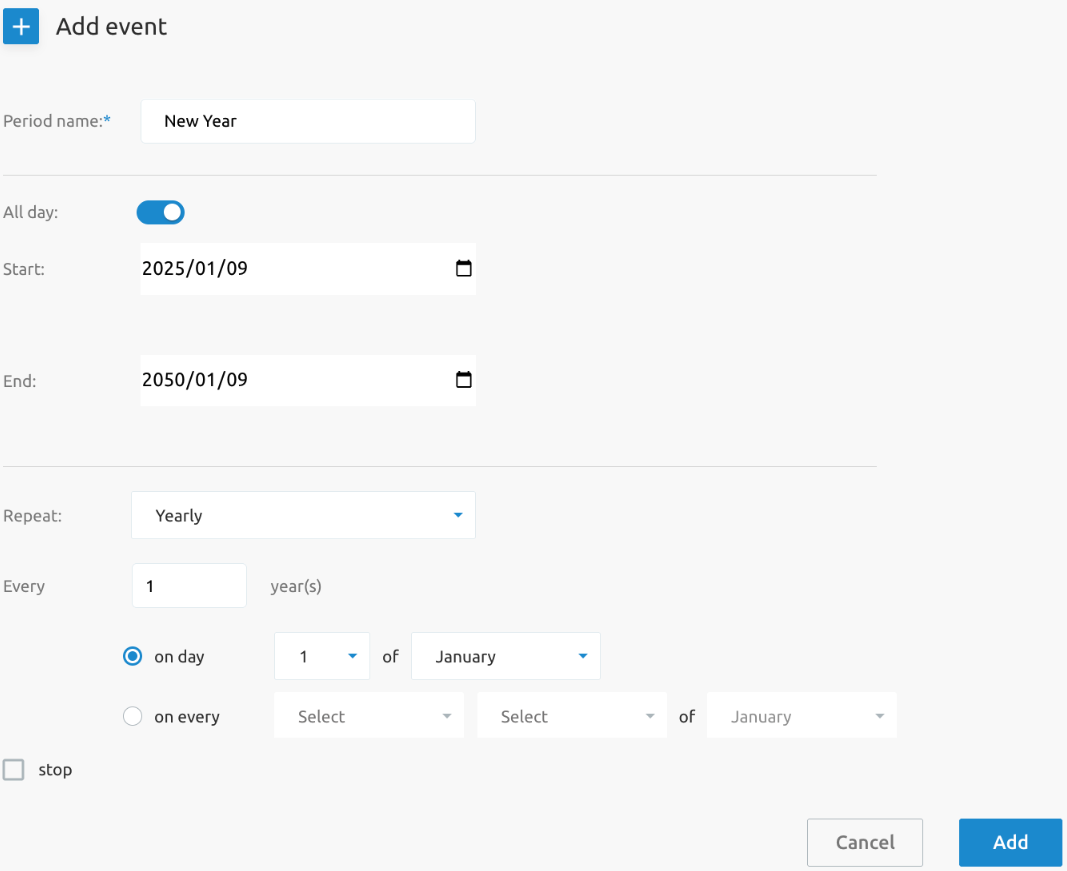
Schedules
The Schedules service manages holiday and time schedules for different levels (tenant and group). These schedules can then be used in other services at those levels.
For example, when configuring an IVR (via the Call Flow service on Group level), and a Schedule (Business Hours and/or Holiday) needs to be defined, the schedules already defined on the Tenant and/or Group levels will be offered as options. The IVR will use the schedules defined at the "Enterprise" or "Service Provider" level (Tenant schedules) or at the "site/group" level.
The calendars work similarly to other calendar applications like Google or Microsoft calendars. It is also possible to configure recurrence options for Holiday Schedules. This is made available for Tenant, Group, End Users & Call Flow Instances:
Service and Feature Management
This section details the various call flows, calling settings, and other features available to administrators.
Call Flows (Virtual Services)
F4B Call flows are virtual PBX services to which you can assign a phone number and/or extension (referring to the Understanding the basics document). When such a call flow is called, it triggers a special behavior for the call, like a voice menu or a hunt group.
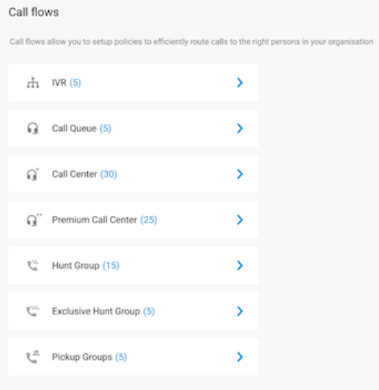
The screenshot below shows the home page of the Call Flow service. The specific services, number of hunt groups, Call Centers, IVRs, etc., may differ from customer to customer depending on what is available in the Broadworks solution.

Interactive Voice Response (IVR)
The IVR, also known as an "Auto Attendant," serves as an automated receptionist that answers the phone and provides a personalized message to callers with options for connecting to an operator, dialing by name or extension, leaving a message, listening to an announcement, or connecting to configurable destinations (e.g., 1 = Marketing, 2 = Sales).
An IVR is a licensed item in the Broadworks solution, meaning a license is needed to set up a voice menu. There are two types of IVRs with the following differences:
| Feature | AA - Basic | AA - Standard |
|---|---|---|
| Max amount of menu levels | 1 | Unlimited |
| Default menu | Yes | Yes |
| After hours menu | Yes | Yes |
| Holiday menu | No | Yes |
Example: The Basic, single-level IVR (Auto Attendant) has only one menu level, for example:
- English
- Dutch
- French
The Standard, multi-level IVR (Auto Attendant) can have two levels, for example:
- English:
- Marketing
- Sales
- Accounting
- French
- Marketing
- Ventes
- Comptabilité
- Dutch
- Marketing
- Verkoop
- Boekhouding
WarningIVRs are a billable service in the Broadworks solution and are not available in unlimited amounts. It is only possible to create IVRs in groups to which Auto Attendant licenses are assigned.
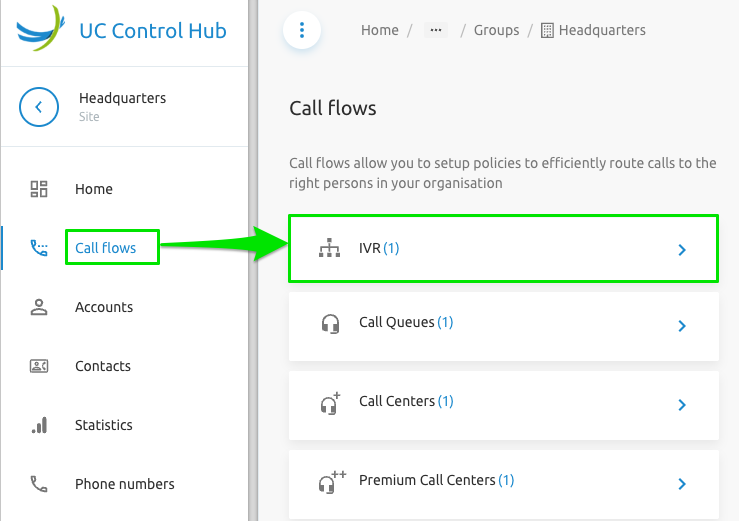
Setting up an IVR
An IVR must be set up in the group/site that requires it and has the proper license assigned. Click on Call flows in the left-hand menu, then click on IVR:
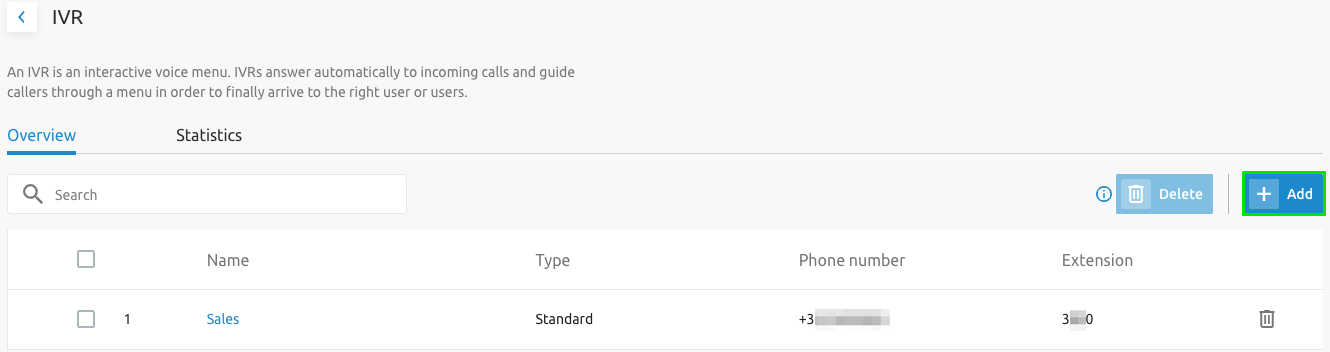
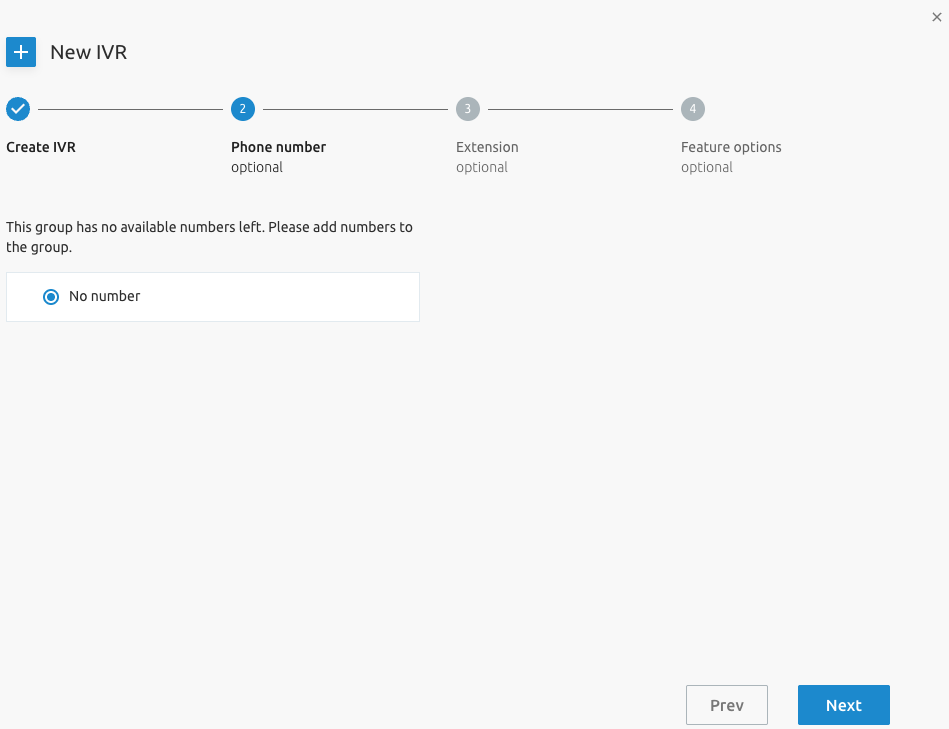
When licenses are available, the Add button will be enabled, which launches a wizard.
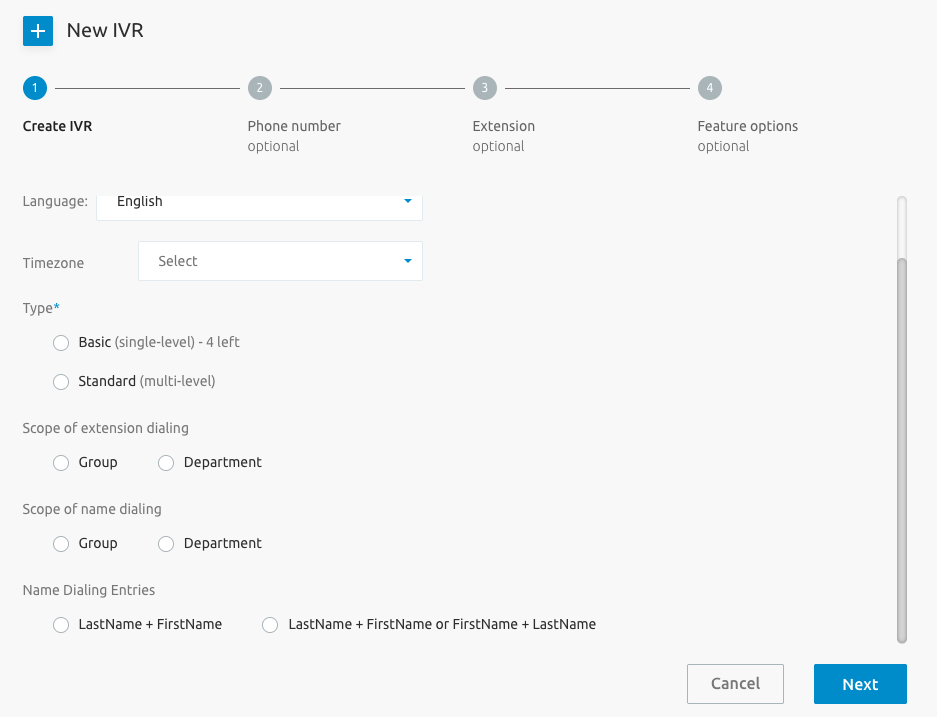
The IVR Setup wizard looks the same regardless of the IVR type (Basic vs. Standard). First, specify a name and the required type. Select Standard if you want an IVR with multi-level menus.
Now, select a phone number for the attendant to listen on:
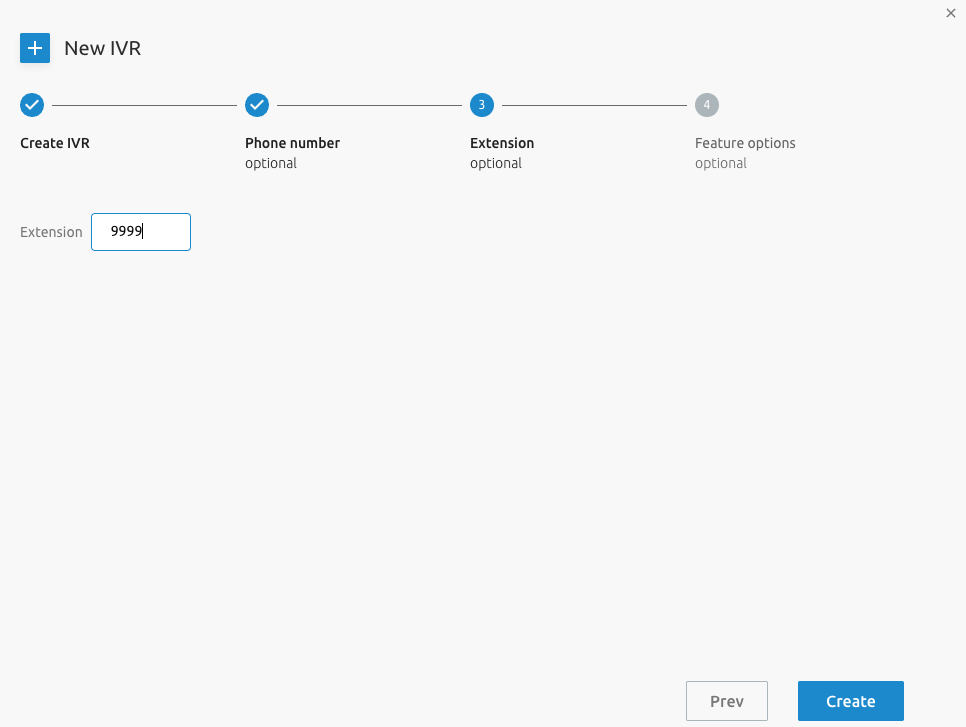
In the next step, the extension is calculated based on the group's extension settings. However, it is possible to overwrite the default extension:
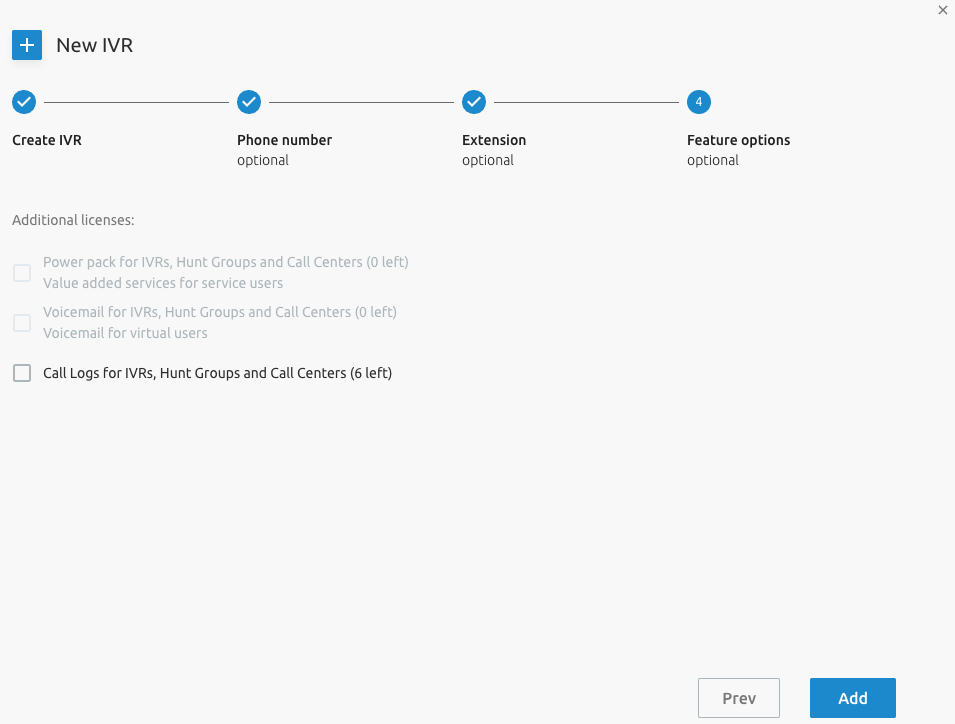
The IVR will now be created. In the last step, you can assign additional services (such as call logs or a power pack):
IVR Configuration
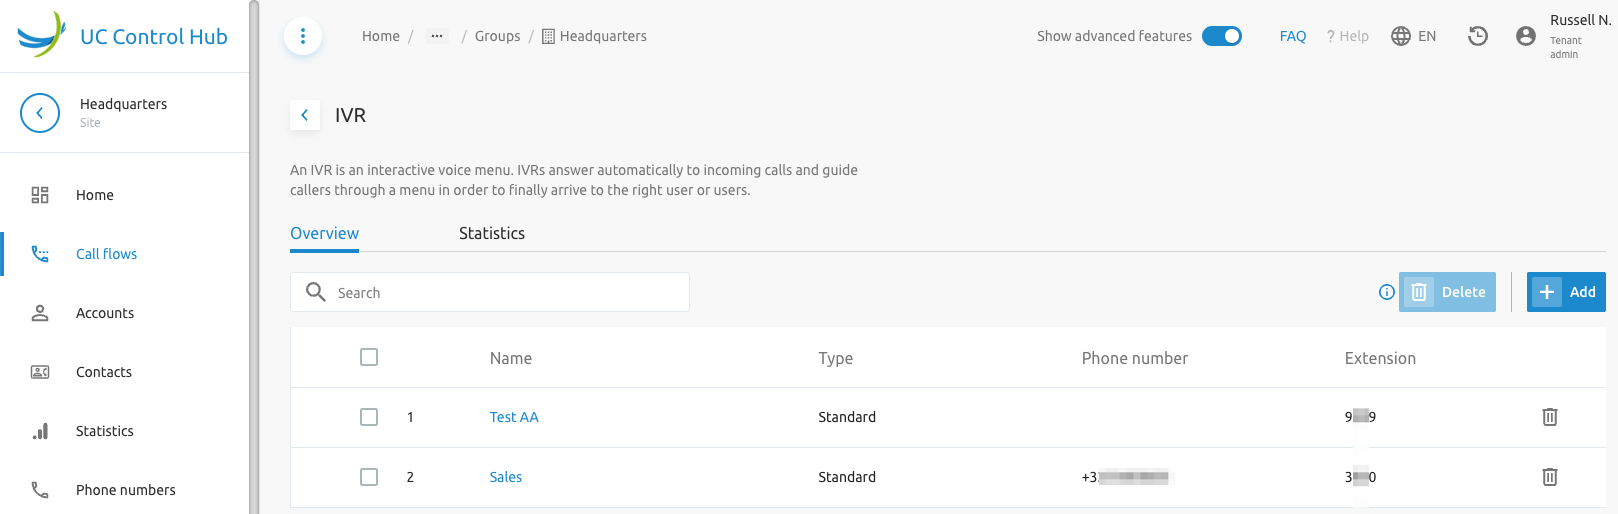
Once the IVR is created successfully, you can drill down to manage its configuration. The figure below shows an example of a list of IVRs created for the Headquarters of an Enterprise (see the group name in the breadcrumbs).
Selecting one of the IVRs allows you to enter its Home page, which is the landing page for an IVR, shows the Business Hour (BH) and Holiday Hour (HH) cards. These cards can be used to quickly access the Menus or Schedules configurations for both time schedules (BH and HH). Remark: Holiday schedules are only available with the Standard license type. The screenshot below provides the menu items for configuration of the IVR.
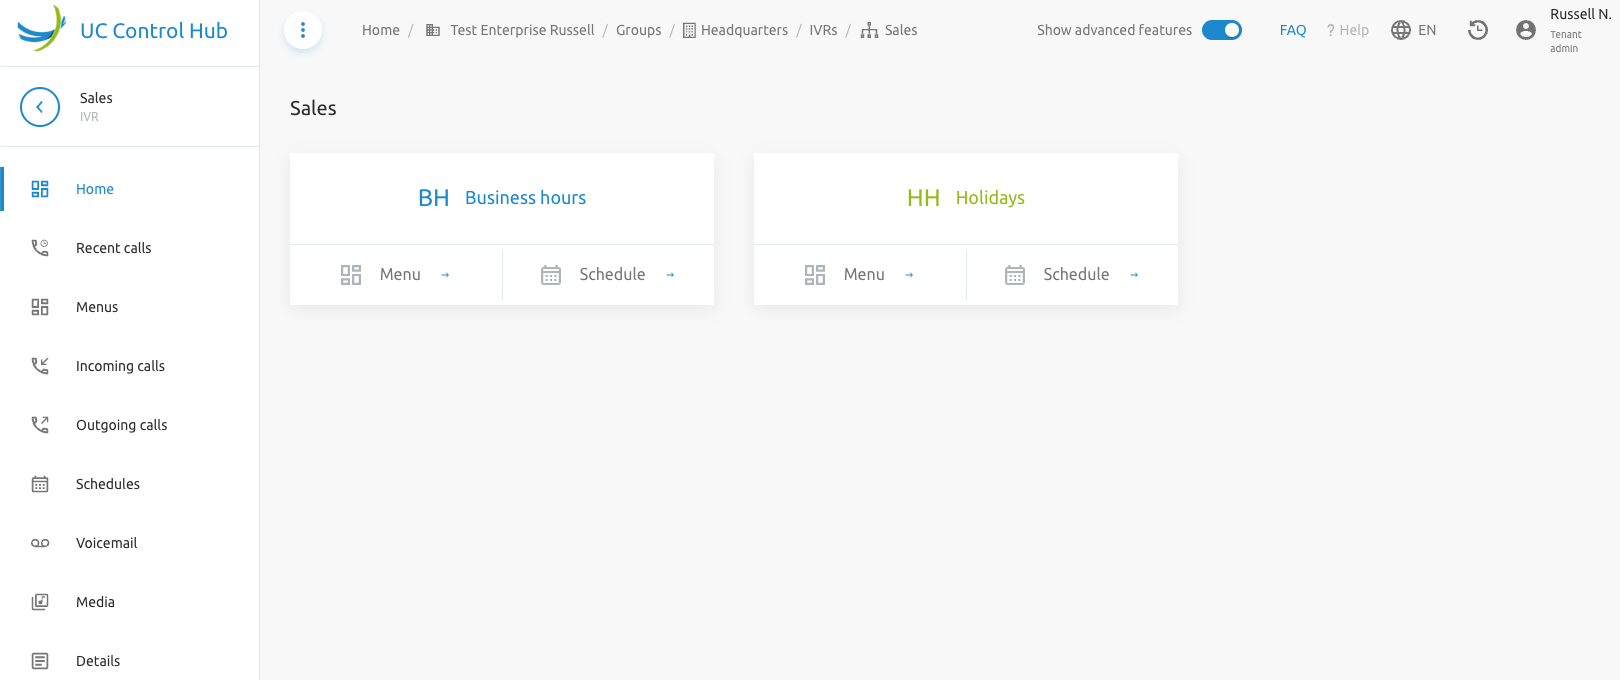
A short description of the different functionalities or services that can be configured for the IVR are listed below.
- Sales - name of the IVR
- Home - landing page of the IVR
- Recent Calls - basic call logs (20 for Cisco BroadWorks)
- Menus - Setup of Menus
- Incoming Calls - Services assigned to manage incoming calls
- Outgoing Calls - Services assigned to manage incoming calls
- Schedules - Manage business hours and holidays
- Voicemail - When voicemail service is assigned to the IVR
- Media - Manage Announcements
- Details - Profile data about the IVR
The Recent Calls page shows an overview of recent calls for that IVR. The administrator needs to have the appropriate rights to view the Recent Calls (or basic call logs) for the IVR.
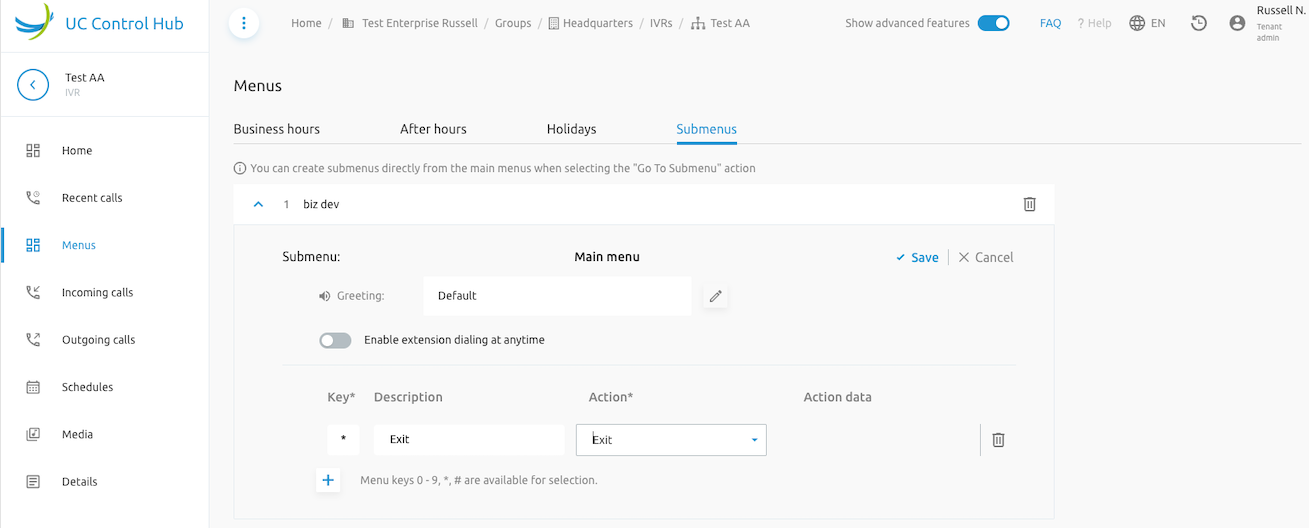
The Menus page allows you to configure a voice menu for Business Hours, After hours, and a Holiday period. The page also has a tab to configure Submenus if they are used in any of the voice menu configurations.
- To set up the menus, select Menus in the left-hand panel.
- To update the menu structure, click the Edit button.
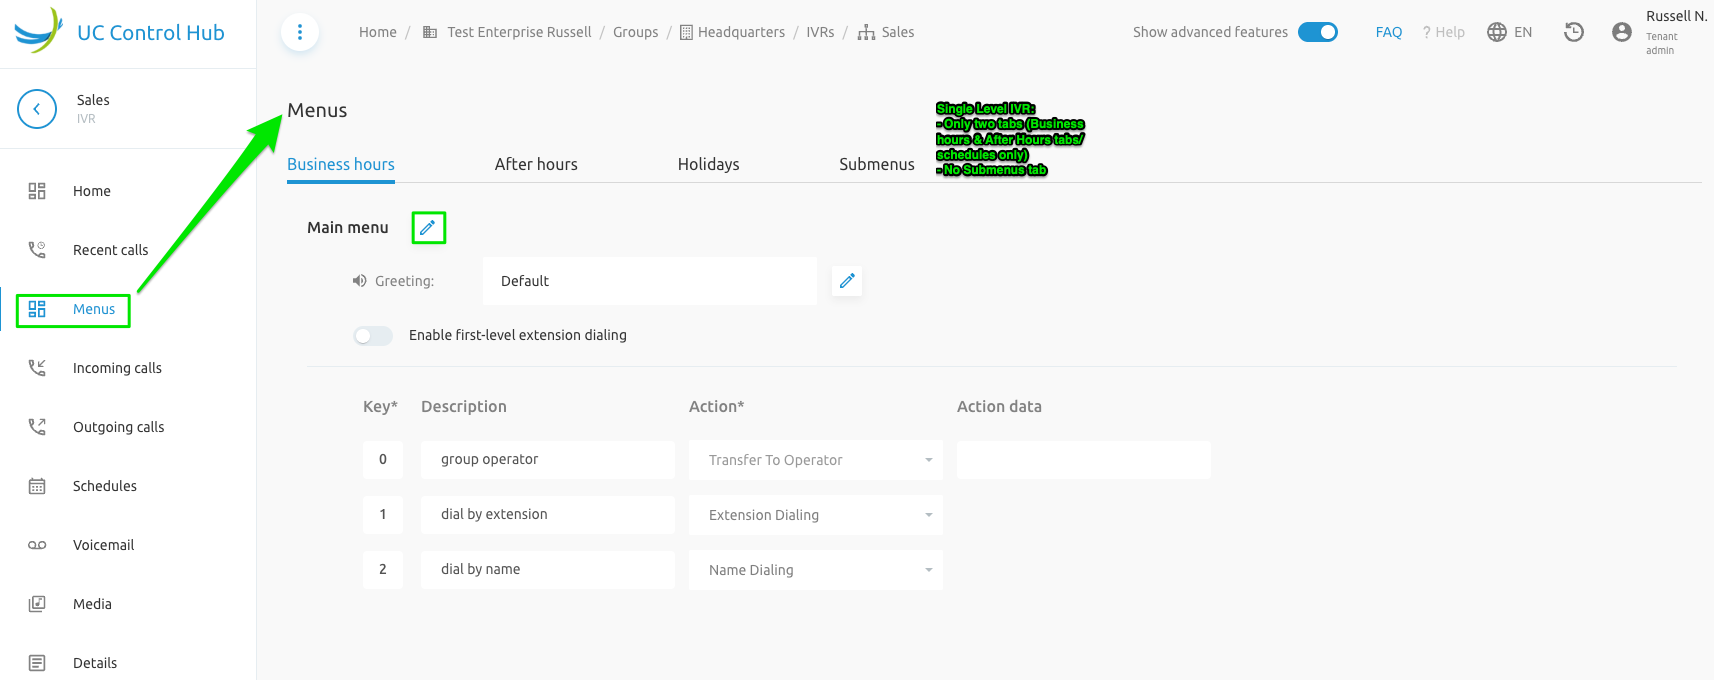
Case 1: Auto Attendant - Basic, with only one menu level.
Click on the Edit button (pencil icon).
Tip"Extension dialing" and "Name dialing" are hidden due to regulation in some jurisdictions and can be shown in the Actions page via some configuration parameters.
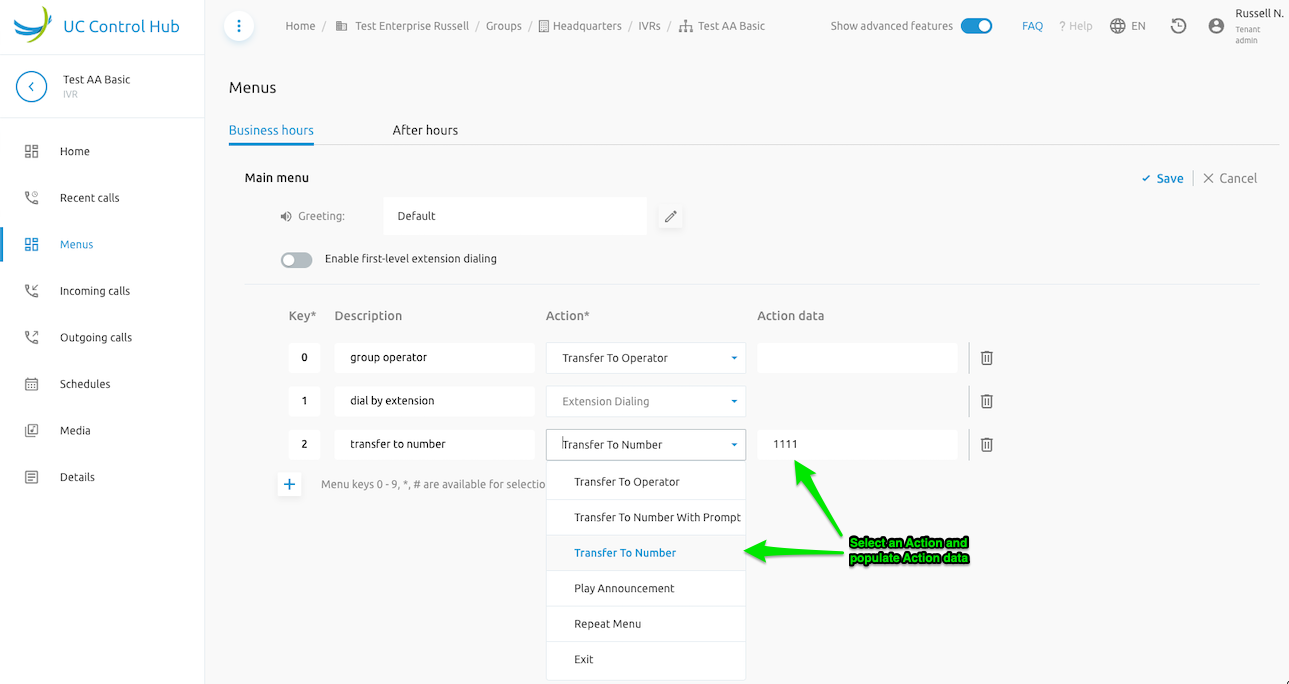
Select an action, populate action data, then click Save.
Case 2: Auto Attendant - Standard, with multi-level menus.
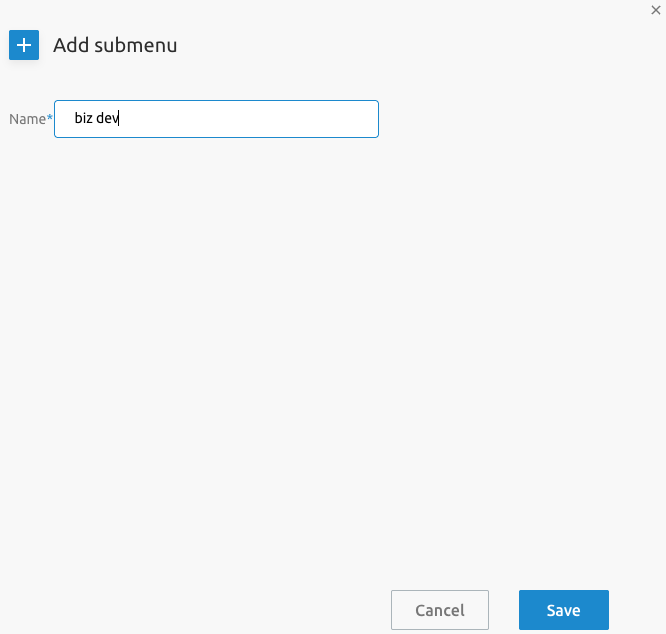
The picture below shows the Main Menu for a Main IVR page (before editing). At this stage, you can create/edit sub-menus directly from the Main Menu tab. To edit the Main Menu, click the Edit button, make the necessary changes, and then click Save.
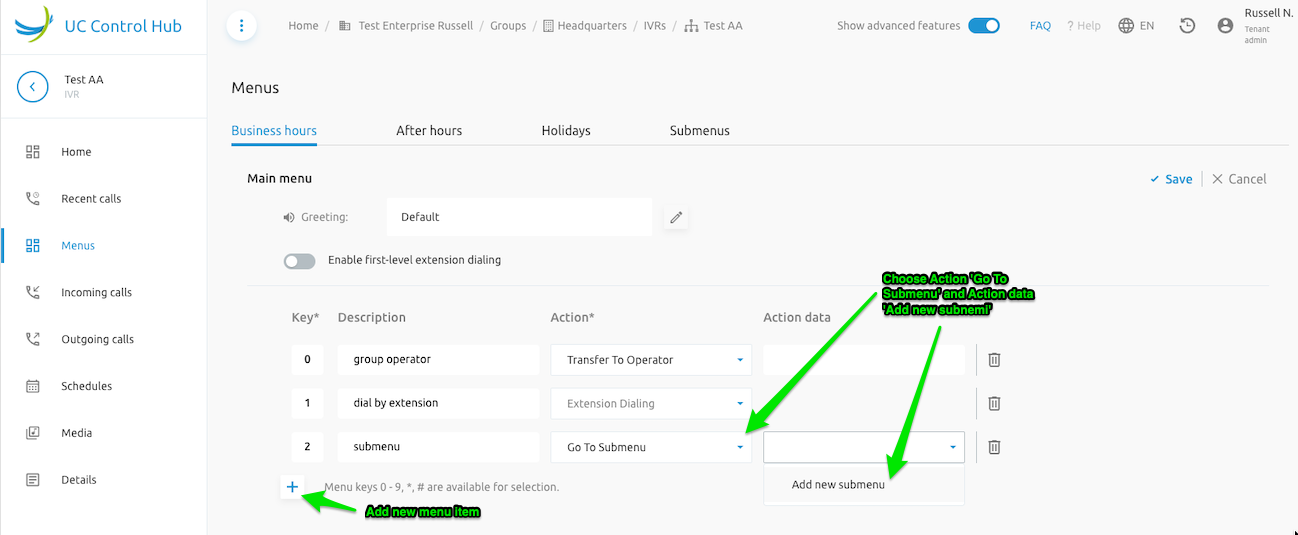
Once the main menu is configured with a submenu, you can select the submenu name.
Note that also the Submenus tab allows you to edit sub-menus individually.
Greetings and other announcements can be selected from either the attendant's repository or the group's announcement repository. It is possible to upload or record announcements via the browser. Only announcements recorded beforehand appear in the list.

Select either the Default or a specific announcement.
Announcements are managed through the Media menu item in the left-hand panel. Listed announcements can be played for control using the Play button in front of the file name. Media files are expected to be .WAV files, but there is also a way to transcode .mp3 files, which are more commonly used by customers.

An automatic forward after an inactivity timeout is defined once for all menus.

Define timeout duration for all menus.
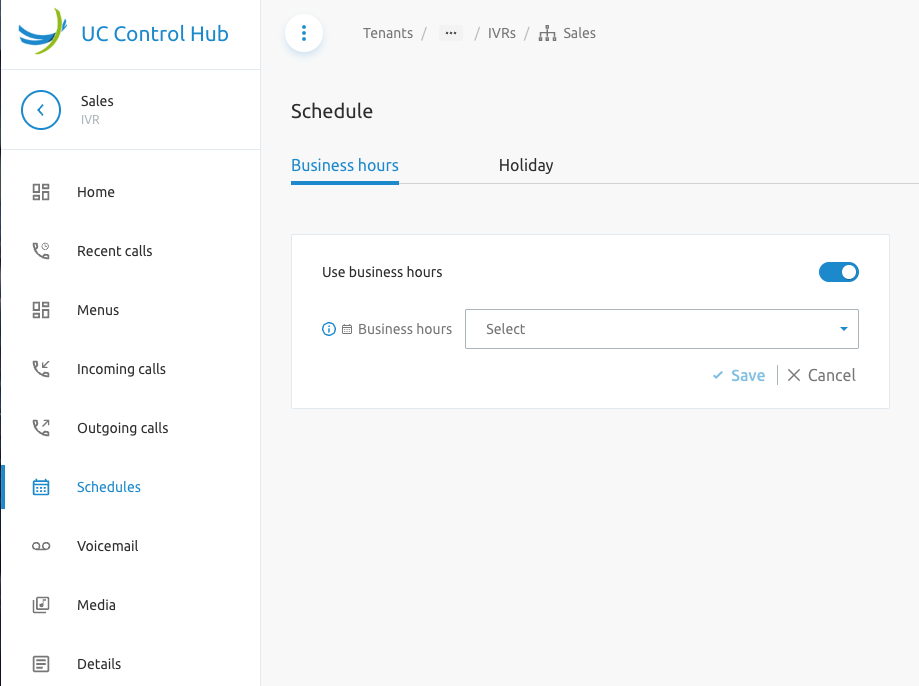
To manage the business hours and holiday schedules for this IVR, go to the corresponding menu item in the left-hand menu. Here, you can select a group schedule that will serve as the business or holiday hour schedule or alternatively Add new schedule.
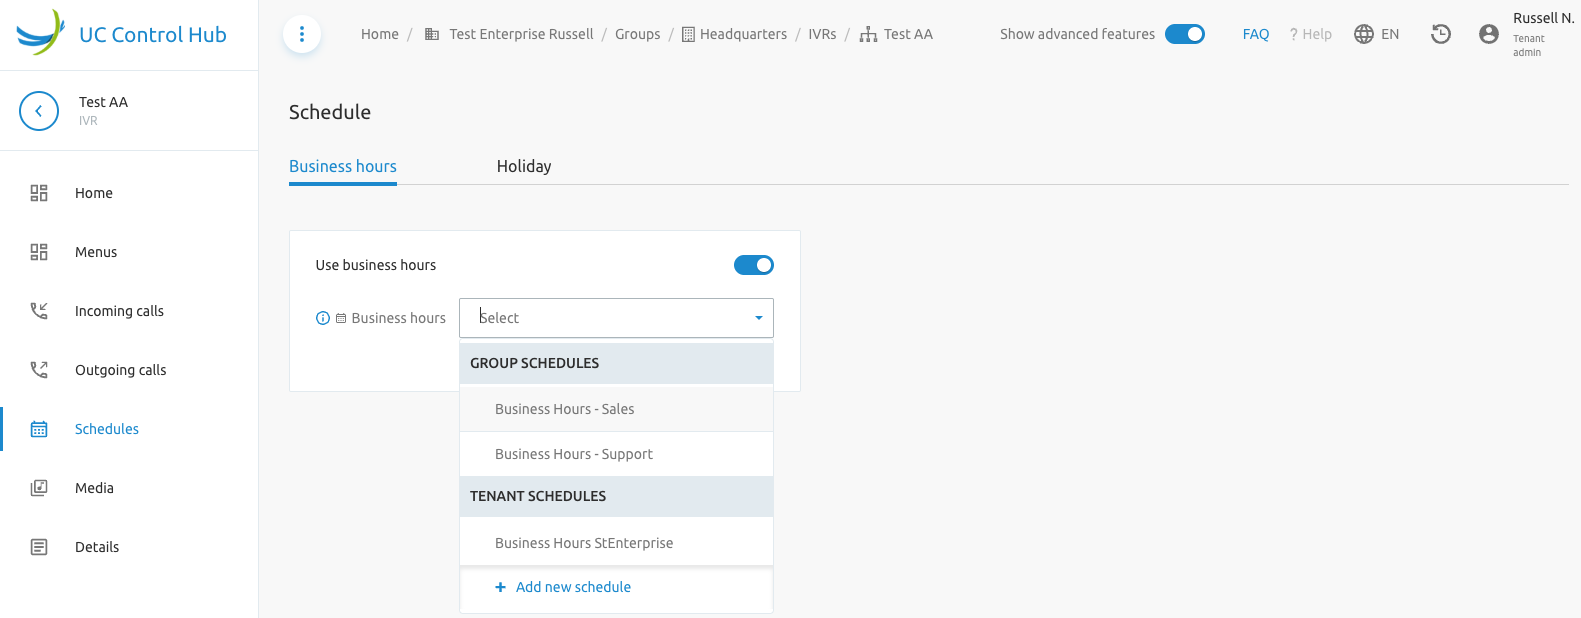
NoteIf no schedules are defined at the group level, you must first create a schedule there.
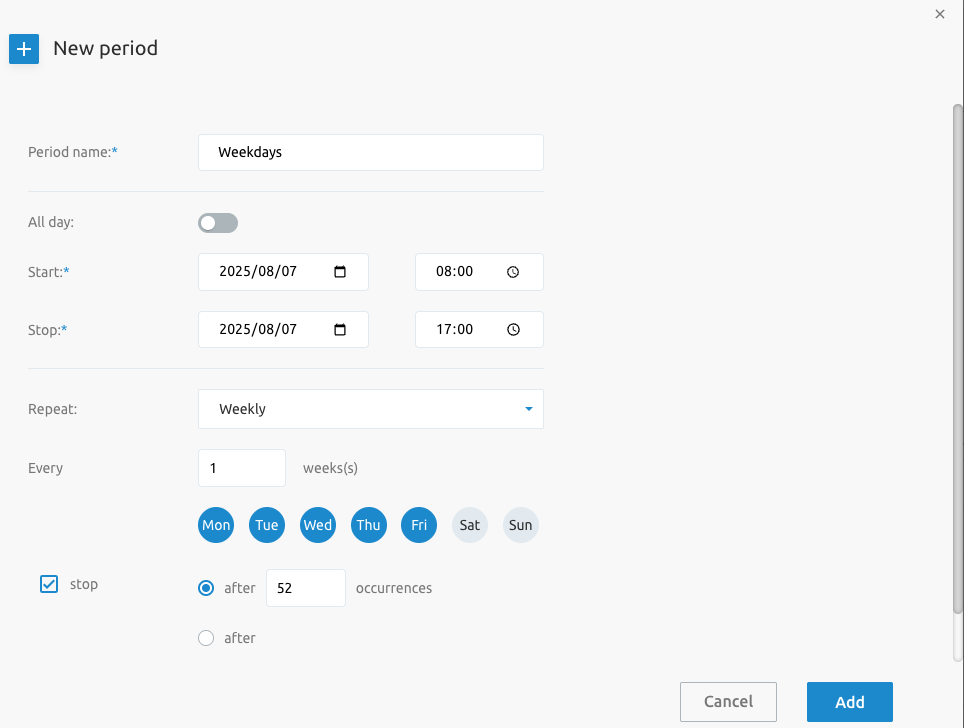
Once a schedule is selected, you can edit the time schedule directly from this screen, similar to a Google calendar. Use the Add button to add a new period and select an existing period to edit or delete it.
Holiday Schedules
On the screen, you can switch on the use of holiday schedules. When active, a drop-down box appears to select the Holiday hours. You will be presented with existing holiday schedules from the Group and Tenant levels, as well as the option to create a new one.
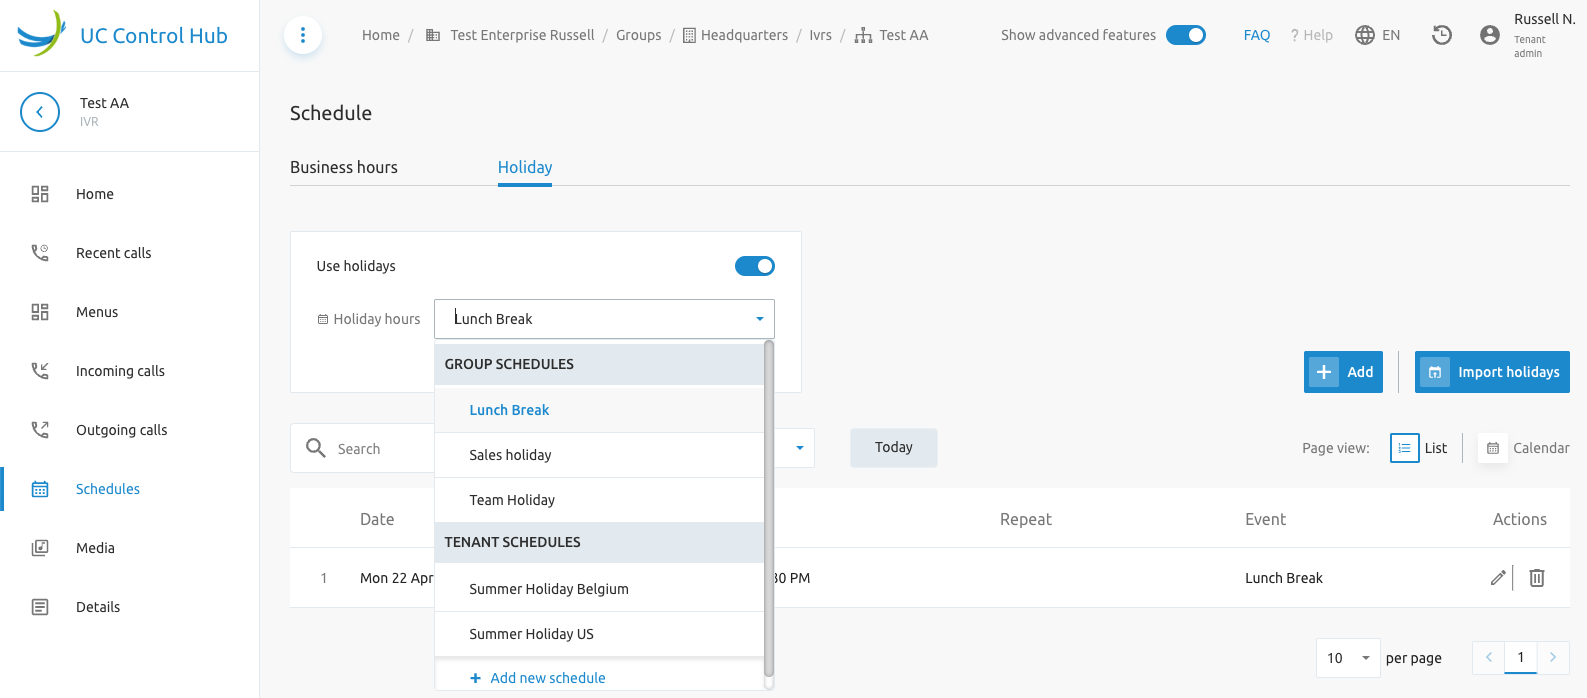
The page allows you to:
- Add a new holiday schedule. Clicking this button opens a new window where the new holiday schedule can be configured.
- Import Holidays. This action opens a window where you can select a year and country to include public holidays in the holiday schedule overview.
- Switch between a list view and a calendar view of the holidays. The list view is advantageous for visualizing recurring holidays over multiple years.
- Search for a specific holiday.
- Show holidays for a specific year.
- Show the view for "Today."
The previous screenshot above shows an example of a holiday schedule for the Sales IVR of an Enterprise.
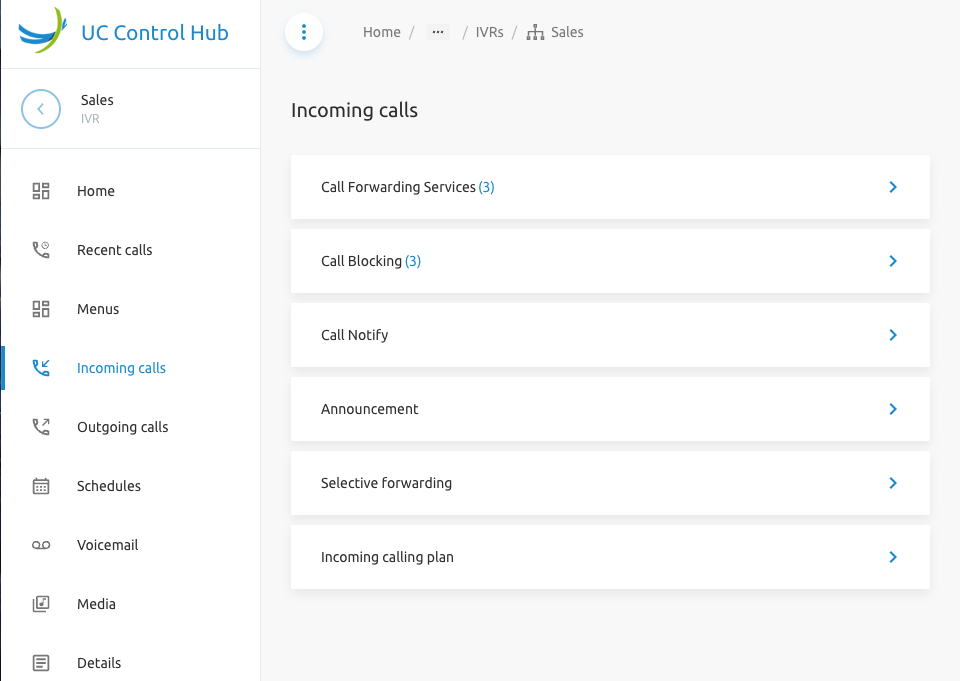
Incoming and Outgoing Calls
On the IVR configuration page, it is possible to configure some incoming and outgoing call settings. What is available or shown depends on what is activated for that group and/or account. It is possible that a certain account cannot access the incoming calls setting of a group and only has access to the outgoing calls setting. The screenshots below are an example of possible services that can be configured on IVR/Auto Attendants.
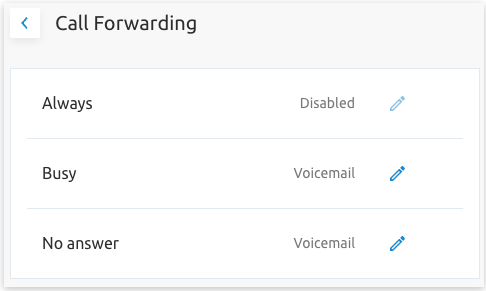
An example is given of the Incoming Calls call forwarding service, which allows the administrator to define what happens to a call in case of "Always", "No answering" or "Busy."
Other incoming call services that can be made available are:
- Call Blocking
- Call Notify
- Announcement
- Selective forwarding
- Incoming calling plan
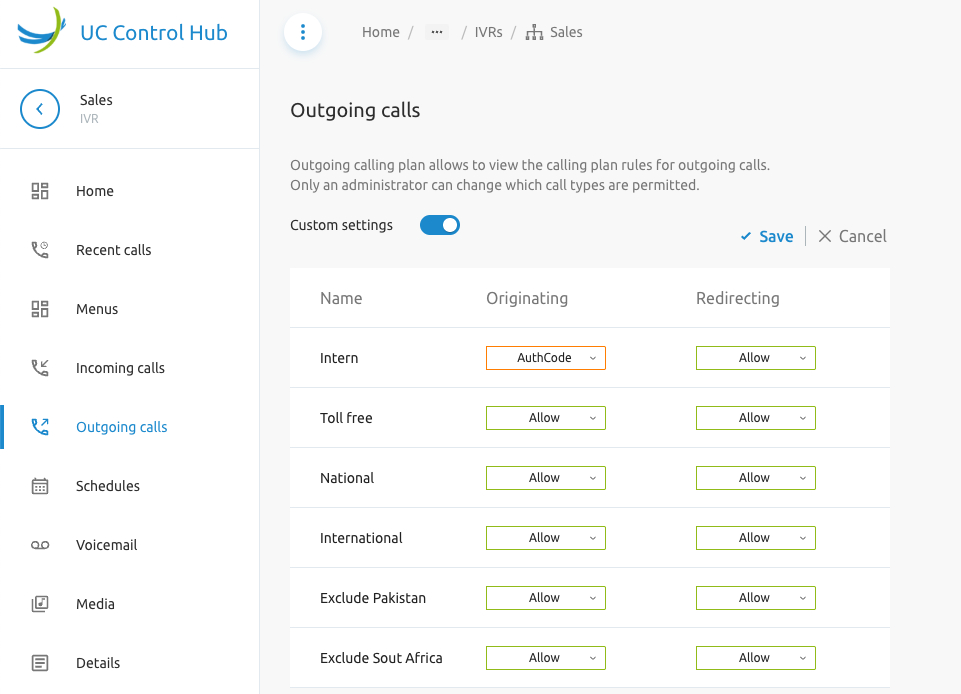
Whether these are shown in the SCP depends on how the IVR configuration has been set up. For Outgoing calls, an "Outgoing calls plan" can be set, which allows you to view the outgoing calling plan rules. These rules can be configured in the calling settings at the Group and/or Tenant level.
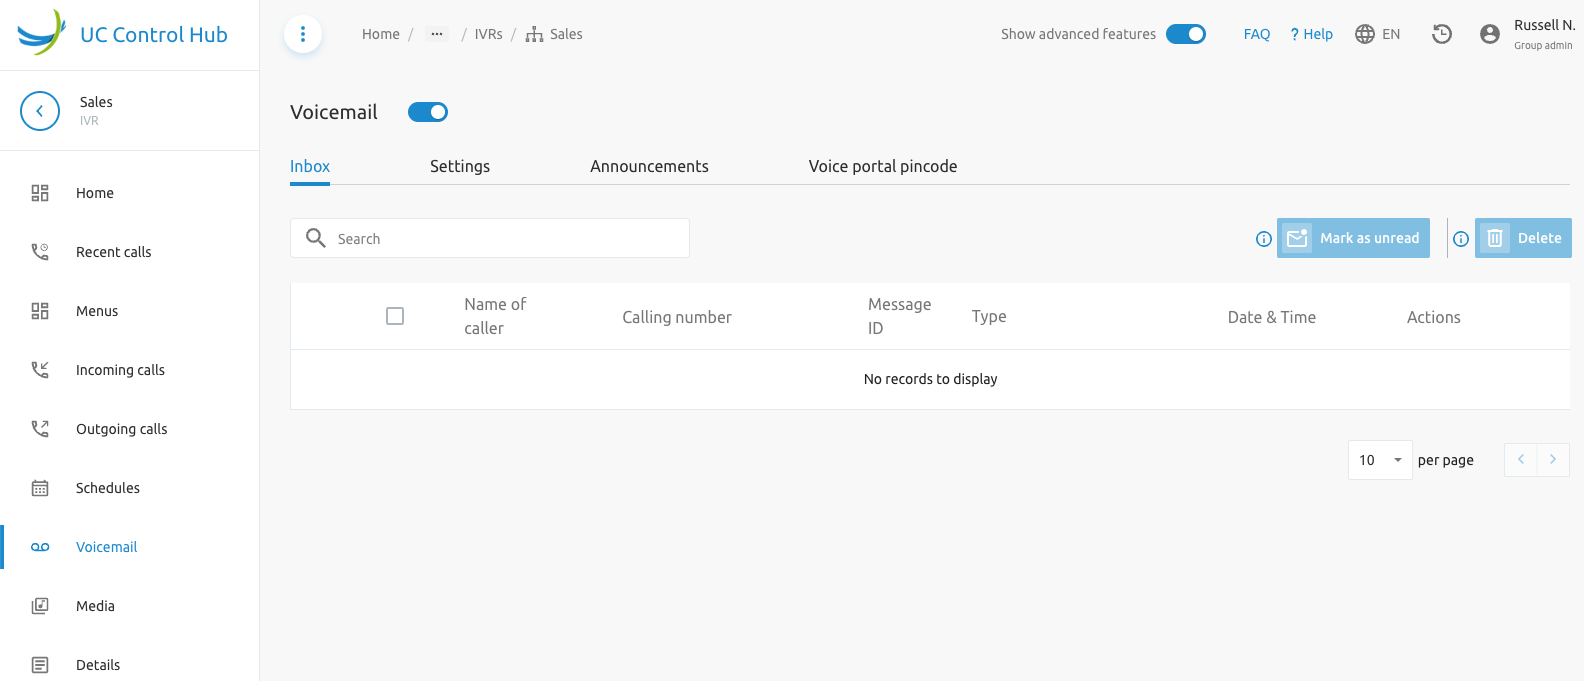
Voicemail
If the Voicemail service is assigned to the IVR, this menu item provides voicemail management options for such as Mark as unread, Delete, Announcements and Voice portal Pincode
TipOnly Group Administrators can view Inbox list of voicemails.
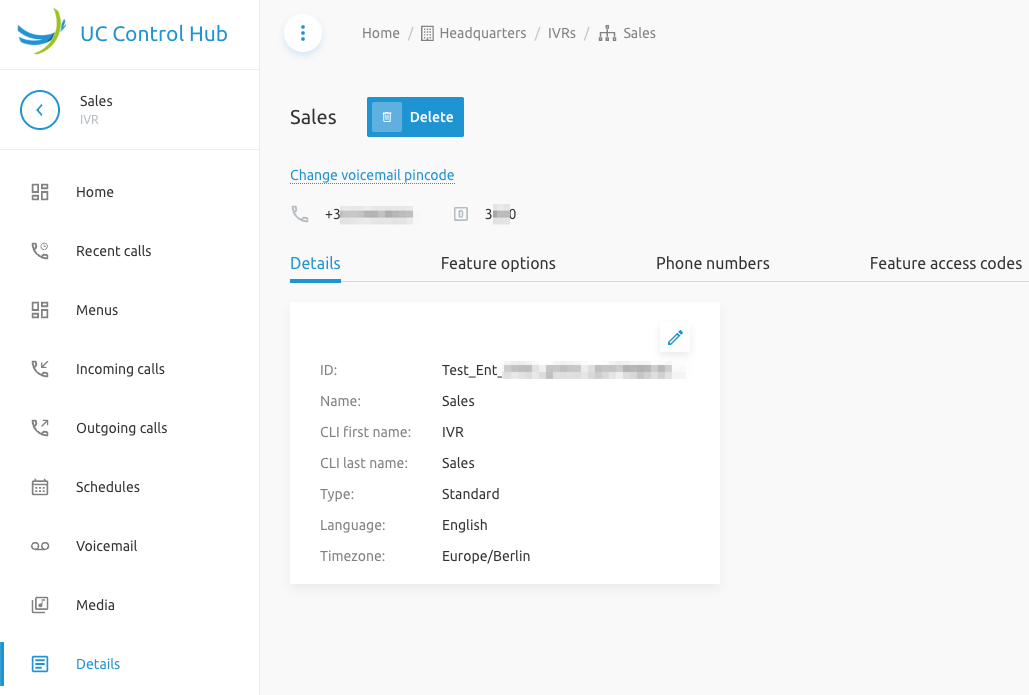
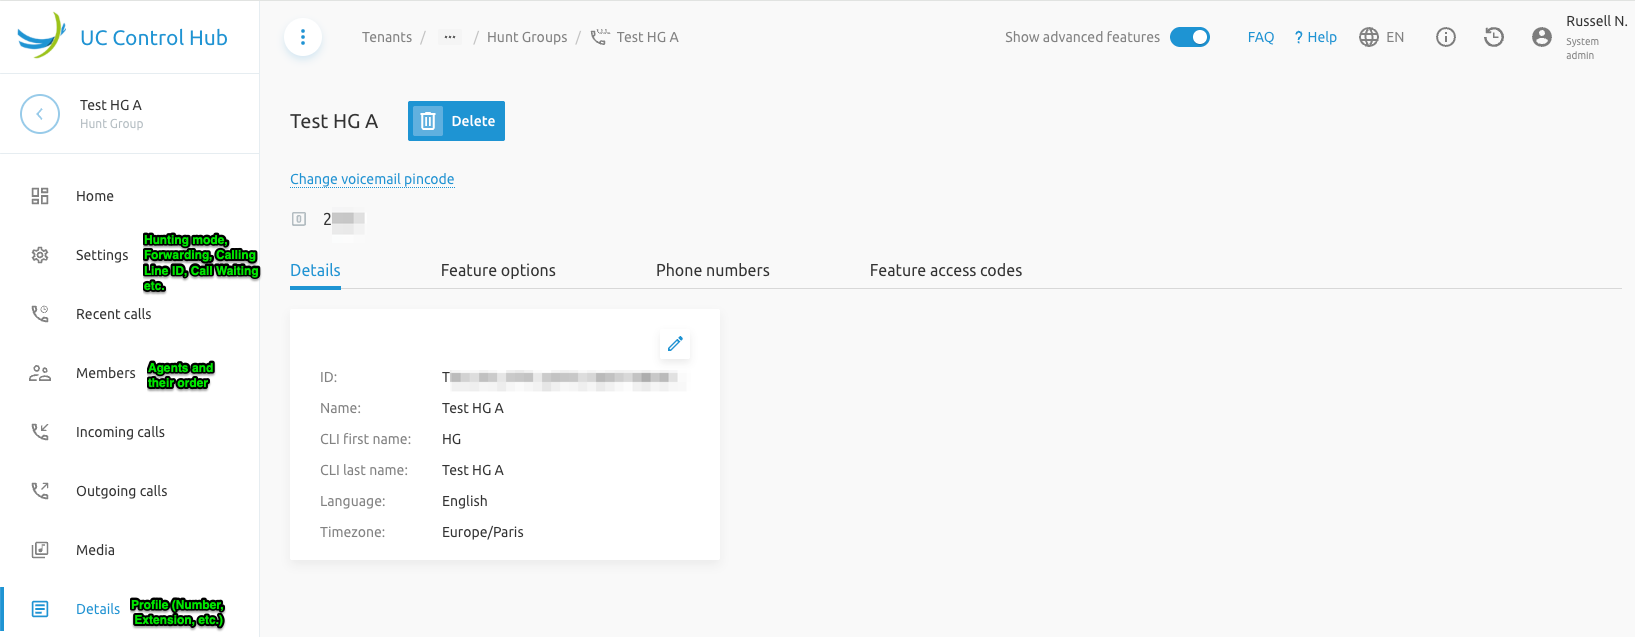
Details
This service provides more information about the IVR, such as its ID, name, CLI name, feature options assigned, and linked phone numbers.
Call Queues (Call Center Basic)
The F4B Call Queue service in the SCP corresponds to the Call Center - Basic service (or service packs) in the Broadworks solution. Call Center - Basic is designed to support a simple call distribution and queuing scenario, such as a front-office receptionist or a small work group.
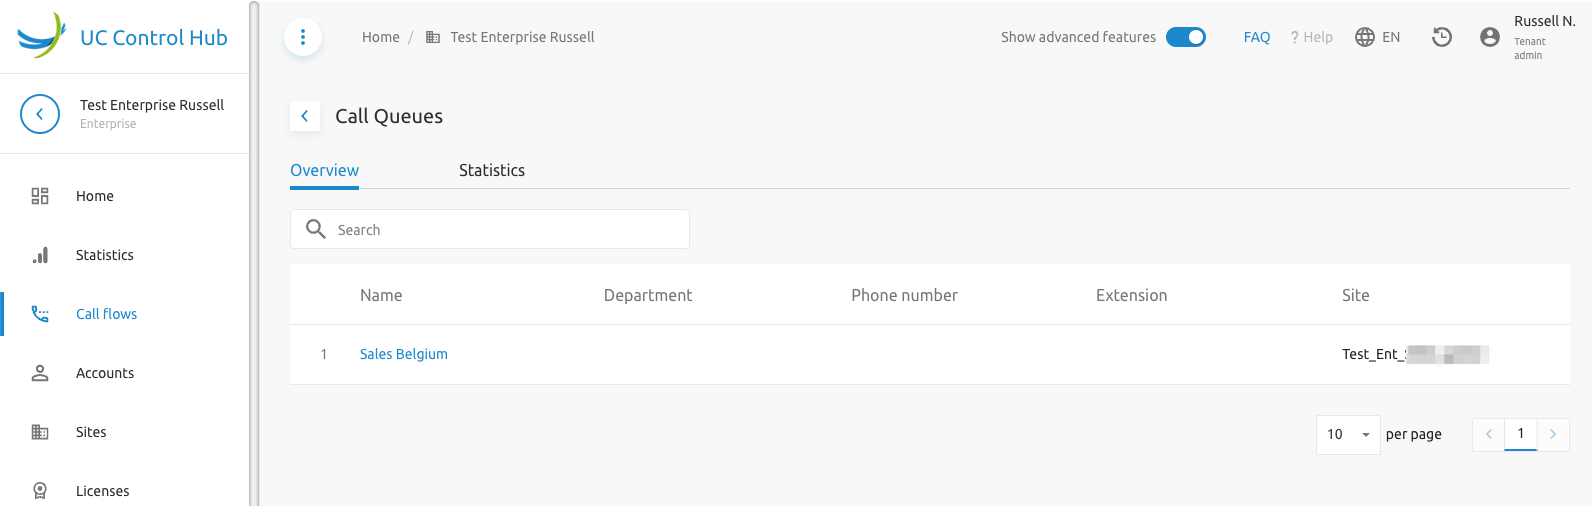
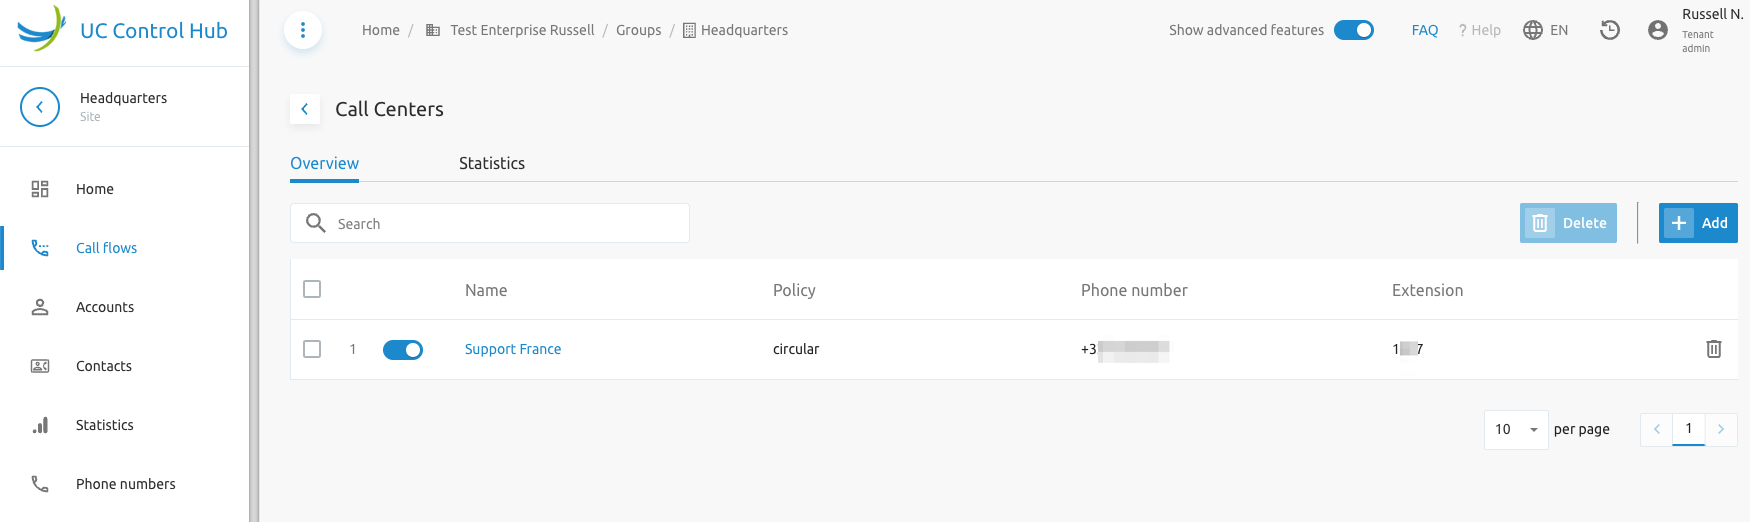
On the Tenant level, the administrator will only have a view of the call queues. Changing or adding new call queues is done at the group level.
The screenshot below shows the Call Queue page on the Tenant level. There is no option to add a new call queue.
The screenshot below shows the Call Queue page on the Group level (the group name is in the breadcrumbs at the top of the screen). There is also the possibility to activate/deactivate the call queue with an on/off switch.

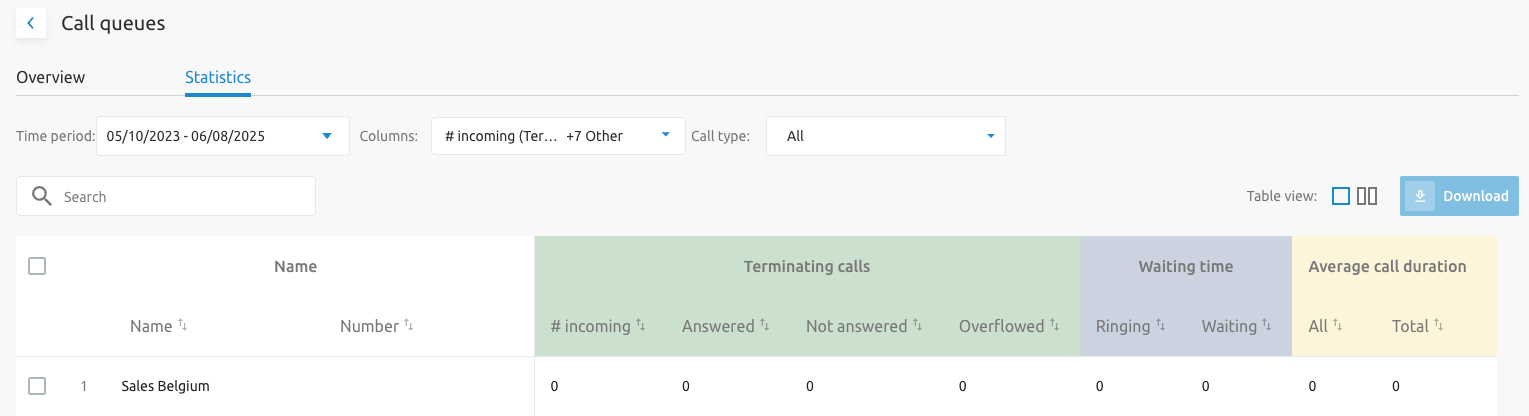
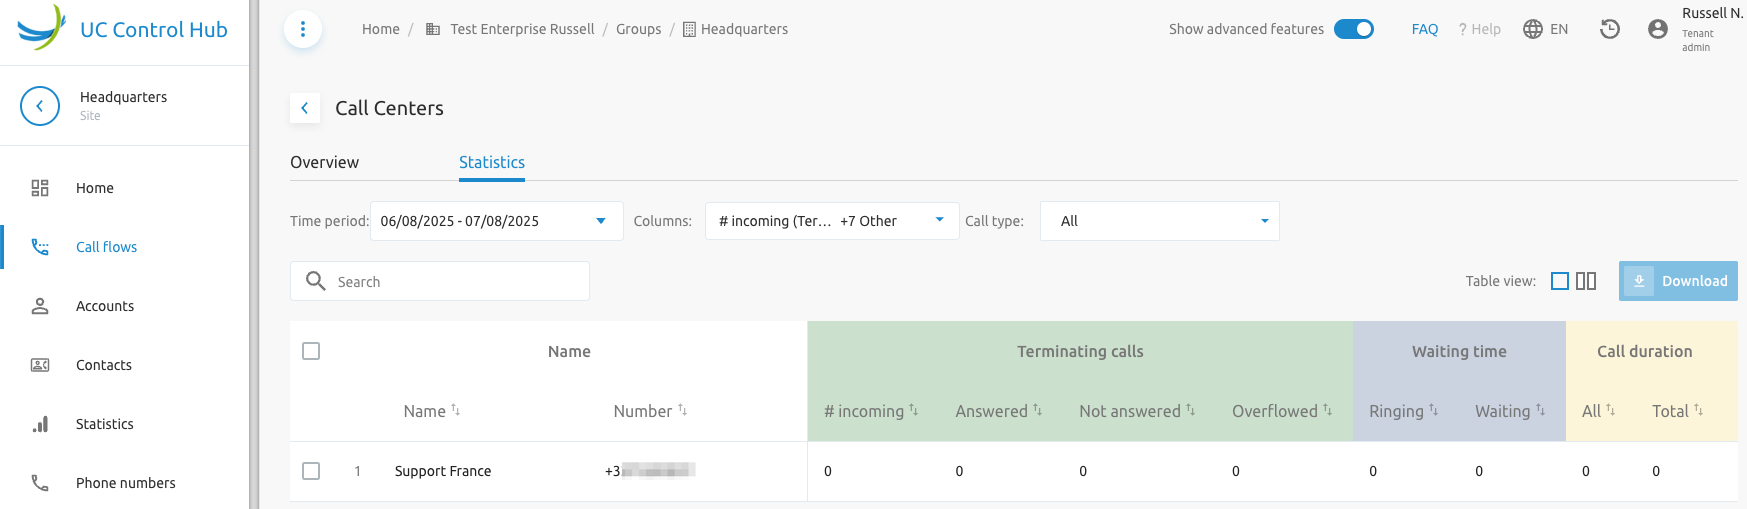
If the customer has the F4B Call Statistics service enabled, a Statistics tab will be on the Call Queue page, giving the administrator a view of the queue's statistics.
By default, the following KPIs are available:
- Terminating calls
- Waiting time
- Average call duration These KPIs can be customized through the columns drop-down box (show or hide certain columns per KPI) for the following call types:
- All
- Internal
- External
The screenshot below gives an example of a Statistics page for the Call Queue service.
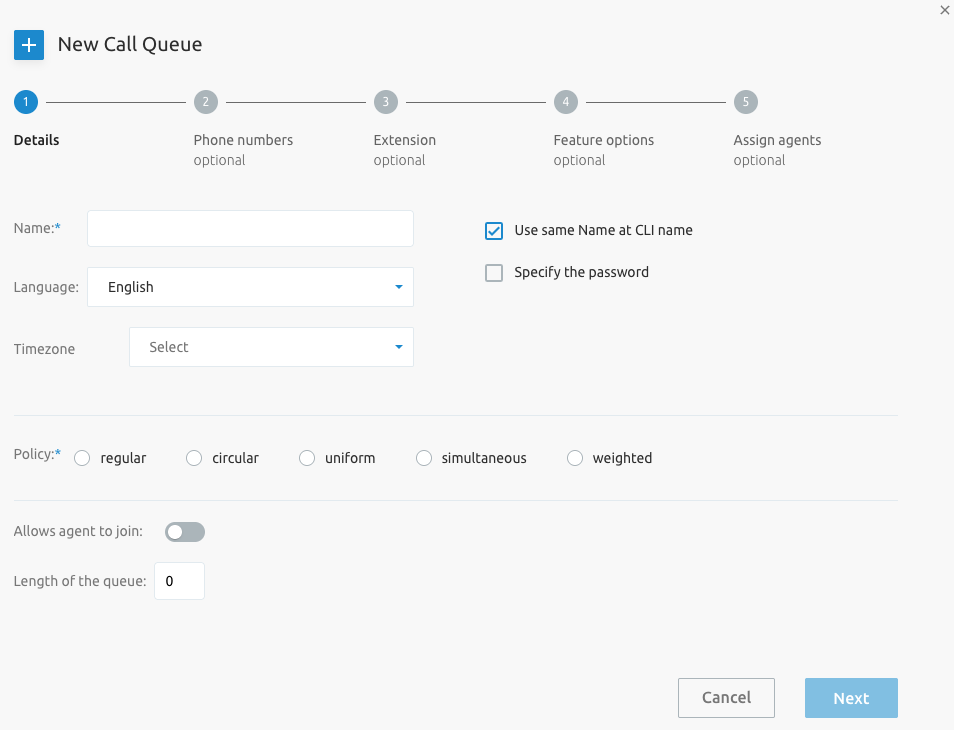
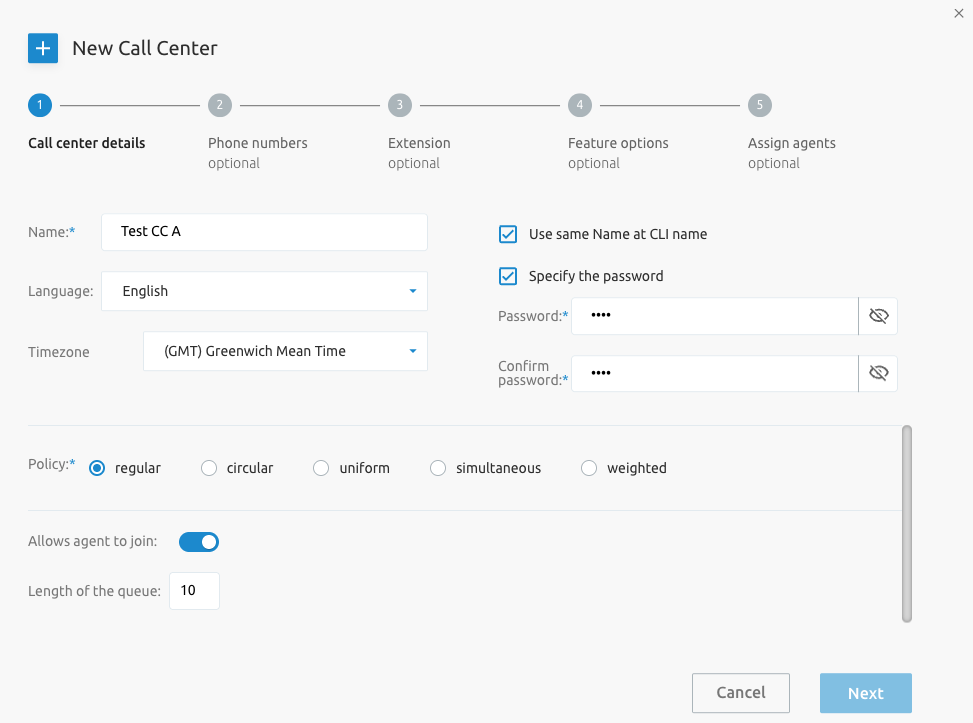
When adding a new call queue, an intuitive configuration wizard window opens where the administrator configures the mandatory items (indicated with a *) and can add information for optional items.
NoteThe phone number is optional for the Call Queue service.
Selecting a call queue from the list allows the administrator to enter the configuration pages.
The services that can be configured on the call queue are:
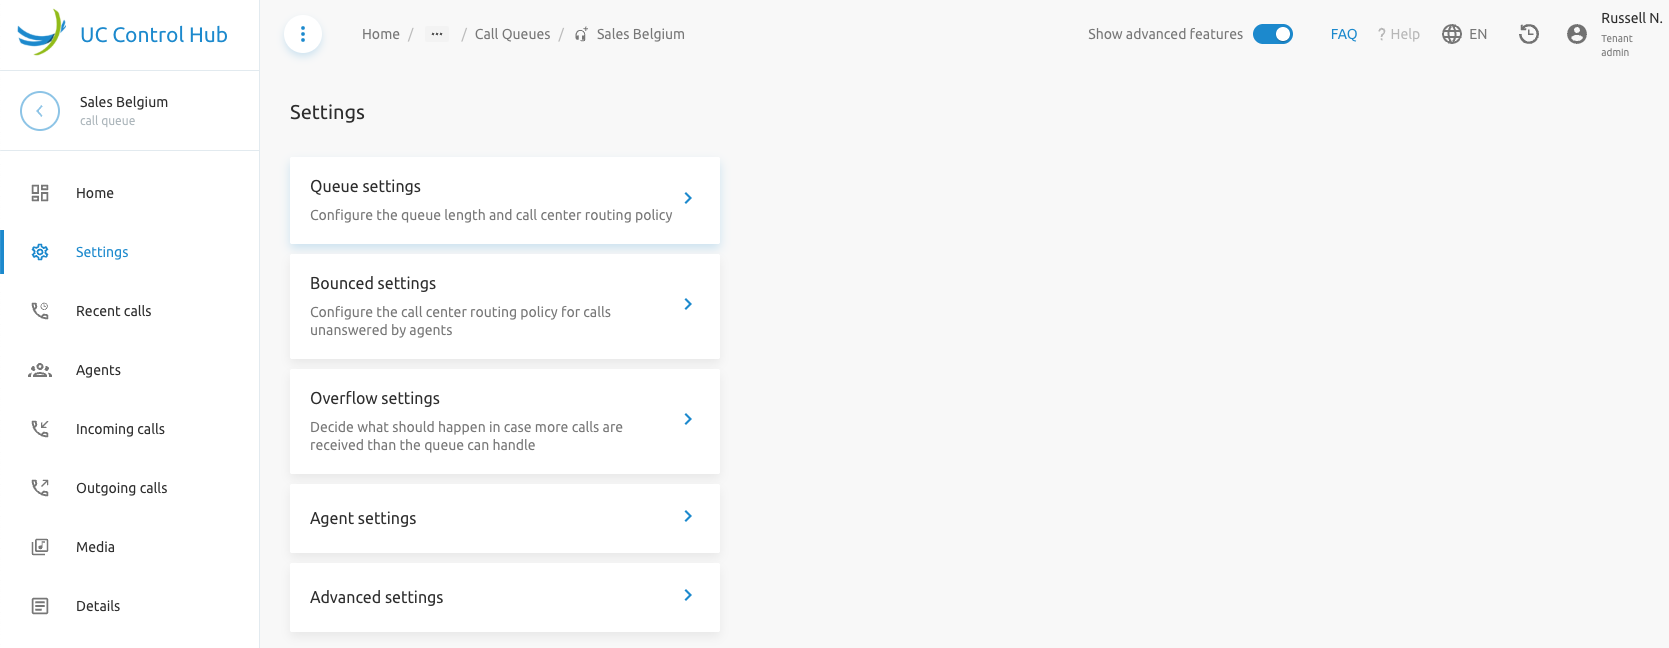
Settings: In the settings page, the administrator can configure the following items:
- Queue settings: Configure the queue length and the call center routing policy.
- Bounced settings: Configure the call center routing policy for calls not answered by any agent.
- Overflow settings: Decide what happens when more calls are received than agents can handle.
- Agent settings: Allow agents to join the call queue and set call waiting on agents.
- Advanced settings: Advanced settings that allow callers to escape the queue and whether the agent receives a ringing sound when a call is offered.
Recent Calls: The recent calls provide a view of the call logs for the specific call queue. Note that call logs will only be shown to accounts with the proper profile.
Agents: When the call queue is configured to allow agents to join, the administrator can add agents. The administrator can define whether to include agents from only this group or from the entire tenant (Enterprise).
The screenshot below shows an example of how the list of agents would look.
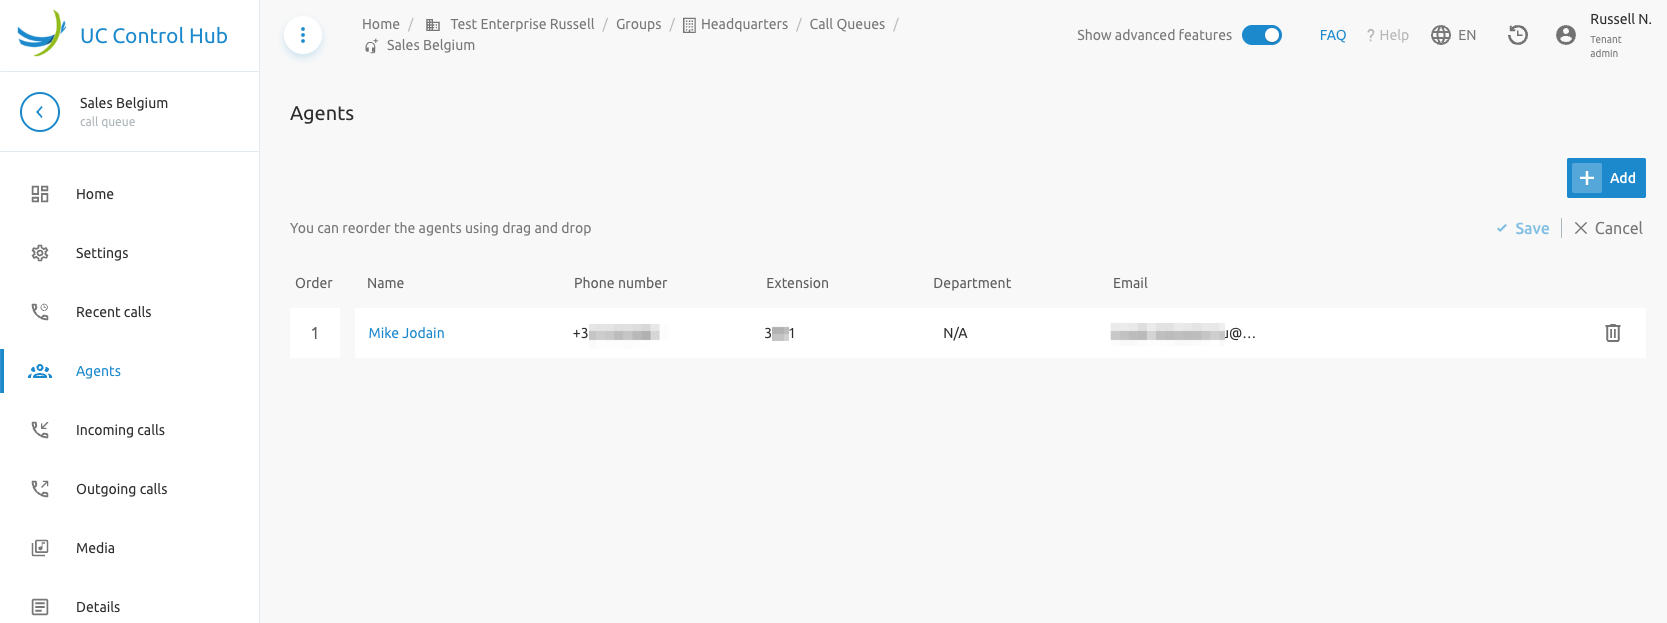
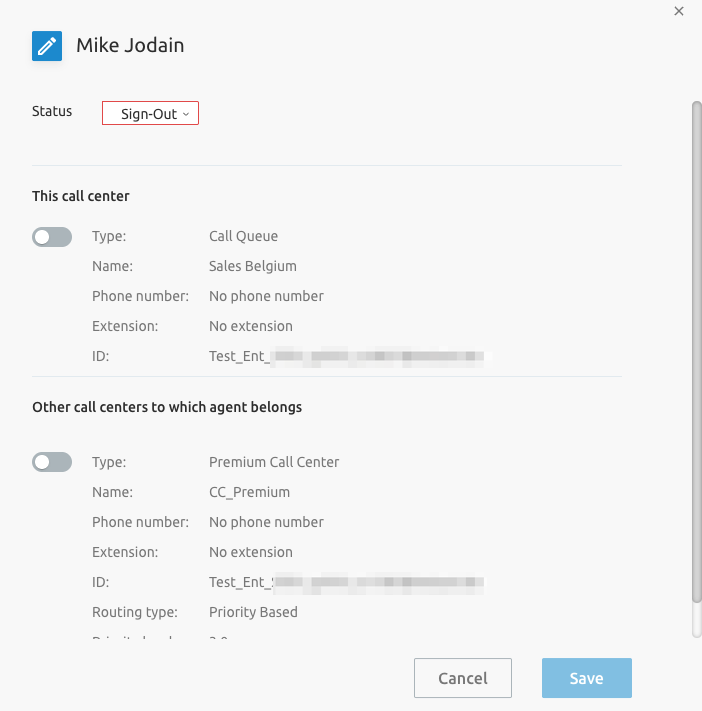
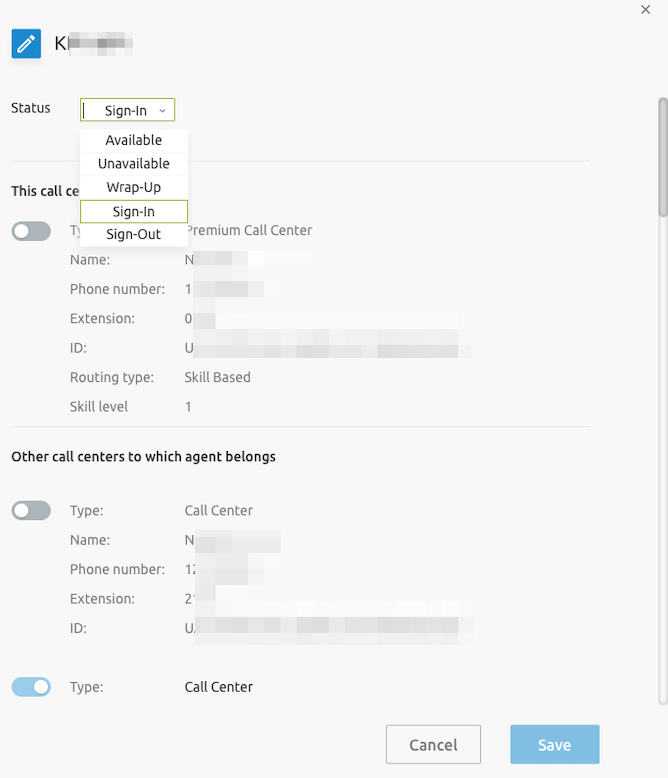
Selecting an agent allows you to:
- Change the agent's status.
- View which call queues the agent belongs to.
- Activate/deactivate the agent for that call queue using the on/off switch.
Incoming and Outgoing Calls
On the Call Queue page, it's also possible to configure incoming and outgoing call settings, similar to the IVR/Auto Attendant configuration page. More information can be found in the IVR section.
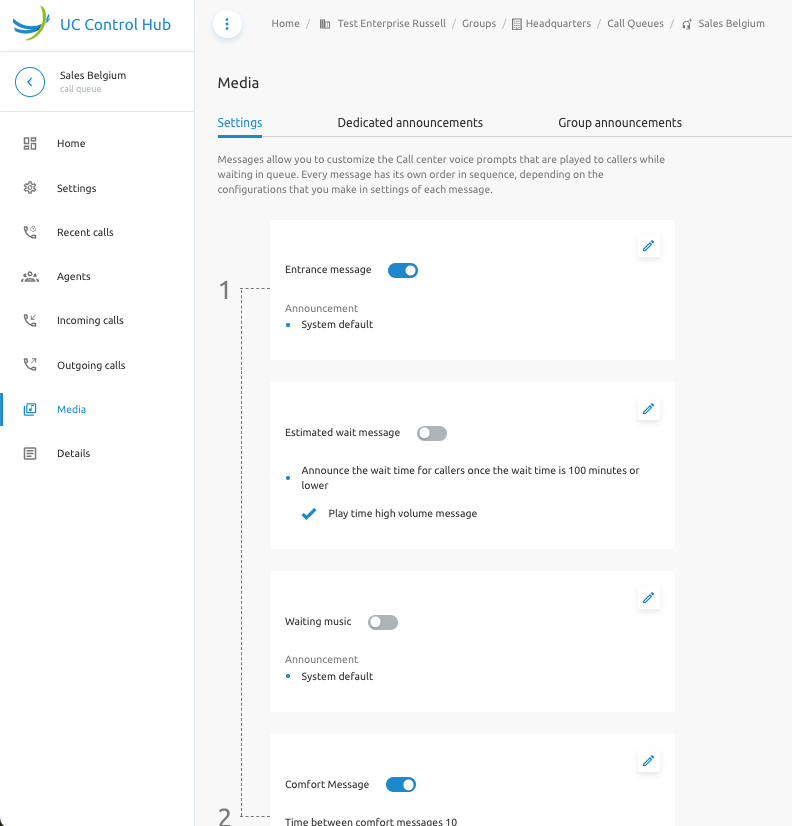
Media
The media service on the Call Queue differs from the IVR in its Settings configuration items. Through the settings tab, you can customize the voice prompts played to callers waiting in the queue. The announcements used in these voice prompts can be managed through the other tabs on the screen: Dedicated Announcements and/or Group Announcements (created at the Group level).
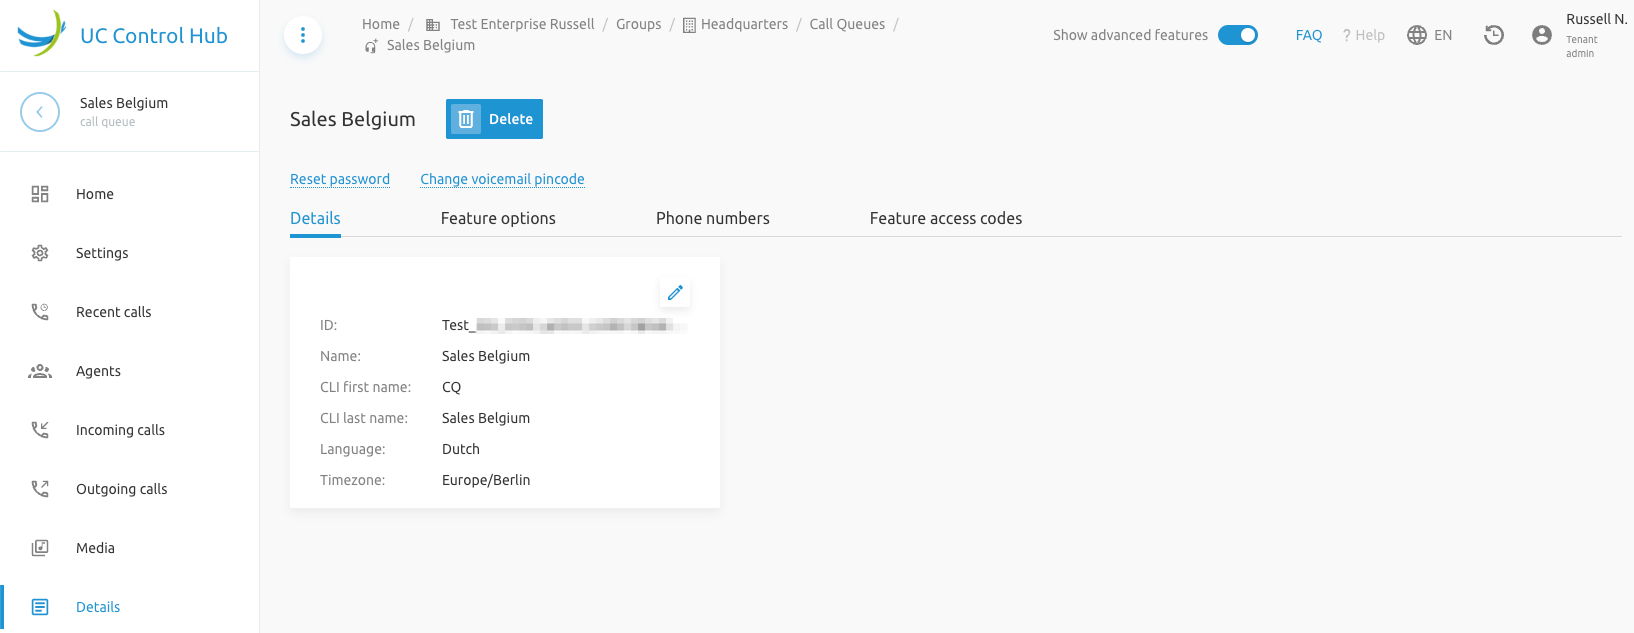
Details
The Details service provides more information about the call queue (ID, name, CLI name, etc.), the assigned feature options, and the linked phone numbers.
Call Center (Call Center Standard)
The F4B Call Center (CC) configuration is similar to the Call Queue configuration. The CC in the SCP corresponds to the Call Center - Standard service (or service packs) in the Broadworks solution and its corresponding license structure. Call Center - Standard is designed to support a normal call center environment where flexible routing options are needed and the agent's workflow dictates the need for ACD states such as Available, Unavailable, and Wrap-up. Again, a Statistics tab is available on the Call Center call flows if the customer has enabled the Call Statistics service.
Remark: When adding a new Call Center, the phone number is no longer optional. The call center requires a phone number. If the group does not have any available phone numbers, the wizard will not proceed to the next step, as seen below the Next button is inactive.
Once a call center is created, its configuration is accessible by clicking on its name.
The screenshot sections show what the configuration pages of the call center look like.
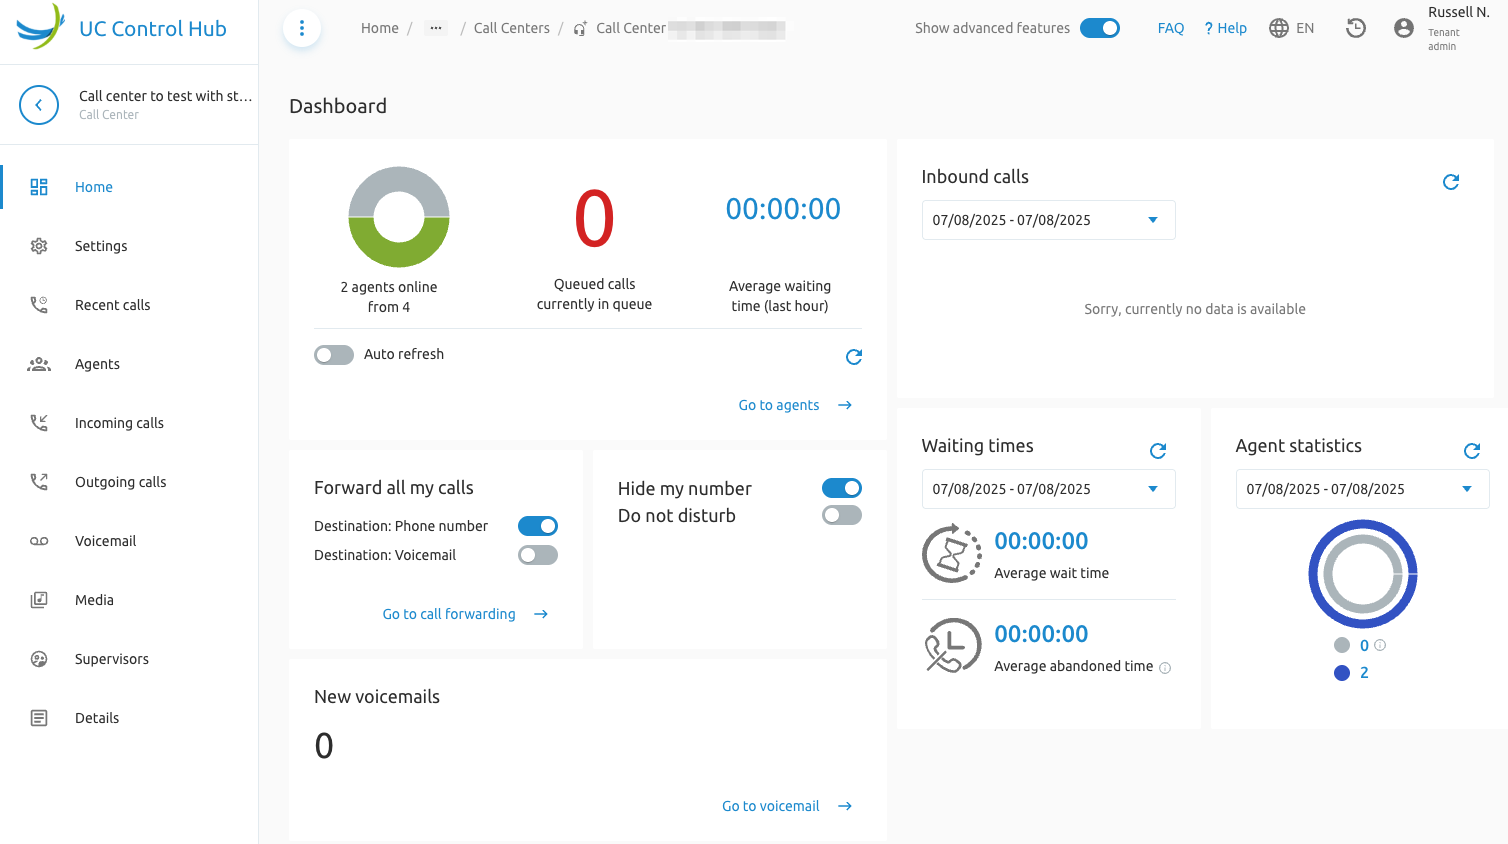
Home service
The Dashboard on the Home service provides a status overview of the contact center. It shows how many agents are available, the number of calls in the queue, and the average waiting time. Other cards on the dashboard show additional information about:
- Inbound calls
- Forwarding calls
- Waiting times
- Agent statistics
- ...
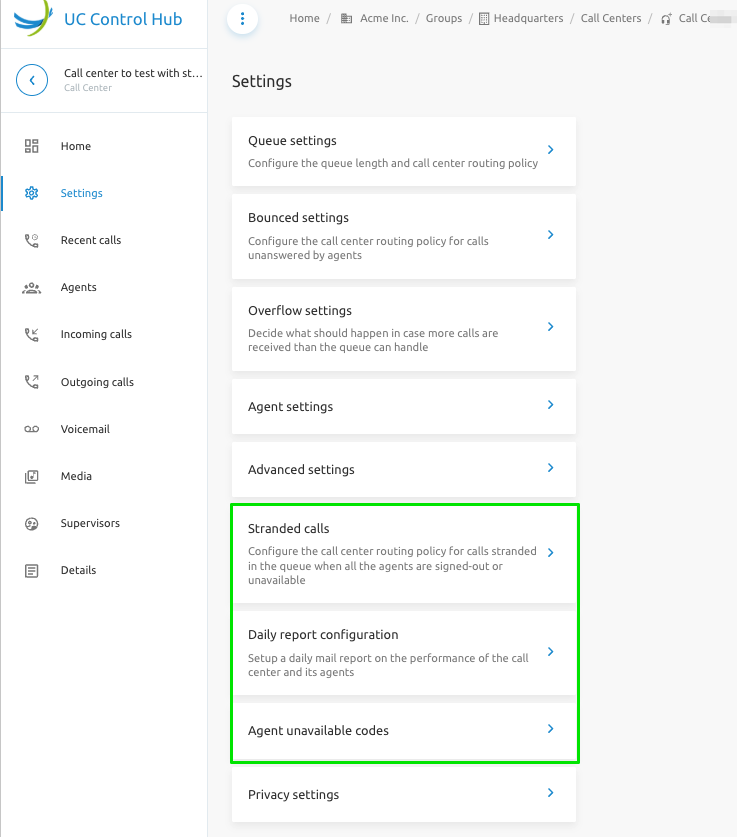
Settings
In the settings page, the administrator can further configure the call center. They can set:
(The settings are self-explanatory)
- Queue settings
- Bounced settings
- Overflow settings
- Agent settings
- Advanced settings The above settings are similar to those of the Call Queue service. The additional settings offered by the Call Center service are:
- Stranded calls
- Daily report configuration (set up a daily email report)
- Agent unavailable codes
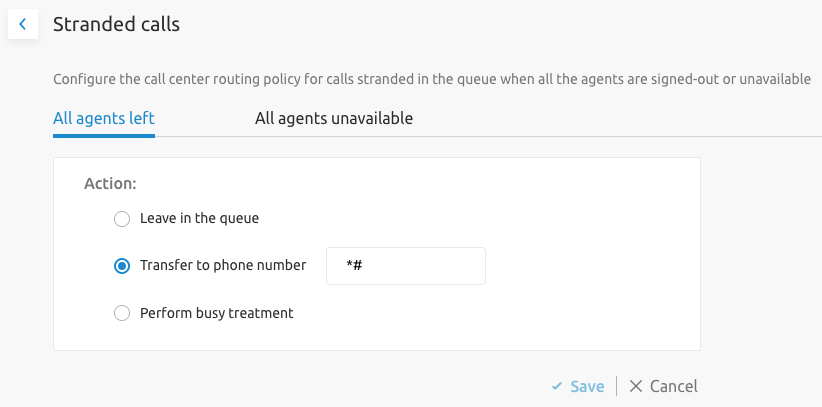
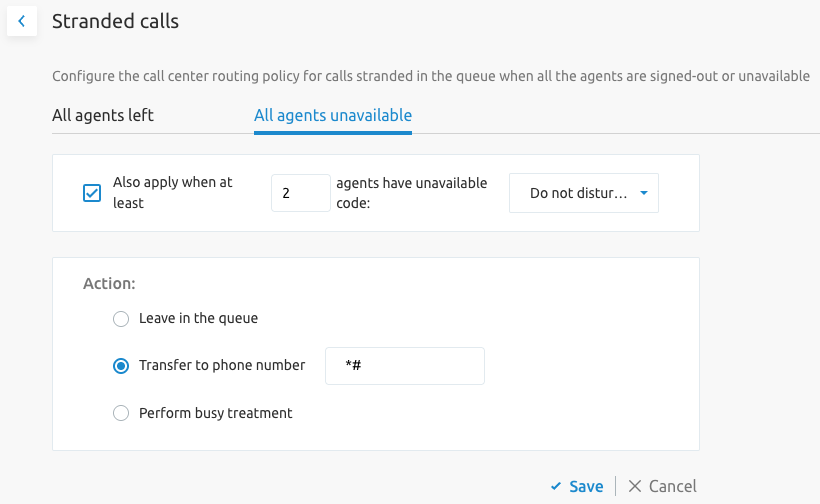
Stranded Calls
This setting configures the call center routing policy for calls stranded in the queue when all agents are signed out or unavailable. There are two tabs to define the routing policies: one for when all agents have left and the other for when agents are unavailable. The screenshots below show these two policies and their configuration options.
Daily Report Configuration
Daily Report Configuration allows to schedule daily basic reports for a call center. These reports include similar statistics as the user interface (UI), such as:
- Dashboard stats like average waiting time.
- Stats per agent (e.g., time online).
You can find the Daily report configuration on the Setting page of the Call Center (Standard and Premium).
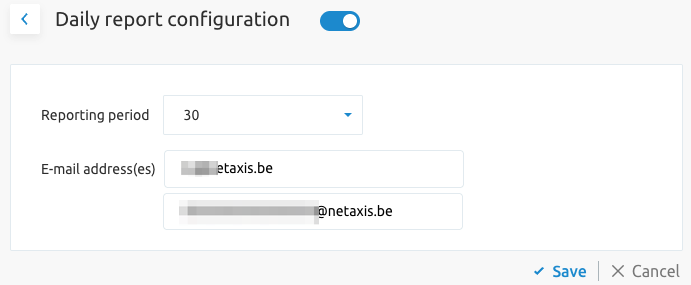
Accessing this feature's configuration pane shows:
- The option to turn the feature on/off.
- The option to choose the report frequency (every 30 or 60 minutes).
- A field to enter the email address to which the reports should be sent.
Recent calls The recent calls show the call logs from the call center.
Agents The agent page provides an overview of the agents assigned to the call center.
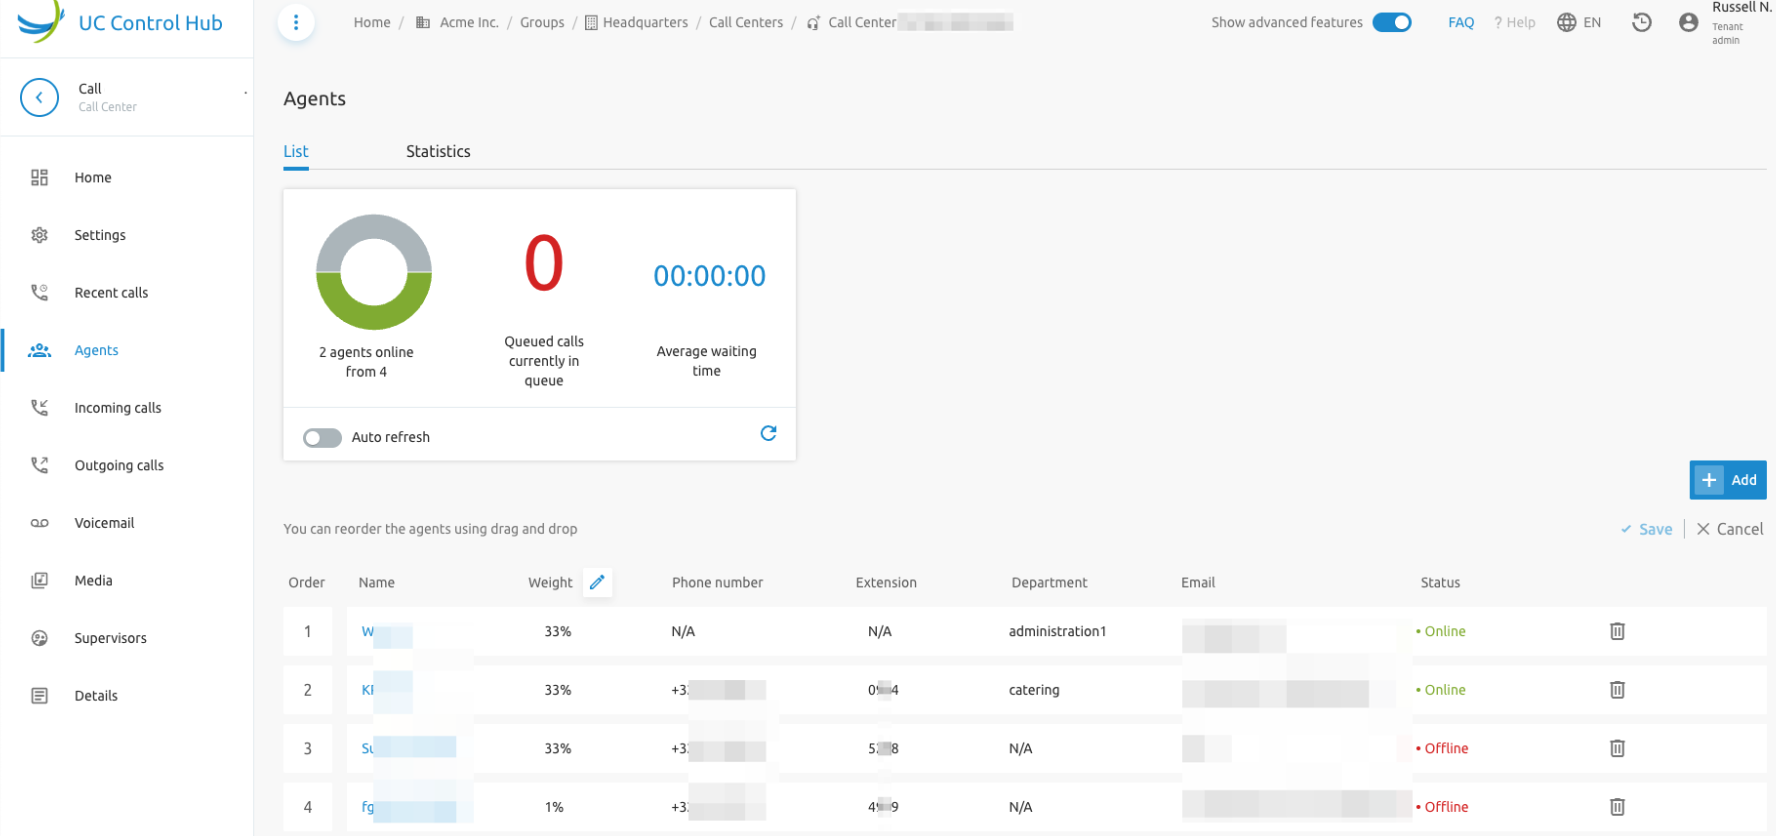
By selecting an agent, the administrator can:
- Change the agent's status.
- View which call queues the agent belongs to.
- Activate/deactivate the agent for that call queue using the on/off switch. As with the Call Queue service, the administrator can add agents to the Call Center. They have the option to choose between agents from this group only or from the entire tenant.
Incoming and Outgoing calls
Similar to the Call Queue service, incoming and outgoing services can be added to the call center calls. The following are examples of services that can be assigned to the Incoming calls:
- Call forwarding services
- Call blocking (create a "Black list" and/or a "White list" of people based on rules to allow or block their calls according to a schedule)
- Call notify (send an email notification when a call comes in)
- Pre-alerting announcement (play an announcement to a caller before the call is connected)
- Selective forwarding (set up call forwarding that is only applied during certain time periods or specific days) For the Outgoing calls, it is also possible to set up calling plan rules for outgoing calls.
Media
The media service is similar to the one on the Call Queue service.
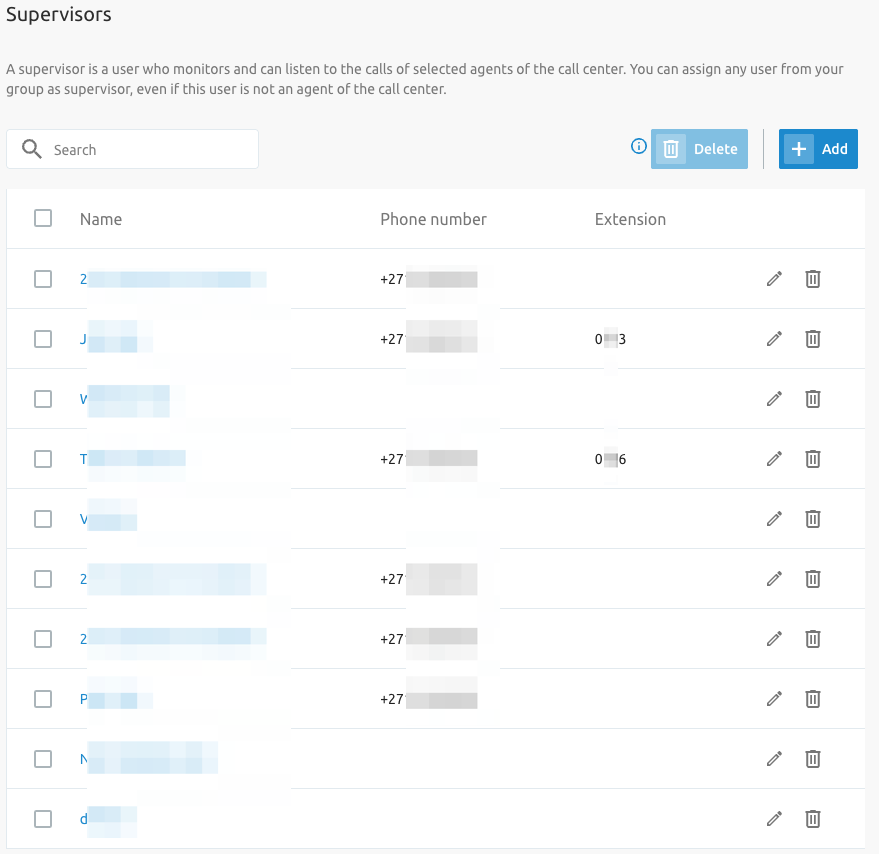
Supervisors
Unlike the Call Queue service, the Call Center service can assign a Supervisor. A supervisor monitors a team of agents. This person can listen to agents' calls for training, follow up on agents, and check reports.
Note that anyone can be a supervisor; you don't need to be an agent. A call center supervisor must be able to specify which agents they are allowed to monitor.
When adding a supervisor, you must follow the wizard in the Supervisors service for Contact Centers and/or Premium Contact Centers. After choosing a supervisor, you can assign agents to them from a list.
Details
The Details service provides more information about the call center (ID, name, CLI name, etc.), the assigned feature options, and the linked phone numbers.
Agent Unavailable Codes
Agent unavailable codes are configurable attributes applied when an agent becomes unavailable. Agents can select a reason for changing their ACD state to "Unavailable" (e.g., lunch, coffee break). Call center managers can use this data to better understand agent performance. Each company can define multiple "Agent Unavailable codes" to track agent performance. These codes are also known as Reason Codes or Walk-away codes.
The unavailable codes are dedicated to the Call Center service and can be used by each call center in the organization. They can be set on a F4B Call Center Call Center - Standard and on a F4B Premium Call Center Call Center - Premium. If the tenant is created as an Enterprise, the Unavailable codes are at the Enterprise level. If the tenant is a Service Provider, the codes are at the Group level.
Enabling the switch next to Enable Unavailable Codes for agents allows the use of default codes with the options shown in the figure below.
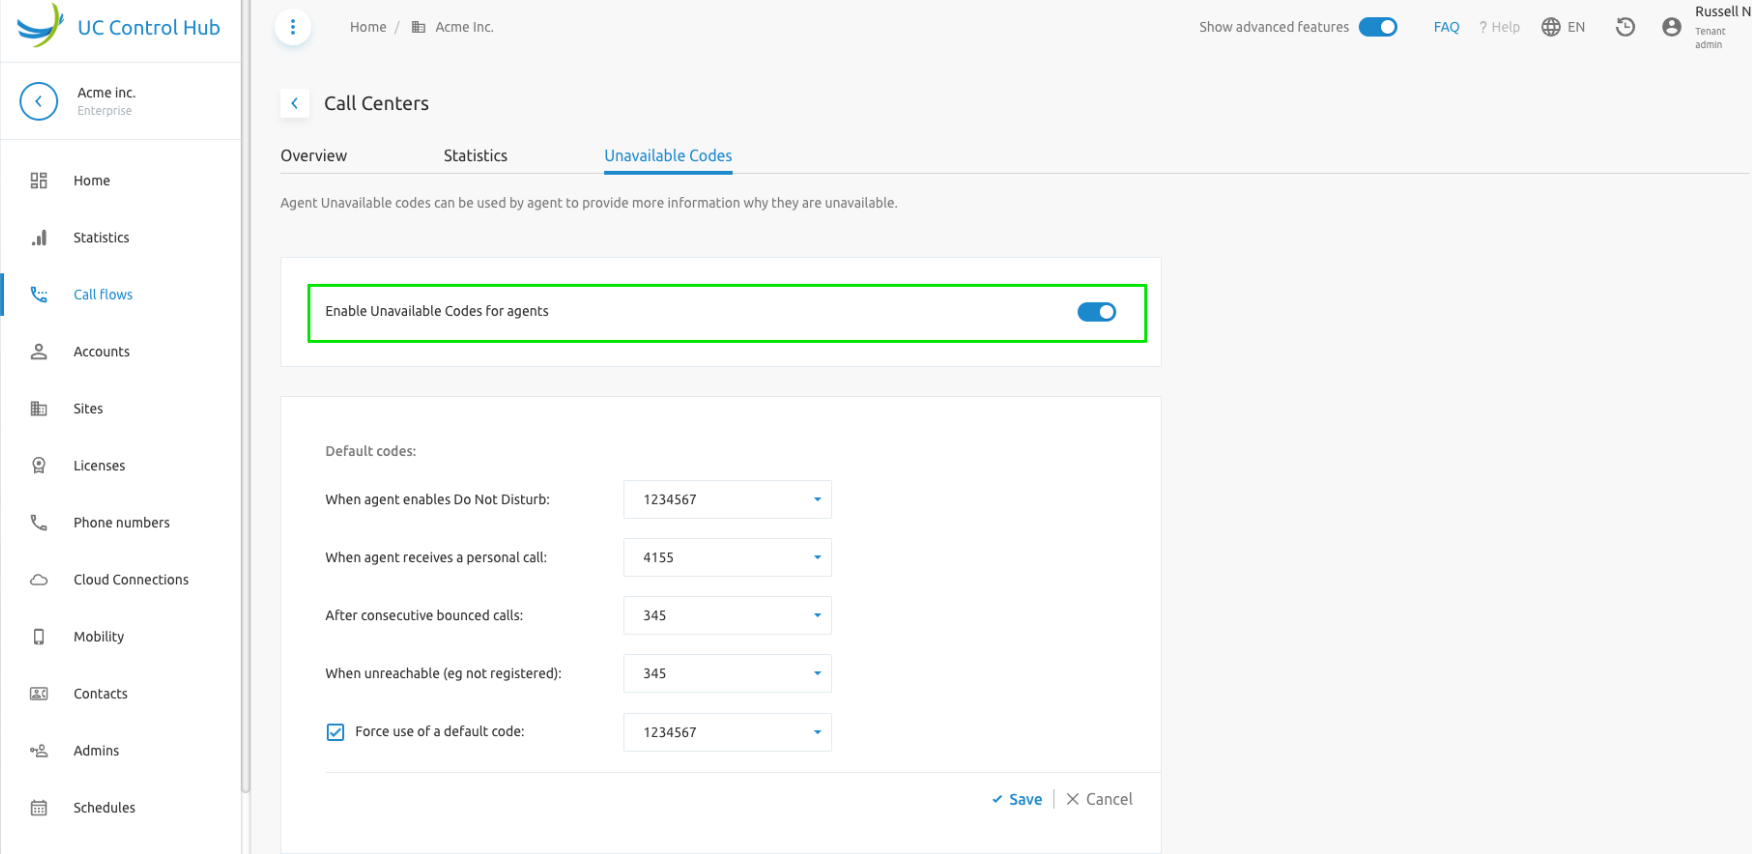
It is also possible to create custom codes, even when using the default ones. Disabling the switch (see the highlighted setting in figure above) prevents you from creating custom codes.
It is not possible to disable the Enable Agent Unavailable Code when there are still agents with contact centers configured in their routing policies (i.e., when they are still part of a call center).
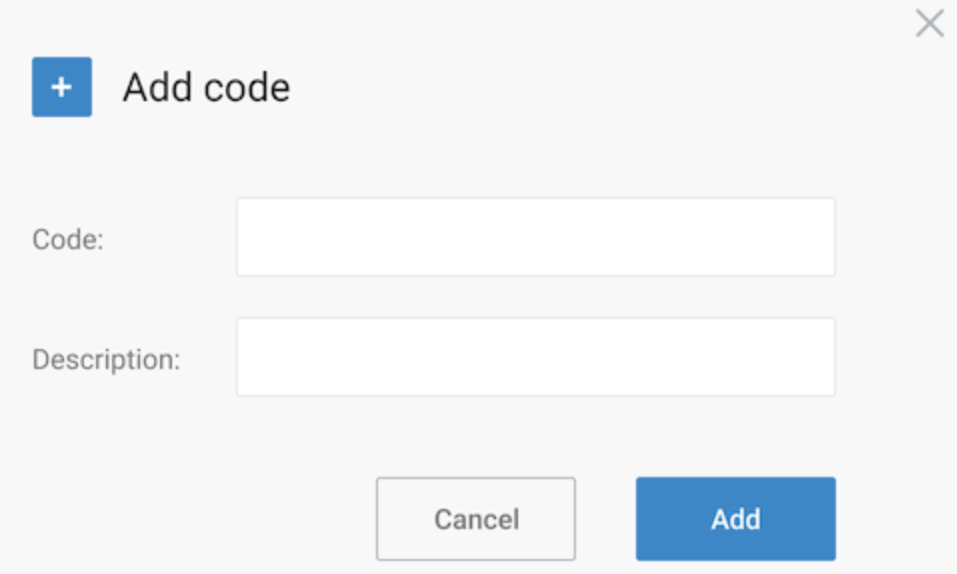
When adding a new code, you only need to enter the new code and give it a description, as shown in the figures below.
Editing a code allows you to change its description.
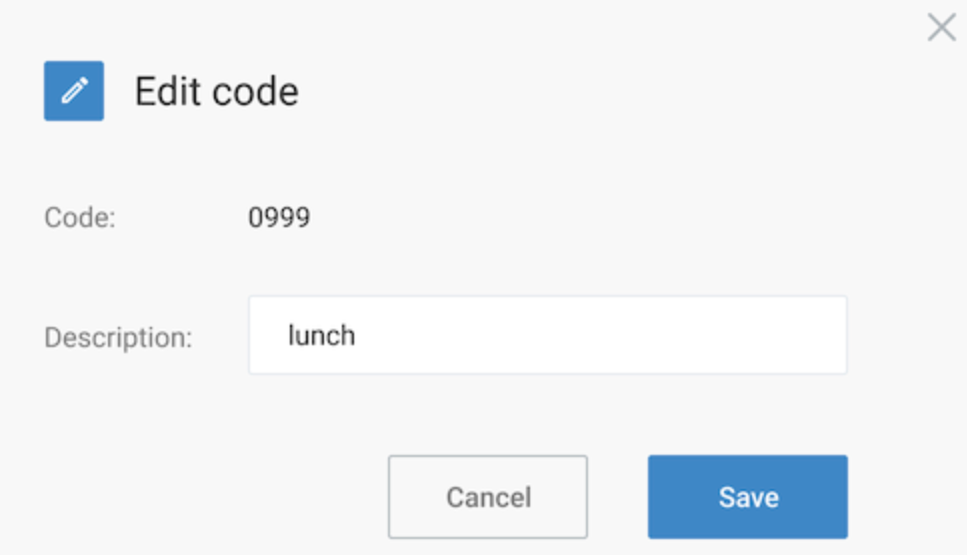
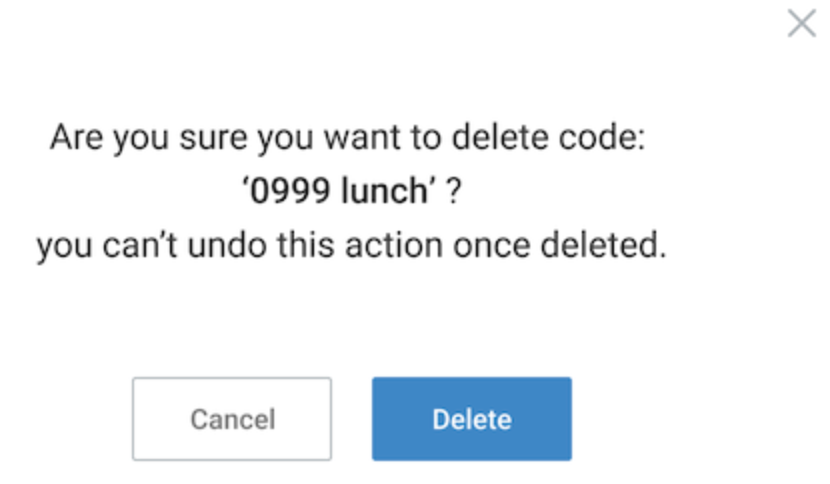
It is not possible to change the code itself while keeping the description. In that case, the code must be removed (deleted) and a new one created.
Premium Call Center
The F4B Premium Call Center (PCC) in the SCP corresponds to the Call Center - Premium service (or service packs) in the Broadworks solution and its corresponding license structure. The configuration of the PCC is similar to the configuration of the Call Center.
Call Center - Premium is designed to provide the most advanced set of routing and call management options to support a formal call center environment. The configuration of the Premium Call Center is similar to the Call Center.
As well, a Statistics tab is available on the PCC call flows if the customer has enabled the Call Statistics service.
The following additional services are applicable to the PCC, and are located as indicated in the figure that follows:
- Disposition code for agents
- DNIS (Dialed Number Identification Service)
- Skill-based Routing
- Night service and holiday mode
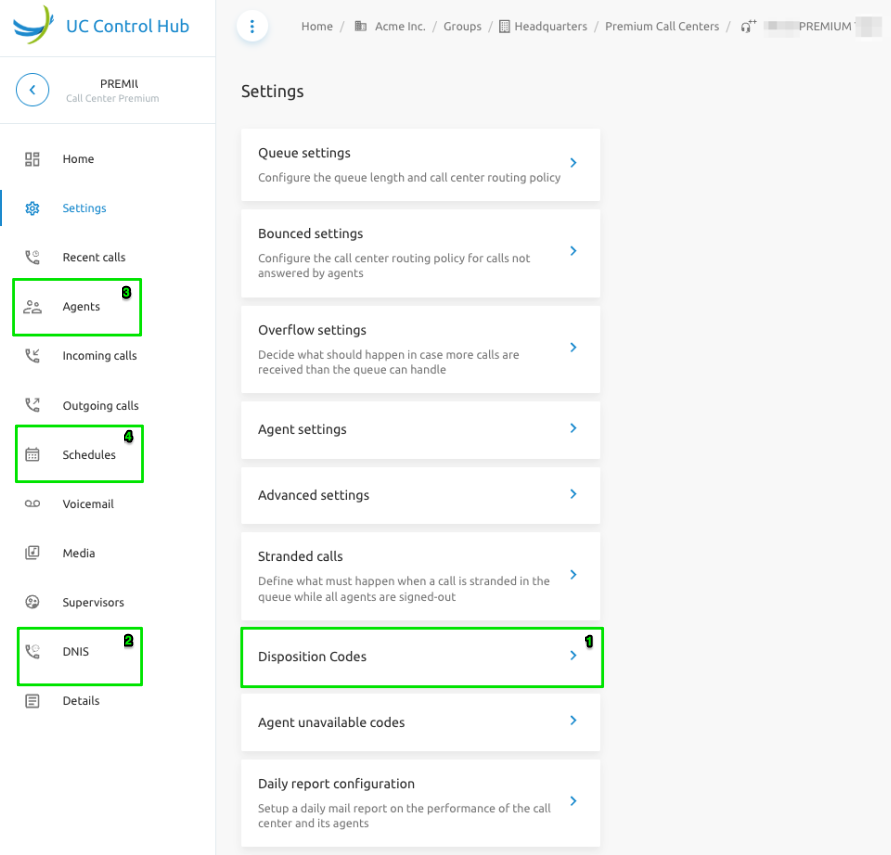
Disposition Code
Disposition codes are an enhancement to the PCC. They allow agents to enter codes for a call to associate it with a marketing promotion or other elements. The codes contain two elements: an identification value and a description.
When the Premium service is authorized for a Call Center, disposition codes can be created at the enterprise (in the enterprise model) or at the group (in the service provider model). The configuration for these codes can be found under the Settings tab in the PCC service.
When to use it?
Disposition codes may be entered by the call center agent while the call is in progress or after the call has finished and the agent is in the Wrap-up state.
If the agent enters the code during the call, they must select the call identification and the disposition code. If the agent is involved in several ongoing calls, the call identification is required to ensure the code is associated with the correct call. If the agent enters a code while in the Wrap-up state, they only provide the disposition code. The remaining information is retrieved from the Broadworks Application Server.
Disposition codes can be used to address multiple scenarios, such as capturing the call result ("Requires Follow-Up," "Issue Resolved"), capturing customer comments ("Angry," "Happy"), or capturing marketing campaign feedback ("Print Advertisement," "Web Site"). Essentially, these are codes that call center agents use to tag a call.
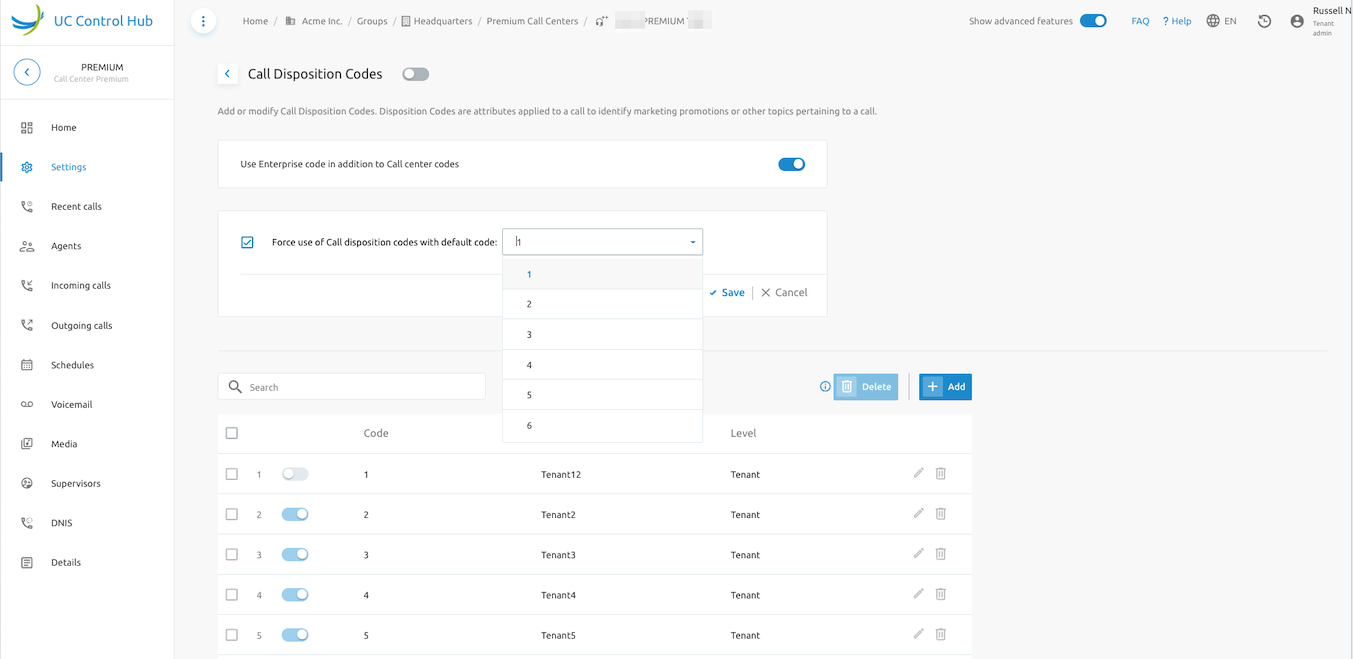
The screenshot below shows more details on configuring these codes:
- You can choose whether to use an Enterprise code in addition to a Disposition code. This is useful if the agent handles calls for multiple enterprises.
- You can force the use of Call Disposition codes with a default value.
- You can create a list of Disposition codes for the agent to choose from. What does a Disposition code look like?
- A code is a digit string of up to 10 digits with a description.
- Each code can be active or inactive.
- Only the description and status can be updated.
DNIS (Dialed Number Identification Service)
A PCC can be assigned up to 63 different Dialed Number Identification Service (DNIS) telephone numbers in addition to the primary call center number. This means you can assign a call center up to 63 different phone numbers on which it can be reached.
With DNIS, the same agents can staff multiple call centers, but to the outside world, they will appear as different call centers (with different numbers and announcements). The primary number is also a DNIS number and is referred to as the primary DNIS.
DNIS numbers can be used to prioritize call center calls so that more important calls are distributed to agents first. To do this, you assign priorities to the different DNIS numbers associated with the call center. When a call comes in on a given DNIS number, it is automatically assigned the priority set for that number. To prevent lower-priority calls from being stranded, you can configure them to receive a higher priority after a certain time in the queue.
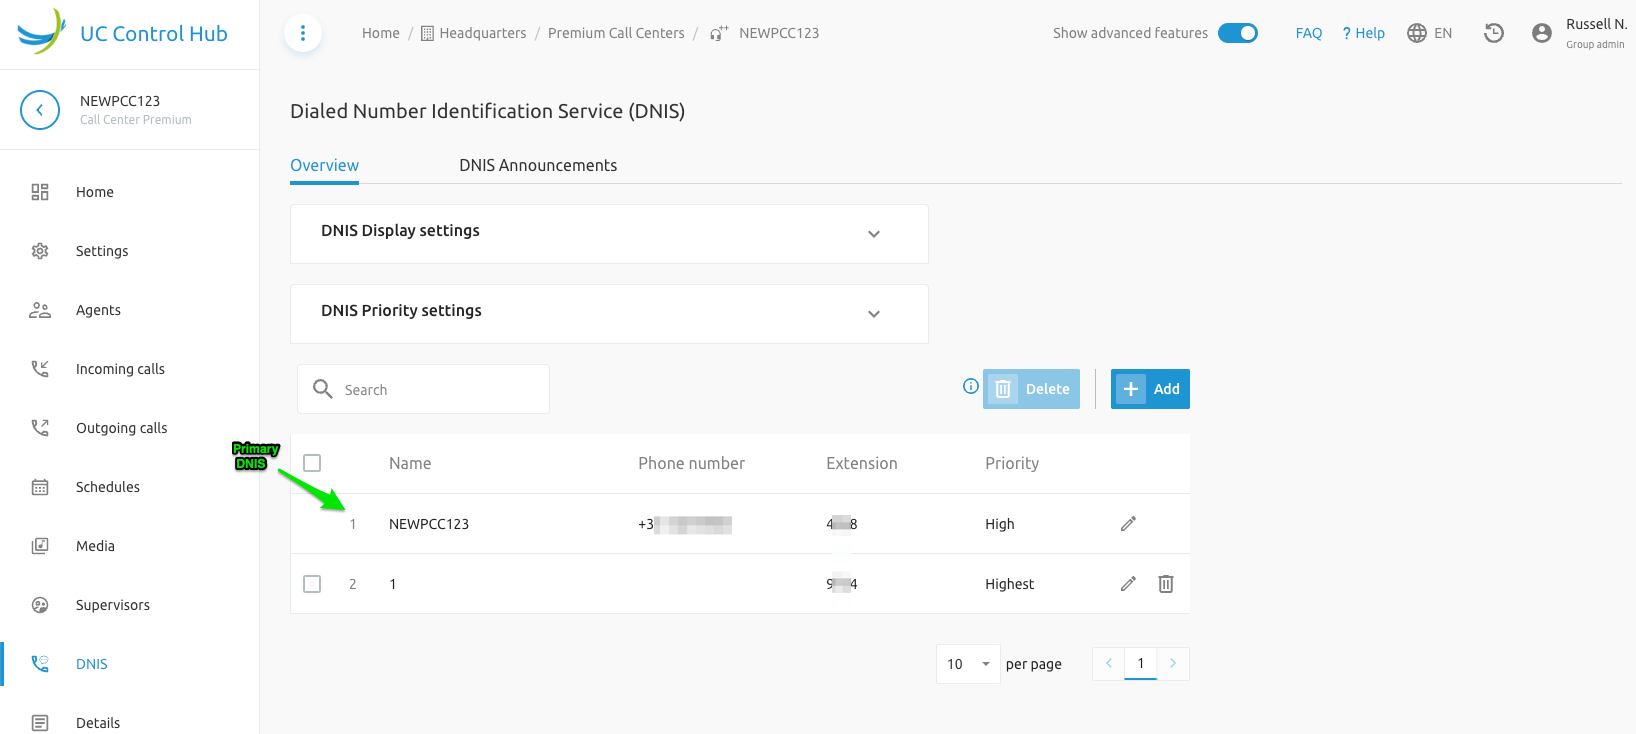
When selecting the DNIS service, you'll see an overview of existing DNIS numbers.
NoteWhile the Primary DNIS settings are editable, its name, extension and phone number cannot be edited.
On this page, the DNIS Display settings and the DNIS Priority settings can be adjusted.
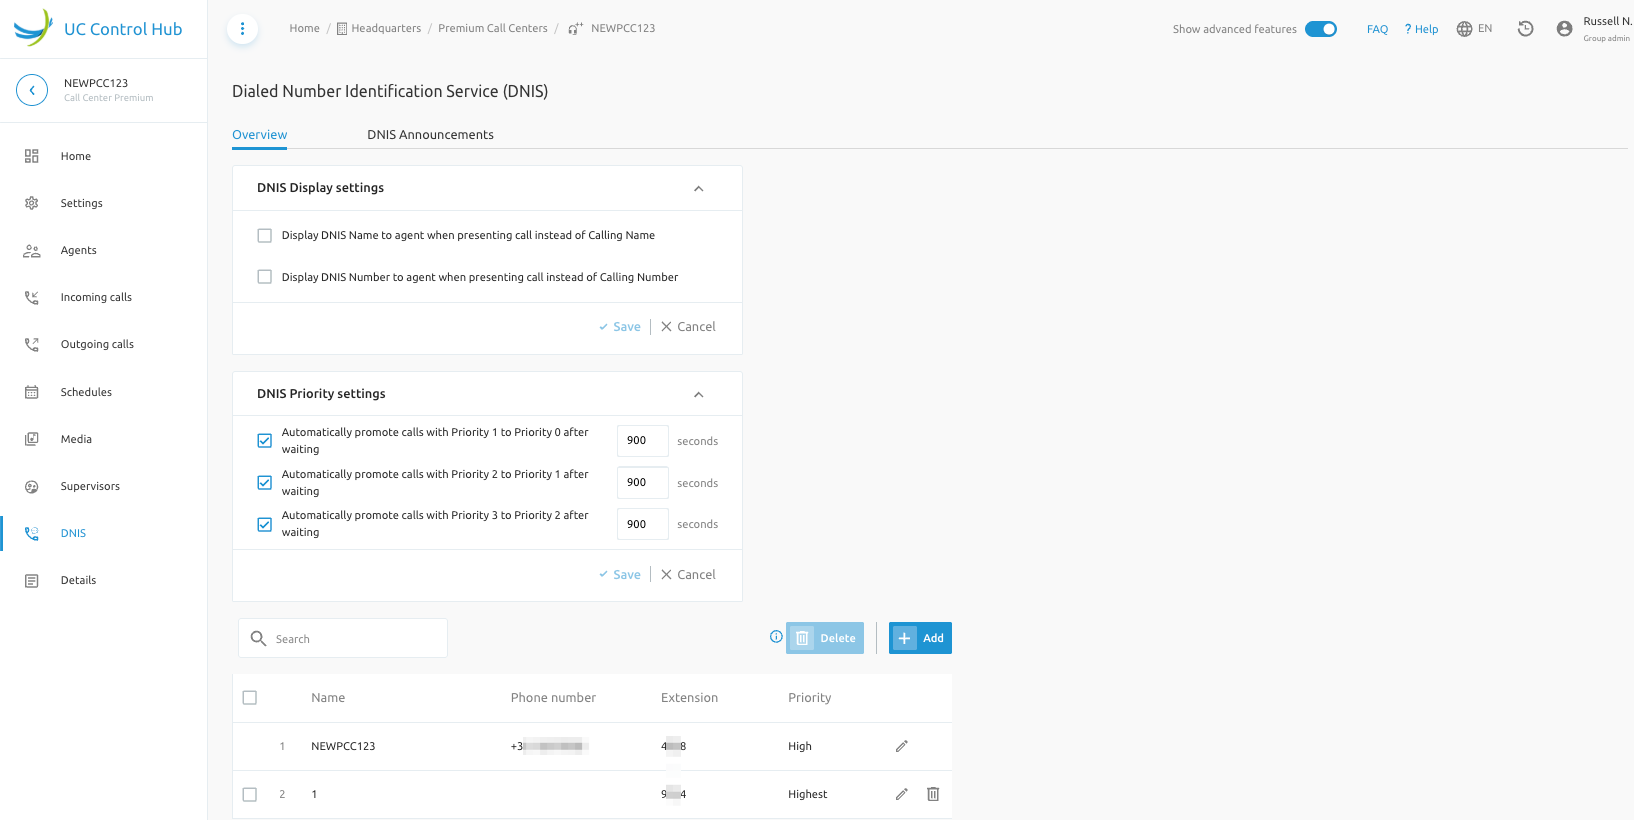
When adding a new DNIS number, the following information is requested:

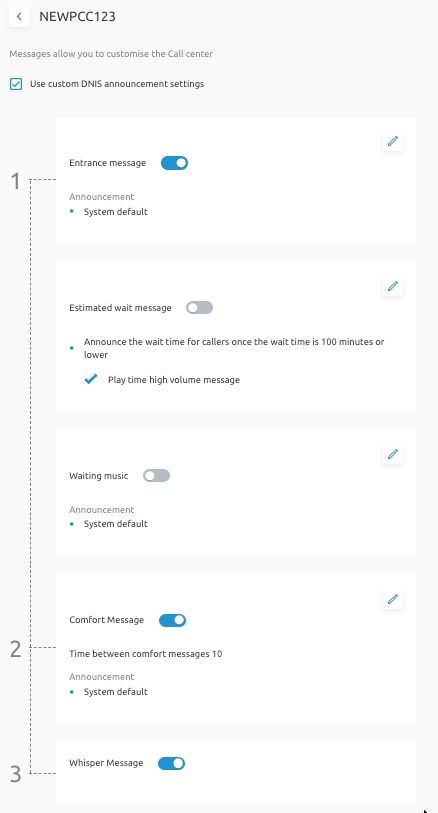
The DNIS Announcement tab allows you to further customize the call center. You can customize settings like:
- Playing an entrance message.
- Giving an estimated waiting message, waiting music, and a periodic comfort message to the caller in the queue. (Use the "pencil" icon to configure or adapt each setting.)
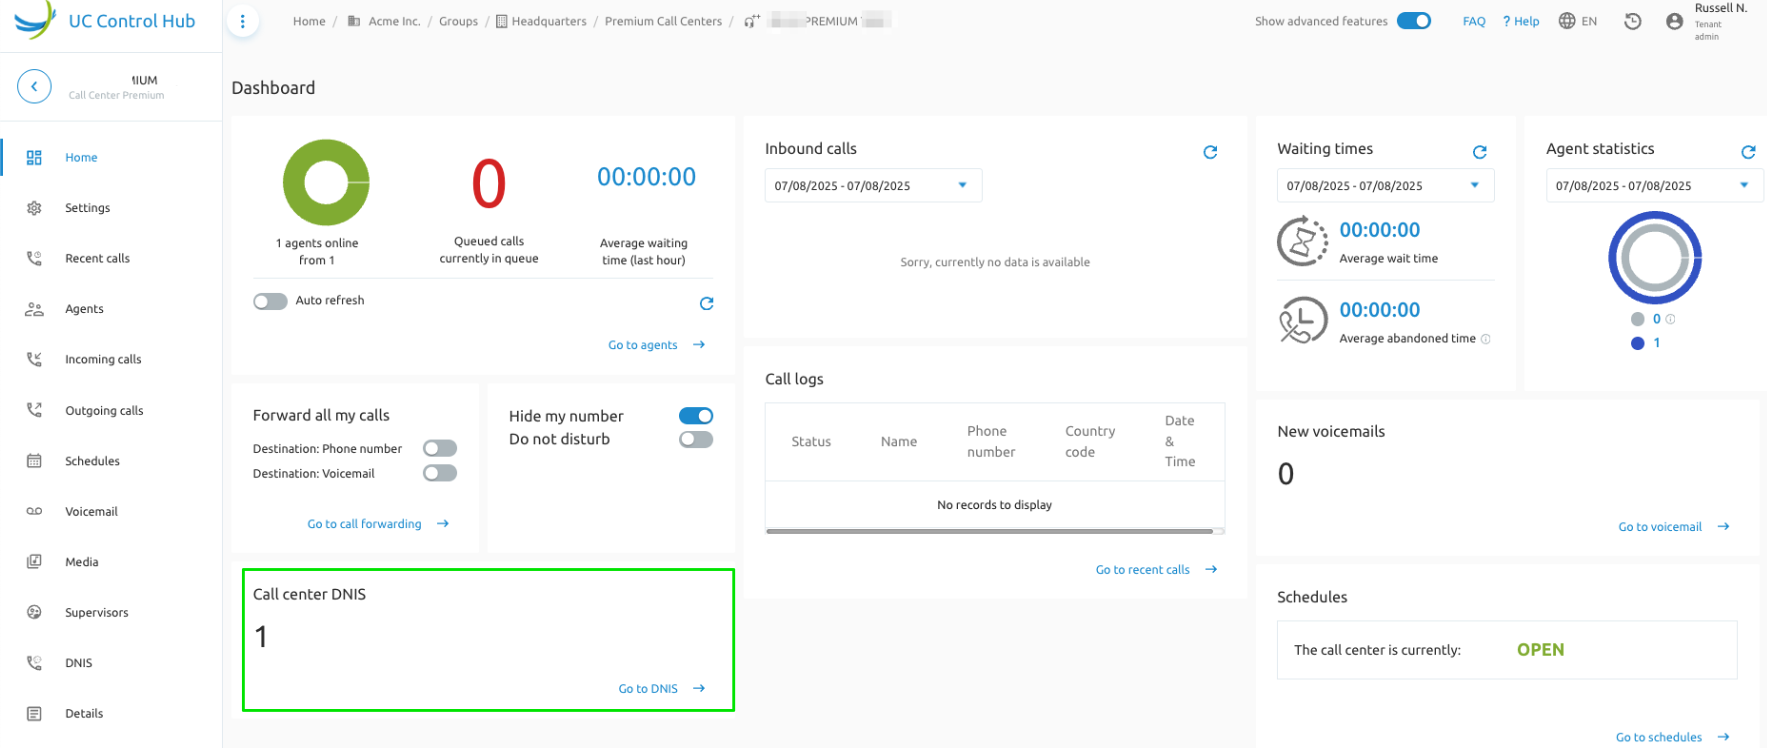
On the PCC dashboard, a widget shows the number of DNIS numbers configured for this call center with a direct link to the configuration page.
Skill-based Routing
Skill-based routing is a feature for PCCs that assigns a "skill" to every agent. When a call arrives, the system connects the caller to an available agent with the highest possible skill. If that agent is unavailable, it searches for the agent with the next highest skill, and so on.
A skill is a number between 1 and 20, where a lower number indicates a higher skill.
Example:
- Agent A is in the support queue with skill 10 and in the sales queue with skill 1 (because they are very good at sales).
- Agent B is in the support queue with skill 1 and in the sales queue with skill 10.
When a call comes into the support queue, Agent B will always get the call if available. Agent A can receive the call if Agent B is not available. When a call comes into the sales queue, Agent A will receive it first if available.
The screenshot below shows an example of a PCC with skill-based routing. All agents have a skill of 1, so they will all likely receive the most calls on this subject.

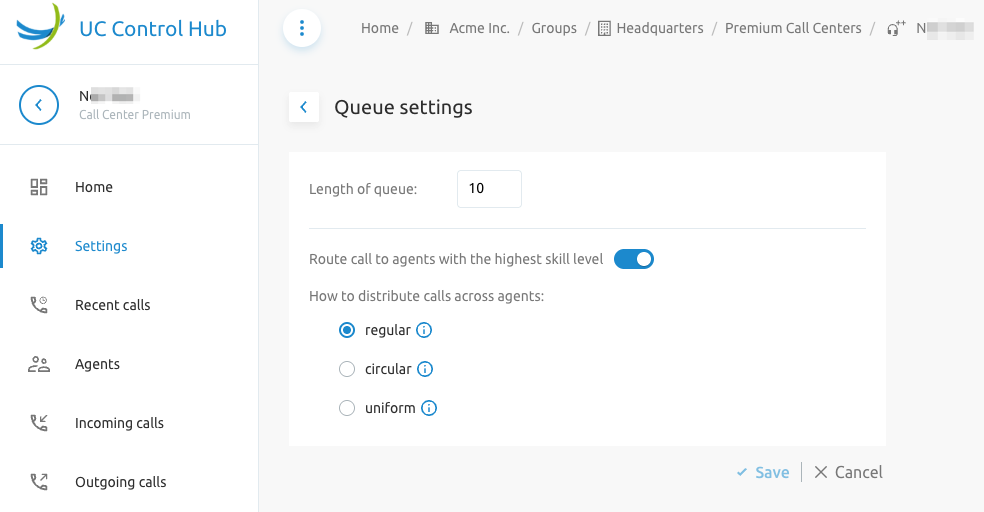
Defining a PCC queue as a "Skill-based routing queue" is done via the Queue settings tab on the Settings service.
The screenshot below shows an example of the configuration screen for skill-based routing (Settings > Queue Settings). You can activate it by turning on the switch. Note that when the switch is turned off, the agents will lose their skill for this queue.
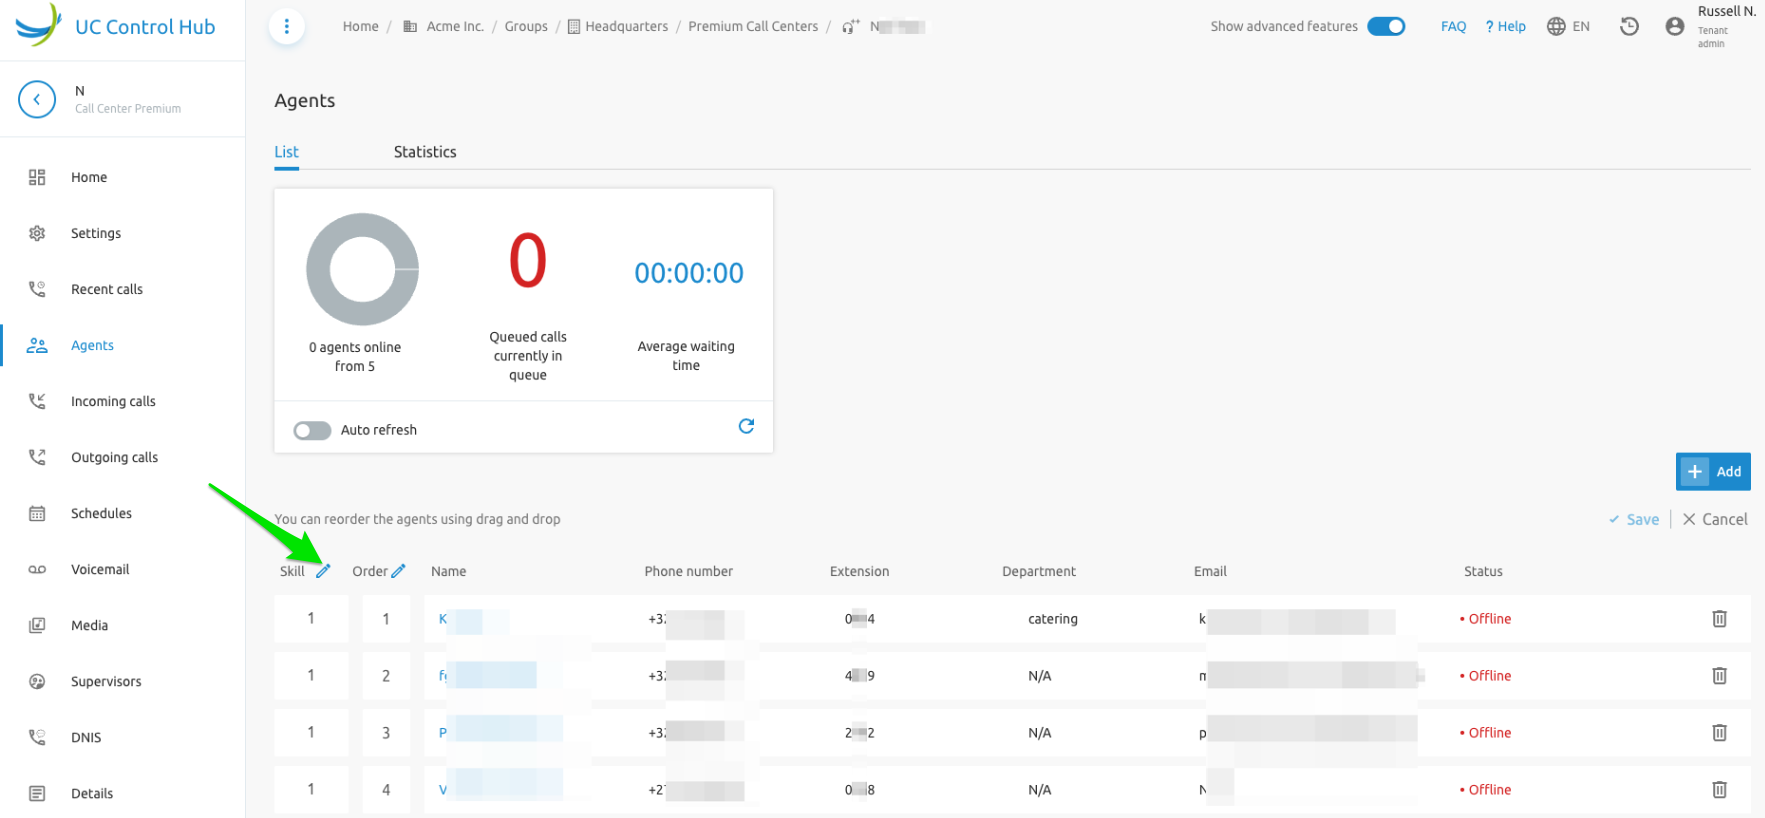
On the Agent service of the premium contact center, you can add a skill to an agent by clicking on the "pencil" next to Skill. This allows you to increase or decrease the skill value. Changing the order of the agents will not change their skill.
Support for Night Service and Holiday Mode
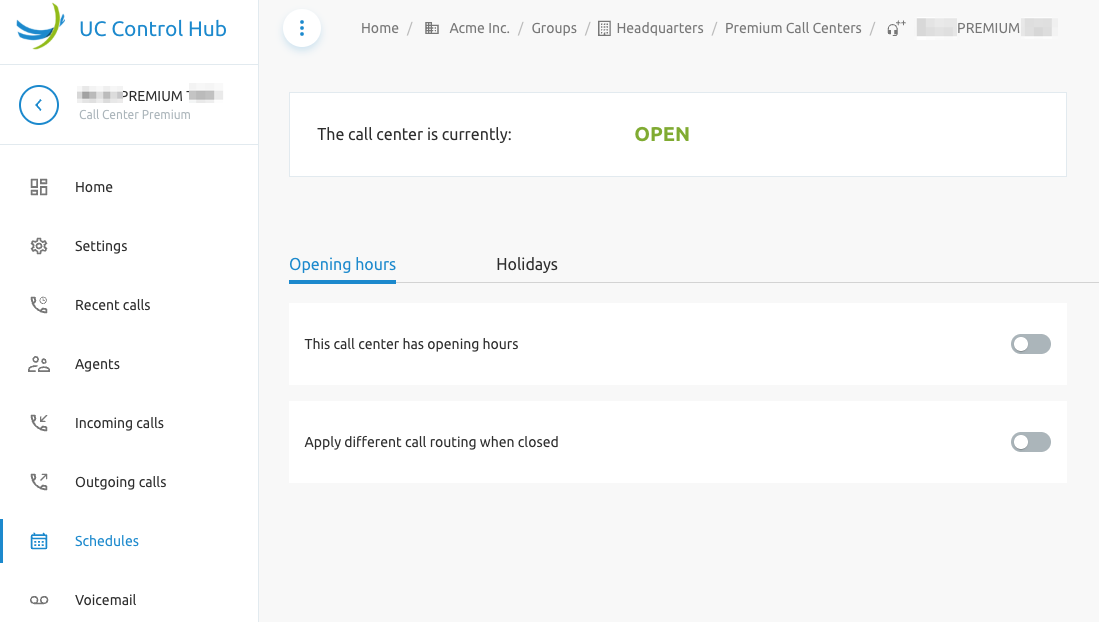
PCCs can be set up with an opening hour schedule and a holiday schedule.
Opening Hours Schedule
First, you need to select if you will use/define opening hours for this PCC. If not, the call center will always be in the "Open" state and can only be closed via the Forced Close button. The screenshot below shows the schedule options for a PCC.
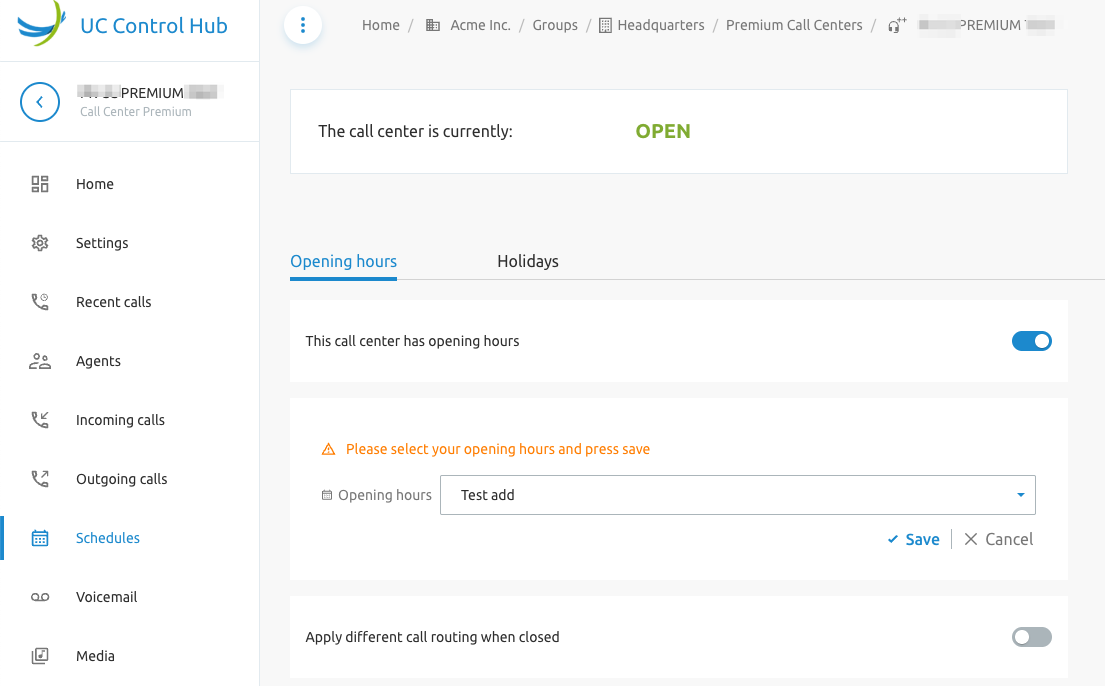
When defining that this call center has opening hours, you can make further configurations. The opening hours can be selected from a list of schedules via the drop-down box.
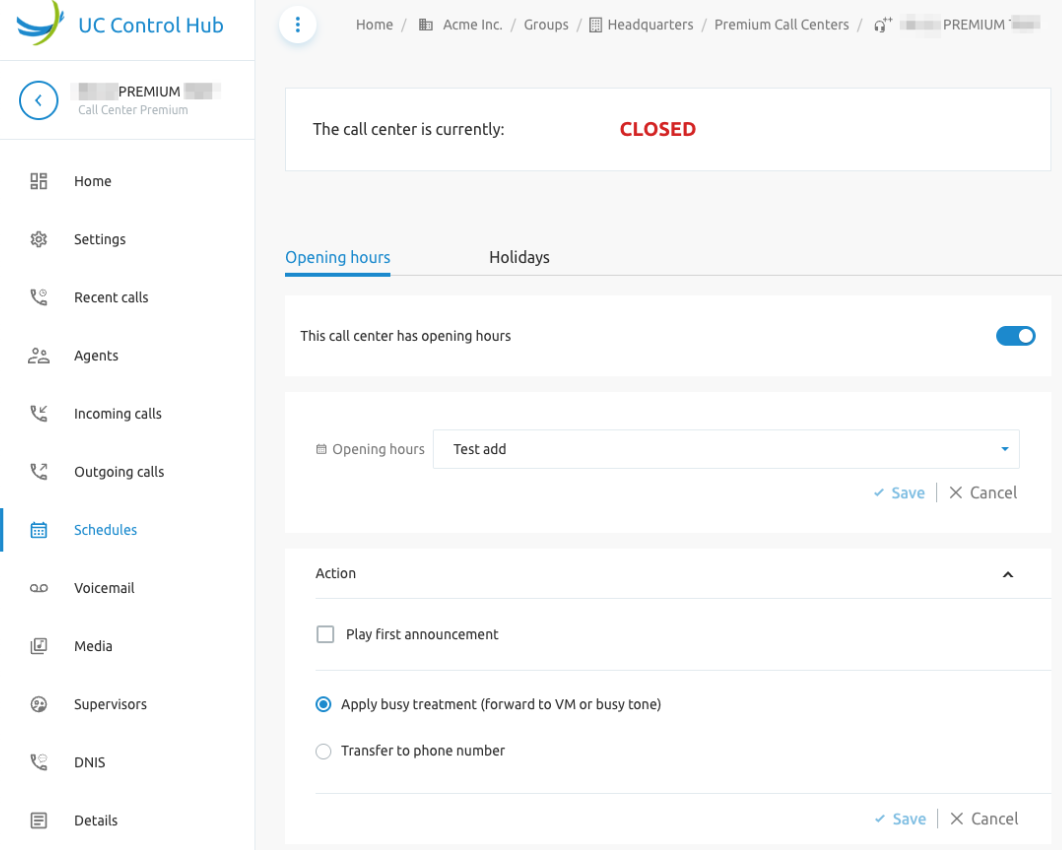
You can define the busy treatment during opening hours in the Action section and define the After-business hours announcement.
You can play a different message if the call center was closed due to a Forced Close action, and you can indicate whether to use Feature Access Codes to manually override the night service.
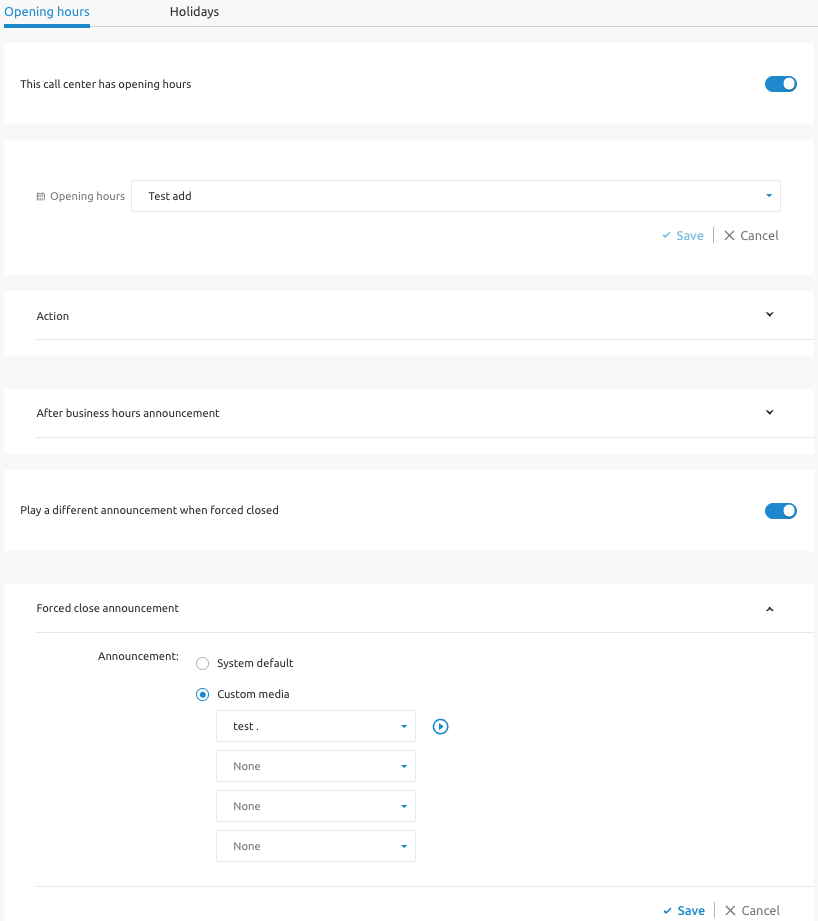
When the call center is closed, it will typically not accept calls but will play a message and then end the call. The call center can be in one of four states:
- Closed due to holiday: If a holiday is active, this mode always takes precedence.
- Closed: If no holiday is active but it is outside of business hours, the call center will be closed.
- Force closed: During normal opening hours, it is possible to manually force the call center to close. A dedicated announcement can be set for this state.
- Open: All other cases.
Hunt Groups
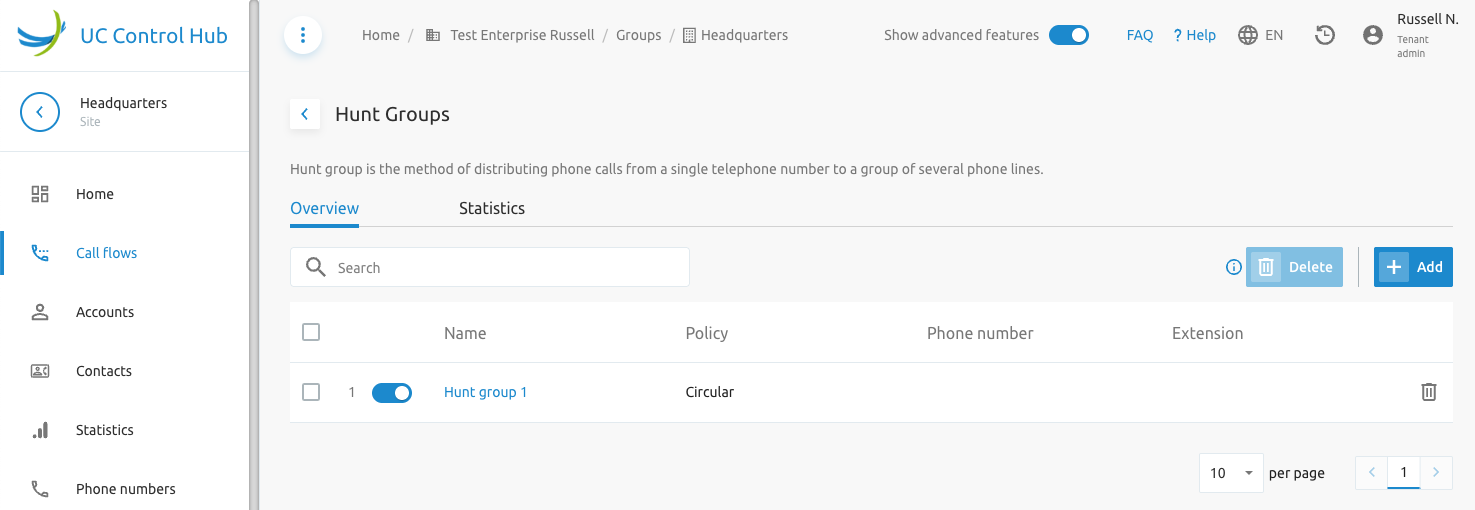
Hunt Groups link a phone number or extension to a group of users. Incoming calls to the Hunt Group's number are distributed among the members based on a configurable algorithm. To set up a Hunt Group:
- Go into the group of choice.
- Go to the Call flows page.
- Select Hunt Groups.
You will now see a list of Hunt Groups. Hunt Groups may require licensing. If you are allowed to create additional Hunt Groups, the Add button will be enabled. The screenshot below gives an example of the Hunt Group list page.
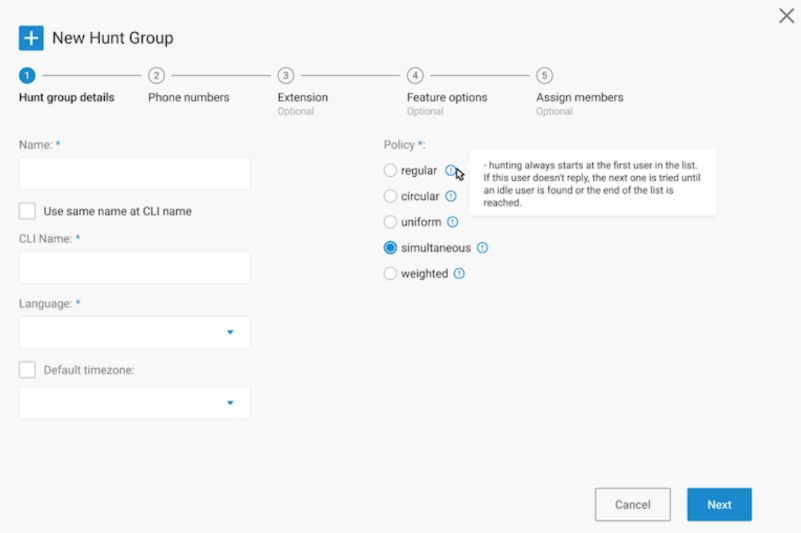
When you click the Add button, a wizard will appear, similar to the New IVR wizard. You will be required to select the Hunt Group call distribution policy. Hover over each policy to see a description.
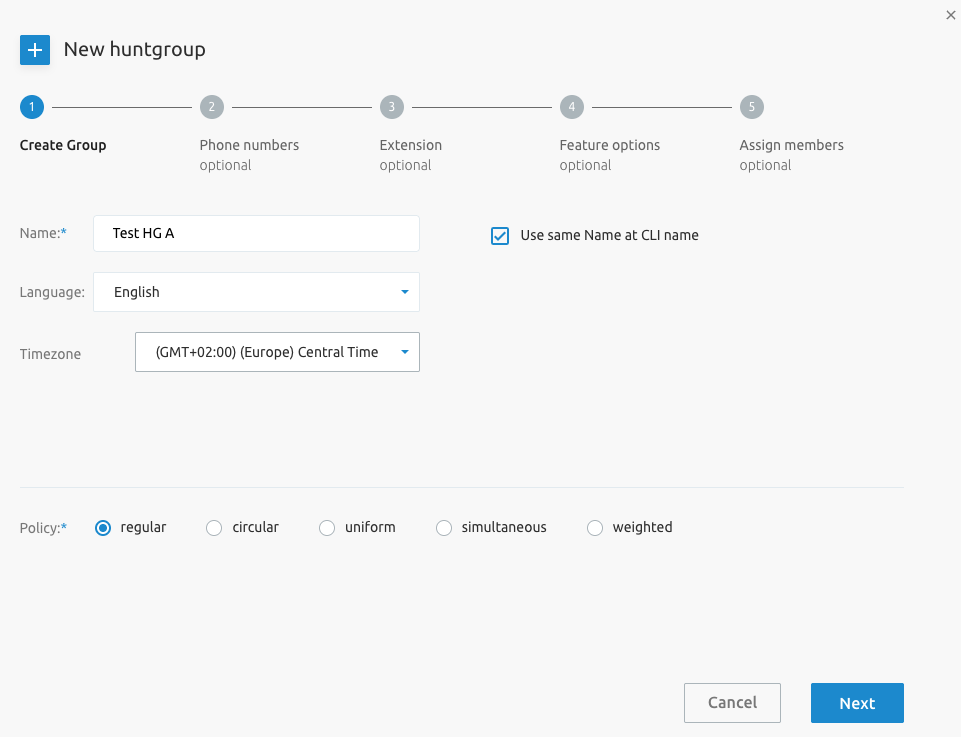
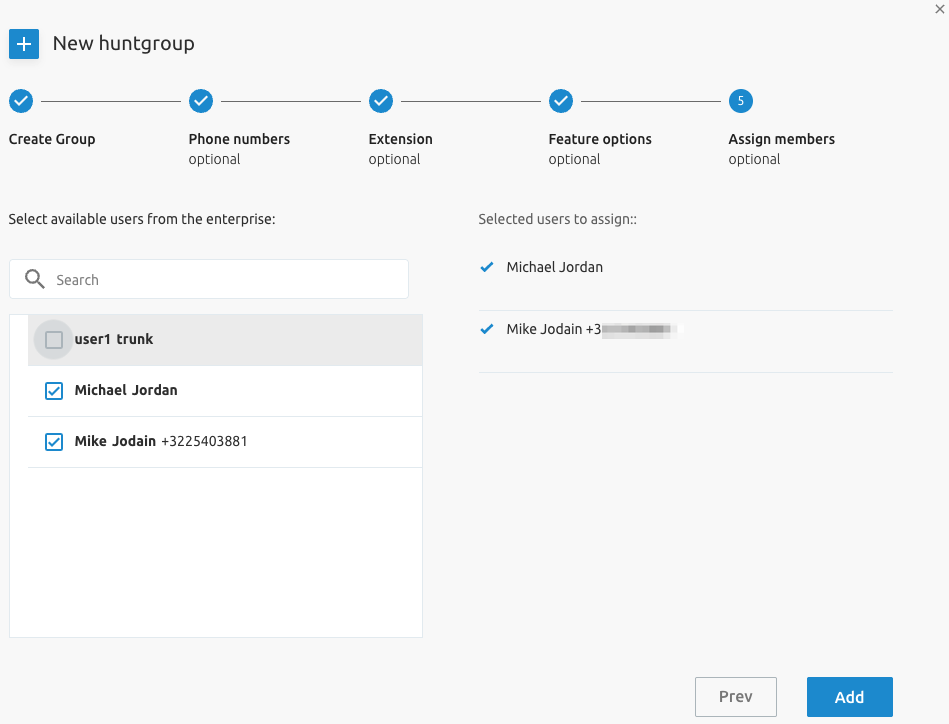
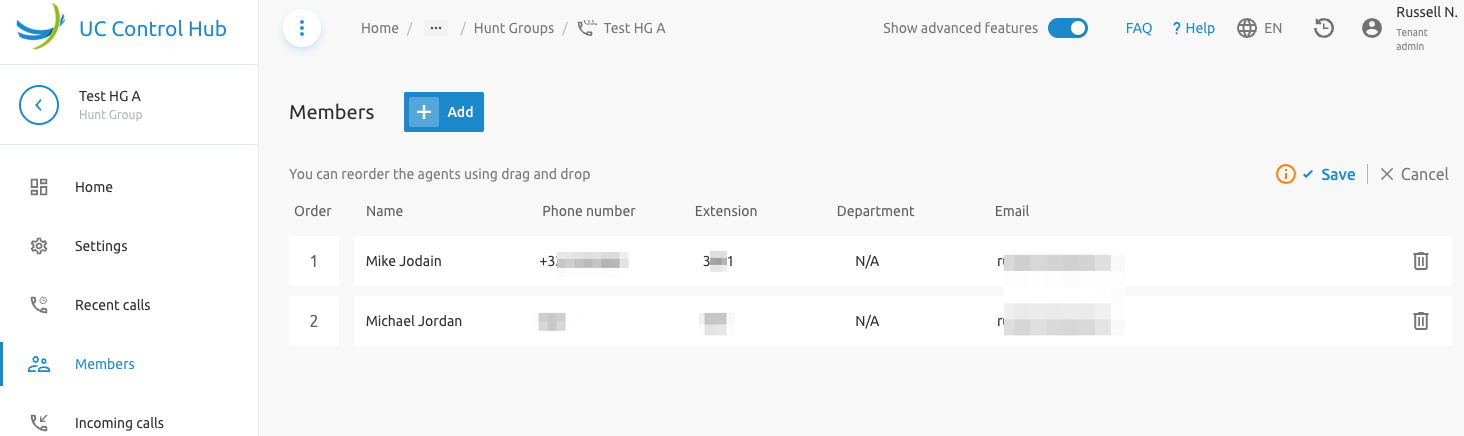
At the end of the wizard, you can select users from the group/tenant to assign as members.
Once the Hunt Group is created, you can drill down to manage its configuration.
To update the Hunt Group's distribution policy:
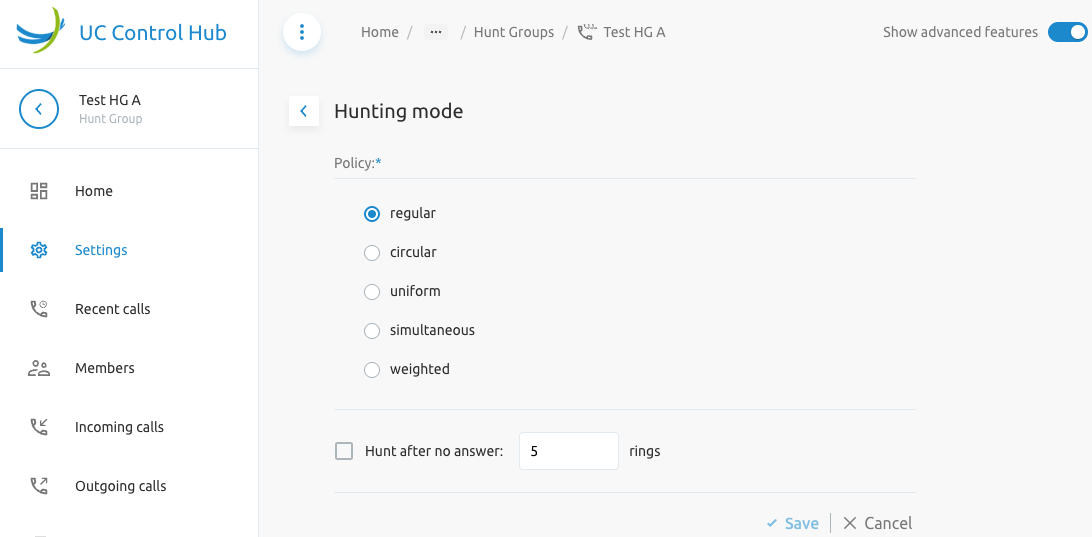
To update the Hunt Group's hunting policy to define members and their order:
F4B Exclusive Hunt Groups (EHG)
F4B Exclusive Hunt Groups (EHG) are a special version of BroadWorks Hunt Groups (HG). EHGs differ from HGs in the following ways:
- End Users can only be part of one EHG.
- The phone number is always mandatory.
- The Outgoing CLI of the end users in an EHG is forced to be the number of the EHG.
- The pages in the SCP for EHGs have the same look and feel as for normal HGs.
- For analytics-related features, EHGs are considered normal HGs.
The EHG feature is project-specific. It is disabled by default and must be enabled if the Service Provider wants to use it during the project implementation. The feature relies on project-specific workflows that implement the API endpoints it uses.
When the feature is enabled, it is shown in the list of Call Flows at the Tenant and Group levels. The figure below shows the list of Call Flows at the Tenant level.
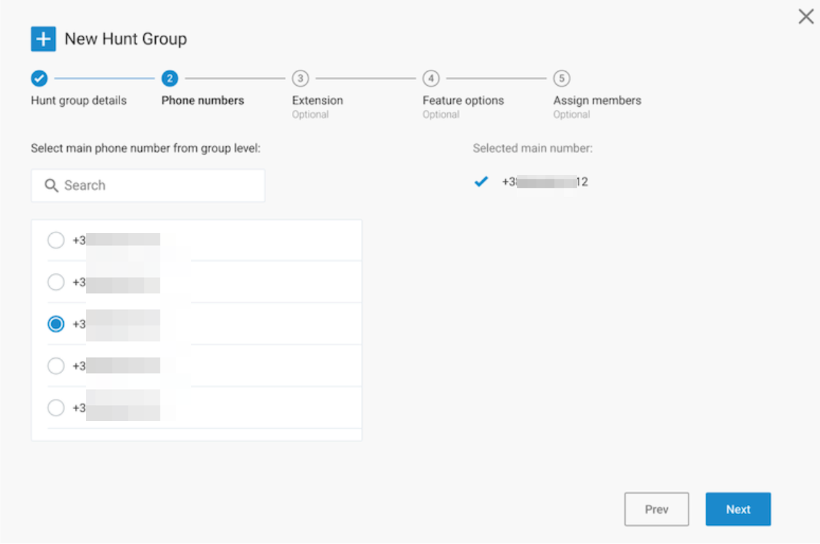
Adding a new EHG is done by following a wizard. Unlike the normal Hunt Group wizard, the phone number is not an optional parameter for the EHG. The figure below shows the full EHG wizard where the phone number is not optional.
The figure below shows the phone number step of the wizard.
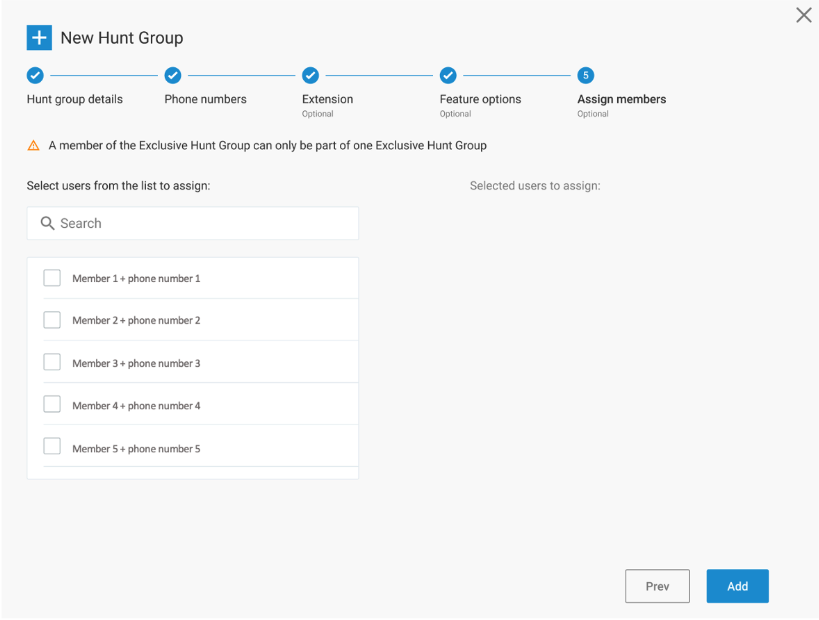
In the last step, assigning members to the EHG, it is clearly mentioned that a member of an EHG can only be part of one EHG.
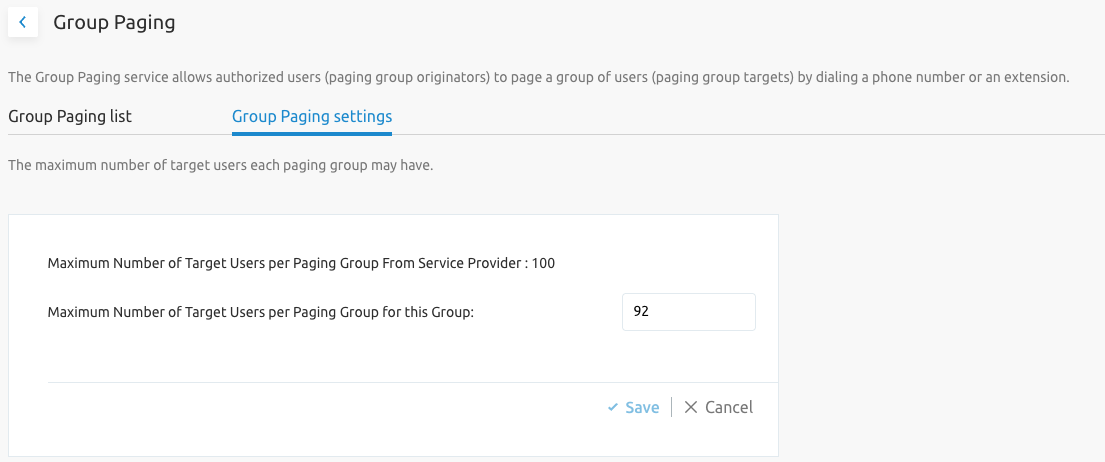
Group Paging
The Group Paging service allows authorized users (paging group originators) to page a group of users (paging group targets) by dialing a phone number or an extension. It is configurable by System, Tenant and Group Admins. The configuration pages are shown if the service "Group Paging" or a service pack with this service is assigned to the group
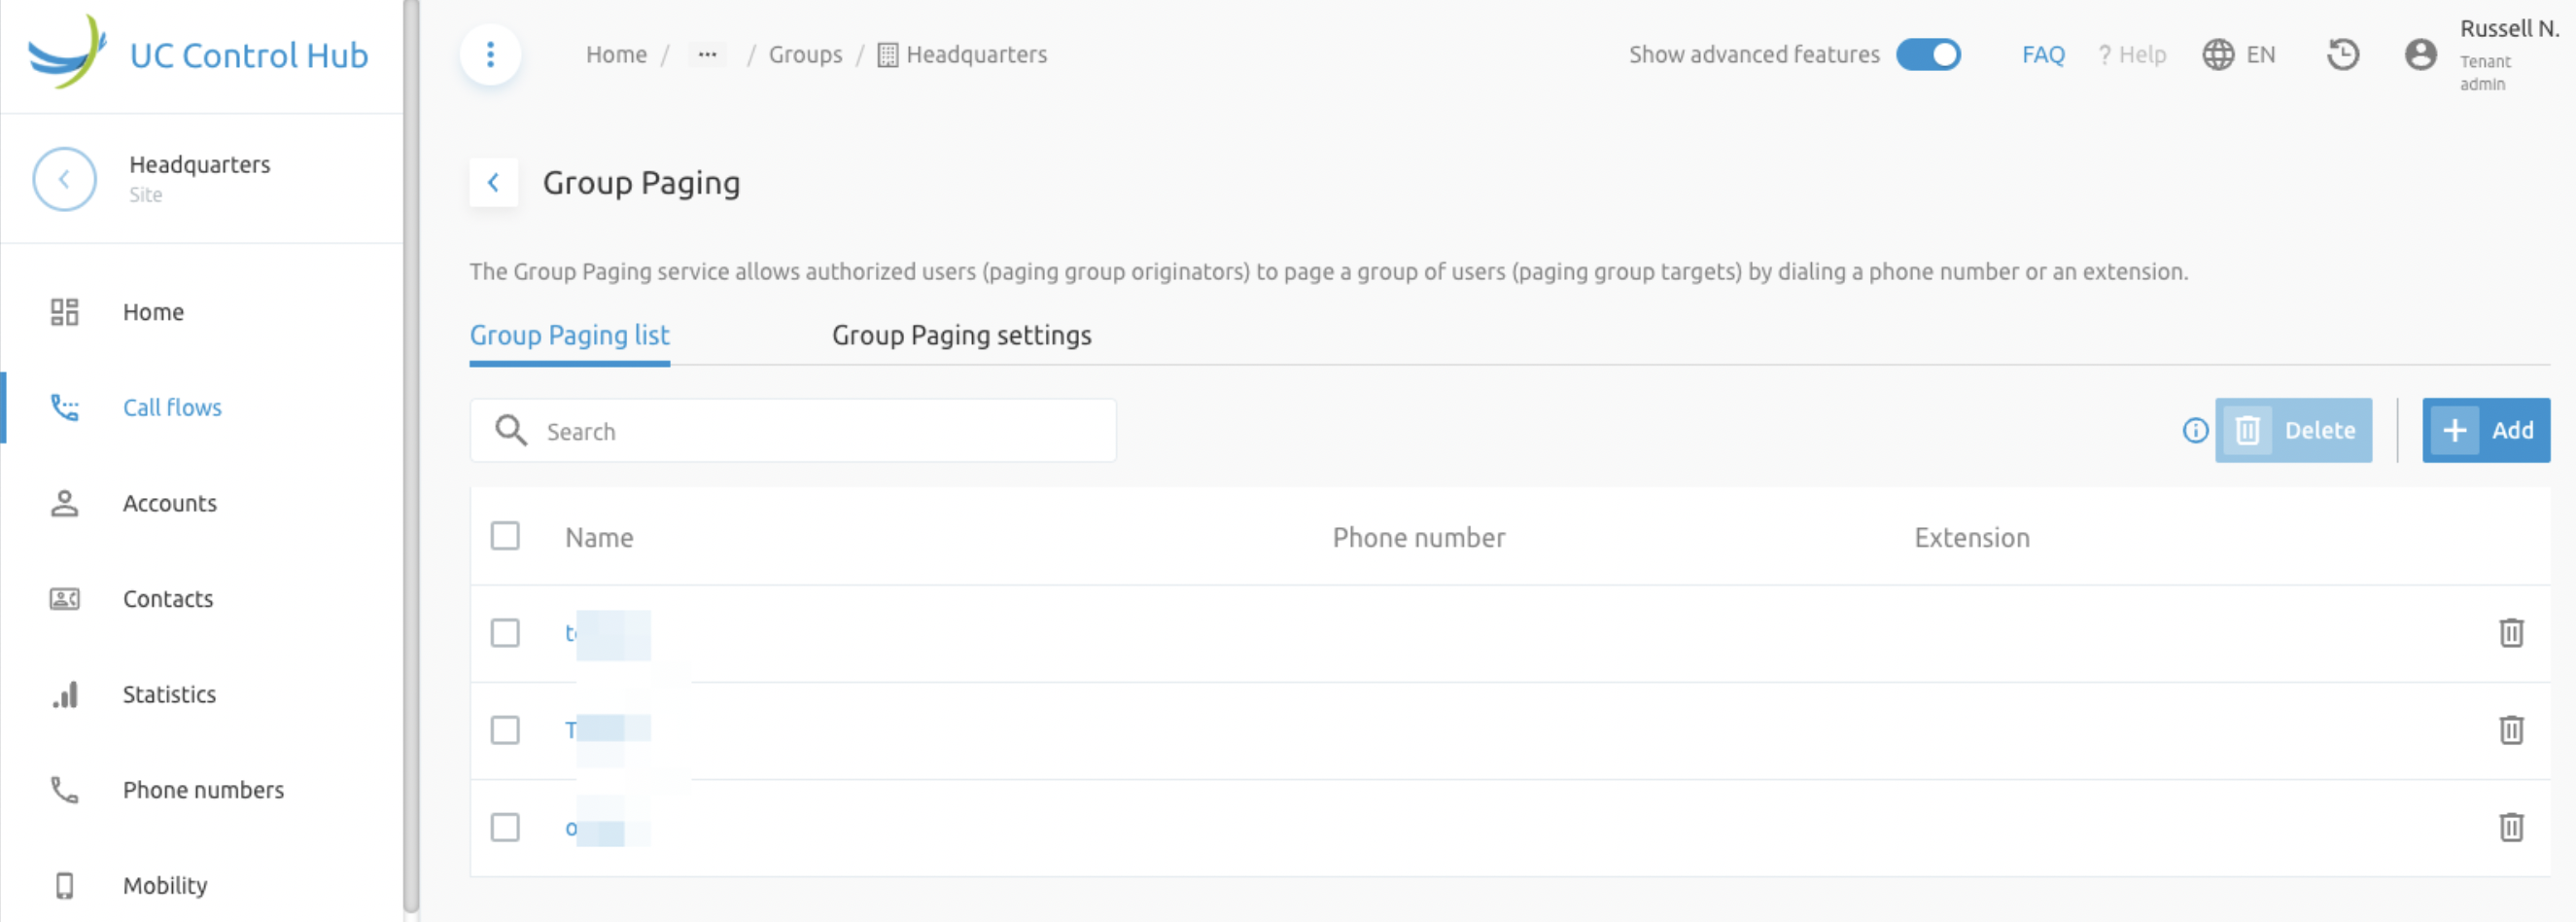
Group paging settings are also configurable for the site/group:
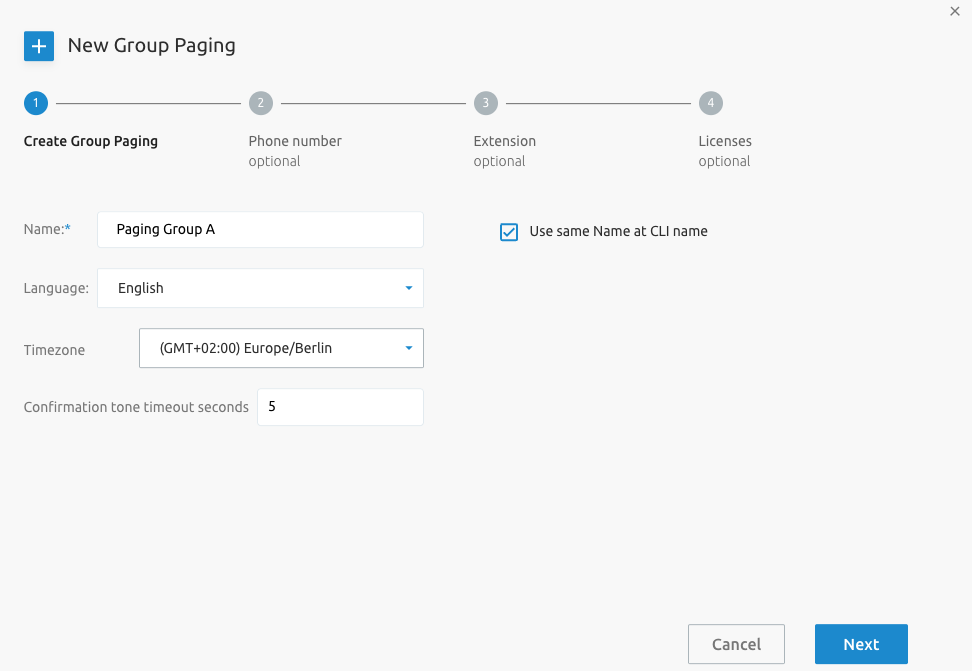
Add New Group Paging
F4B provides an intuitive wizard for the configuration of a new paging group:
- Create Group Paging
- Phone Number
- Extension
- Licenses
Configure Group Paging Settings
This page allows to configure the Originators, Targets of the paging group as well as its privacy setting
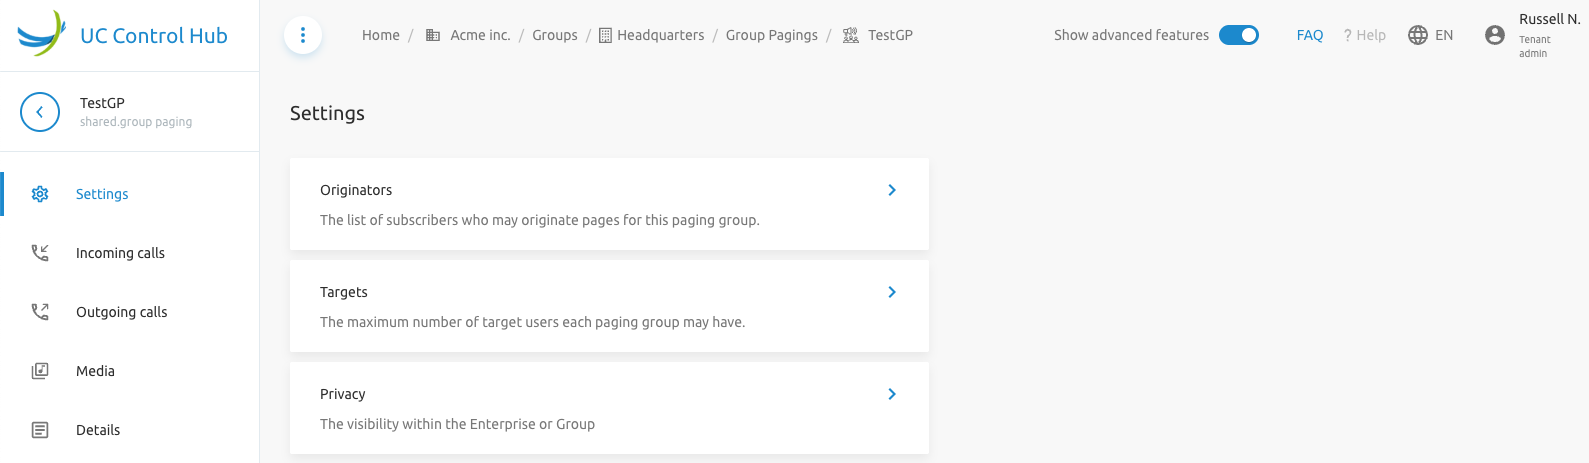
On the side menu, you can also configure Incoming and Outgoing Call settings, provided the relavant service is assigned to the Paging Group. Also the Media for the Paging Group can be configured or customised.
Instant Group Call
The Instant Group Call service enables a user to call a number that provides a group of members with an instant conference bridge.
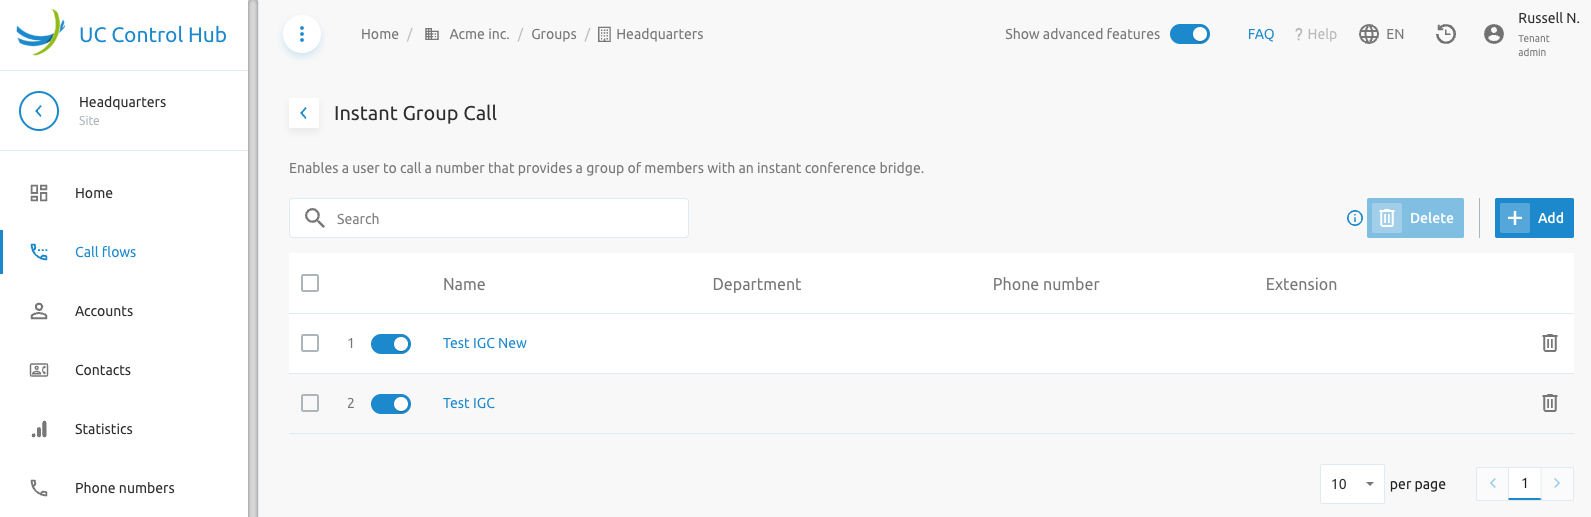
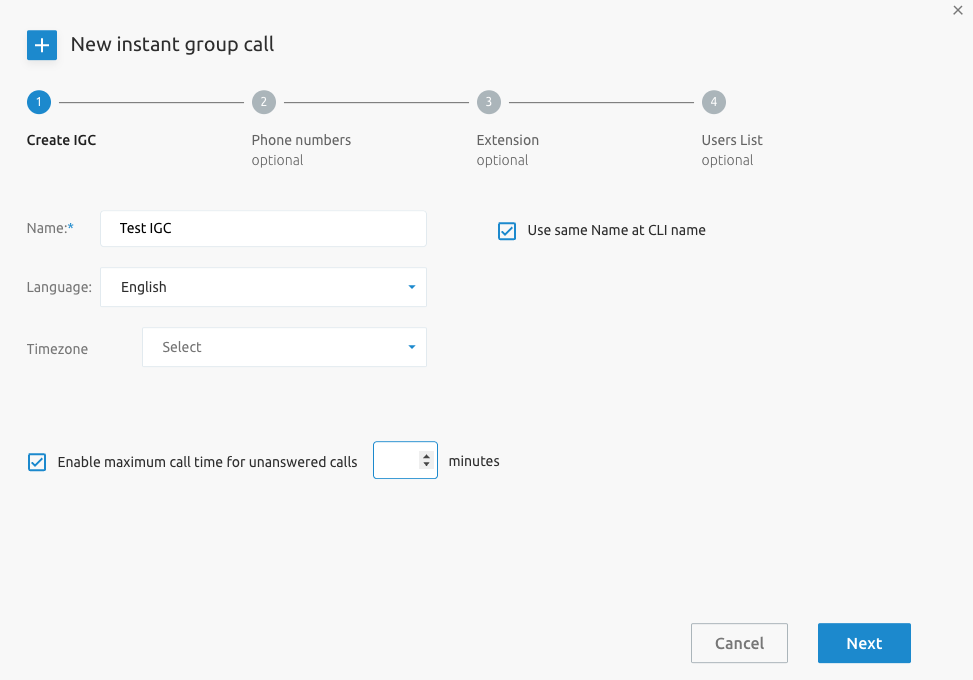
Add New Instant Group Call
F4B provides an intuitive wizard for the configuration of a new Instant Group Call:
- Create IGC
- Phone Number
- Extension
- Users List
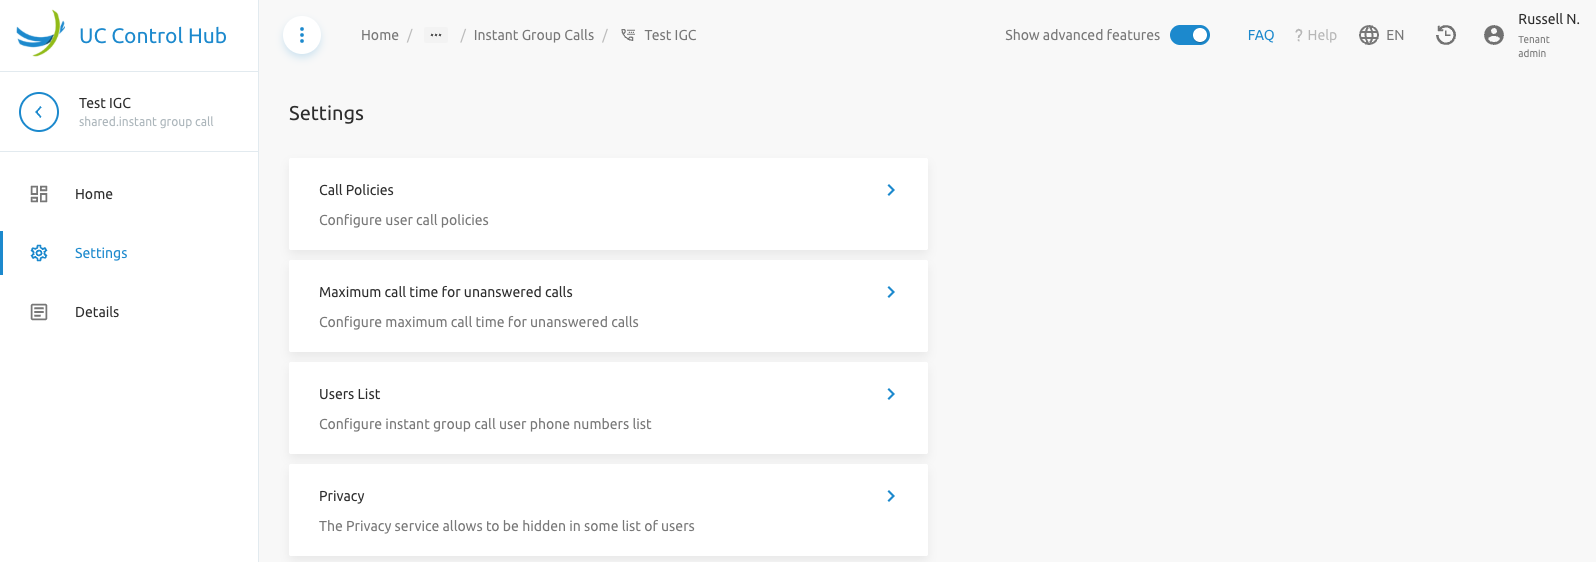
Configure Instant Group Call Settings
This page allows to configure the Call Policies, Max Time for Unanswered Calls, Users List to be called, as well as the privacy setting for the Instant Group Call
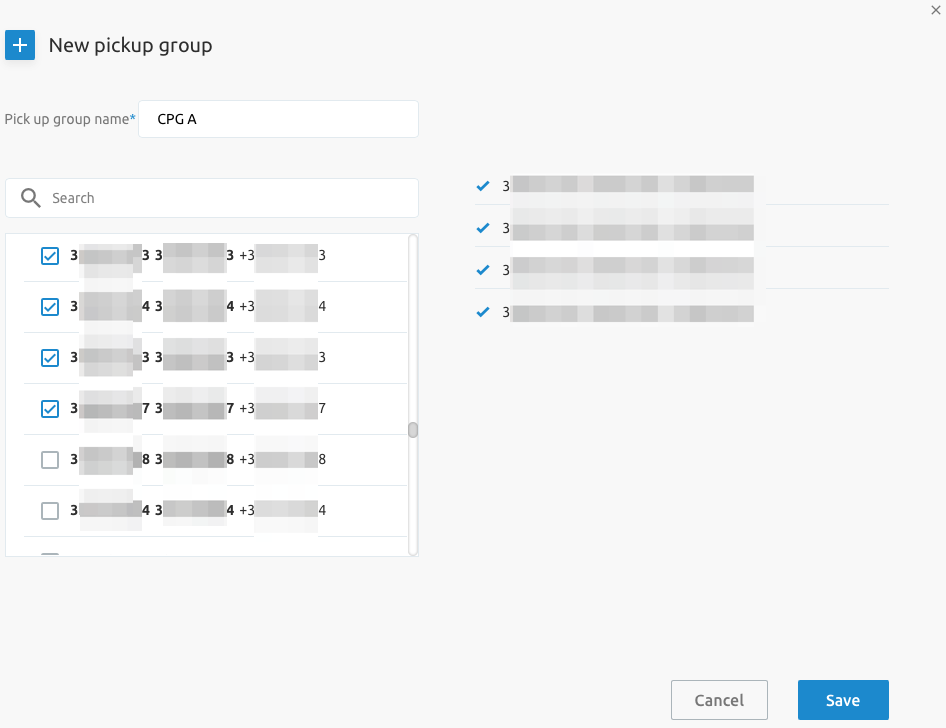
Pickup Groups
The Pickup Group call flow groups users so they can answer ringing lines of others in the group. To pick up a ringing call, go off-hook and dial the Call Pickup feature access code, which connects you to the ringing party. Adding a new pickup group opens a new window where you can set the name and members of the group. The screenshot below shows the list of pickup groups available in a specific group.
Calling Settings
The calling settings allow for the configuration of various call-related rules and policies.
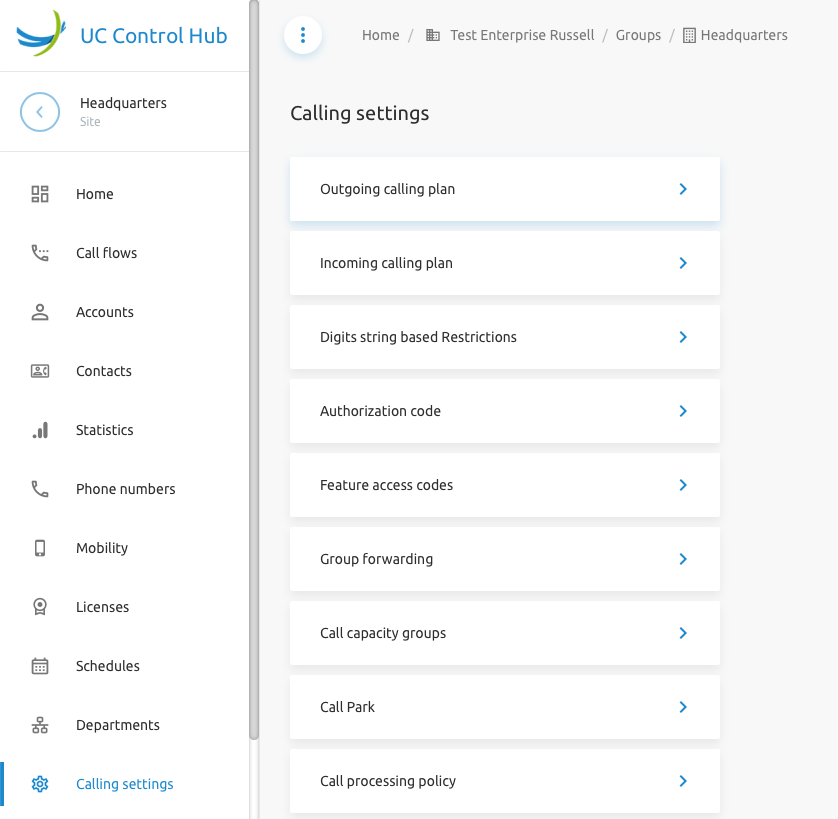
Outgoing Calling Plan (OCP)
The outgoing calling plan allows you to view the calling plan rules for outgoing calls. Only an administrator can change which call types are permitted. There are two tabs: one for originating calls and one for redirecting calls. The OCP service must be assigned to the tenant/group.

The administrator can add custom Digit Strings by clicking the below URL, which takes them to the Digit String Based Restrictions page

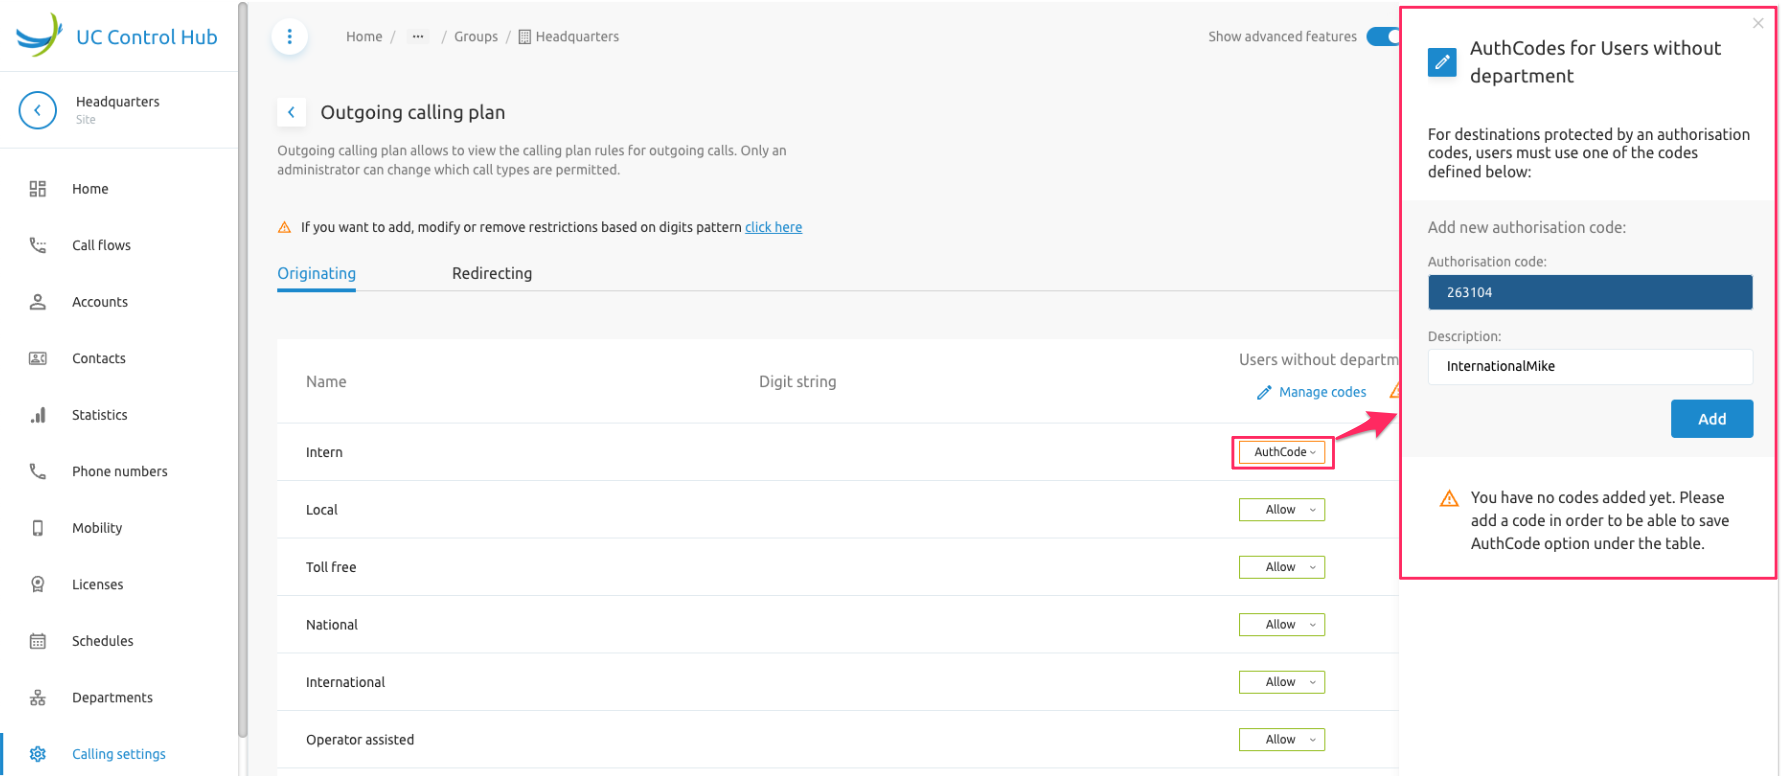
Enhanced Outgoing Calling Plan (E-OCP)
Enhanced Outgoing Calling Plan (E-OCP) is supported in the SCP. Outgoing Calling Plan (OCP) Authorisation codes can be managed by Tenant and Group Admins when the service is assigned to the Group.
Incoming Calling Plan (ICP)
This setting can be used to set incoming call restrictions for departments within your group. You can also set restrictions for users by drilling down to their incoming settings menu. The ICP service must be assigned to the tenant/group.
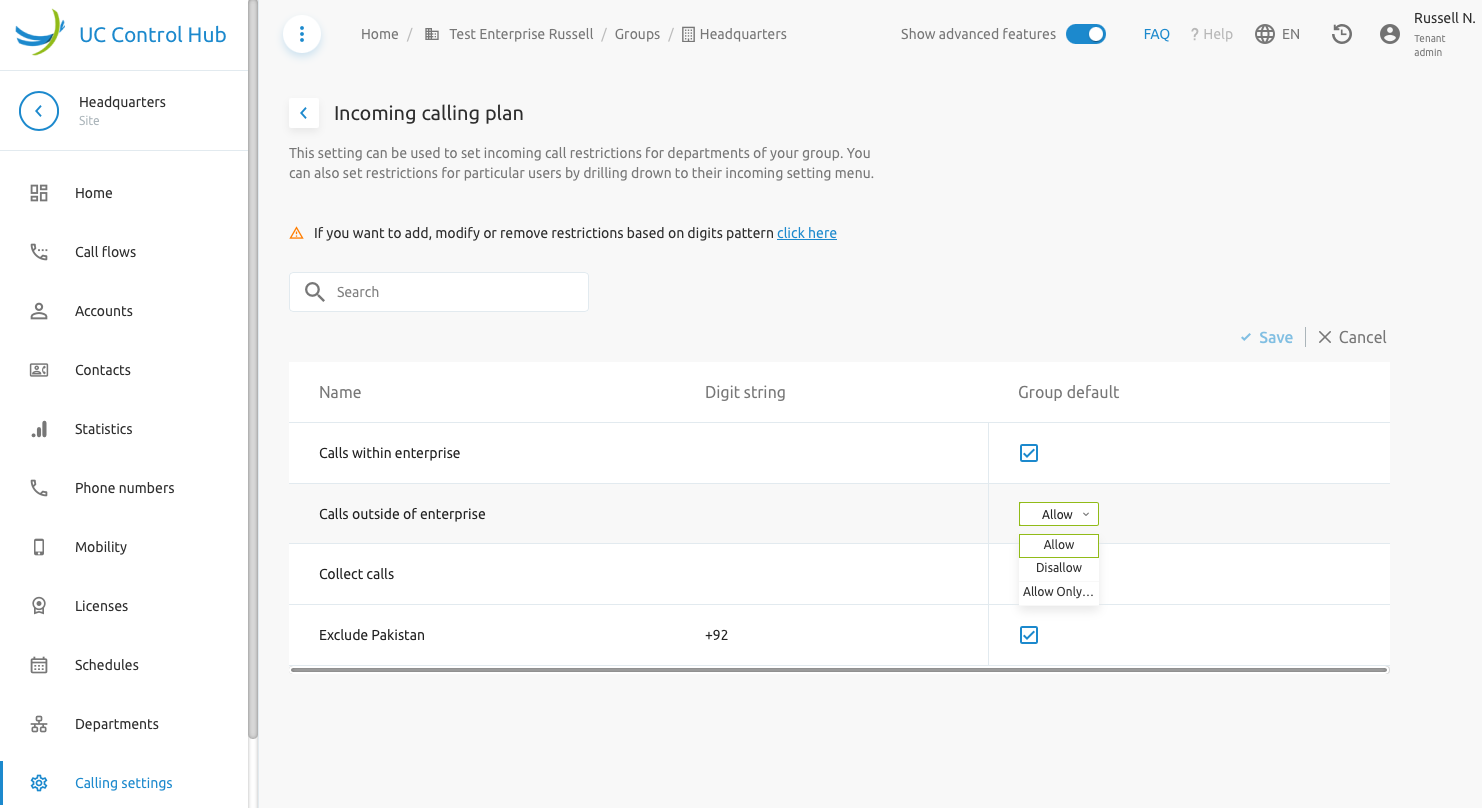
The administrator can add custom Digit Strings by clicking the below URL, which takes them to the Digit String Based Restrictions page
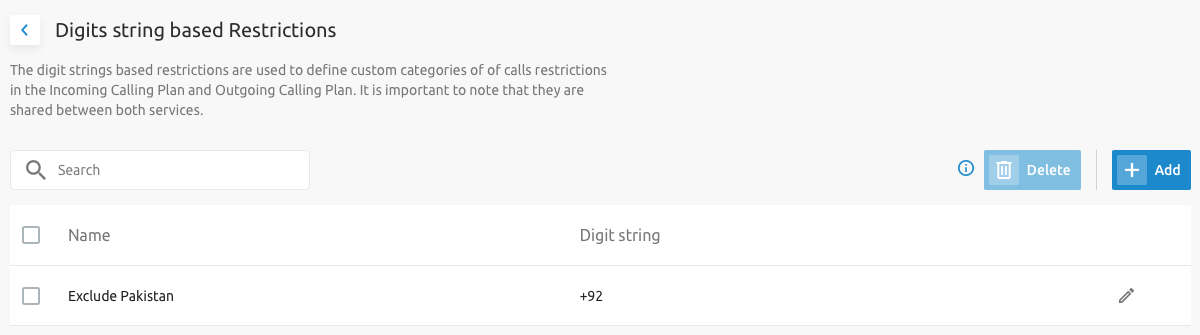
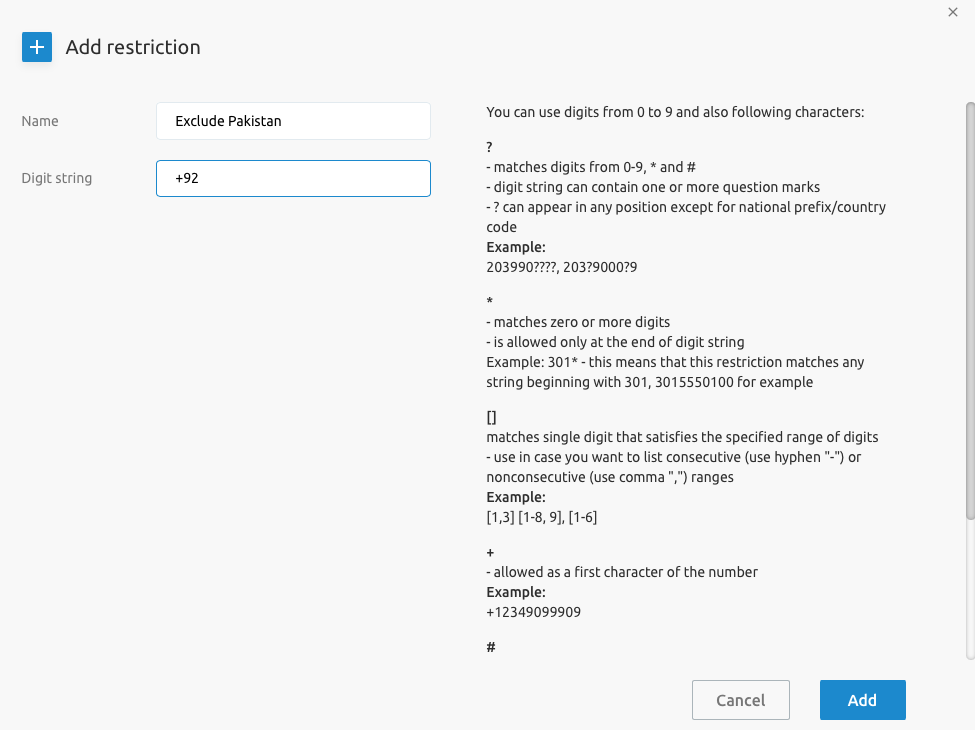
Digit String Based Restrictions
This service allows for an administrator to configure digit string for assignment to OCP and ICP. This enables the Outgoing Digit Plan and Incoming Digit Plan. The OCP and/or ICP service must be assigned to the tenant/group.
Authorisation Codes
This service allows the group administrator to select specific users who must enter a valid authorization code when making a call to a party outside of the group.
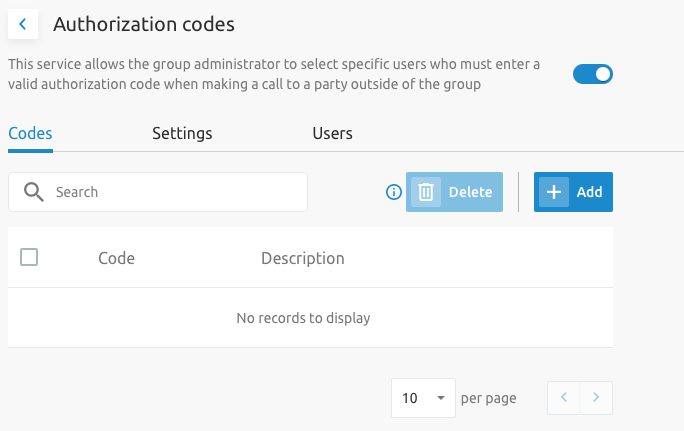
There are three tabs on the Authorization page:
- Codes: To manage the codes.
- Settings: To define some settings.
- Users: To enter the users who need to dial out with these authorization codes.
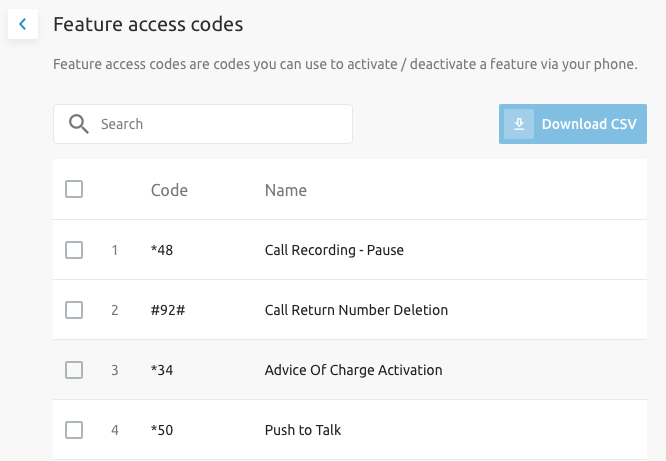
Feature Access Codes (FAC)
FACs are codes you can use to activate/deactivate a feature via your phone. The page shows a list of all FACs configured in the solution.
TipIt is possible to display a Groups' Feature Access Codes (FACs) comprised of only its assigned services, instead of displaying all available FACs in the system. This is enabled by a backend parameter.
Group Forwarding
This feature redirects all incoming calls for a user to a forwarding number. The redirection can be activated either manually (permanently) or automatically at specified time periods (defined by a time and/or holiday schedule). When choosing the "Only during" option, the schedules defined in the Schedules service will appear.

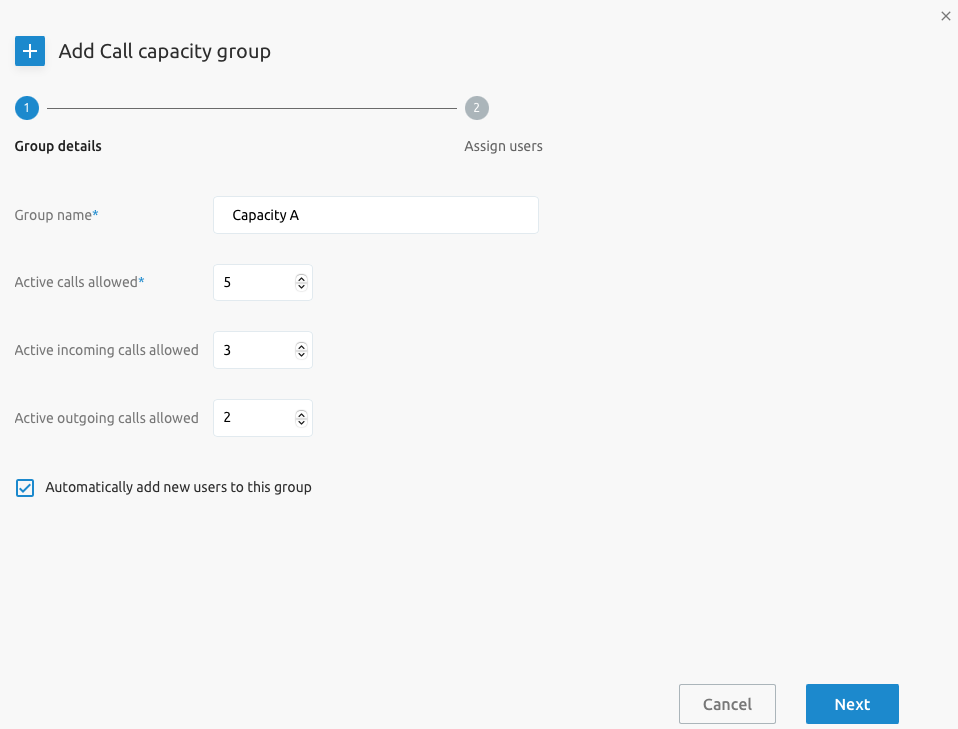
Call Capacity Groups
This service allows you to create and manage call capacity groups. Defining a call capacity group limits users in those groups to a defined number of concurrent calls.
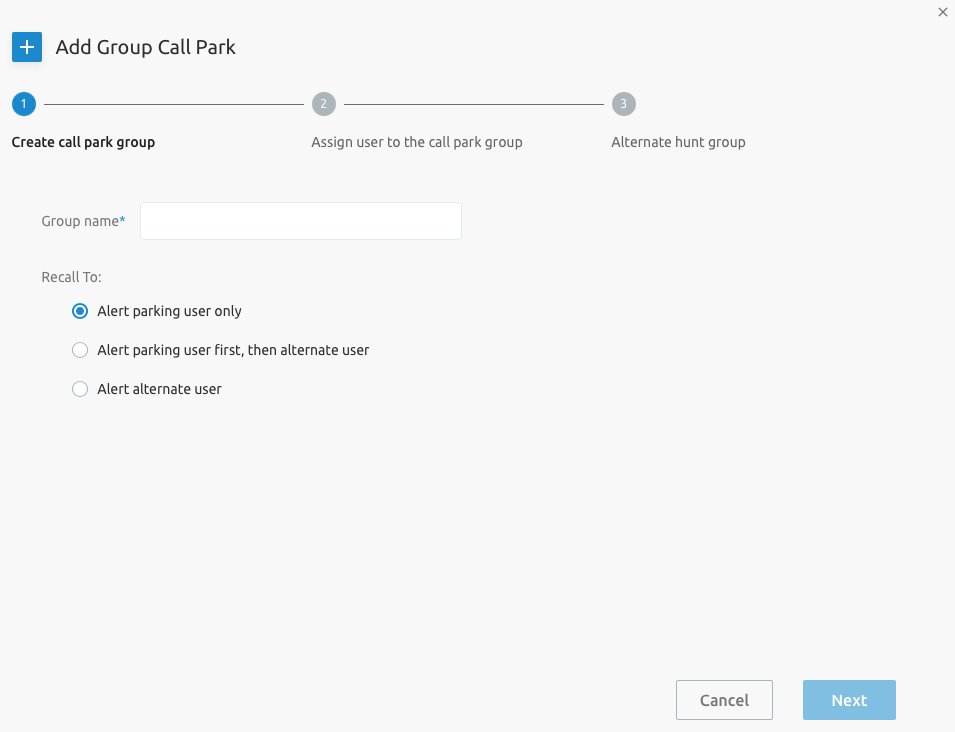
Call Park
Call Park groups allow users in those groups to park calls.
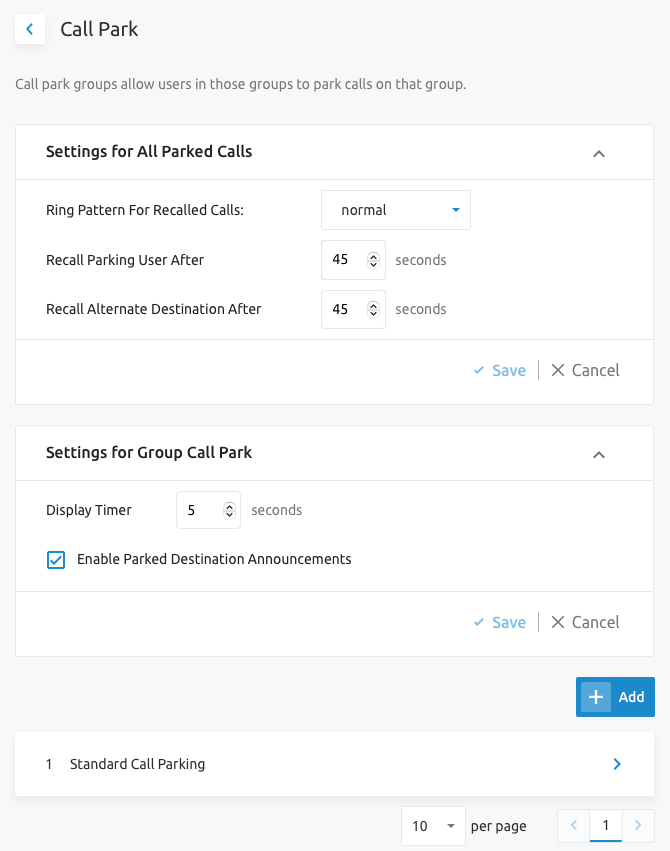
Adding a new Call Park group will open a new wizard window to guide the administrator through the creation process.
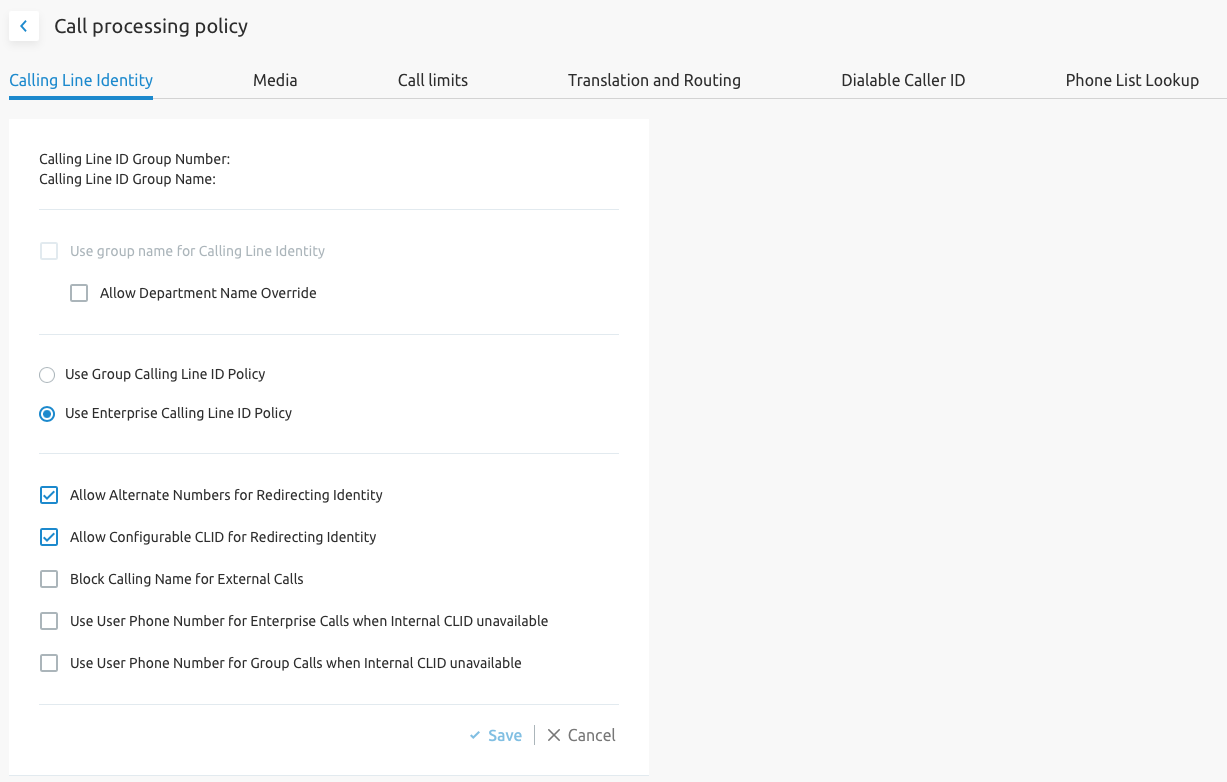
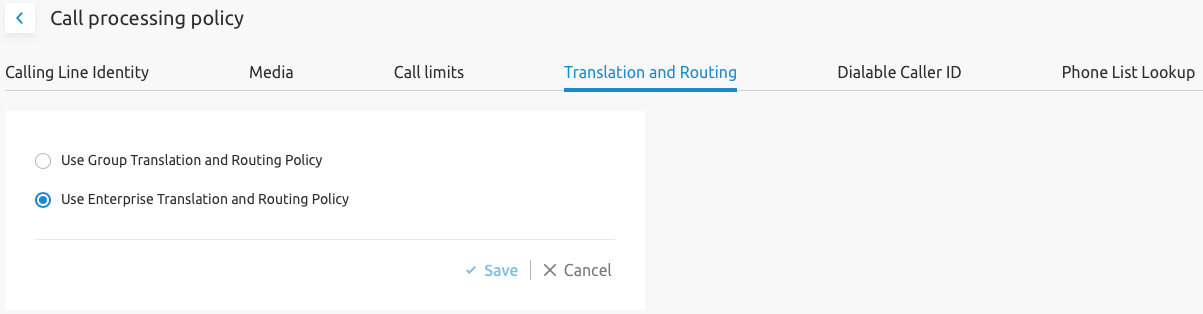
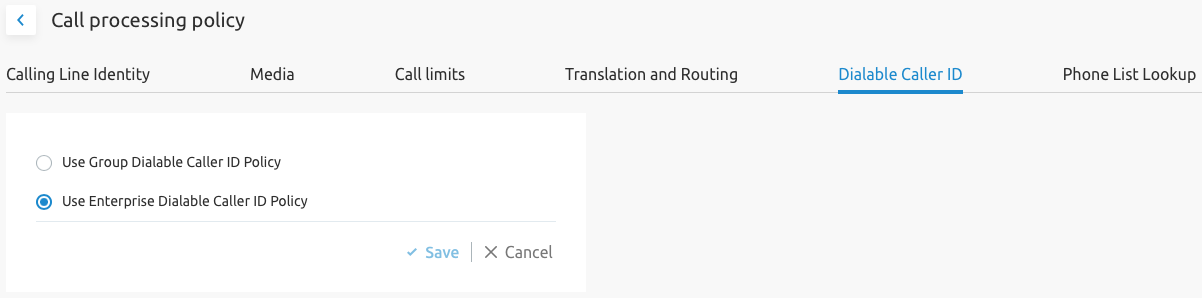
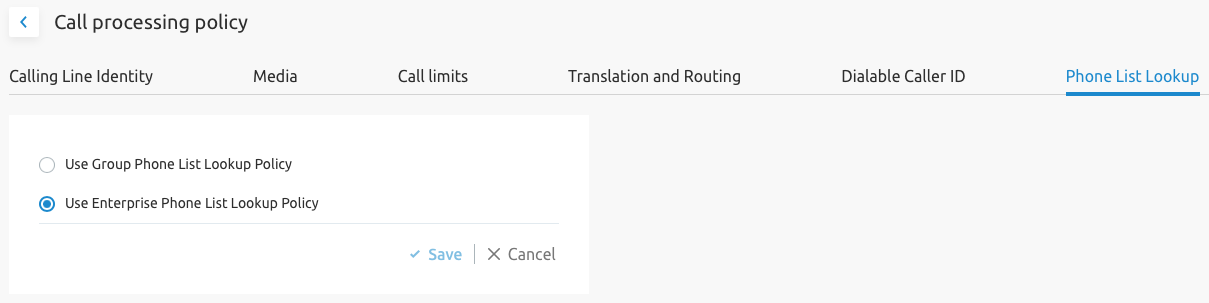
Call Processing Policy
The SCP allows managing Call Processing Policies at the Group level. Because some parameters are specific to an Enterprise setup in Broadworks and others are specific to the Service Provider's setup, there is a difference in what will be displayed in these two modes. The different categories that can be configured are:
- Calling Line Identity
- Media
- Call limits
- Translation and Routing
- Dialable Caller ID
- Phone List Lookup The screenshots below are taken from the Enterprise setup. The Service Provider setup has the same categories, but the configuration options are slightly different. Calling Line Identity
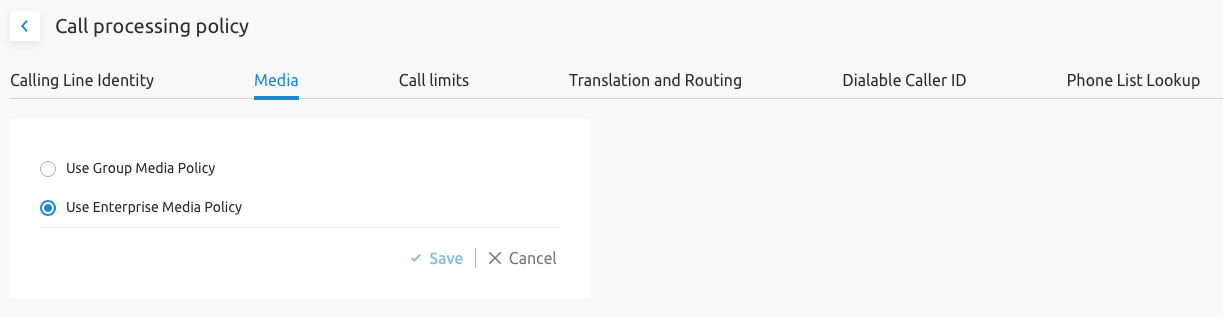
Media
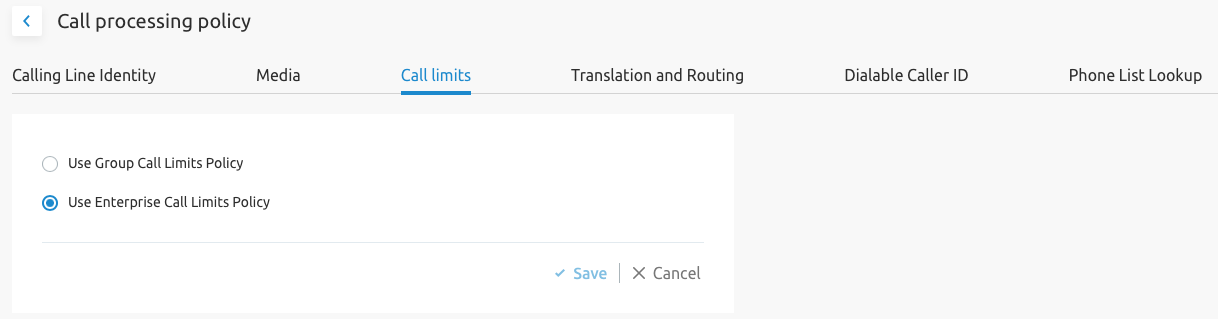
Call Limits
Translation and Routing
Dialable Caller ID
Phone List Lookup
Fax to Email
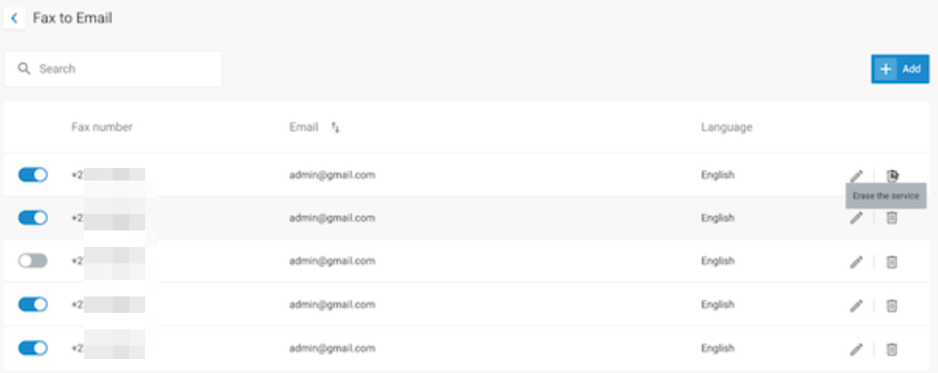
This service is disabled by default and needs to be enabled during the implementation phase for Service Providers who want to use it. This service exposes a virtual service at the Group level by creating a fax user in the background. The figure below shows the Fax to Email page in the SCP.
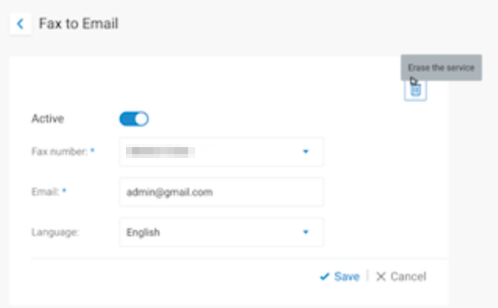
The page allows you to activate the service, fill in the fax number, the email address where the fax needs to be sent, and an optional language. A future improvement will be the ability to add several faxes to email and create an overview list. The figure below shows a preview of how this improvement will look:
Infrastructure and Inventory Management
This section covers the management of numbers, licenses, devices, and other infrastructure-related services.
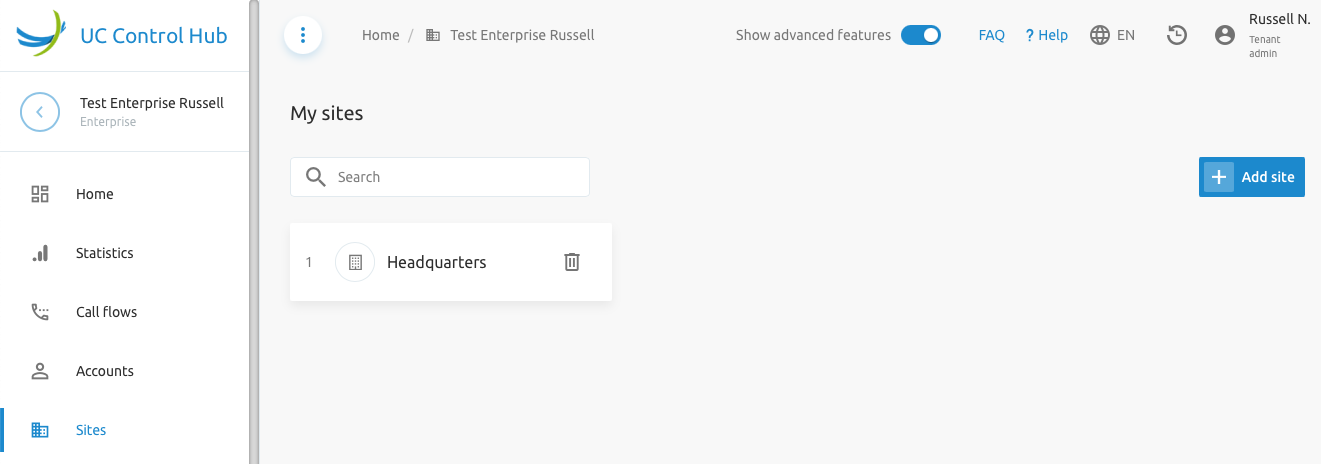
Sites (Groups)
The Sites service is used to manage sites (also known as Groups). Sites typically refer to a geographical location (building or a campus) where a user is located. Both users and call flows (virtual PBX services) must be assigned to a specific site/group. This means that at least one site/group is needed in your tenant, as it is impossible to create users and call flows without assigning them to a site/group.
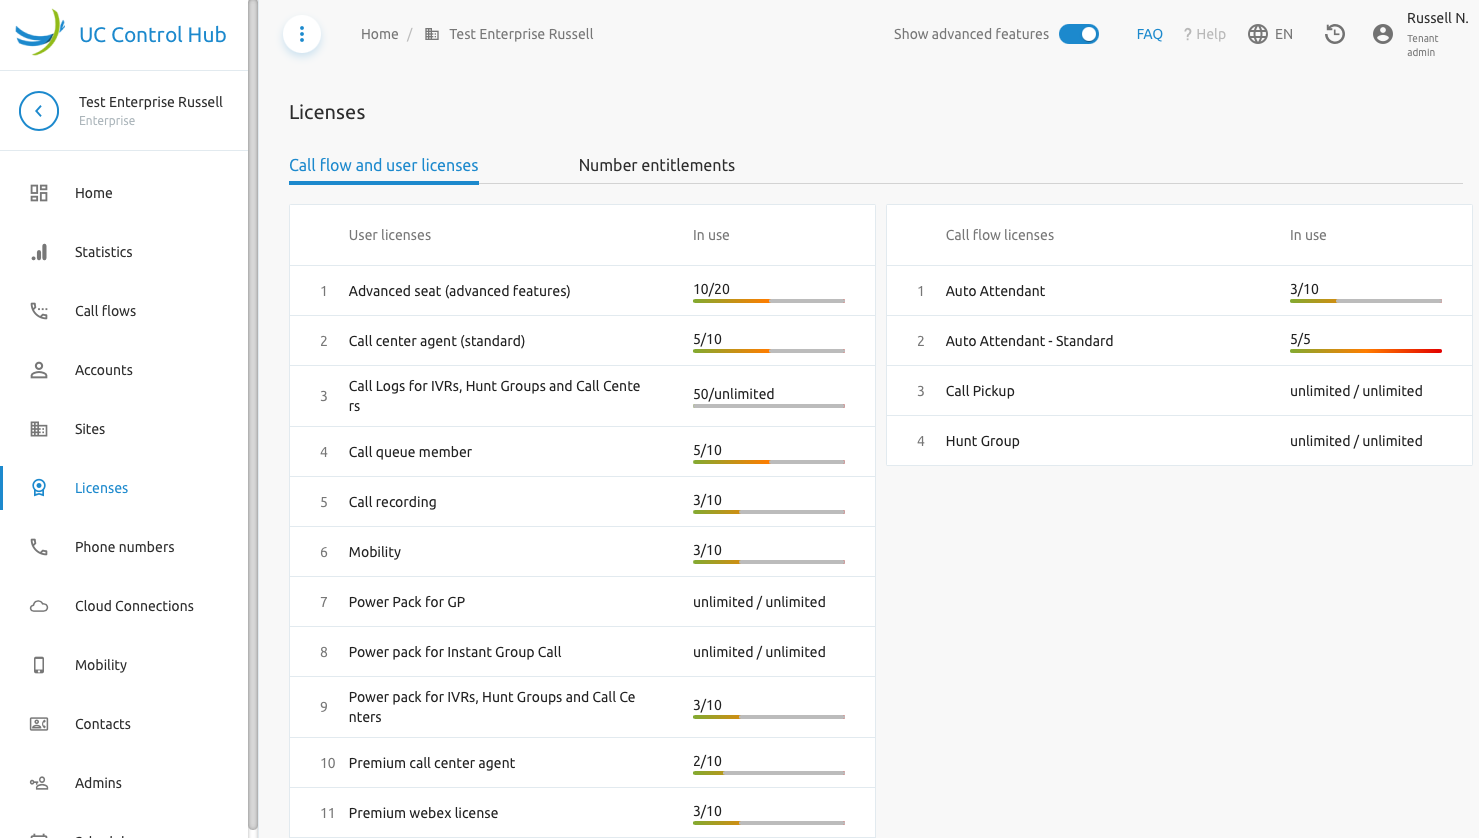
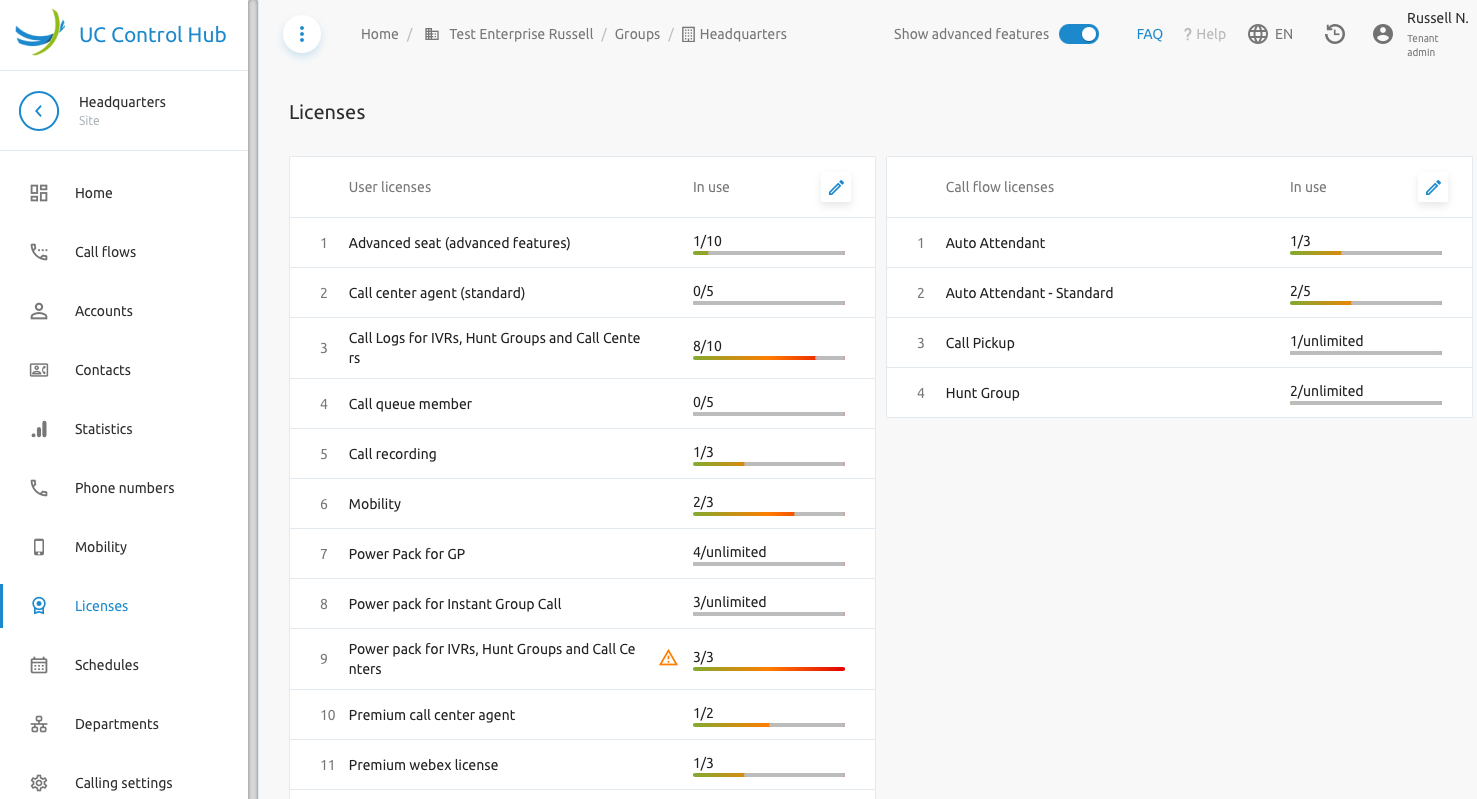
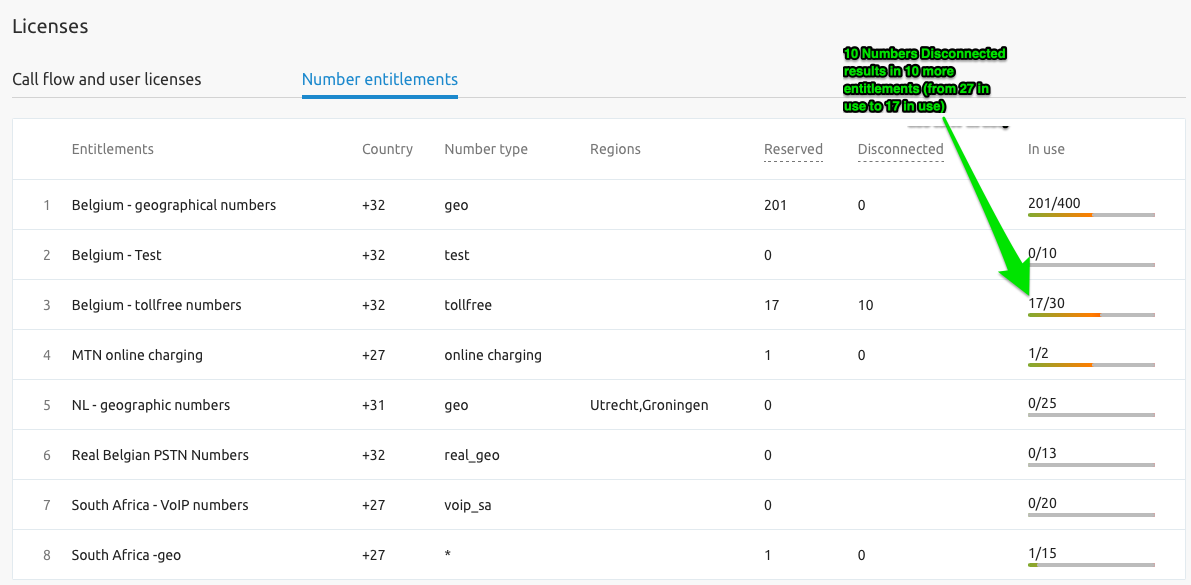
Licenses
There is much to say about licenses, and the details will differ for each customer. The licenses shown in the SCP are a representation of the licenses and service packs in the Netaxis Test Broadworks application, which is why they are different for every customer.
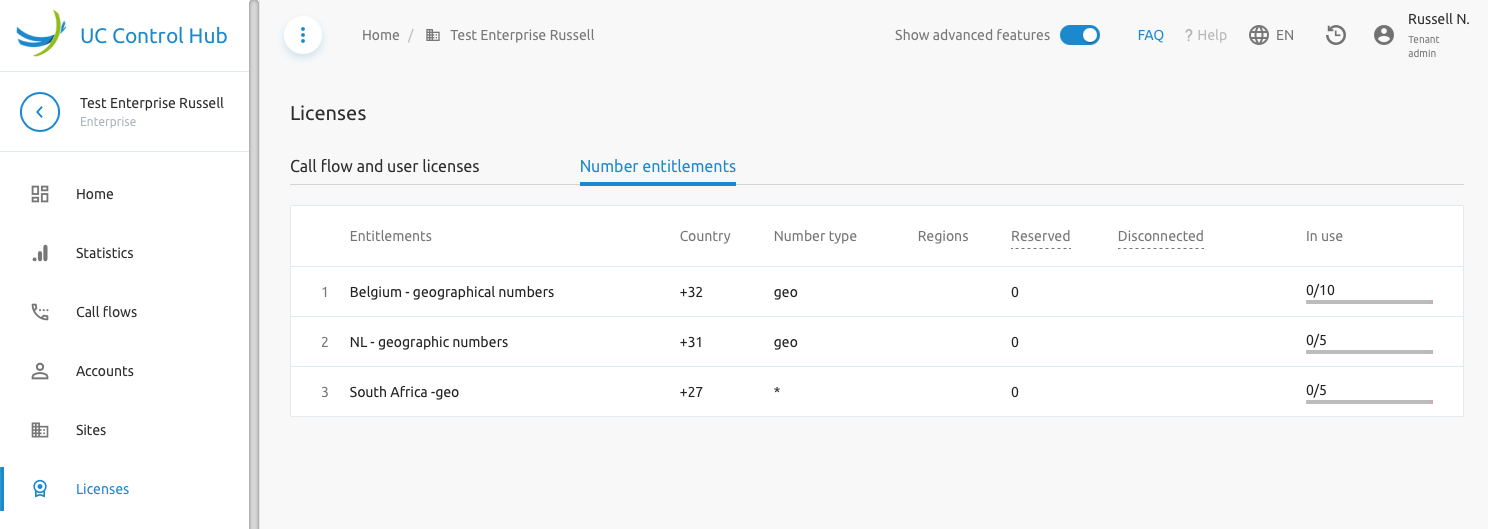
Next to the license tab, there is also the Number Entitlement tab. A number entitlement can be considered a license for phone numbers. It grants the ability to select and/or assign a phone number from the inventory of numbers. It gives the "right" to use numbers from a certain block (e.g., Belgian national numbers, local numbers). If there are entitlements, numbers can be selected.
On Tenant Level:
The license page on the tenant level shows the licenses available for that tenant. A Tenant Administrator cannot edit or change the number of licenses assigned to their tenant. Changing this number is the responsibility of a System Administrator and can only be done through the Provisioning User Interface (ProvUI) on the APIO Core or through an automated process.
On Group Level:
A Tenant Administrator will have the ability to change the number of licenses for a certain group or site. The pencil icon on the license table allows for editing.
The screenshot below shows the new window that appears when clicking the pencil icon.
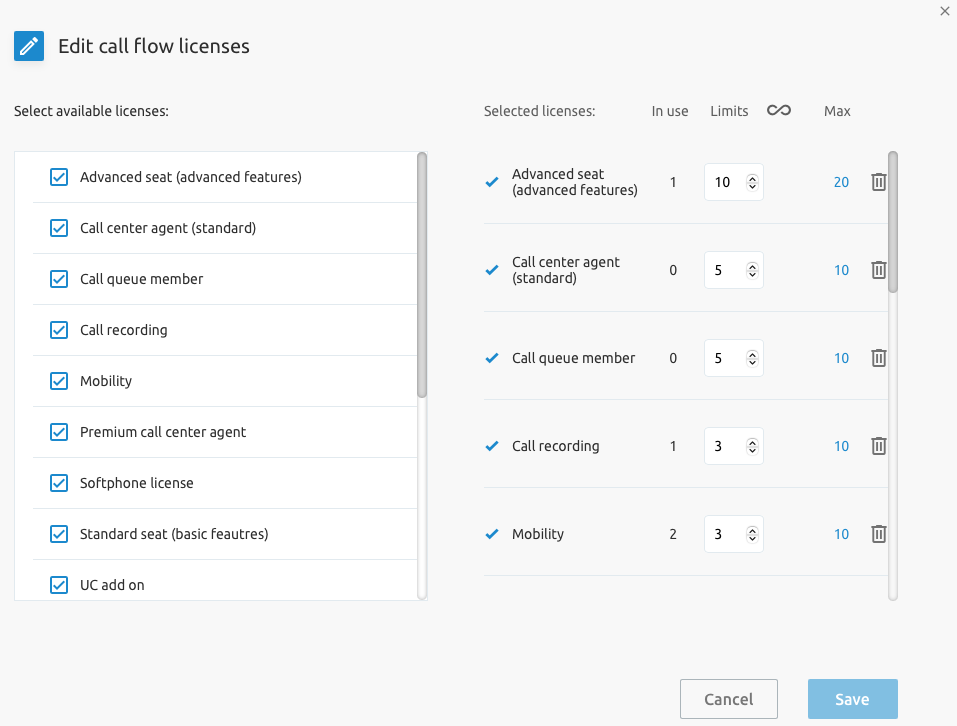
The Call Flow licenses are also editable. A Group Administrator will only have a view of the licenses (like the Tenant Administrator has on the tenant level).
Phone Numbers
When using the portal for the first time, it's best to check whether numbers were already assigned to the account. If so, users can be created immediately. If not, numbers can be selected from the inventory, linked to the solution, or ported into the platform.
Phone Number Management
To get numbers for the phone system, two options are offered:
- Selecting numbers from our inventory.
- Porting in new numbers.
The solution also offers a third option: using disconnected numbers. These are:
- For existing native numbers: Disconnecting a number de-assigns it from your account and puts it in quarantine for 90 days, after which it becomes available again for someone else.
- For ported numbers: A disconnected number is also de-assigned and goes into quarantine. After 90 days, the original operator can re-assign the number to another customer.
Selecting Numbers from our Inventory
When we refer to "our inventory," as the Netaxis NIMS (Number Inventory Management System) which is used for number lifecycle management.
New Numbers
Adding new numbers is possible if entitlements are available. This can be done at the tenant level in the Phone Numbers service, under the
Assigned numbers tab, using the Add button. This button is only available if at least one entitlement is available.
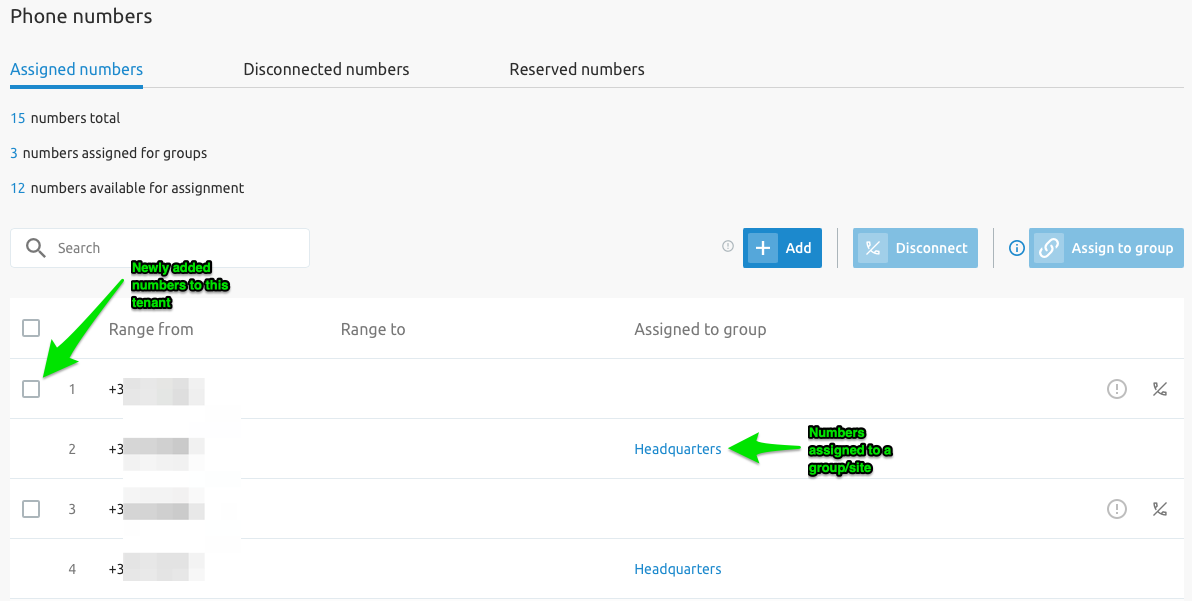
The screenshot below gives an example of the Phone Number service—Assigned numbers—in the SCP.
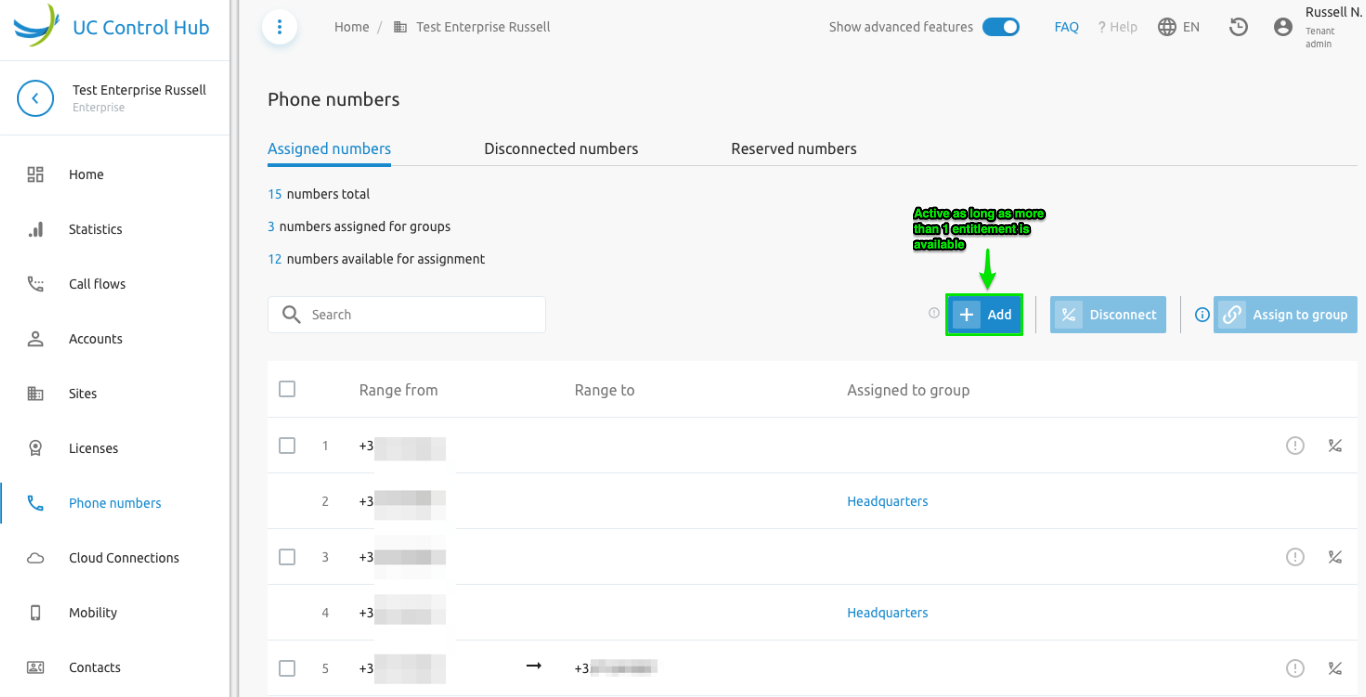
When adding numbers, a modal window pops up showing all number ranges owned by the operator providing the numbers. The entitlement column indicates how many numbers can still be selected in that specific range.
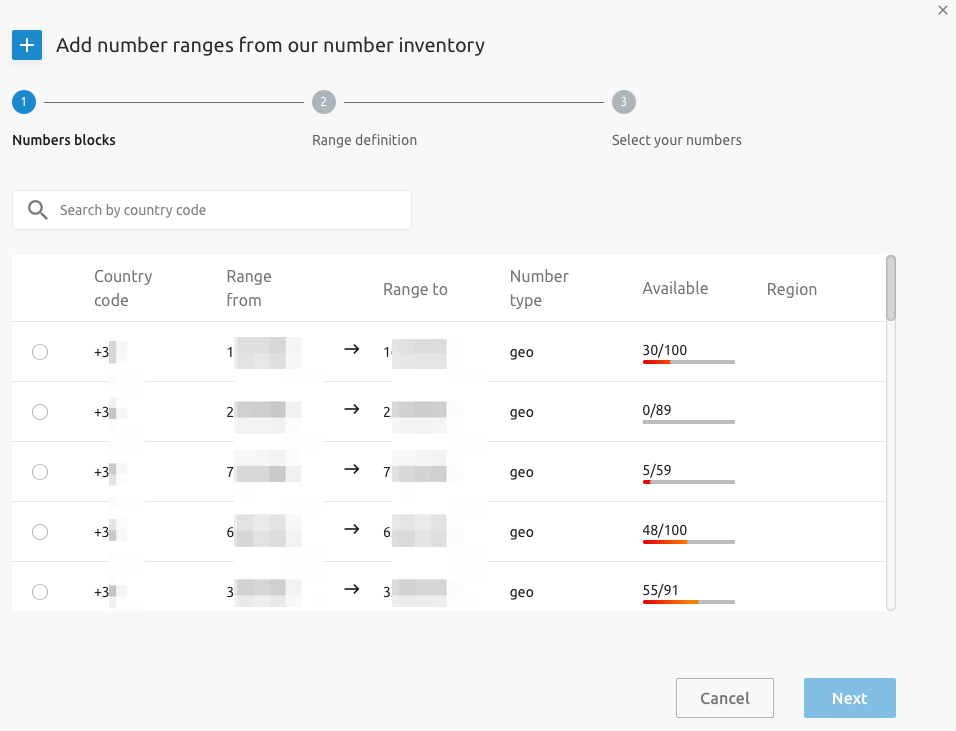
After selecting the number block of choice, the next step in the wizard asks you to indicate:
- How large the range must be (e.g., a single number, a range of 10, 20, or more).
- How many suggestions you would like to see. If possible, the system will propose a few options that meet your criteria.
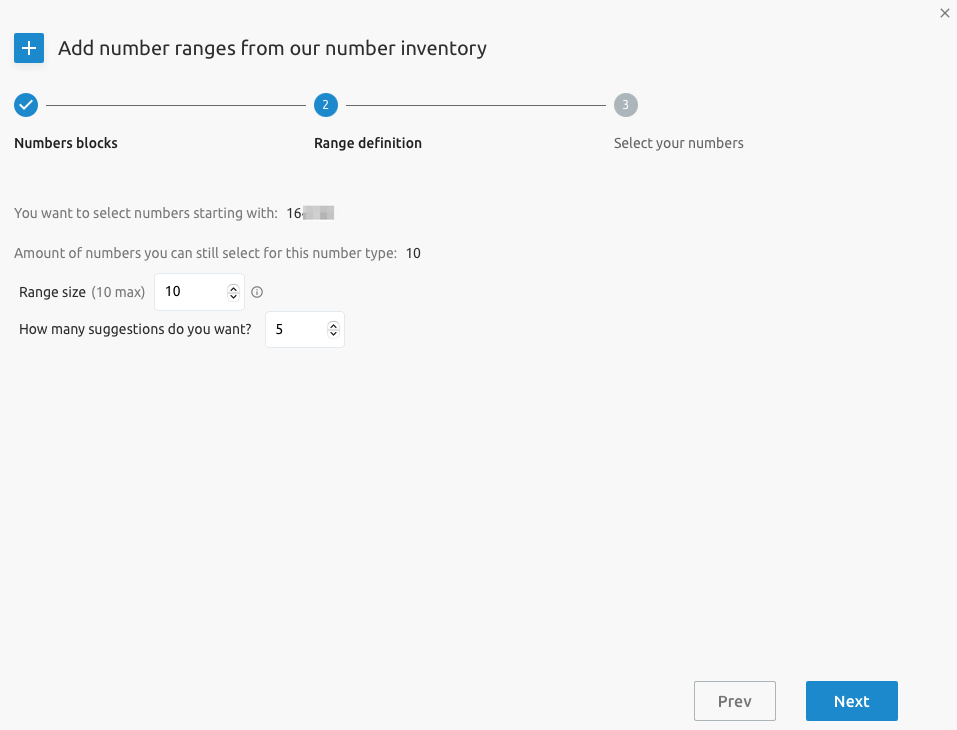
The system will then try to propose several options that meet your criteria. If no results are found, retry your search request while reducing the range size. The larger your range size, the more unlikely it is to find a suitable range. It is currently not possible to see which sub-ranges are available within a number block from the SCP.
Multiple suggestions can be selected if enough entitlements are available.
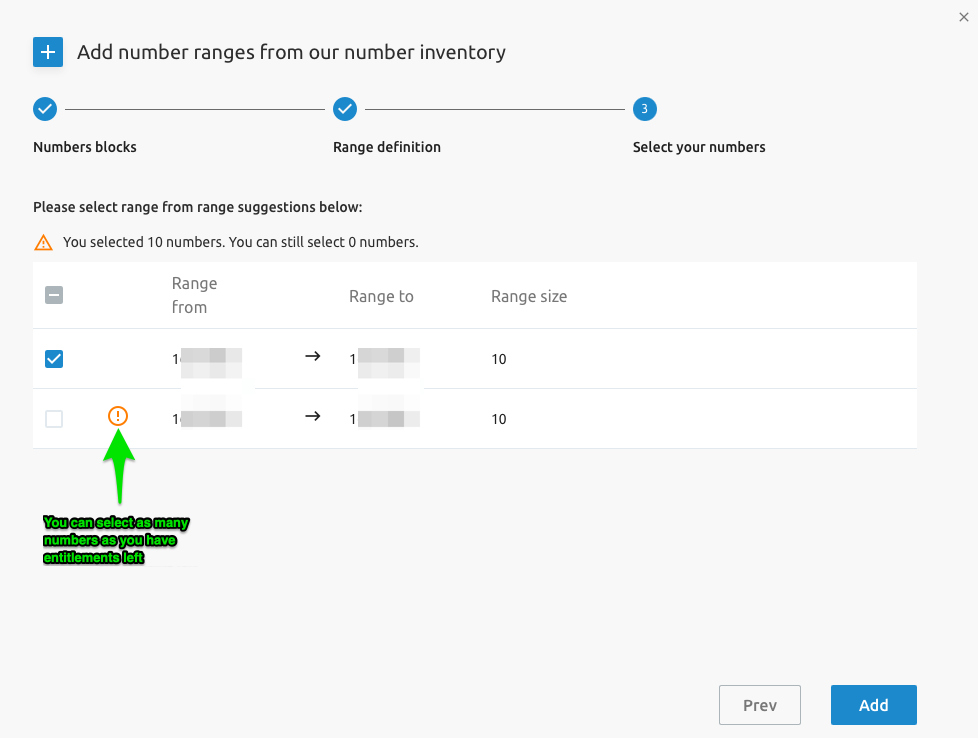
The numbers will now be available under the Assigned numbers tab.
The numbers are available for immediate assignment to groups and users. This can be done directly from the tenant level or by drilling down into a group and adding them from the group level. When numbers are added, this will, of course, impact your Number entitlements view on the License service.
Reserved Numbers
When numbers are reserved for your account, they appear in the Reserved numbers tab under the Phone numbers service at the tenant level.
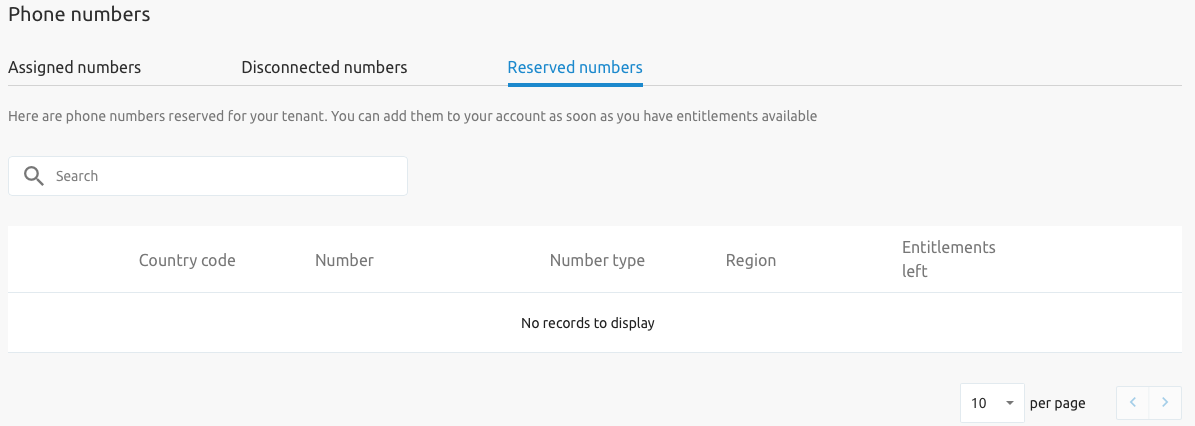
Reserved numbers are not counted in entitlements. However, when selecting a reserved number and adding it to your account, available entitlements are still required. For example, if a tenant has no more entitlement for geographical numbers, it is not possible to add a reserved number. Either numbers will have to be disconnected, or more number entitlements must be ordered.
Disconnected Numbers
In certain cases, you might want to release numbers (disconnect them) because they are no longer needed or numbers from a different geographic region are required. To do this, go back to the phone number menu at the tenant level. Make sure that the numbers you want to disconnect are not allocated to a group or user. If they are, you must first de-assign them. Only when they are free at the tenant level can these numbers be disconnected.
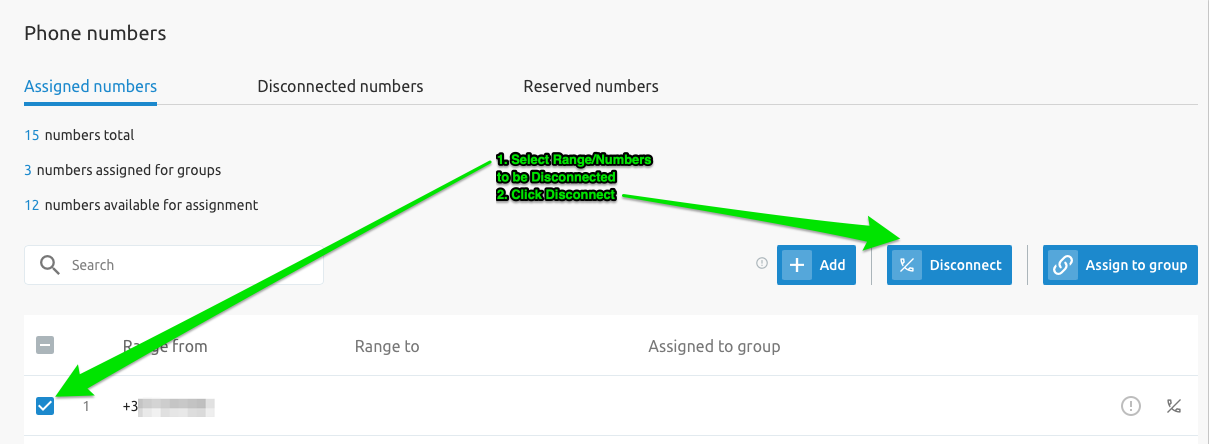
Numbers that are disconnected are listed in the Disconnected Numbers tab.
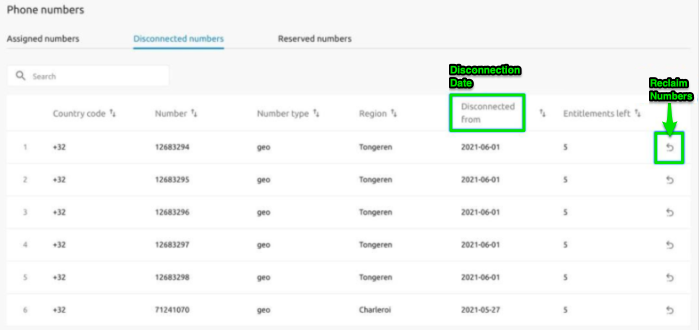
Disconnected numbers remain in quarantine for 3 months. This means they are still associated with this account and can be reclaimed at any time until the quarantine period expires.
NoteIf the number was previously ported in, it will not appear in this list of disconnected numbers. However, our porting system will keep your number in quarantine for 3 months. Please contact the help desk to reclaim the number. After the quarantine period, the number will be permanently released.
Number Activation
The F4B SCP has a Number Activation feature that allows activate/deactivate numbers (commencement of billing cycle). The activation is an optional feature configured at the system level. It is controlled globally using a new configuration option. By default, the feature is disabled. If it needs to be enabled, it can be done upon request during the setup and configuration of the solution.
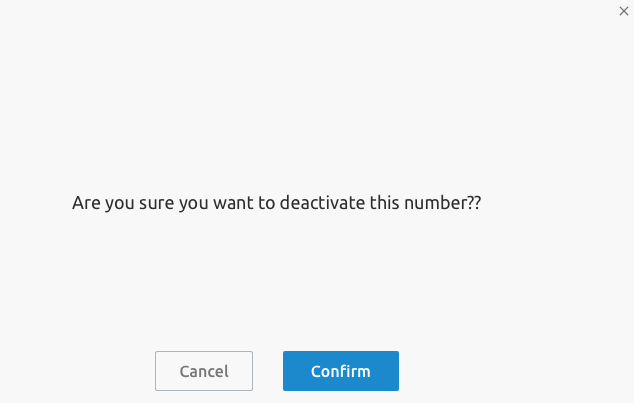
The feature is accessible at the Group level in the "Numbers" service. If enabled, the Numbers service at the Group level will show it as follows:

When deactivating an individual number, a message pops up to ensure you are aware of what you are doing, which prevents accidental deactivation.
Porting Service
To use the porting service in the SCP, the Netaxis NPACT application must be included in the solution setup.
To port in numbers, go to the Porting requests service in the left side menu. This page provides an overview of all porting requests (port-in, NOT port-out) initiated for this tenant.
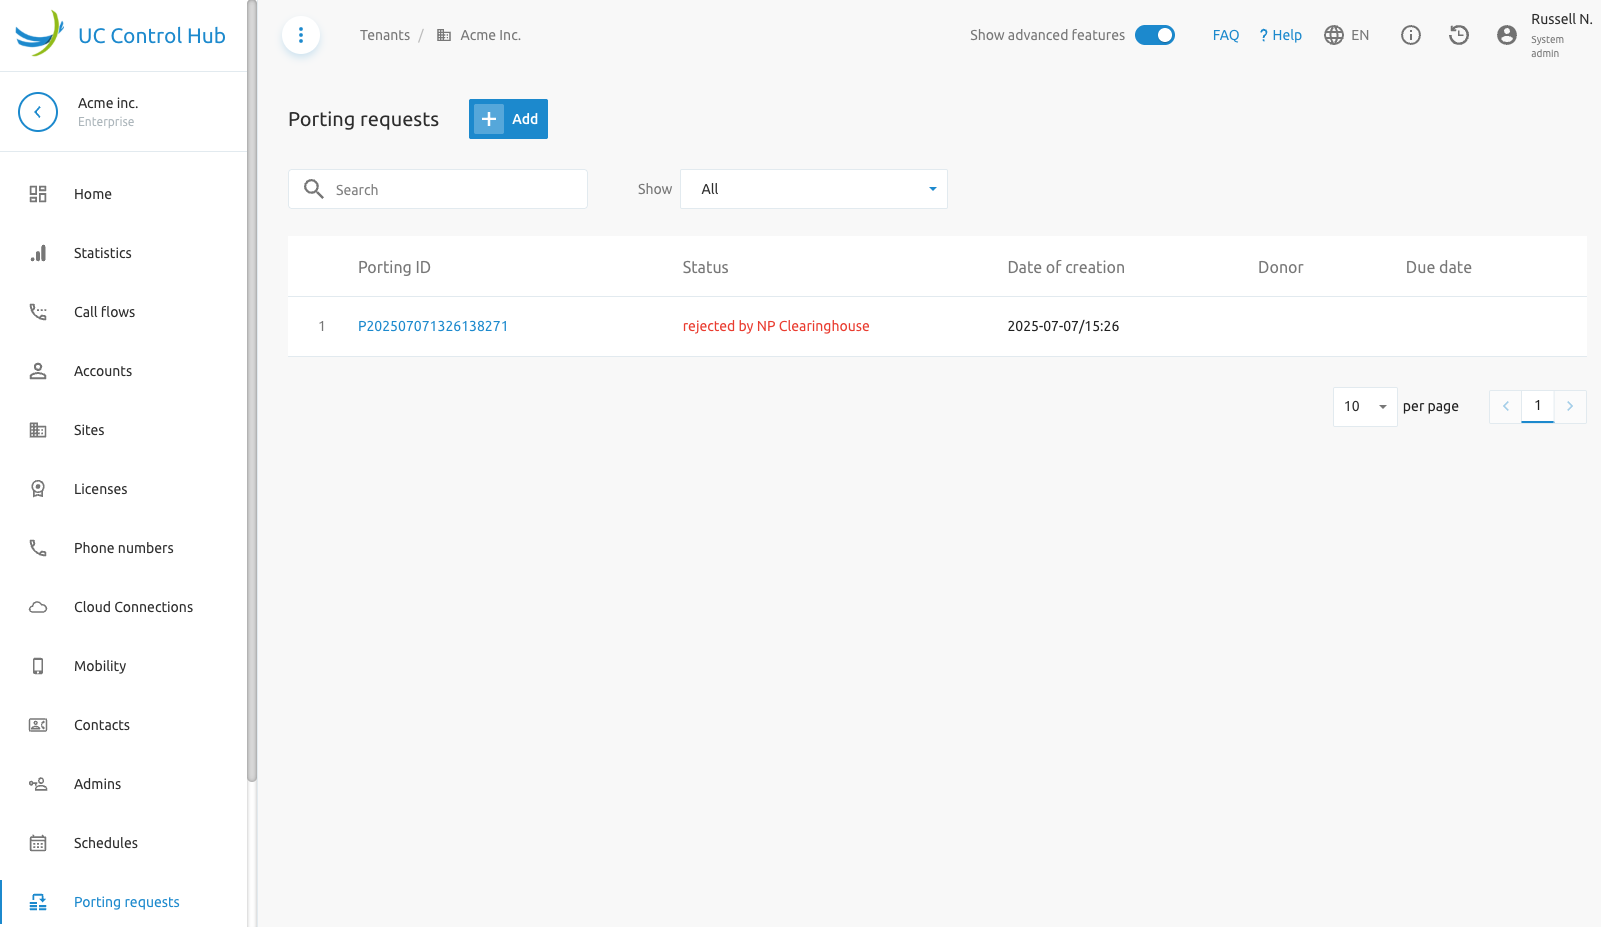
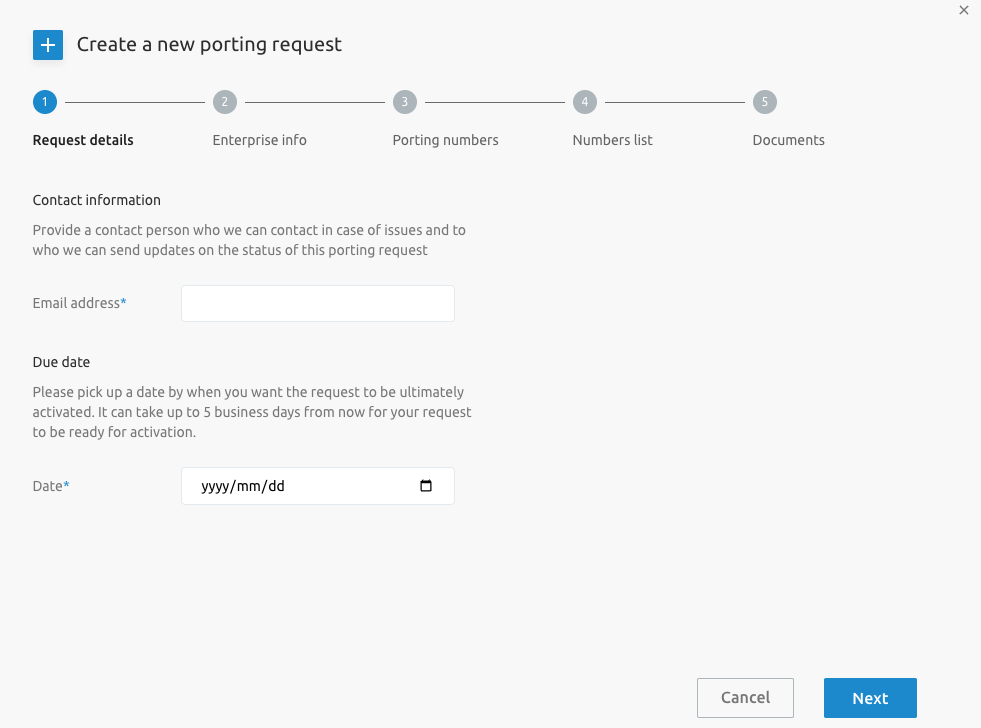
To launch a new porting request, click the Add button. A wizard will pop up, showing the steps to port in a number.
- A contact email needs to be filled in for communication on the porting request's progress.
- A due date is requested by the porting authority. The advice is to set it at least 7 days in advance. However, the date is purely administrative.
The subsequent steps guide you to complete the porting process:
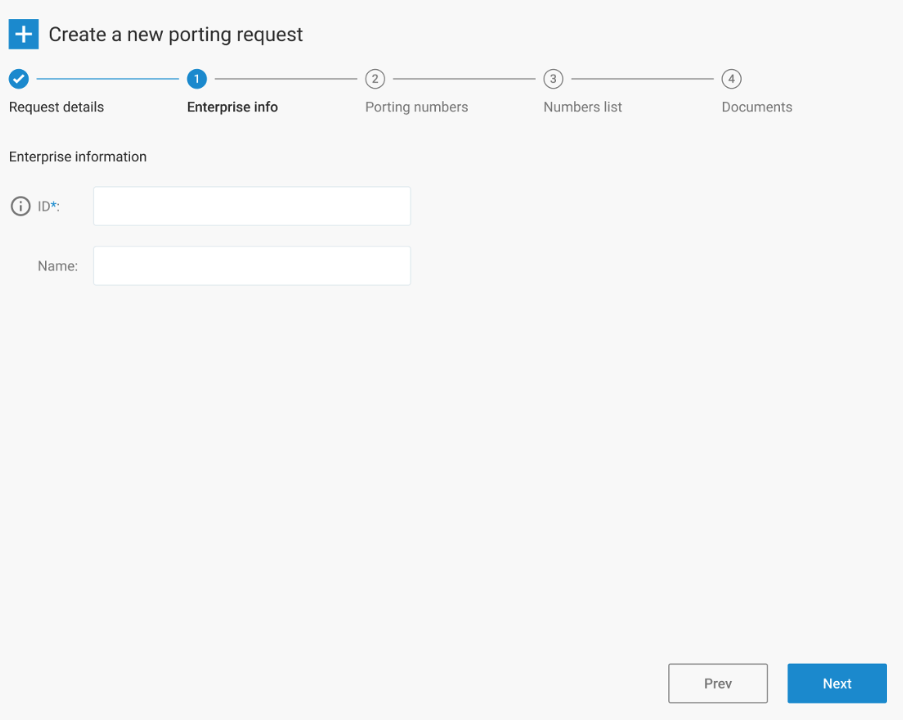
- Enterprise info - in the next step, you must provide information about the enterprise for which the porting is requested. Although the customer ID is known, what is needed here is the official account number at the donor provider (the provider from which you want to port the numbers).
- Porting numbers - provide the numbers that need to be ported in. Follow the instructions provided by the portal.
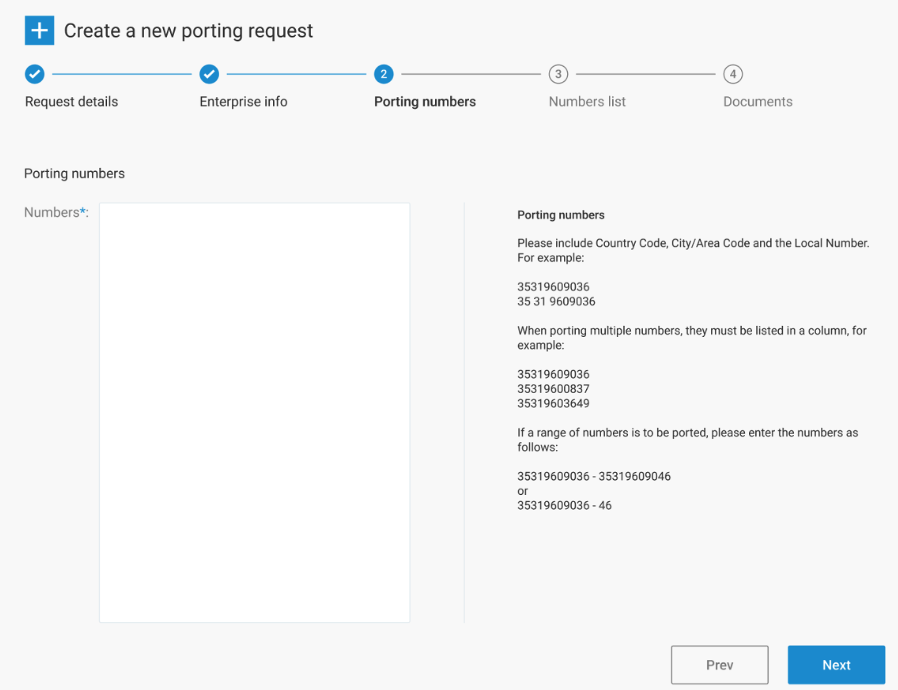
Important: Do not try to port multiple ranges at once. If this is needed, provide the numbers as individual numbers or make multiple requests. The porting authority will otherwise refuse the request.
- Numbers list - the next step performs a very basic verification. The numbers are not checked for validity against the numbering plan; the only verification is that the input can be correctly parsed.
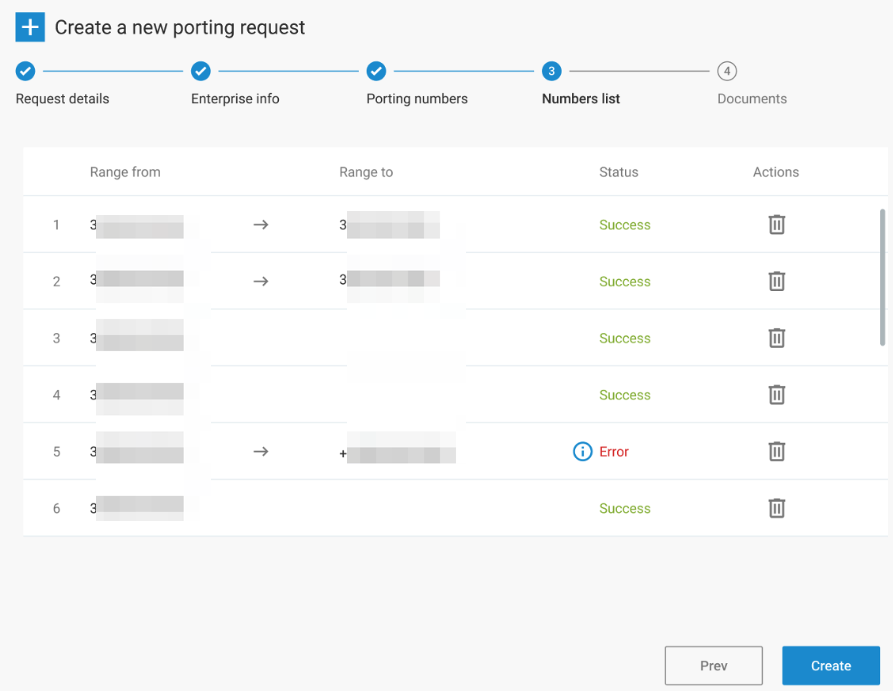
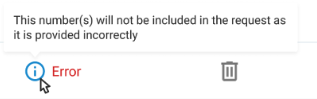
If there is an error in the porting of a certain number (range), it will be indicated. Hovering over the error provides more information on why it occurred.
Once confirmed, the porting request will be created. It will be sent for review to our number porting back office. This back office will double-check the request before sending it to the porting authority.
To validate the porting request, it is mandatory to complete the next step (step 5), which is uploading the required legal documents.
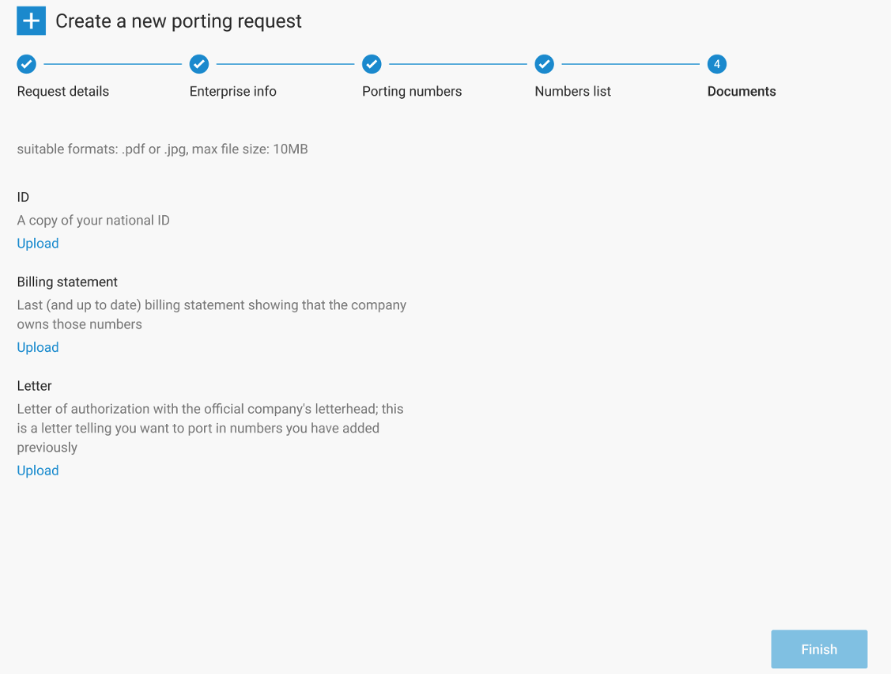
The Finish button becomes active once the required manual actions are completed. For example, the customer may need to upload a letter authorizing the Telecom operator to port in the numbers, or a bill from the old provider may be required to prove ownership. If the modal window is closed without being completed, you can still upload documents afterward.
Selecting one of the porting IDs allows you to re-enter the porting request details, for example, to upload documents.
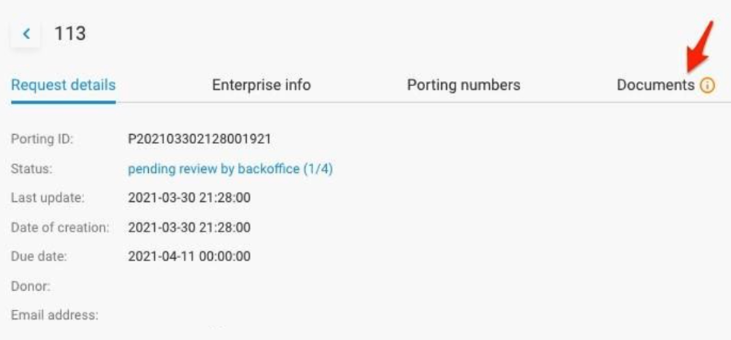
The porting will now go through different stages:
Pending review by back office (1/4): The back office is informed and must validate the request. If the request is considered invalid, the back office will reject it. The porting case will be closed with the status: Rejected by back-office. This means the request must be re-initiated with better information. When the back office confirms the request is valid, it is sent to the porting authority. The status will then be:
Validated, sent to NP Clearing house (2/4): If the porting authority refuses the request, it will be closed with the status: Rejected by the NP Clearinghouse. Reasons may include:
- One or more numbers are involved in another port.
- One or more numbers were ported too recently.
- Multiple ranges were provided as input.
- Other reasons.
If the request is sent to the NP Clearinghouse and relayed to the donor, the donor must either accept or reject the port. If accepted, the status changes to:
- Accepted by donor, ready to activate (3/4): If refused, the status will be: Rejected by donor. In this case, contact the current service provider to understand the reason for refusal.
Once the porting request is accepted, it is possible to either cancel or activate the port. The status will change accordingly.
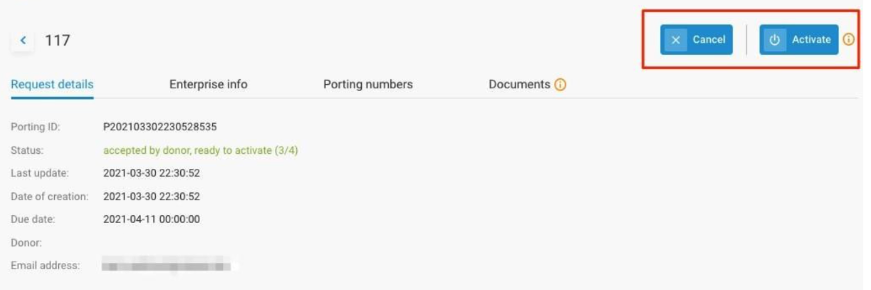
When clicking the Activate button:
- The numbers are added to the platform and are now ready for use.
- The donor and the porting authority are informed that the port must be activated. As soon as the broadcast is received from the porting authority, the status is changed to ACTIVATED.
NoteWhen you disconnect a ported-in number, it will not be visible in the disconnected tab. However, the number remains in quarantine for a while. Our Number Porting system will release the number to the donor after the quarantine period.
Mobility
The Mobility service displays mobile numbers added to your tenant for fixed-mobile integration. Only these numbers can be used for on-net mobility.

Devices
The device inventory page gives an overview of all devices used in that site/group. It provides a view of the Device name, type, and in some cases, the MAC address and free ports.
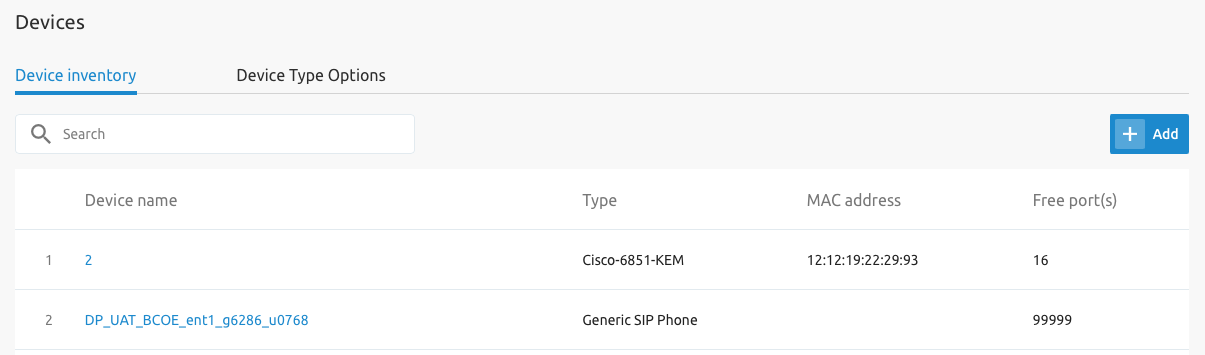
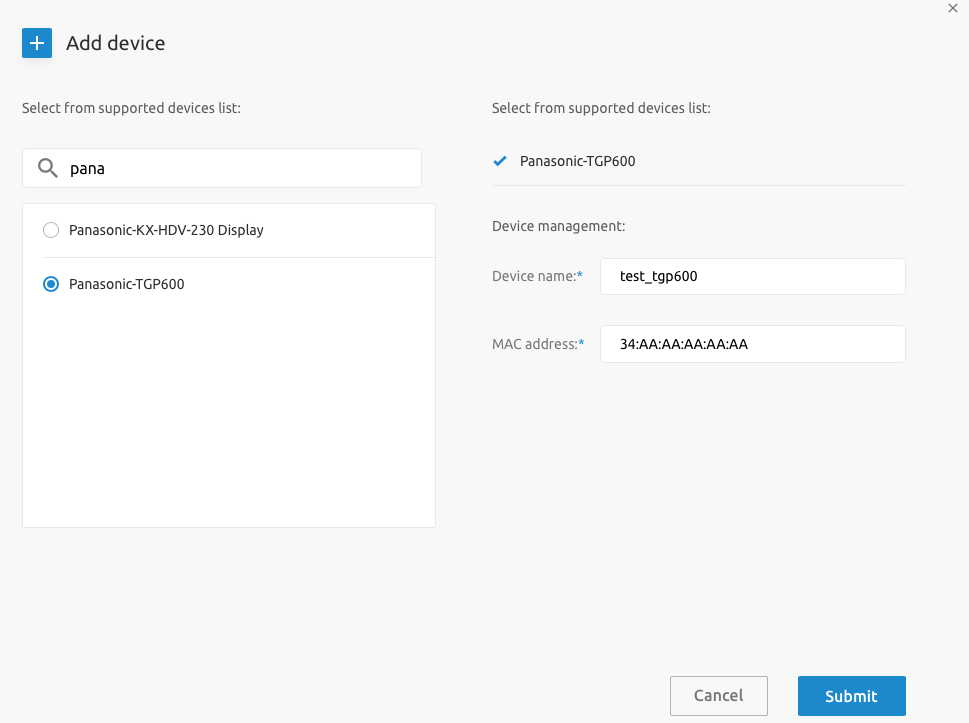
Adding a new device opens a new window where the device must be selected from a list. When a device is selected from a supported list, the device name and MAC address must be entered.
Once the device is created you get the below page:
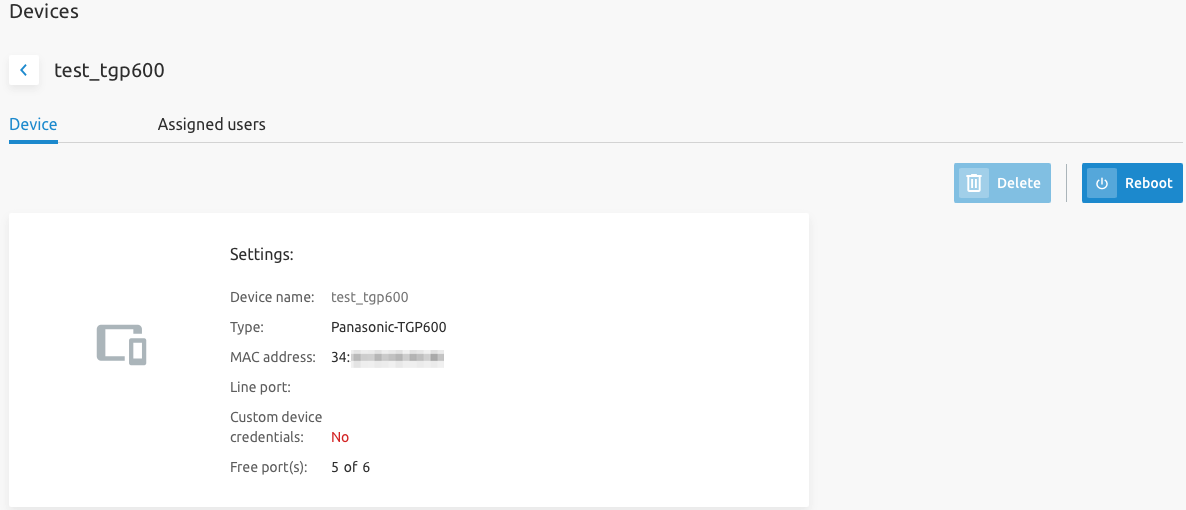
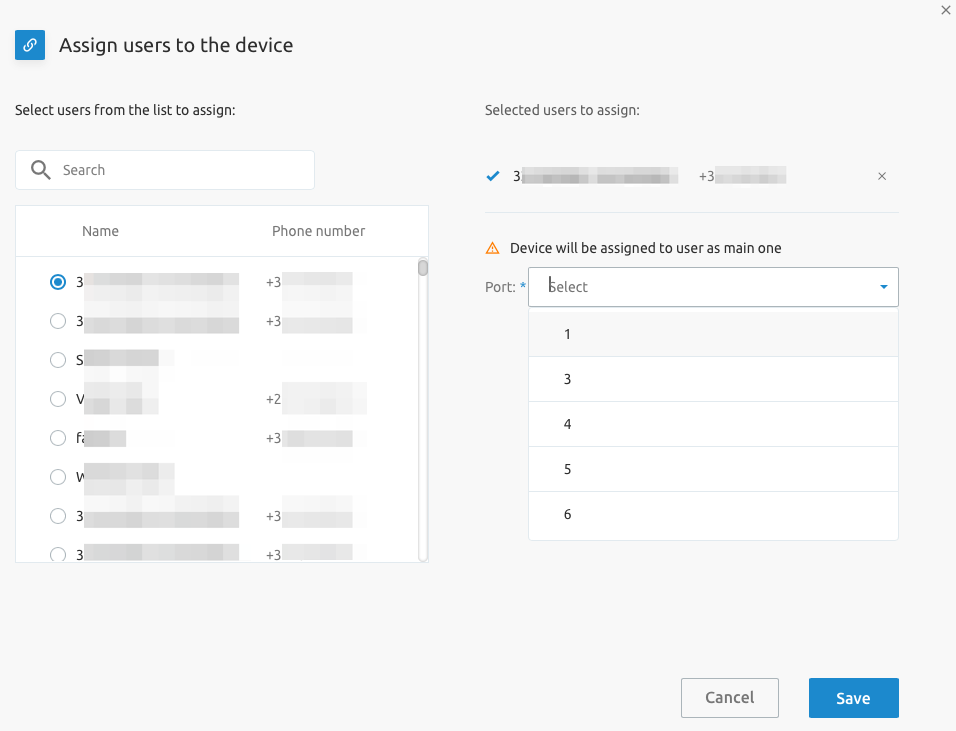
Clicking on the Assigned Users tab, allows you to Assign the device to a user. Once in this tab click Assign:
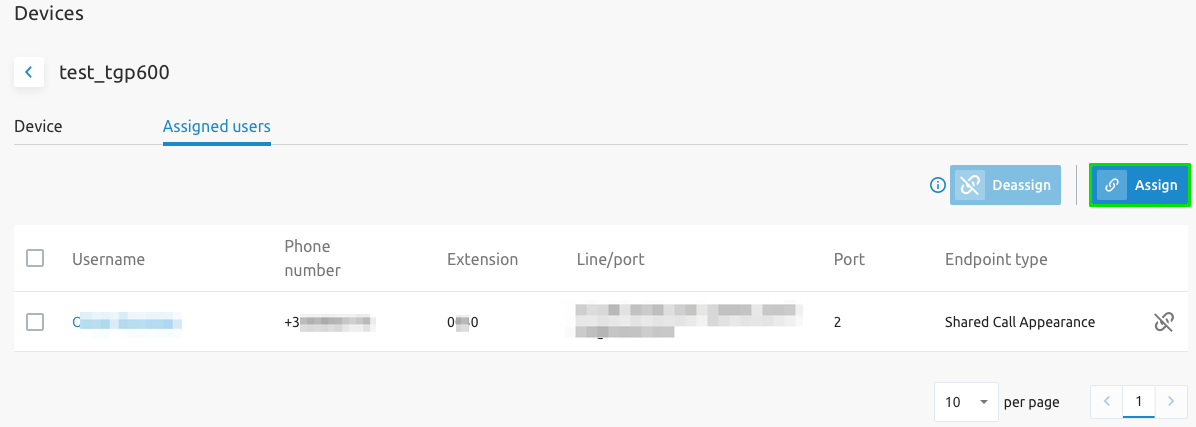
If Static Line Port ordering is configured for the SCP, you will be able to assign a port for this assignment.
Browsing to a user's "Devices" also allows you to configure their primary and additional devices.
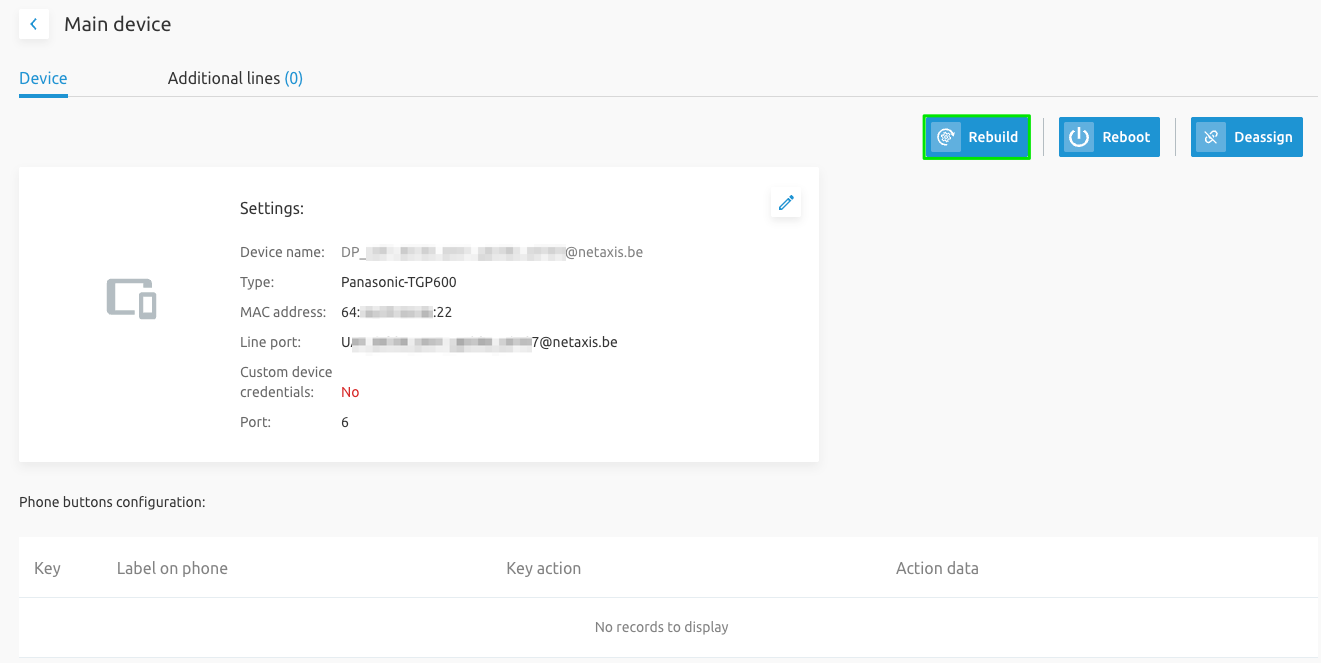
NoteThe "Rebuild" and "Reboot" buttons can be exposed by configuring backend parameters.
NoteThe Media Access Control (MAC) address can be made readonly at both User/Group Device pages to ensure consistent device identification across network management systems. A backend parameter enables this.
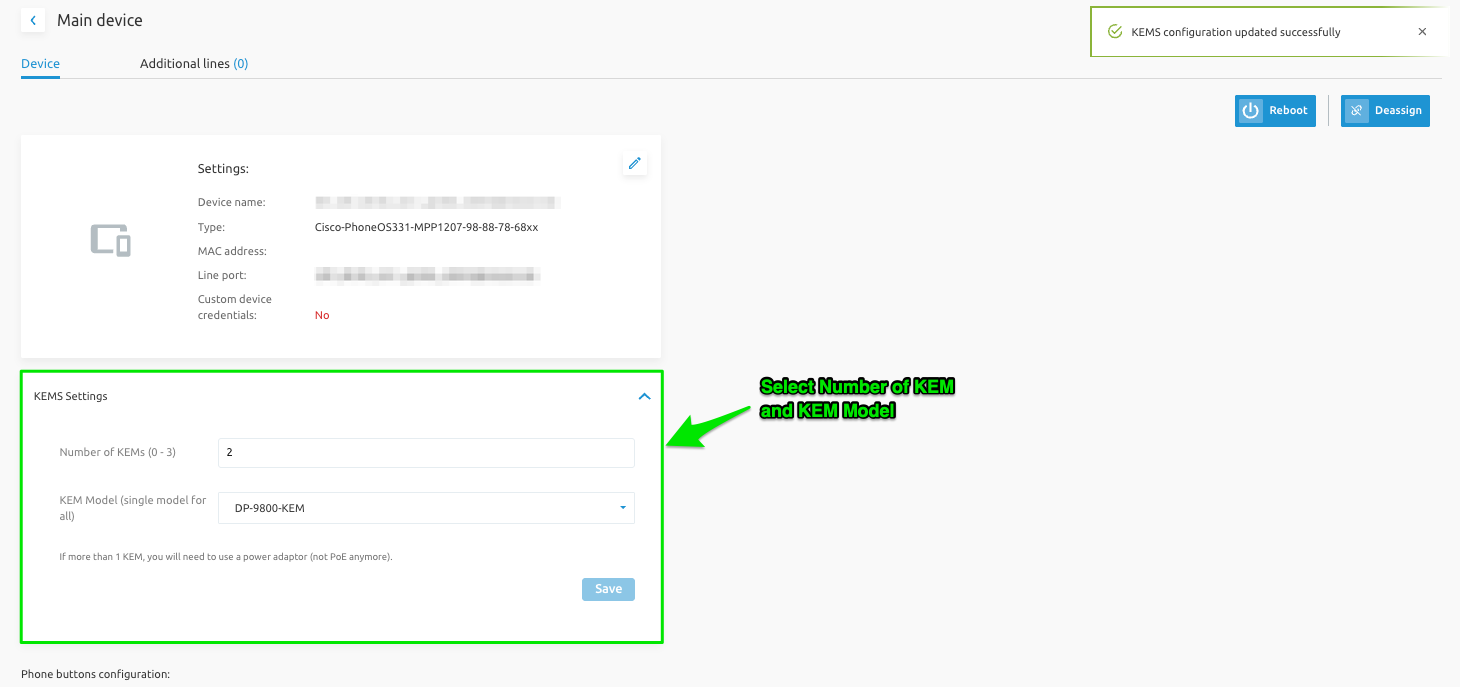
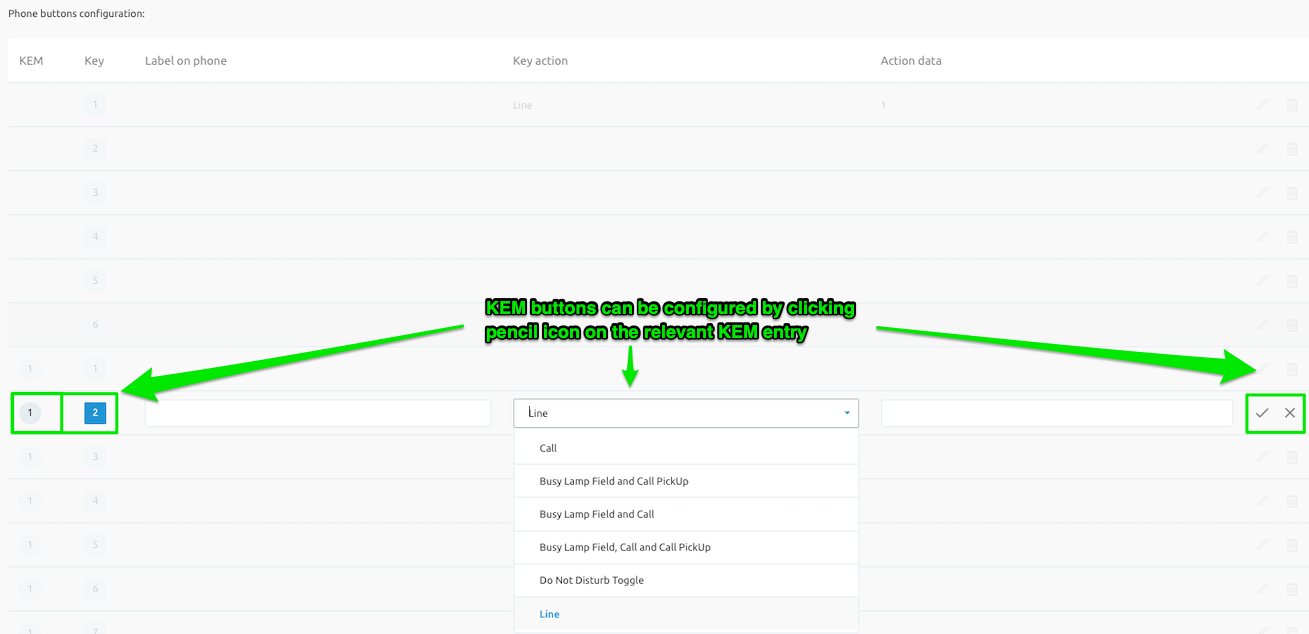
Some devices have expansion modules like the Cisco Key Expansion Module (KEM). Administrators can configure these devices by selecting the number of KEMs and the KEM Model to be assigned to a device.
TipThe Busy Lamp Field (BLF) should be assigned to the end user and configured under their Contacts page prior to KEM "BLF-related" entry configurations
Media
The media service allows the administrator to define announcements for use by other services within the group (e.g., on voicemail), as well as Music On Hold (MoH) and Custom Ringback Tone (RBT) for the Group. You can search through your media using the "Search" bar.
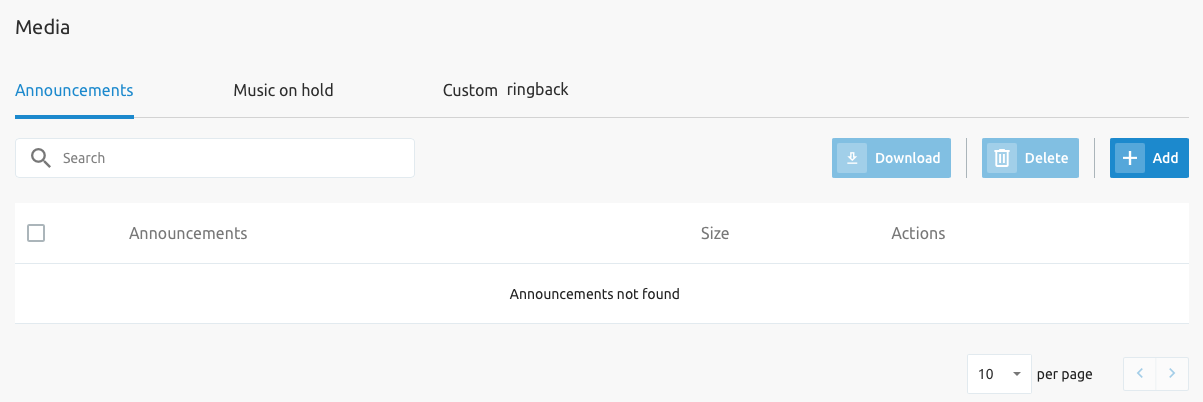
Adding new media can be done by uploading a media file, recording an announcement, or selecting a media file from the library.
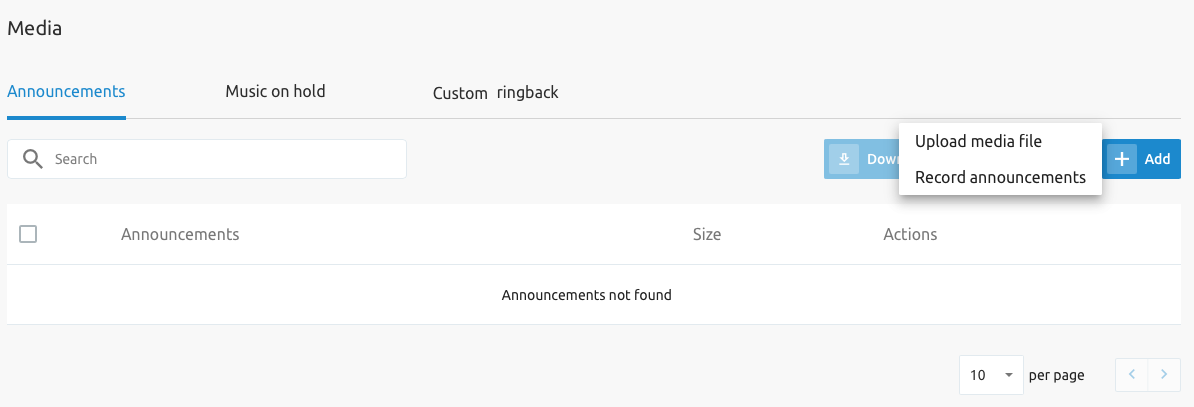
On the Music on Hold tab, it is possible to define when Music on Hold needs to be played to callers, as well as a custom MOH tone.
NoteThe MoH Group service needs to be assigned to the group.
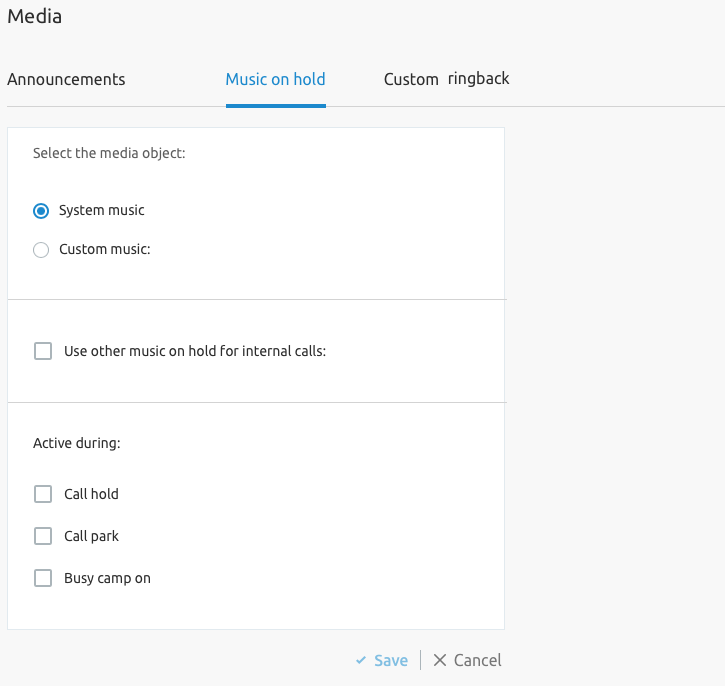
On the Custom Ringback tab, it is possible to enable custom ringback (tone) for the group.
NoteThe Custom Ringback Group service needs to be assigned to the group for this tab to be visible.
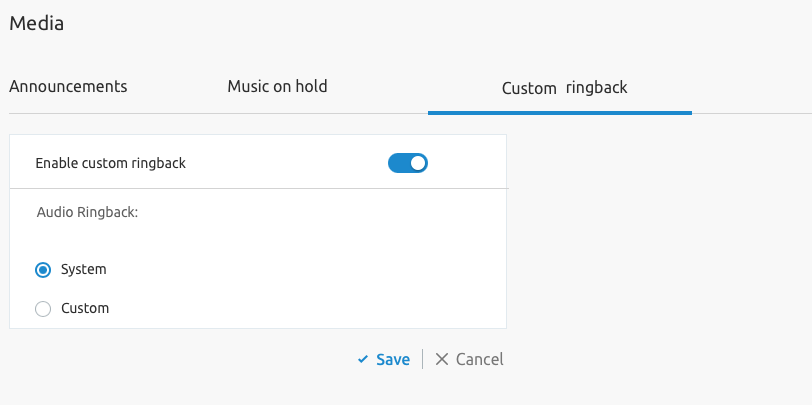
Trunk Groups
The F4B Trunkgroup service represents BroadWorks Business Trunking Enterprise Trunks, where trunks can be grouped to load balance traffic and provide redundancy.
Enterprise trunk management allows grouping the 'trunks' into logical "trunk groups," so that different routes (connections) can be created from the Broadworks solution to an endpoint (network, SBC, etc.). This way, the load can be spread over different routes, or a backup route can be provided.
- In the tenant/enterprise Trunkgroup is representing Enterprise Trunks
- In the group/site Trunking is representing Trunk Groups.
How it is done:
- When Business Trunking service is assigned (BTLU's assigned i.e. 63), you are presented with a Trunking menu with the ability to configure simultaneous calls for the group:
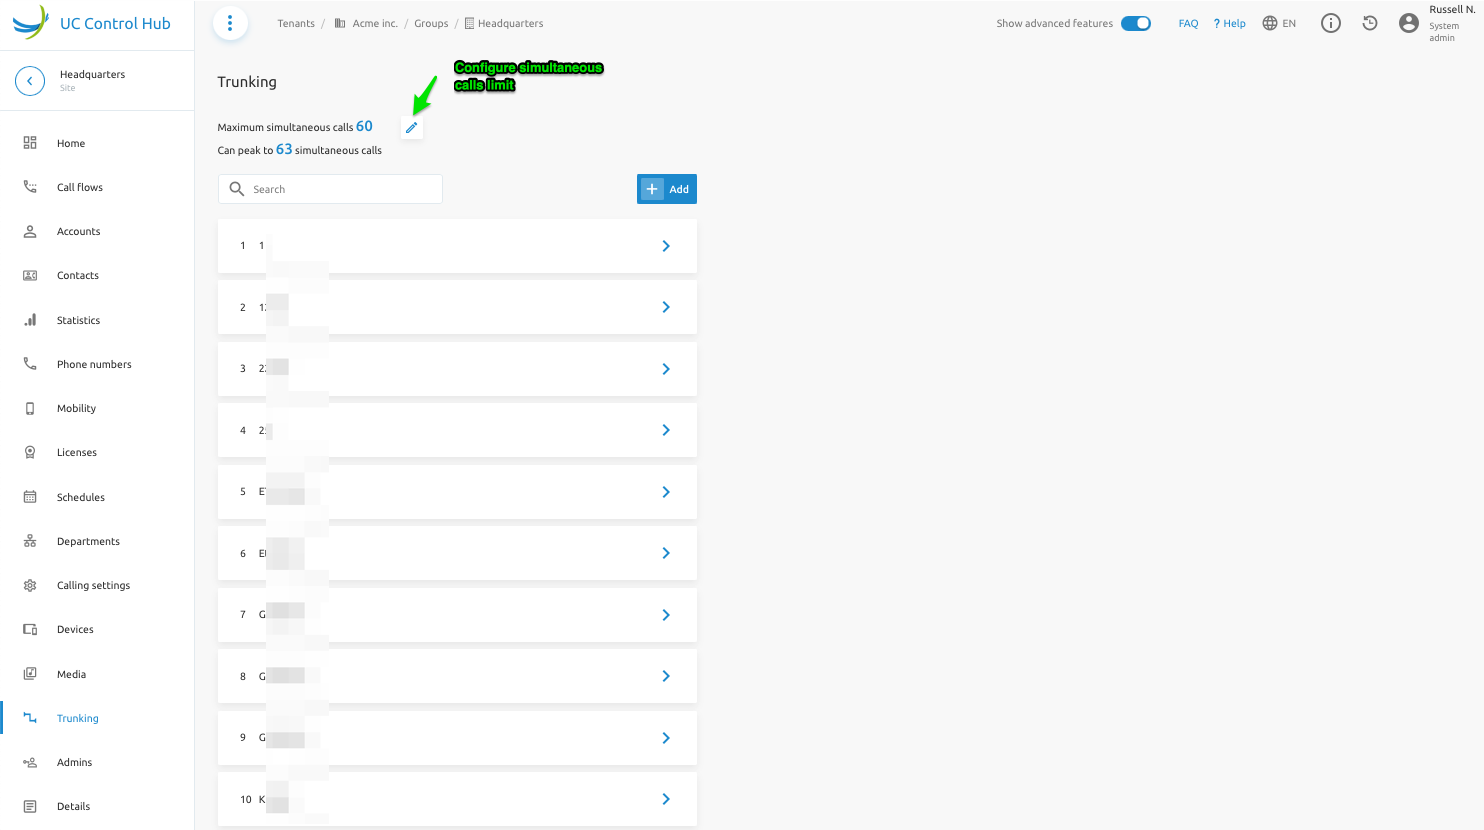
- A trunk group must be created at the group level. These trunk groups are the point-to-point connections between the Broadworks solution and the network. An intuitive wizard allows you to "Create Trunk" with a Point ot Presence, add optional "Authentication" details for the trunk group and optionally select "Pilot User" for the trunk.
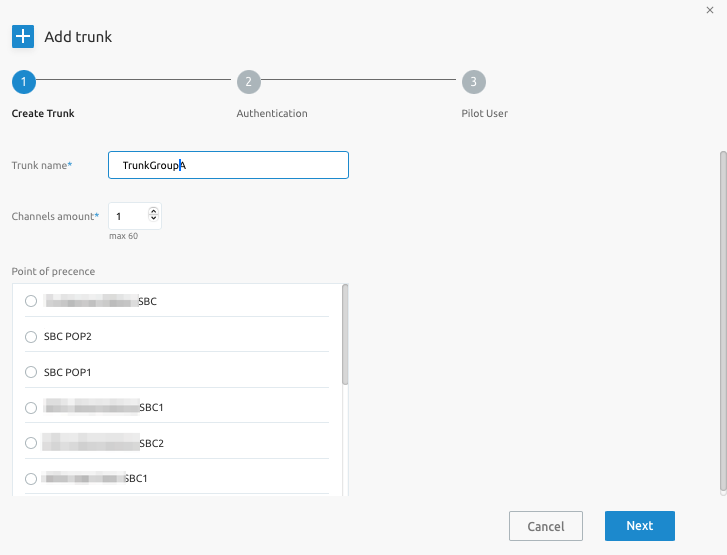
Next the trunk group can be further configured with:
- Access details - customise authentication details of the trunk.
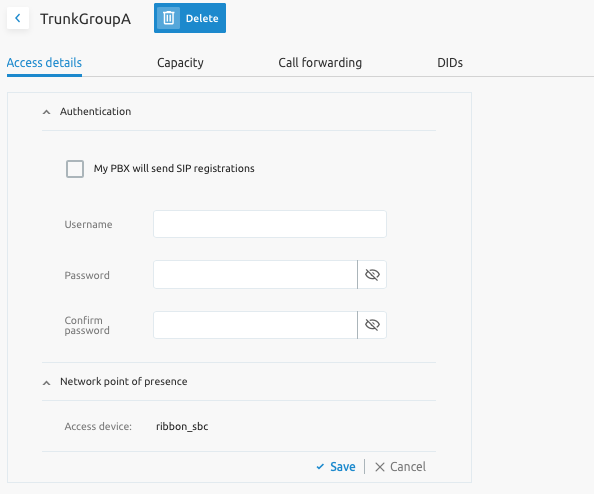
- Capacity - configure maximum number of simultaneous and/or incoming and/or outgoing calls. As well the same settings for bursting.
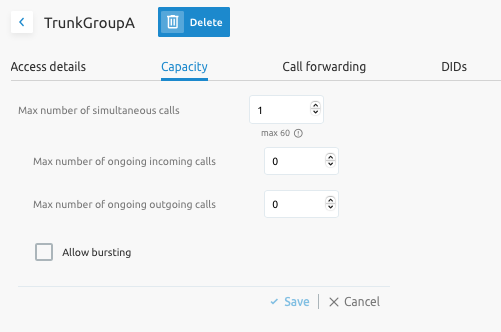
- Call forwarding - configure call forwarding for the trunk group.
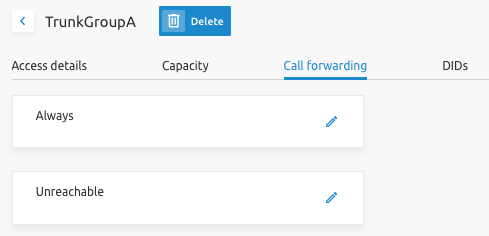
- DIDs - assign phone number(s) to the trunk group and subsequently create the trunk users with the phone number(s).
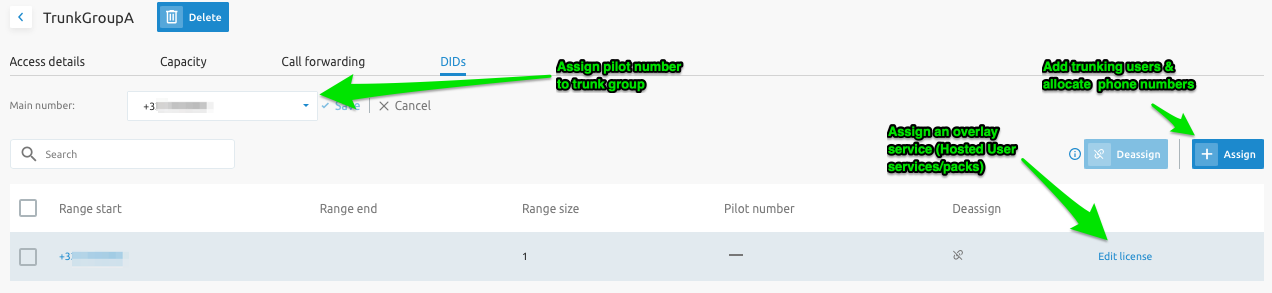
- An enterprise trunk is created, which is a trunk group that creates redundant groups of trunks.

An intuitive wizard is provided when adding an Enterprise Trunk in the Enterprise:
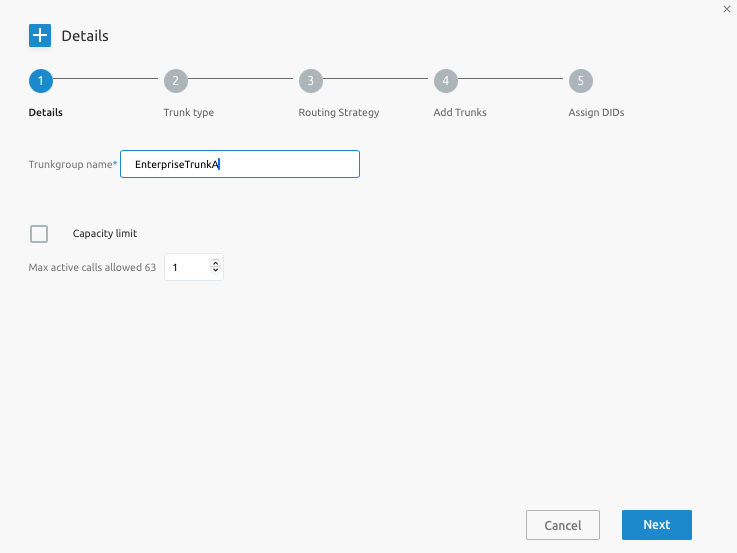
The wizard provides the below steps:
- Details - Add capacity limits for the trunk
- Trunk type
Ordered enterprise trunks: In the selection criteria, the first trunk is always selected. If this first trunk is out of service or overloaded, the next one is taken, and so on.
Weighted enterprise trunks: It is possible to set a priority and a weight for the trunks. The trunk with the highest priority is taken first. If multiple trunks share the same priority, traffic is spread according to the provisioned weight.
- Routing Strategy - Configure rerouting attempts and/or forwarding
- Add Trunks - select trunk groups to be added to the Enterprise Trunk
- Assign DIDs - create Enterprise Trunk (ET) users and assign phone numbers to them
Once the ET is created, you can add more ET users in the DIDs tab of the ET:

Trunk Users can also be viewed from the Tenant/Enterprise "Accounts" page:
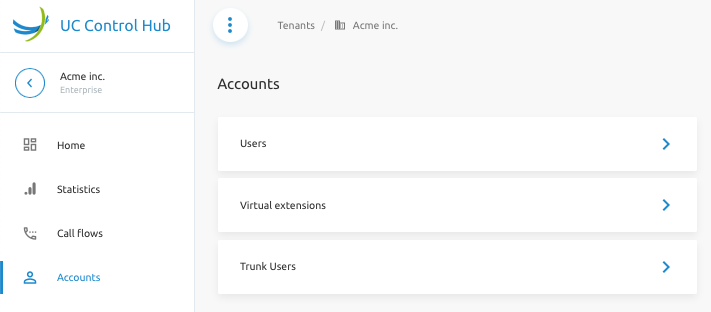
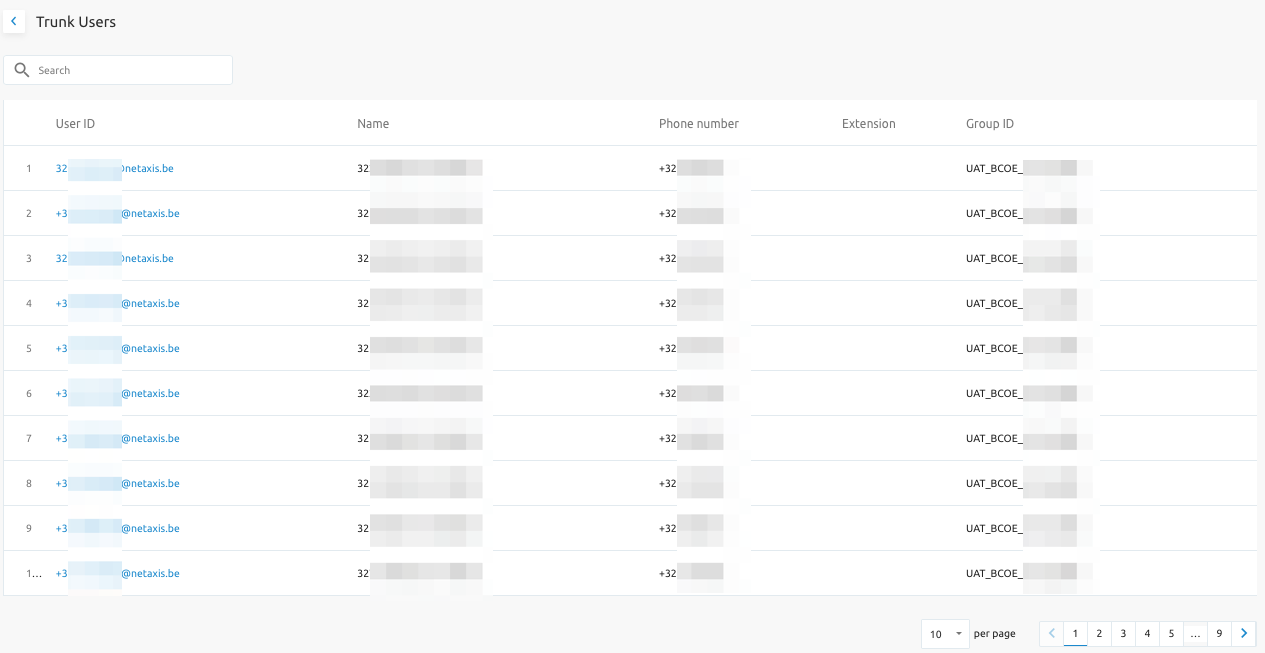
Cloud Connections
The F4B solutions provides the management of Cloud Connections. This service is about integrating the Broadworks application (Hosted PBX or Business Trunking) with UCaaS applications e.g. Microsoft Teams Direct Routing.
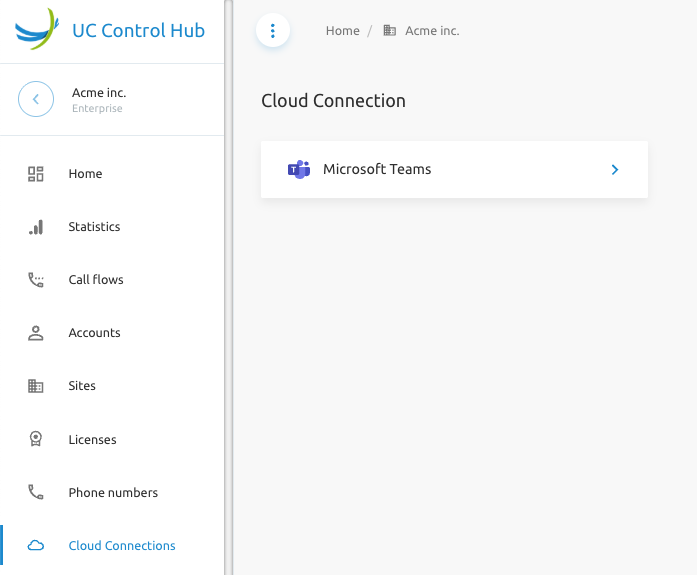
Microsoft Teams Direct Routing Integration
F4B provides a holistic modular Direct Routing solution that provides a hybrid cloud carrier grade solution which includes:
- Teams tenant provisioning
- Number management and provisioning
- OSS/BSS integrations (optional)
- Automated DNS provisioning (optional)
- Automated SBC configuration (optional)
The administrator has the ability to add an integrated mapping of a BroadWorks Enterprise/Group with a Teams tenant. The process of adding the integration is outlined below:
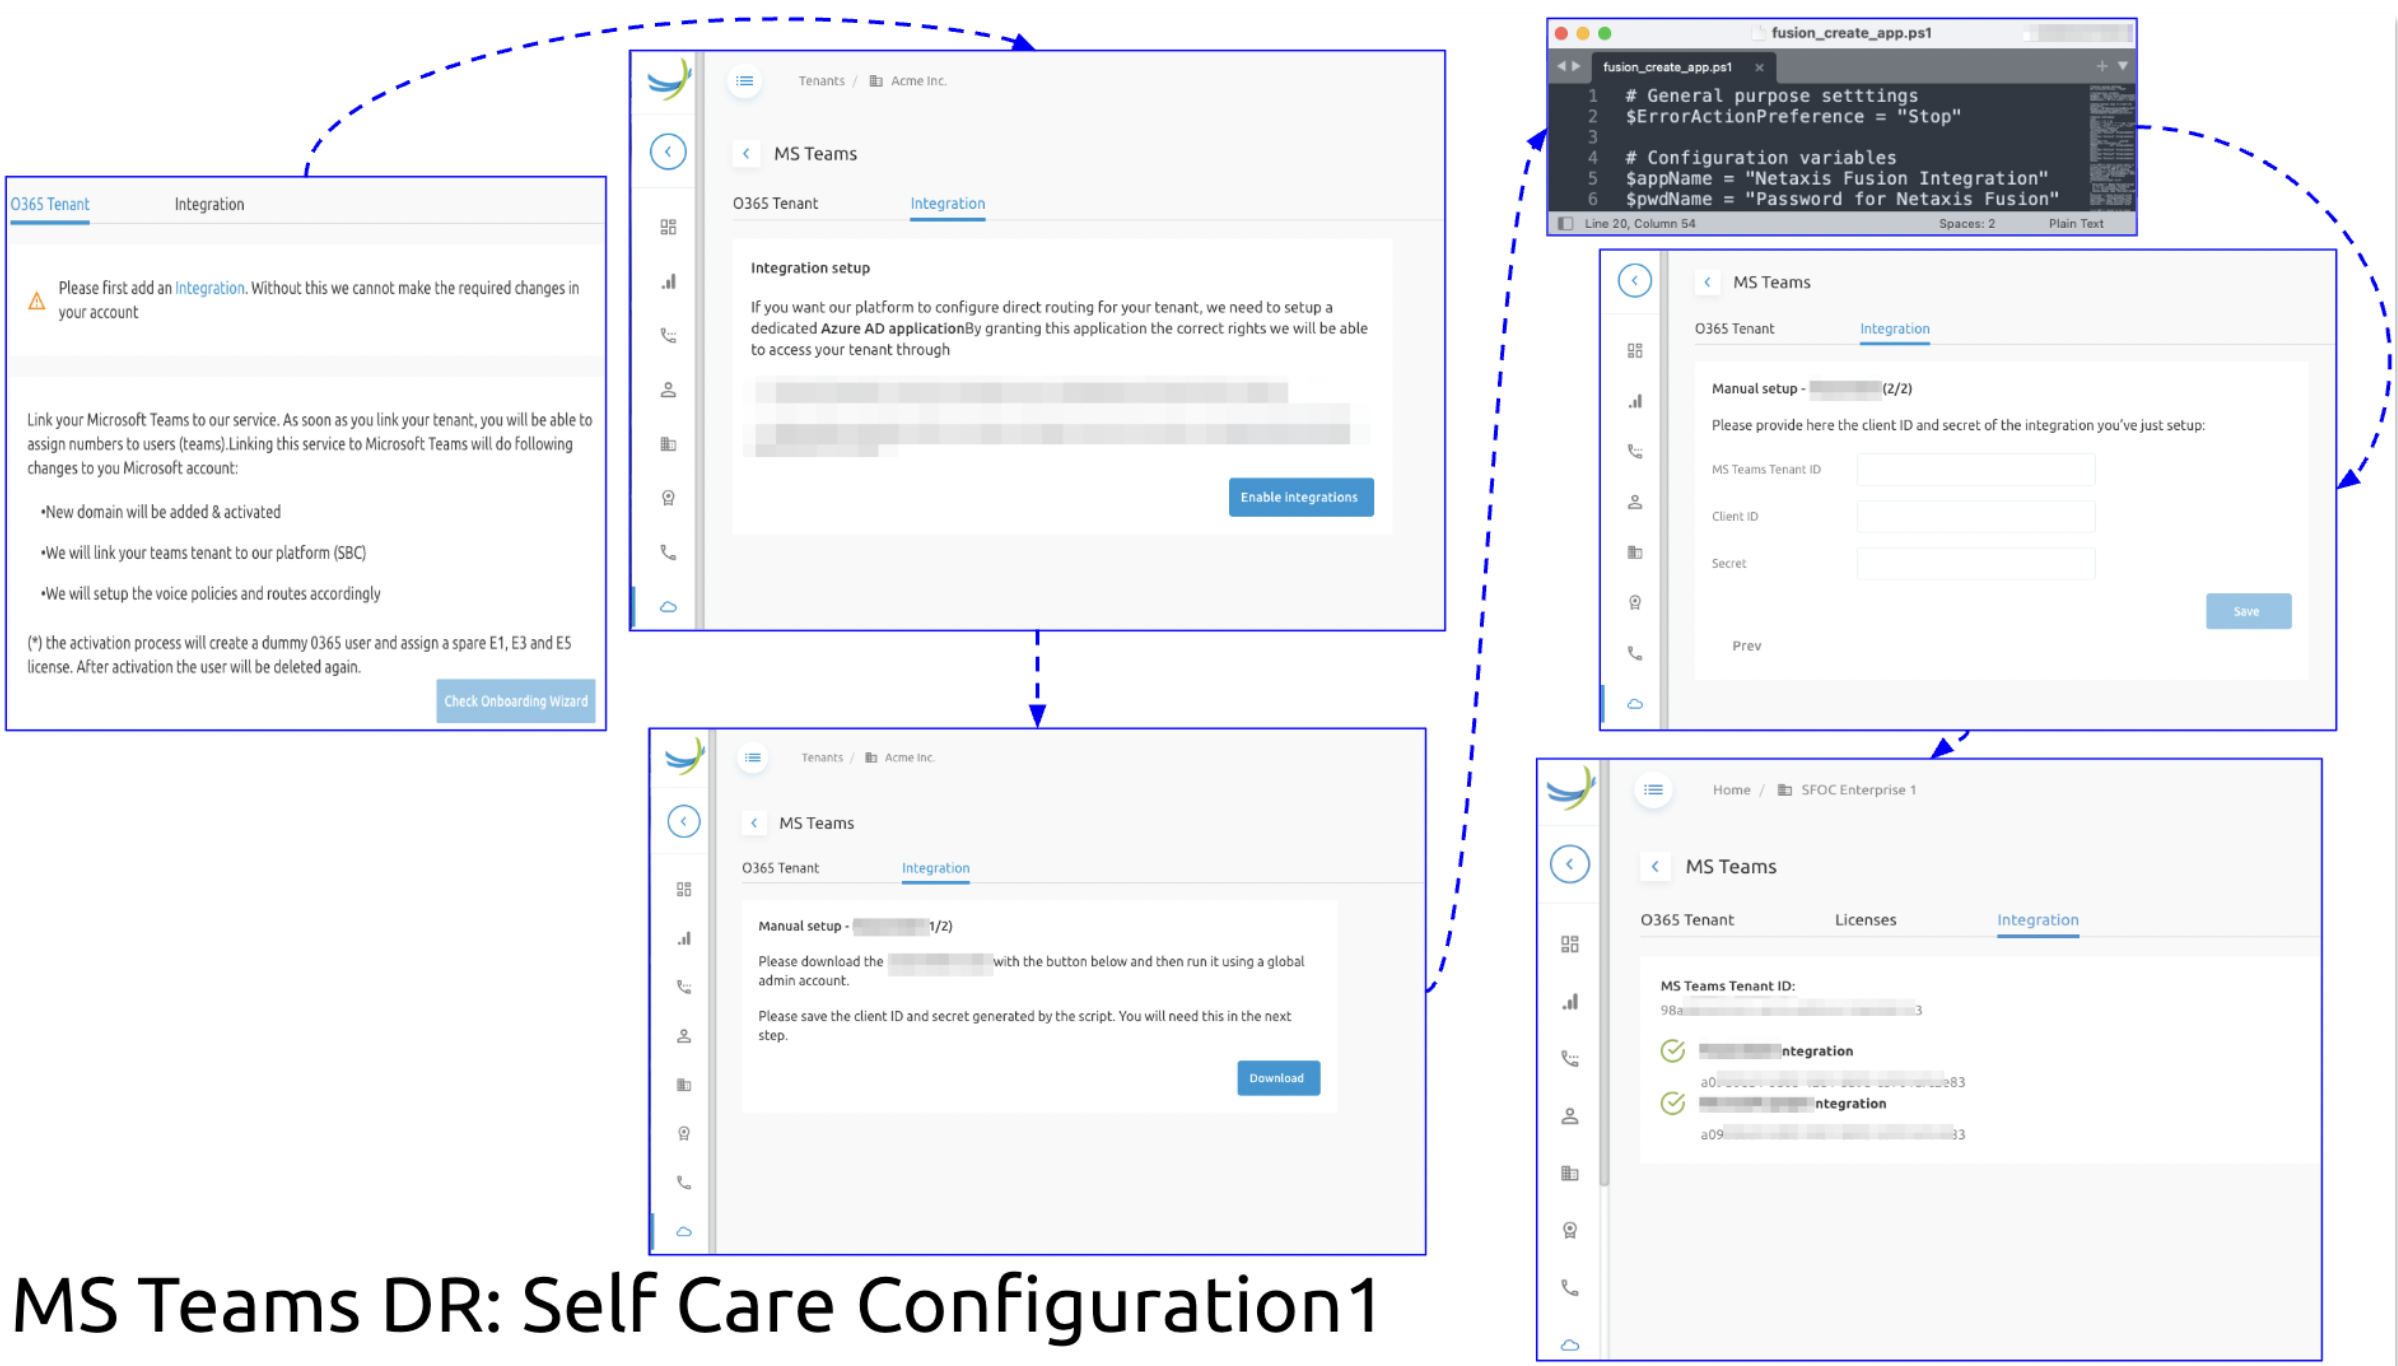
The administrator then has the ability to assign phone numbers from a business trunk to the teams users in an intuitive process outlined below:
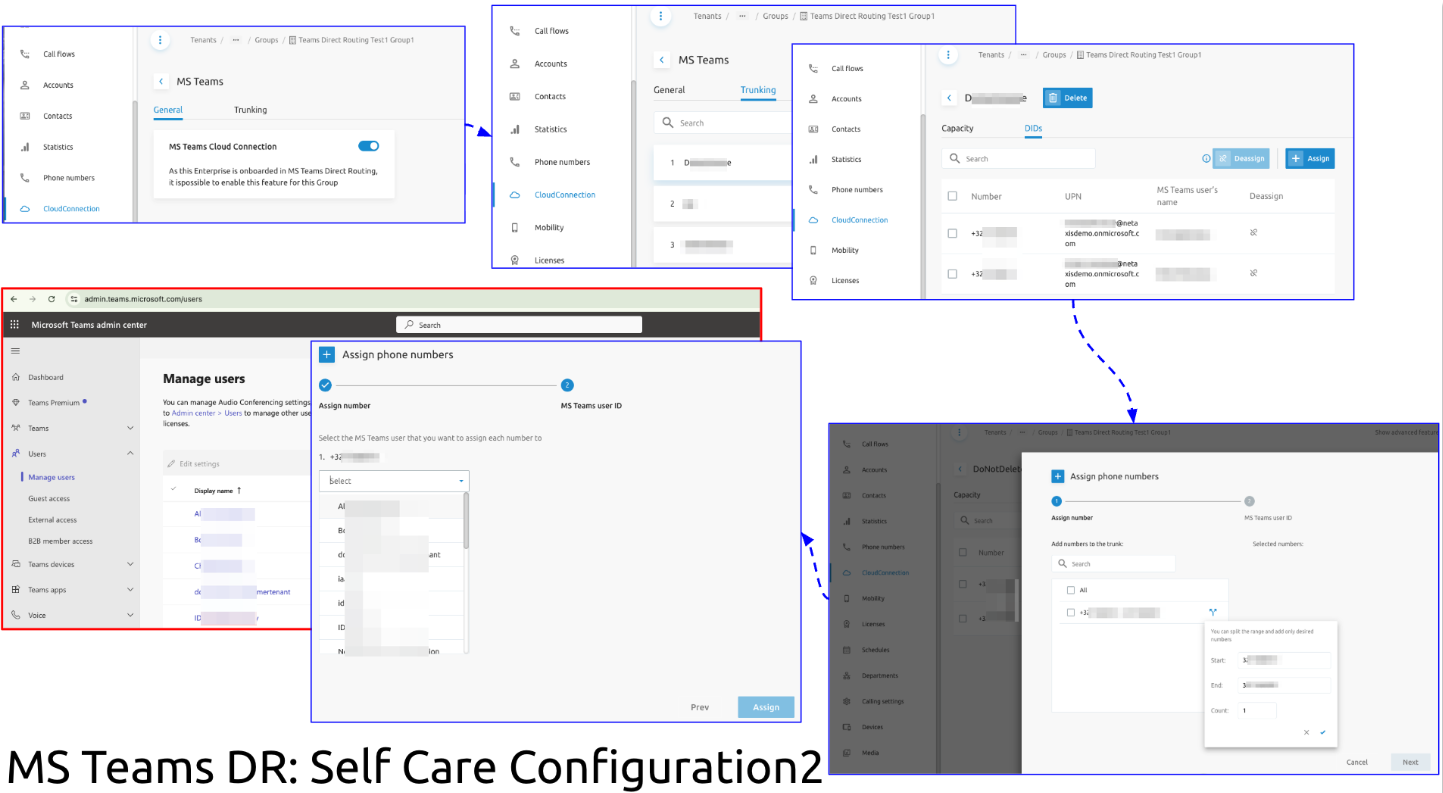
NoteBroadWorks Hosted PBX users can also be linked to the trunk for call forking flows (Shared Call Apperance, SCA)
Departments
A department is an optional classification within a group. The SCP offers the ability to add, edit, and delete departments in the Broadworks solution. Each department has its own CLI phone number and could use its own CLI name.
NoteThe Department "CLI Phone number" field can optionally be made readonly via a configuration parameter.
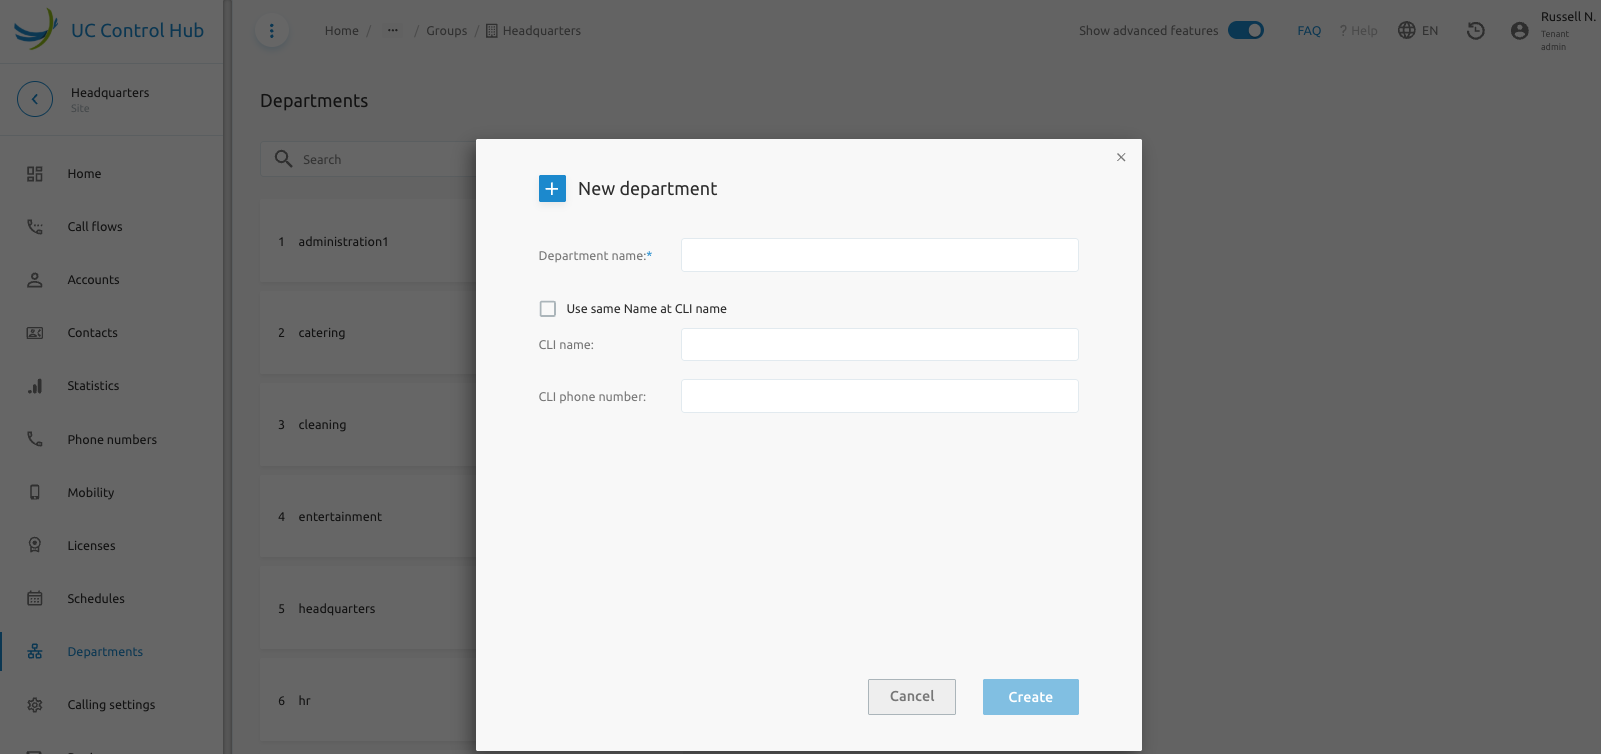
Details - Inventory Report
An Inventory Report tab is avaialbale in the Details page at group level. The goal of this feature is to generate an inventory report from the backend and send it by email.
In the SCP, the page will display a set of parameters to define what can be in the report:
- Users (all users: end users and service users/call flows)
- Services (by default not selectable)
- Numbers
- Devices
- Departments (by default not selectable)
For the email address, if the connected user already has an email address, this field is pre-filled. If not, the field is empty and a valid email address must be entered.
The figure below shows the Inventory Report service.
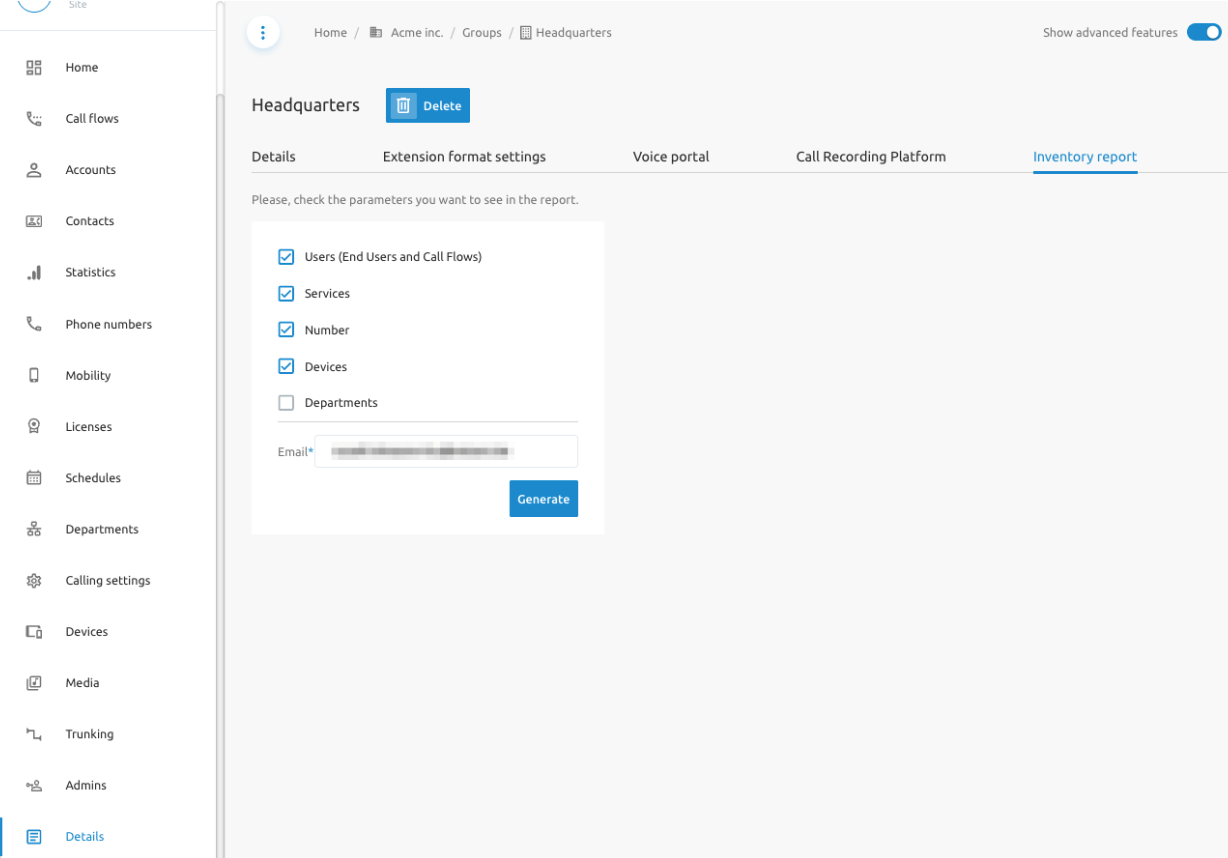
The Generate button requests the report generation. As soon as the report is generated, the user is informed.

Contacts
The Contacts service manages external contacts and is available at each level (Tenant, Group, and End User) for administrators. Contacts are created (added) by the administrator at that specific level (Tenant, Group, and End User) and visible for the respective persona
Enterprise/Group Contacts
There are a few ways to add new contacts: one by one via the Add button or in bulk via the Upload csv button. The page also offers the ability to download the list of contacts.
The screenshot below shows the Contacts service at the Tenant level.

It is also possible to synchronize with the Webex directory at the Group level. The service allows an administrator to synchronize the contact list in Broadworks with the Webex directory on demand.

User Contacts
Administrators can manage contacts for end users, in the respective user's configuration page. Four types of contacts can be managed namely:
- Speed Dials: allow dialing a contact (number or person) by dialing just a single digit instead of their full extension or phonenumber.
- Speed Codes: allow dialing a contact using a double-digit code.
- All Contacts: show a list of all your contacts, with their name, phone number, extension (if they have one), the type of contact (User contact, yourself, Group contact, Colleague & Call flows) and their mobile number.
- Busy Lamp Field (BLF): when BLF service is assigned to a user, users group-wide or enterprise-wide can be added to the BLF list (managed by a parameter).
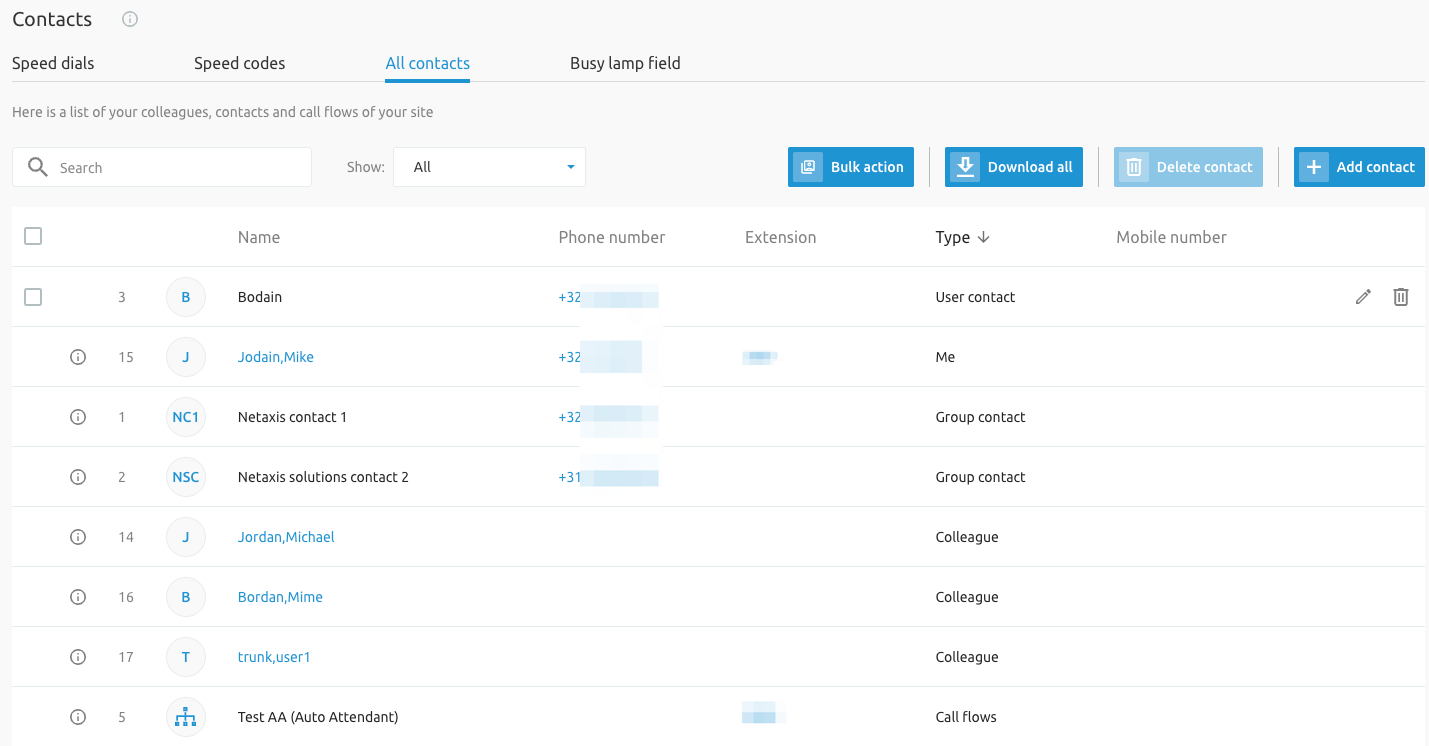
Search
At the Tenant level, there is also a Search service that allows you to search the tenant for the following categories:
- Users
- Devices
- Sites
Different filters can be set per category, as well as an Advanced Search. The screenshot below gives an example of the search filters for the users' category.
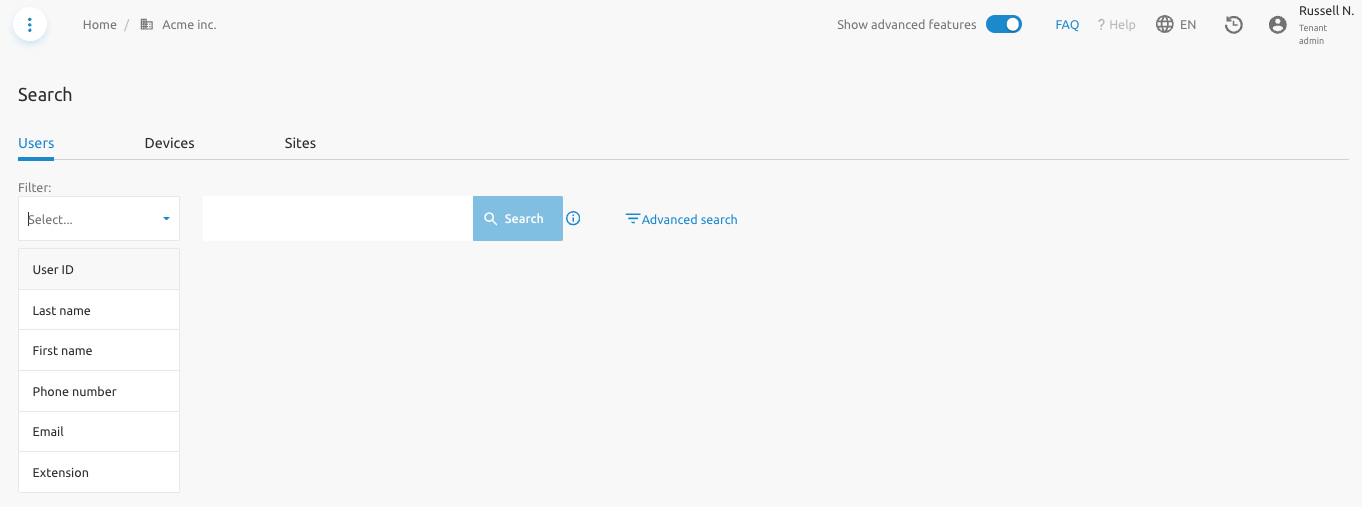
Selecting the Advanced Search for the users' category will open the following screen:
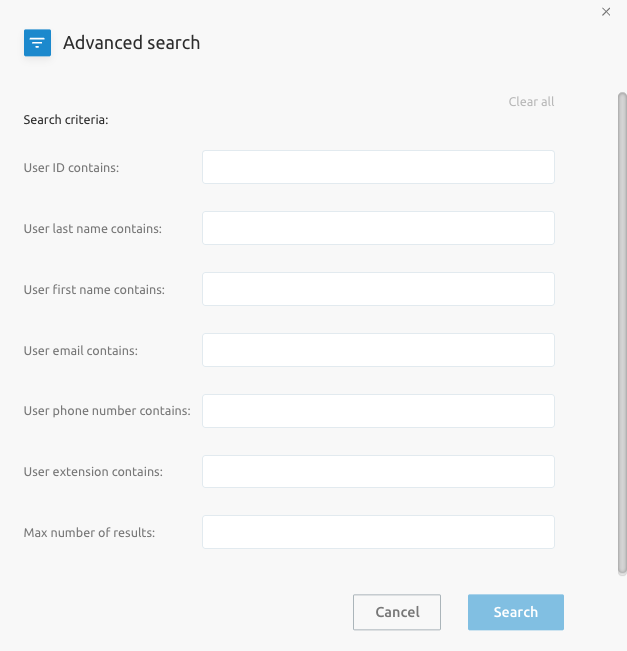
Analytics and Reporting
This section describes analytics and reporting features specific to F4B SCP.
Call Logs
Basic Call Logs stored on the BroadWorks AS are available for users and call flows (virtual services). The SCP supports and displays them when the relevant service is assigned:
- Users can view and delete BroadWorks Basic Call Logs (last 20 calls)
- Administrators can view and delete BroadWorks Basic Call Logs for virtual services like call center, hunt group (last 20 calls)
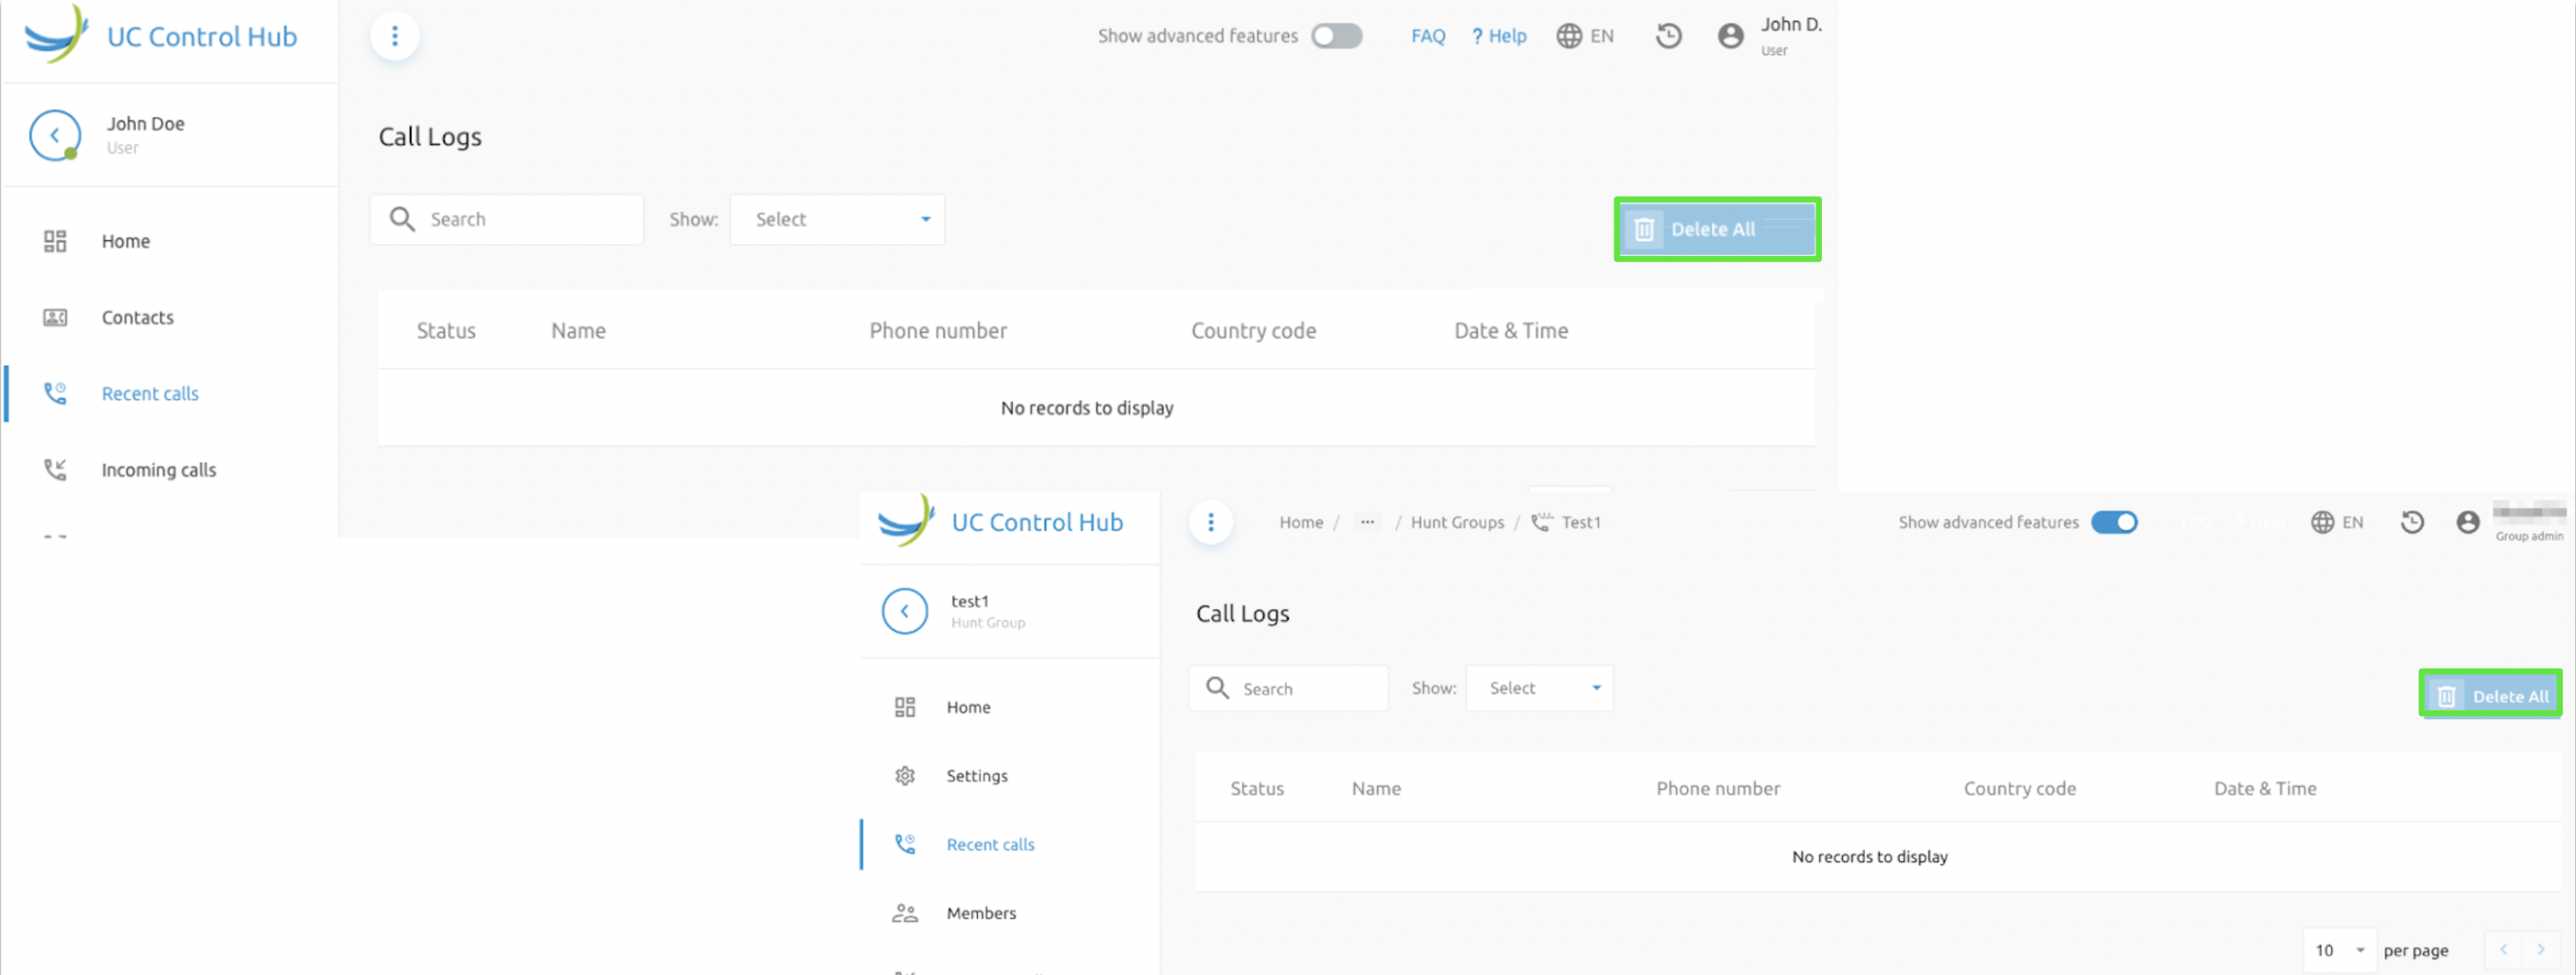
TipIt is possible to configure optional Service Provider's privacy disclaimers, to be displayed to tenant/group administrators in Call Logs pages of Call Flows (Call Center, Hunt Group and IVR).
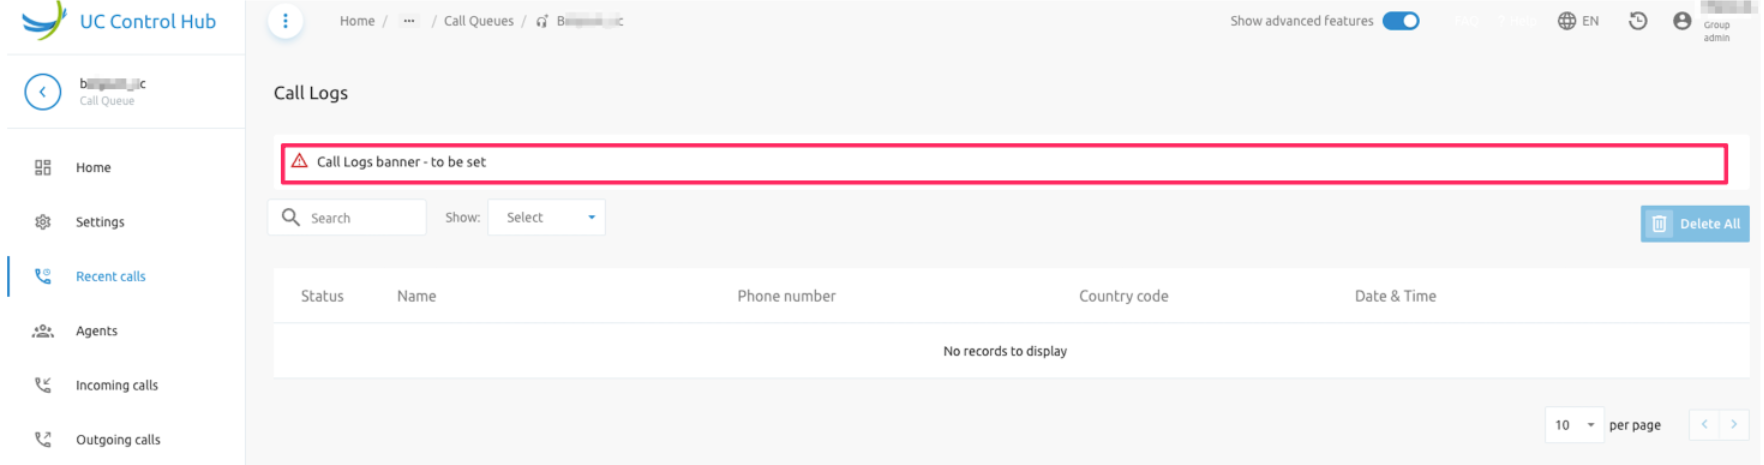
Call Statistics
F4B Call Statistics are platform-wide BroadWorks CDRs, split by F4B into Enterprise/SP and its Groups to offer Statistics. The F4B Network Monitoring (NEMO) solution is utilised to provide this capability.
Examples are given below for tenant and group wide statistics:
- Tenant Call Statistics Charts
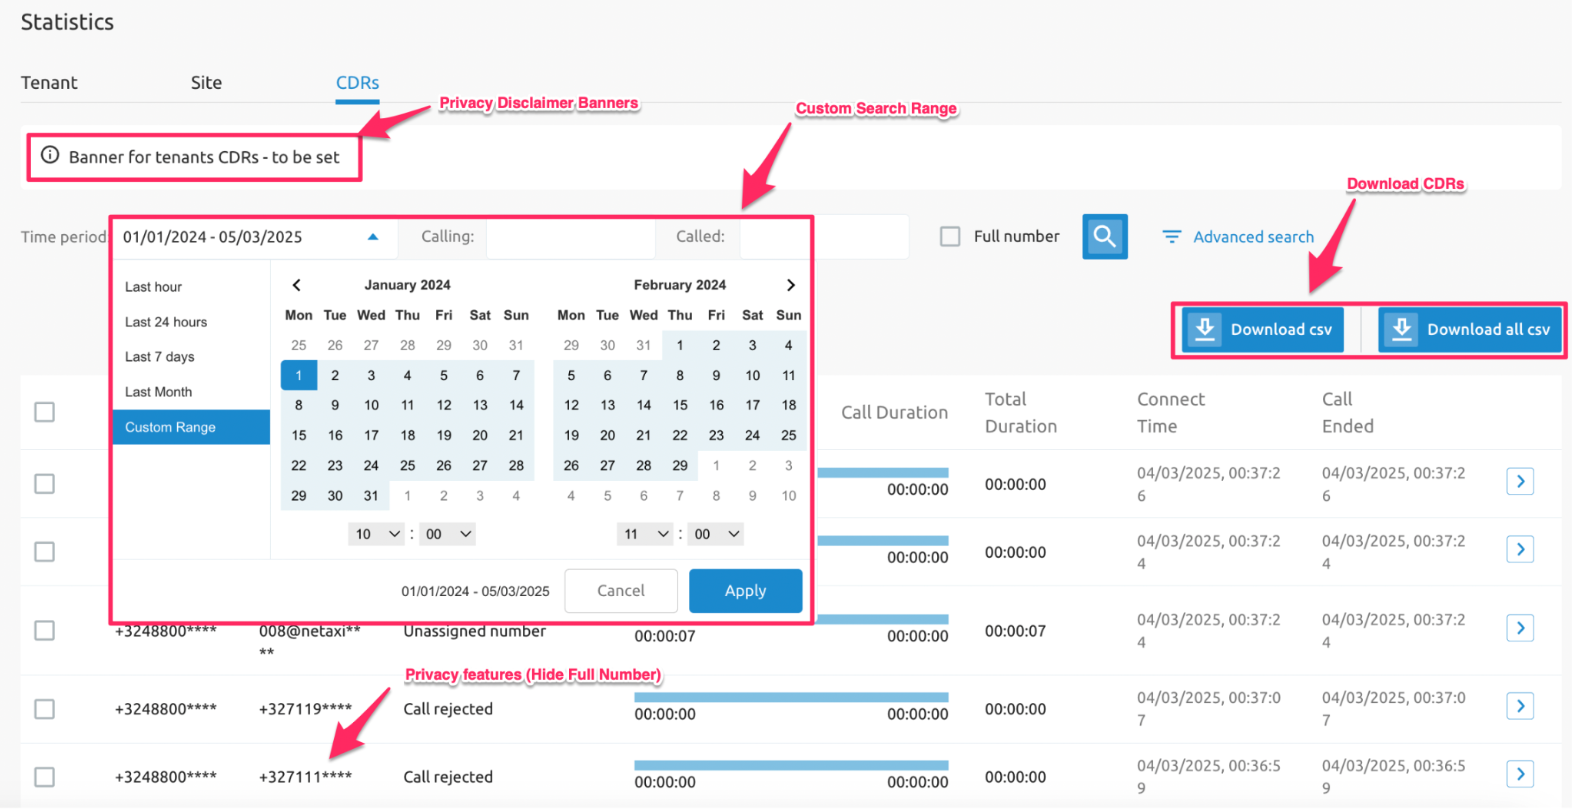
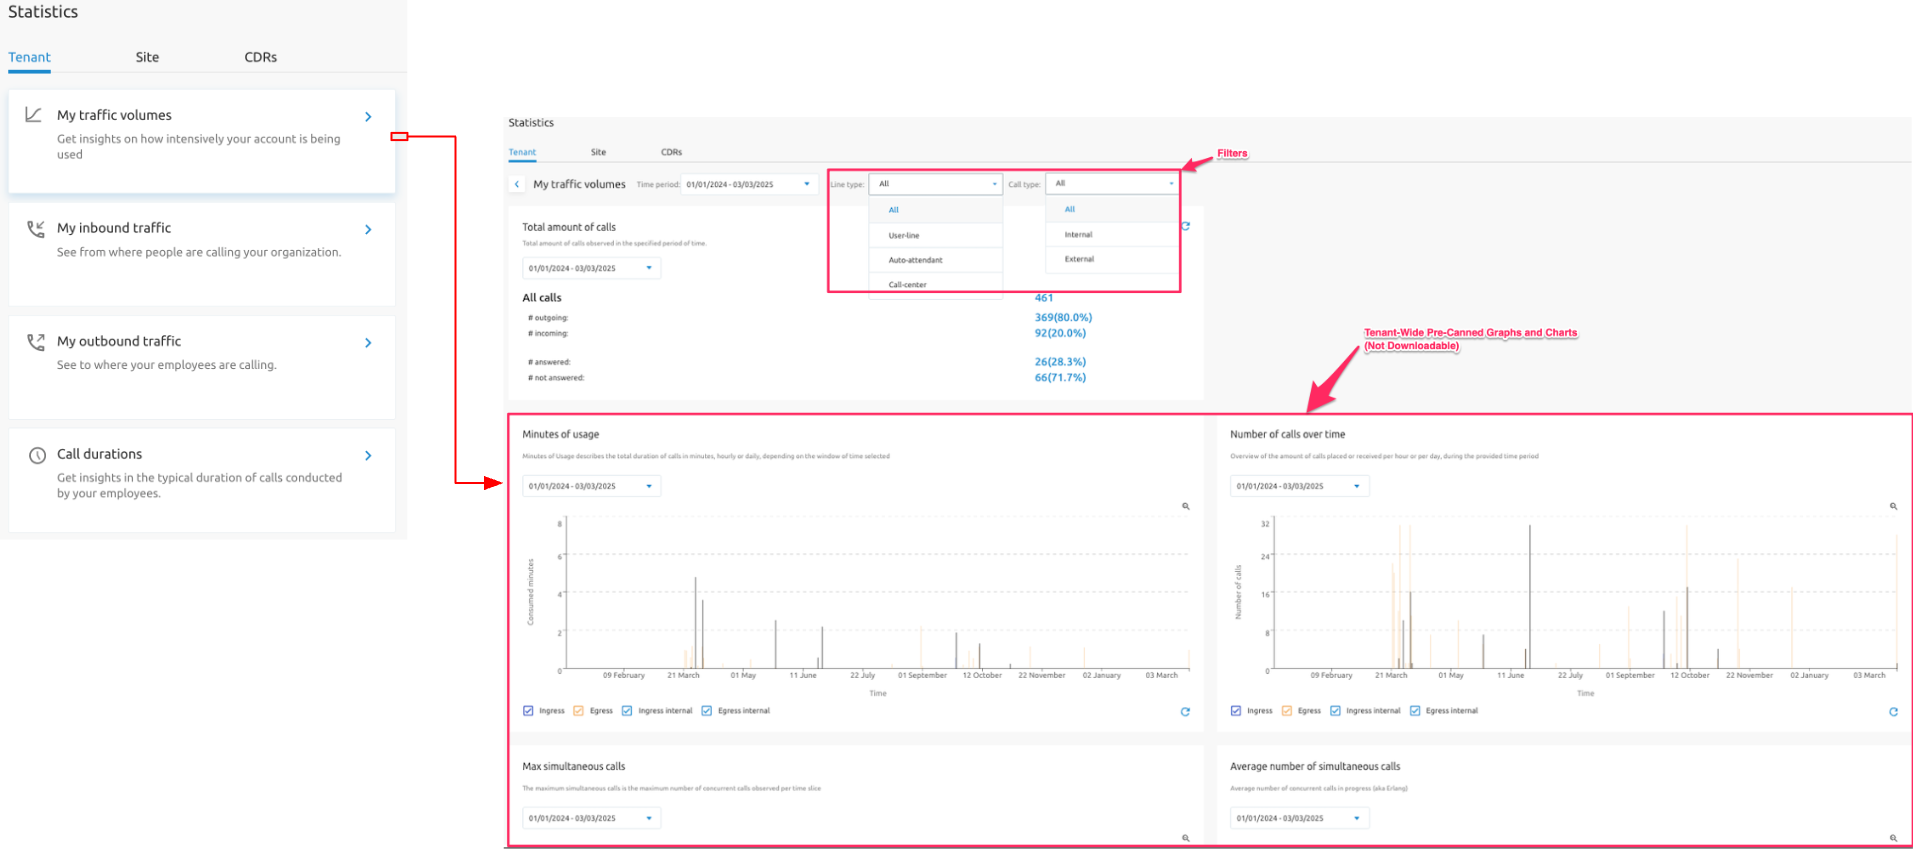
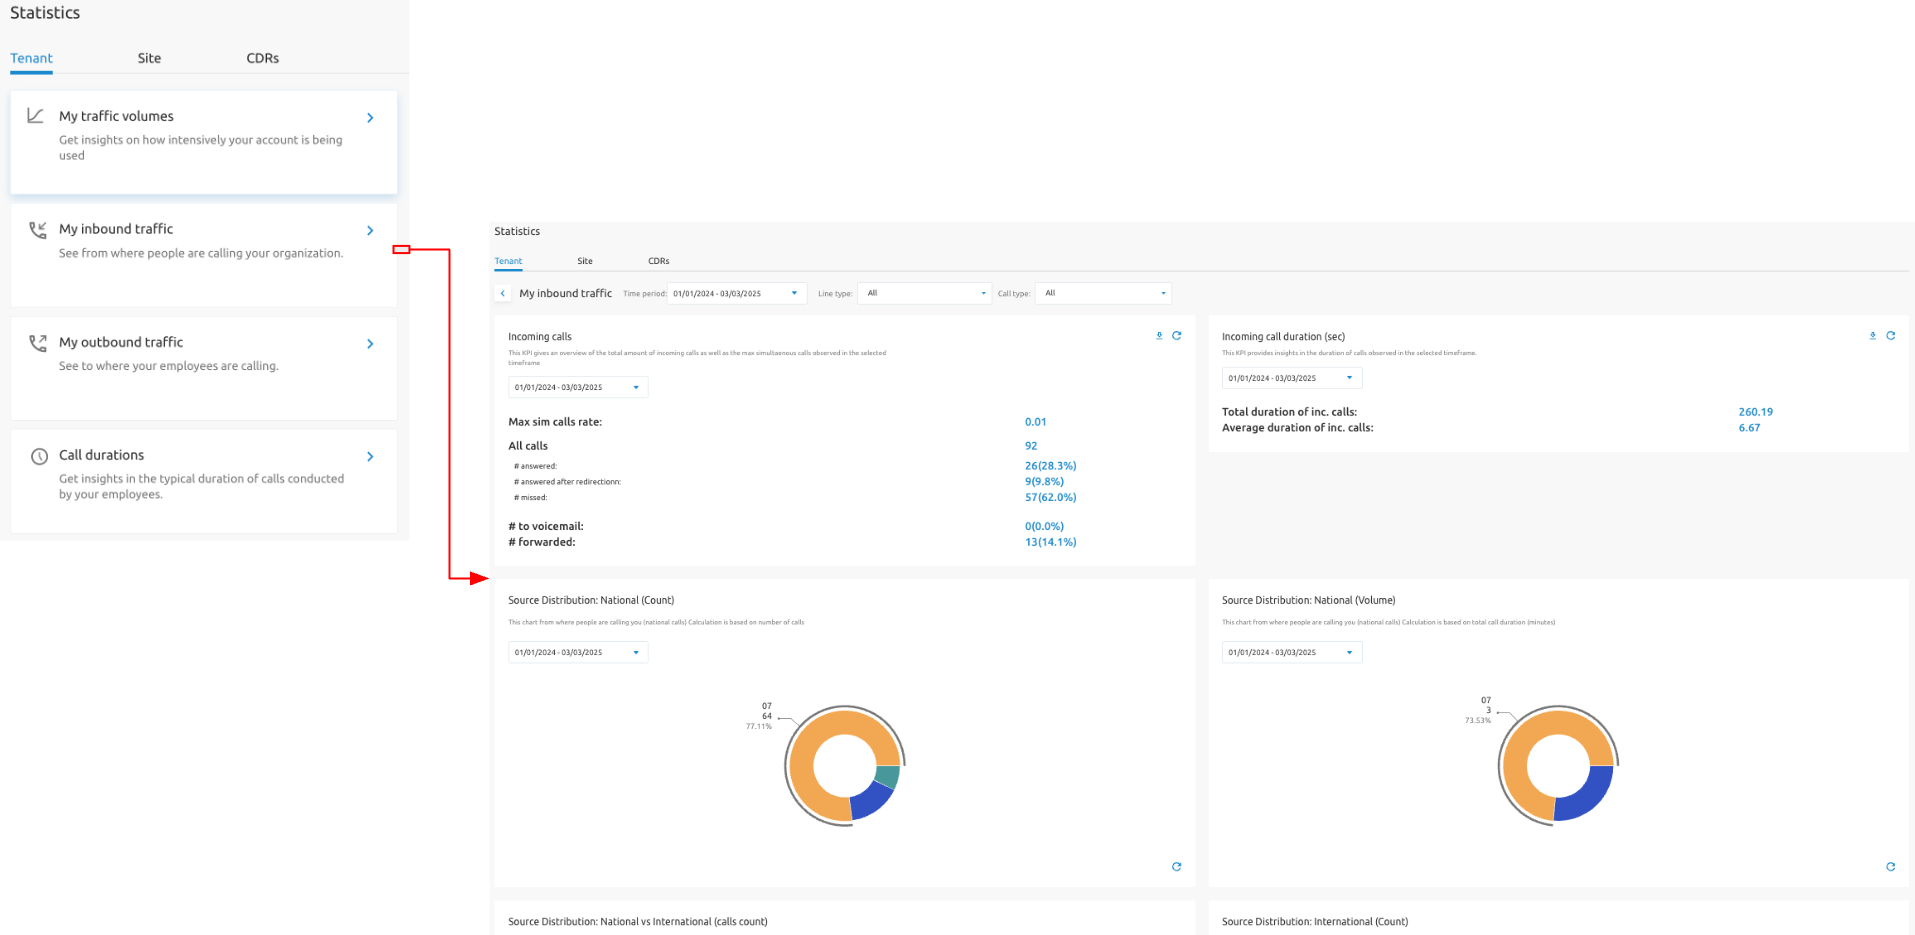
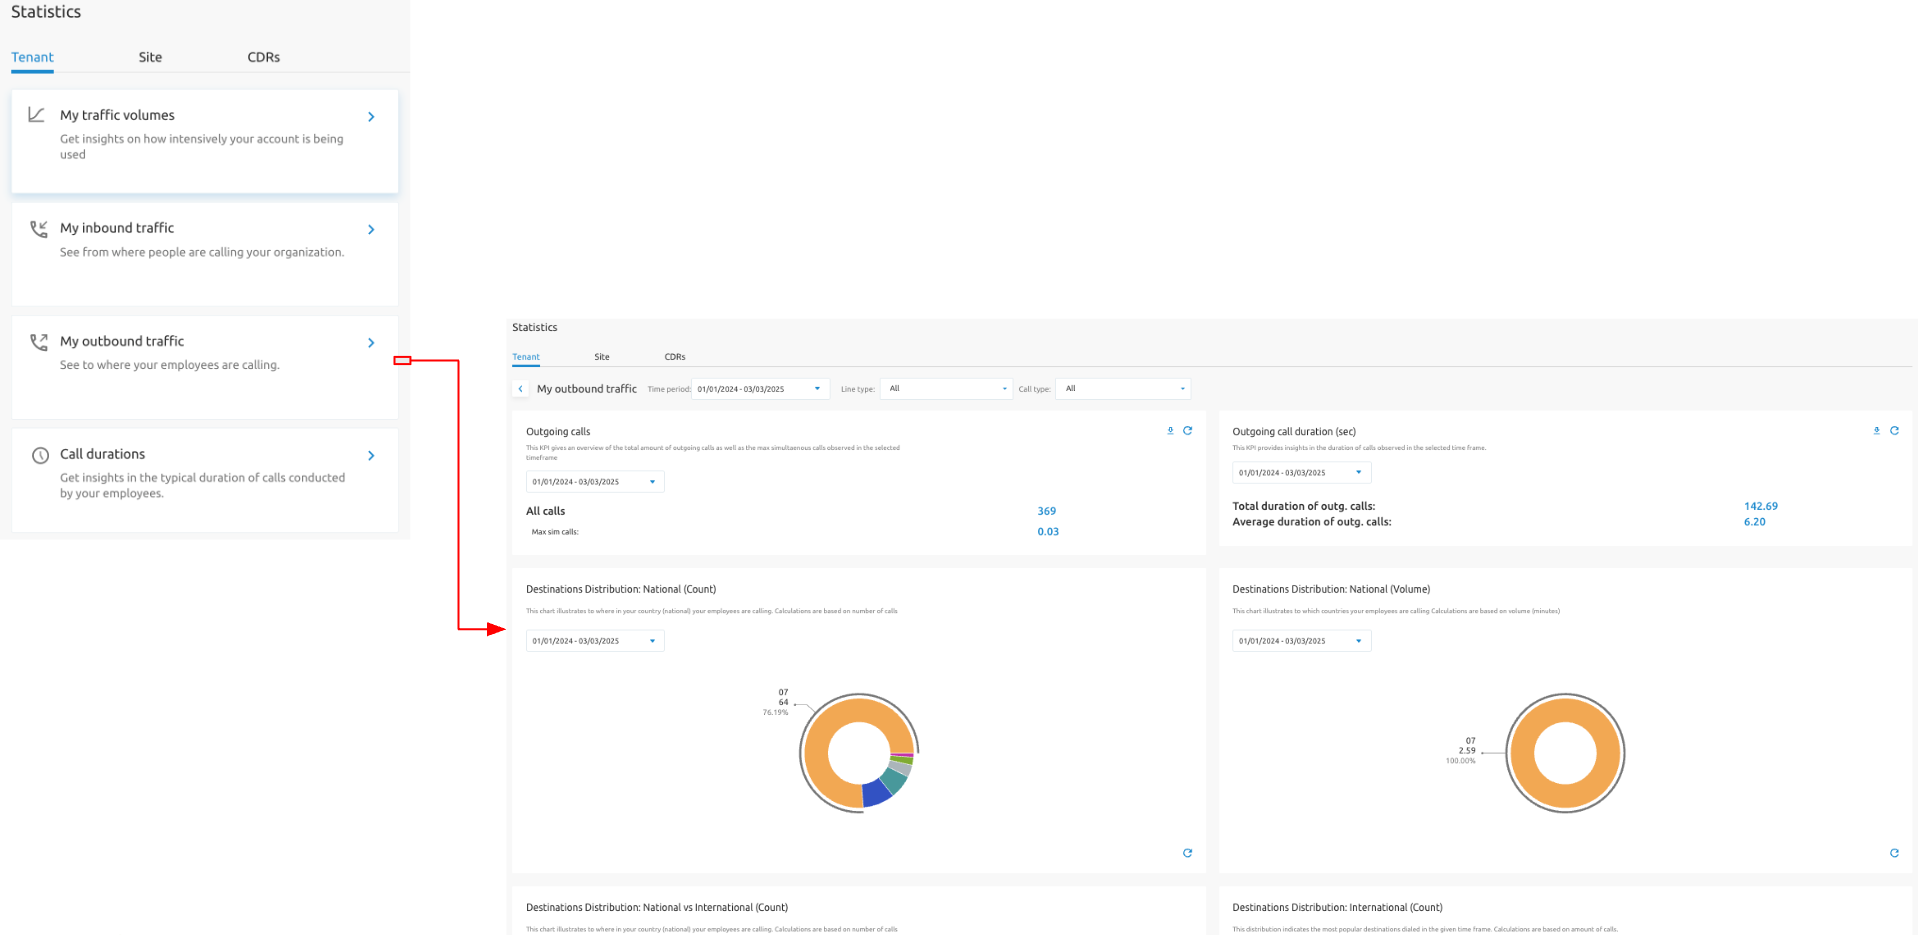
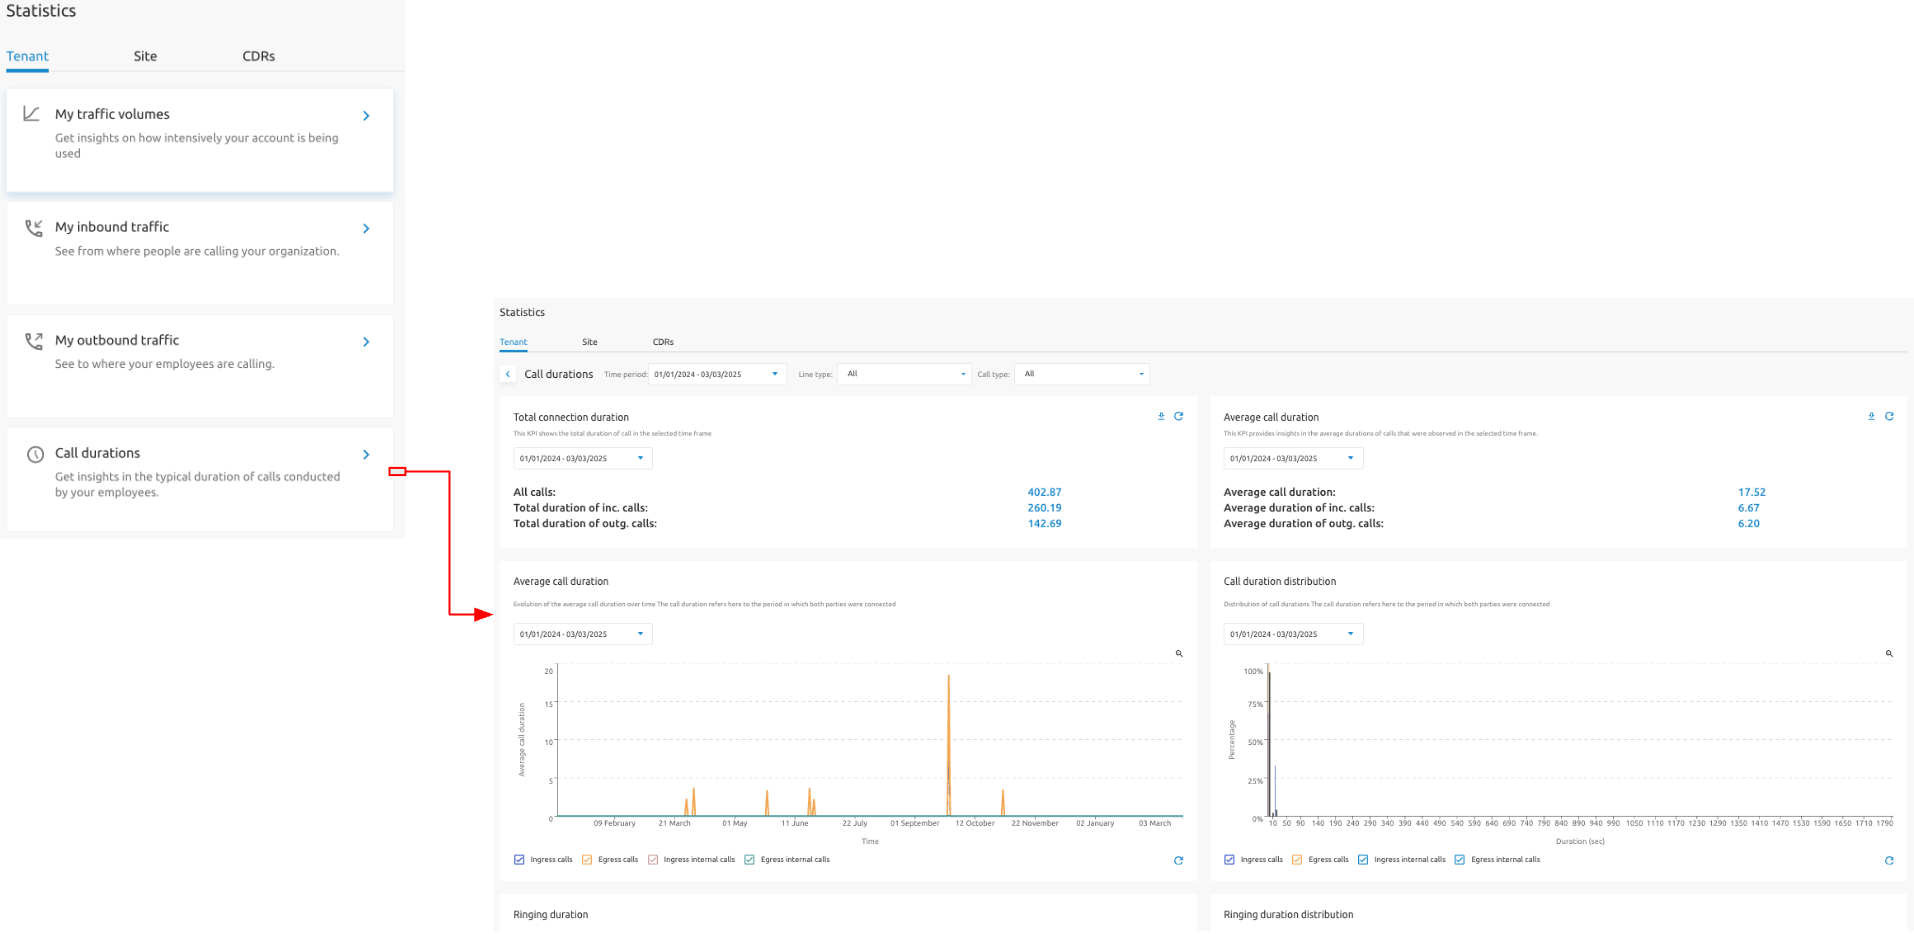
- Group Call Statistics Charts - it is possible to filter for group statistics at tenant level
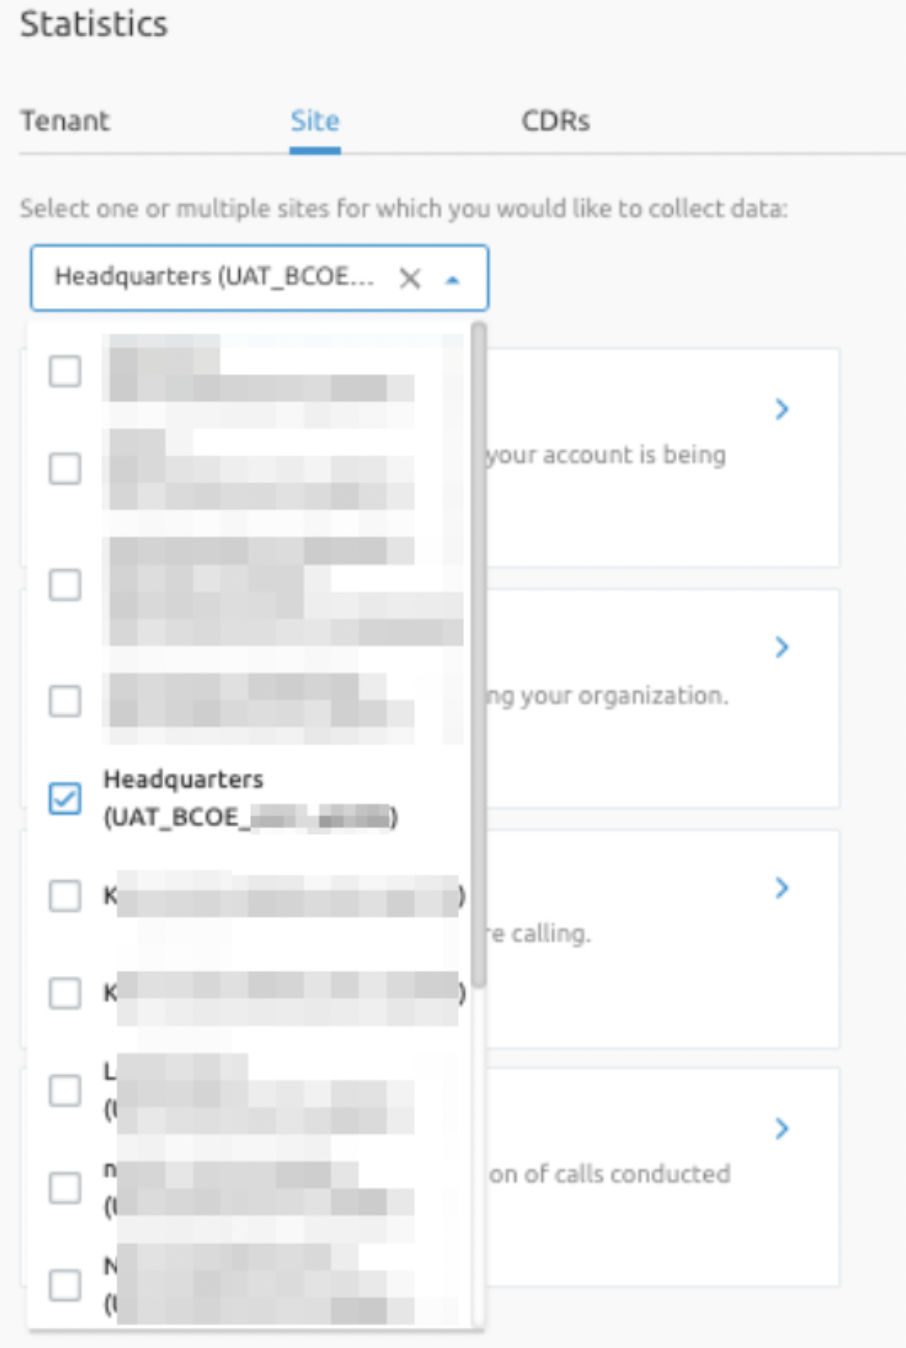
- CDR Download - the call statistics service allows an administrator/user to filter and download CDRs to a CSV file. Please note this is not a billing solution nor a CDR rating tool. Two buttons to download the displayed CDRs as well to download the complete filtered CDRs are exposed:
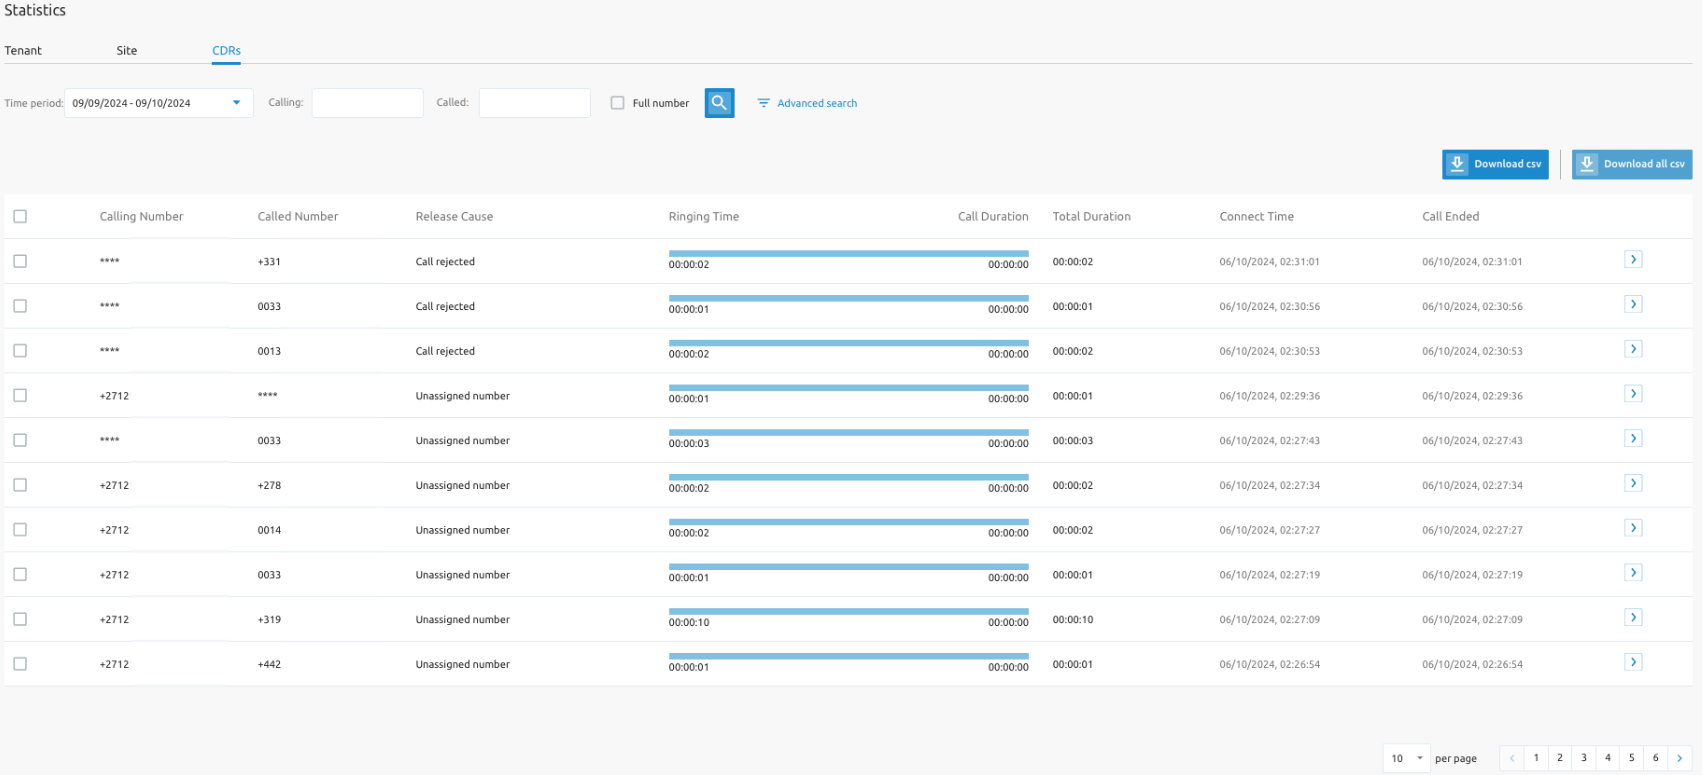
It is also possible to configure optional Service Provider's privacy disclaimers, to be displayed to tenant/group administrators in CDR pages for the Site/Group and Tenant/Enterprise.
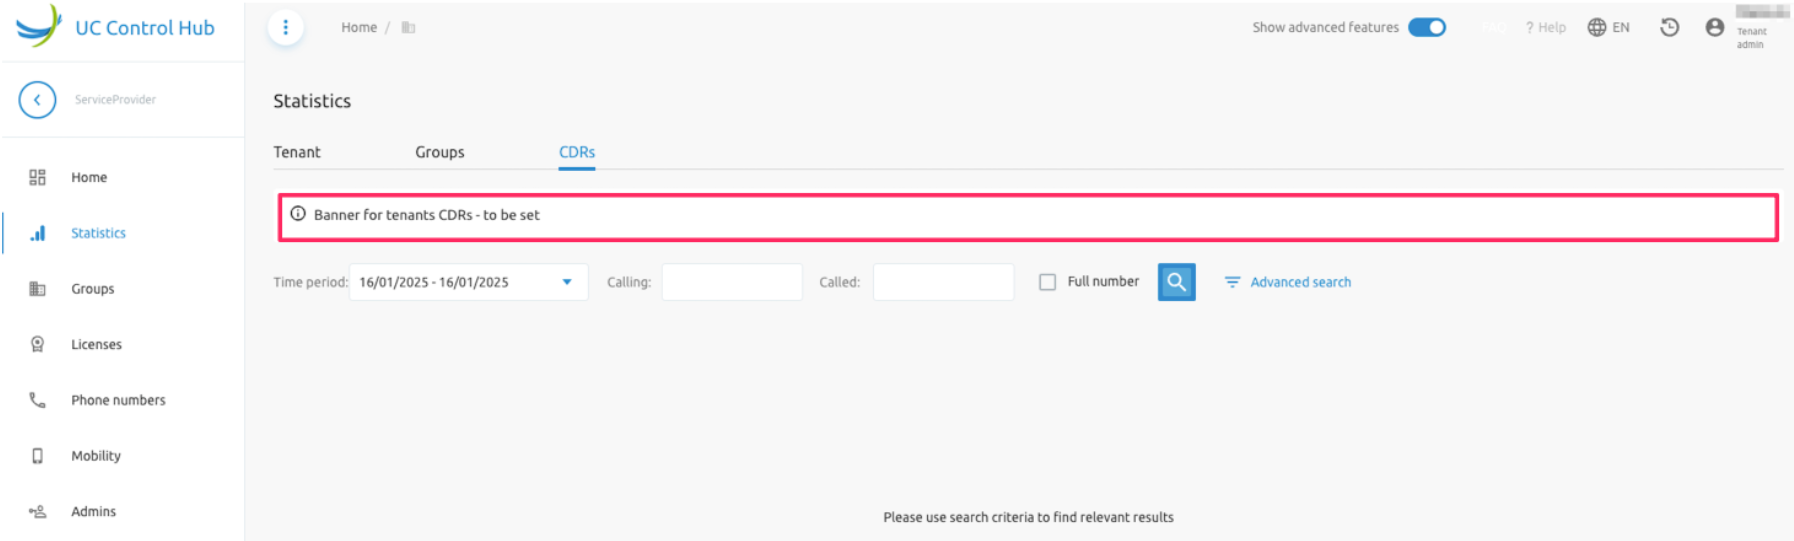
Call Center Basic Statistics/Reports
F4B Call Center's provide a basic call center dashboard, statistics and basic canned reports. Please note this is not a comprehensive call center reporting tool i.e. Enhanced Call Center Reporting (ECCR) replacement. It is therefore recommended to deploy ecosystem partner solutions for ECCR replacement. Consult your Netaxis Account Manager for more information.
- Call Center Dashboard
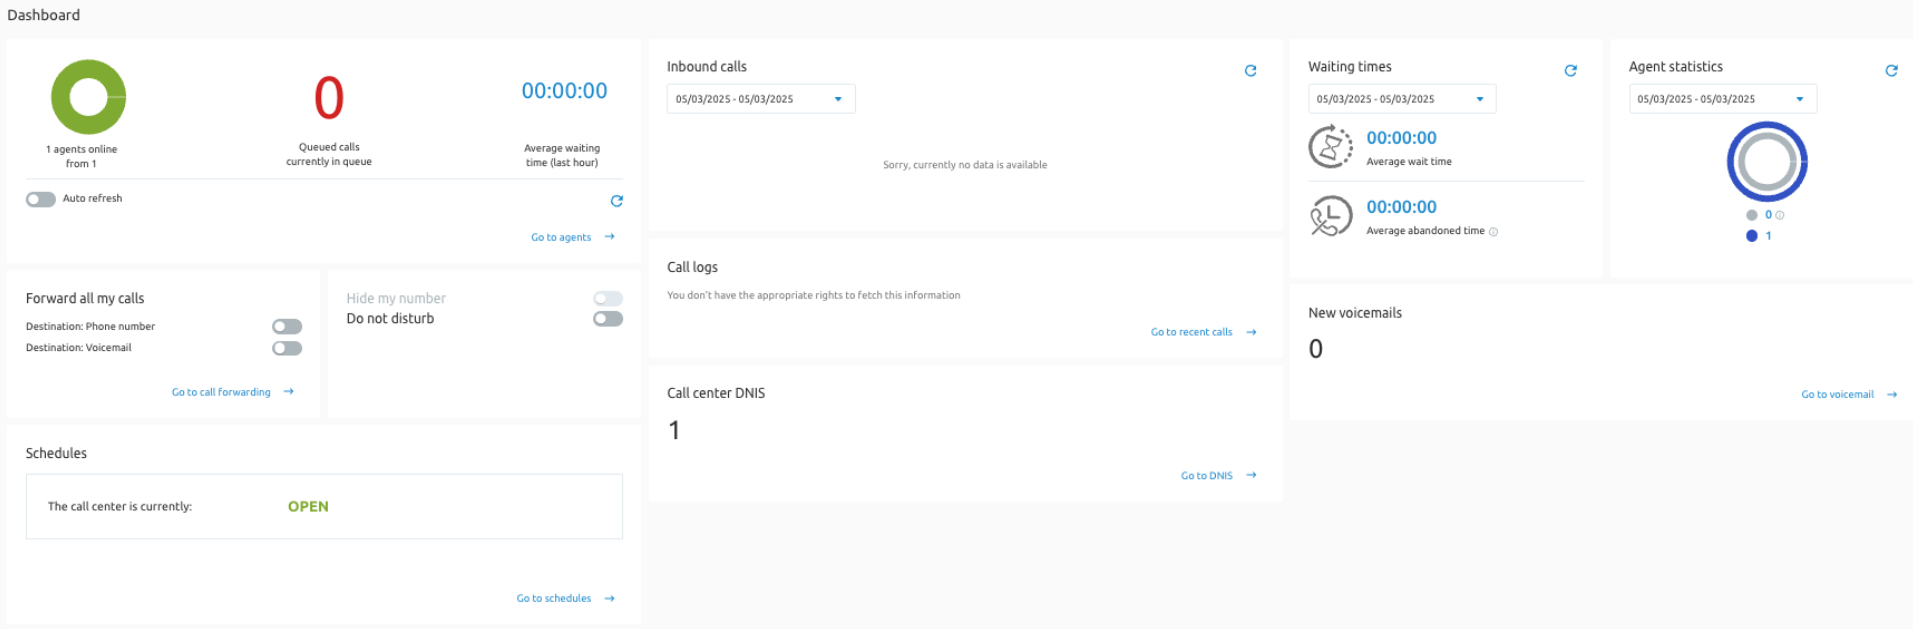
- Call Statistics for Call Center

- Basic Canned Report for Call Center
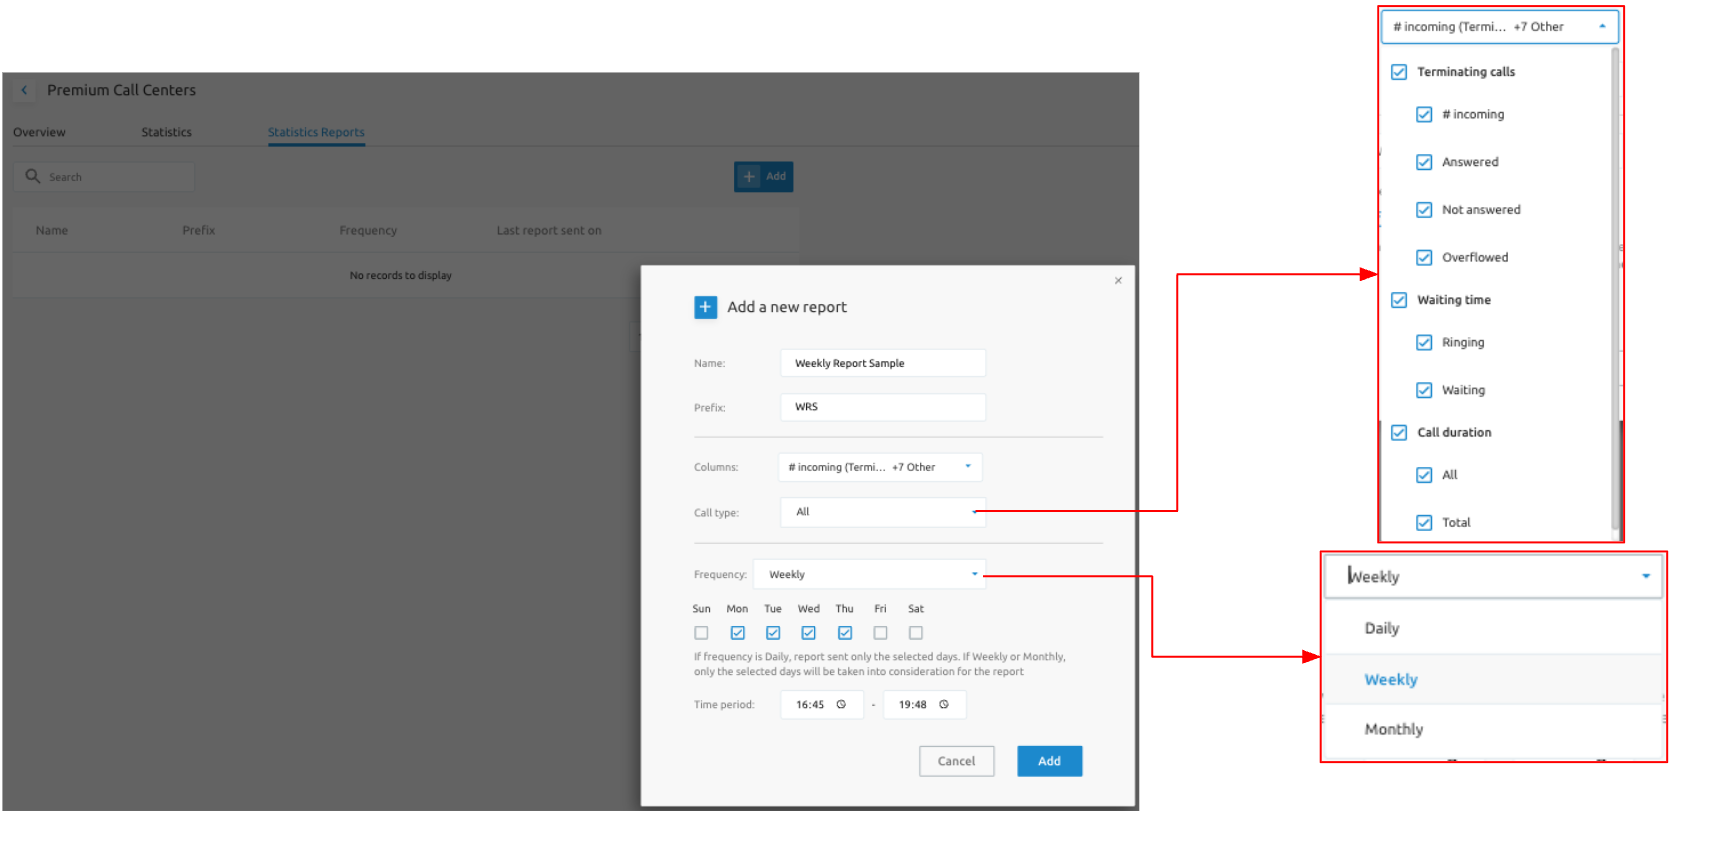
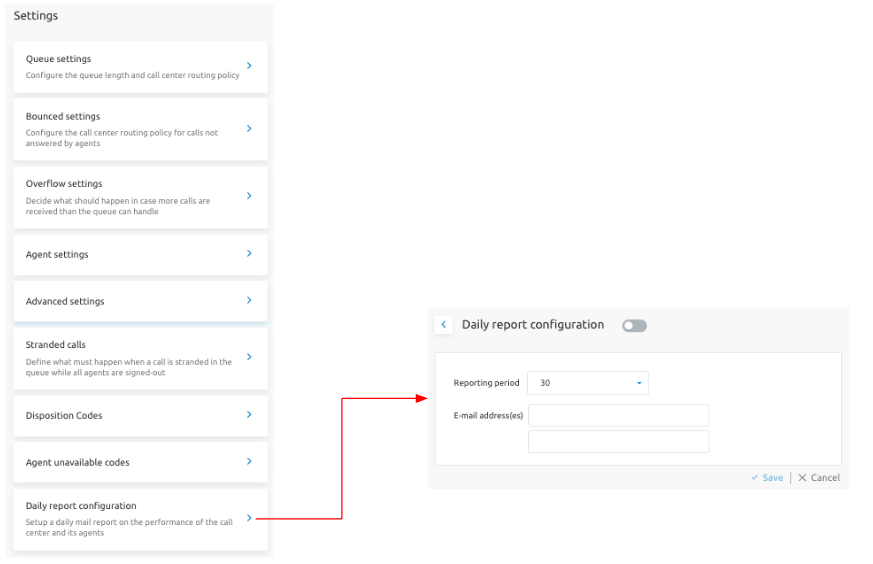
Change Log / Audit Tab
This feature provides traceability for all changes made on an enterprise, group or user. The feature is valuable for technicians and support engineers when troubleshooting the solution. It provides visibility into all historical changes made since a given date or within a specific time. They can see what was changed, by whom, and can revert the configuration if needed.
The feature can be accessed by selecting the "watch" icon in the top-right corner of the screen. As it is a feature valid for multiple levels/pages, it is always shown when logged in as a System Administrator. The feature is accessible at the following levels and/or services:
- Tenant
- Group
- User
- Basic Call Center (Call Center / Premium Call Center)
- IVR
- Hunt Group
The functionality of the feature is the same on all levels/services. The only difference is that the "scope of the history" is limited to the specific level or service.
For example:
- When you are at the tenant level for "Enterprise A," you will see all requests for that specific tenant (including all changes on sites, users, IVRs, etc., belonging to that enterprise).
- When you drill down into a specific call center, you will only see the changes for that call center.
- When you are in a specific group, you will see all changes made in that group, but not changes from another group. As an example when a Tenant Administrator presses the Audit button, the below page is displayed:
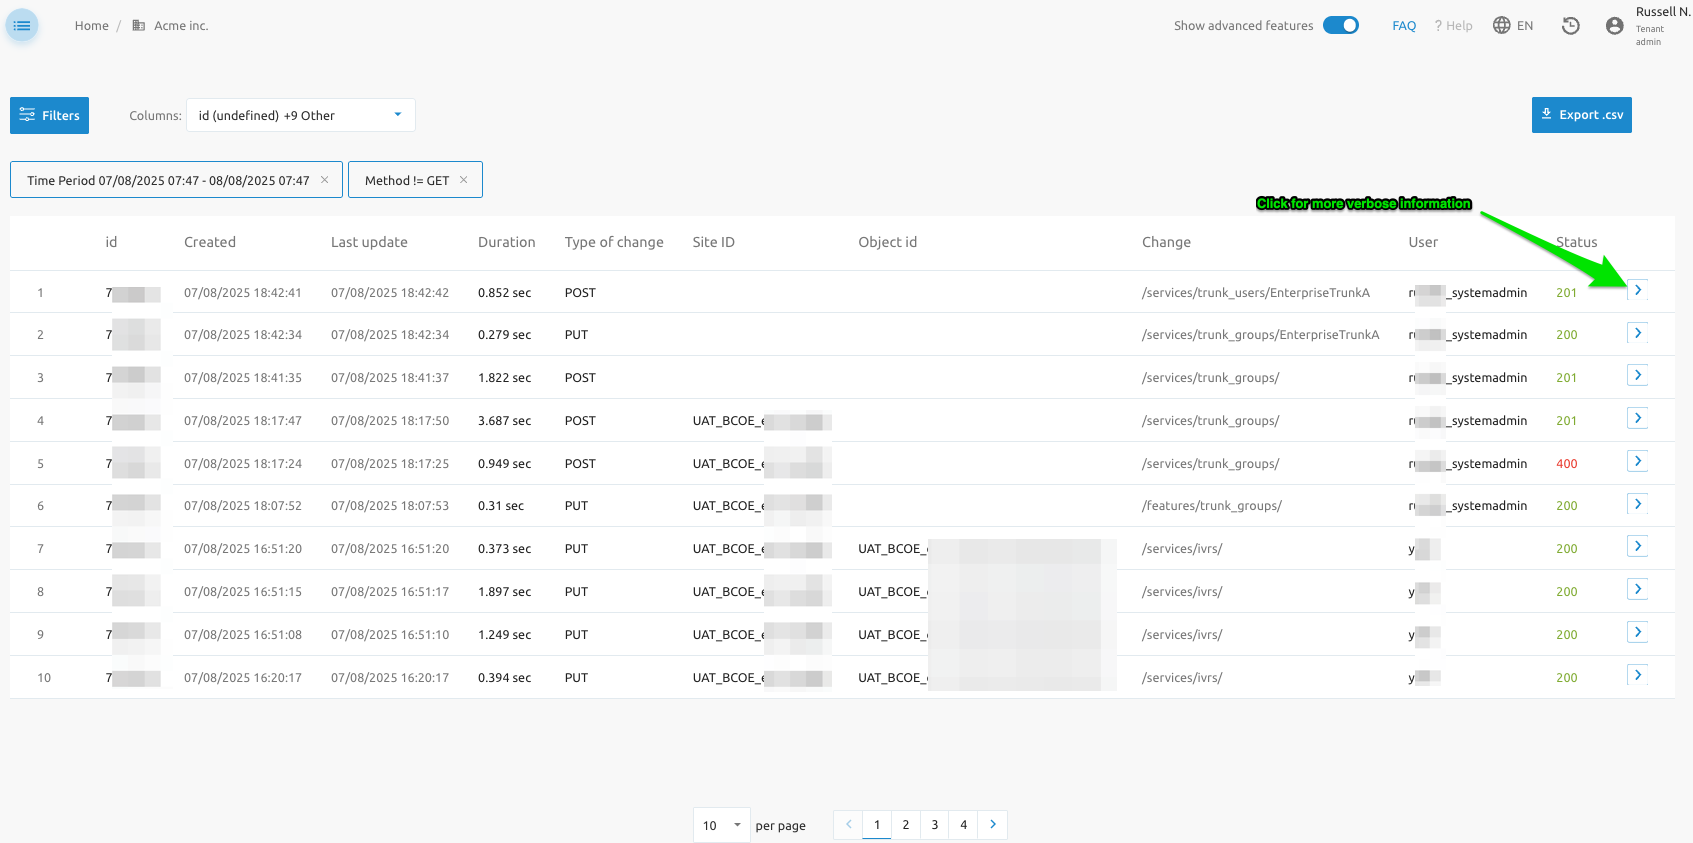
The table columns are defined as follows:
| Column | Description |
|---|---|
| Instance ID | A sequential ID provided by the system for each request. Clicking on the Instance ID provides more details. |
| Created on | The date and time the change was observed. |
| Last update | The date and time the last update was done. |
| Duration | The time between "last update" and "created on." |
| Type of change | The HTTP method of the API call: read (GET), update (PUT), create (POST), and delete (DELETE). |
| Group id/site id | The ID of the site/group on which the change was made. This field might be empty if the action was not linked to a specific site/group. |
| Object id | The call center ID, IVR ID, user ID, etc. This can be empty if it is a tenant or group change. |
| Changed configuration | This field shows the configuration path where the change was made. |
| User | This field provides information about the user who made the change. |
| Status | The status value of the change. A value between 200 and 300 is shown as green (successful); a value of 404 is shown as orange (an issue); and other codes are shown as red. |
On the right side of each line in the overview, you can click on the little ">" to open a right-hand drawer that shows:
- Request tab: The JSON body as it was sent to the API.
- Response tab: The response provided by the API.
- Info tab: All the details already shown in the table (like ID, created, updated, etc.).
Date Format in SCP
A setting is available in the SCP backend to enforce consistent date formatting. Its configuration determines how dates are displayed to users, based on their language or locale preference.
Example formats include:
YYYY-MM-DD(e.g., 2025-07-29) — ISO 8601 standard, used internationallyMM/DD/YYYY(e.g., 07/29/2025) — common in the United States