About this document
Last updated: 23 May 2024
This document describes how to use the Fusion for BroadWorks UC Control Hub, the self-care portal, as an End User.
Log into the portal
When the IT Administrator of your company has created you as an End User on the telephony system, the solution has sent you a "Welcome mail" containing your credentials to use for logging into the self-care portal.
When entering the portal URL, or clicking on the link included in the email sent out by the solution, the following screen is shown:
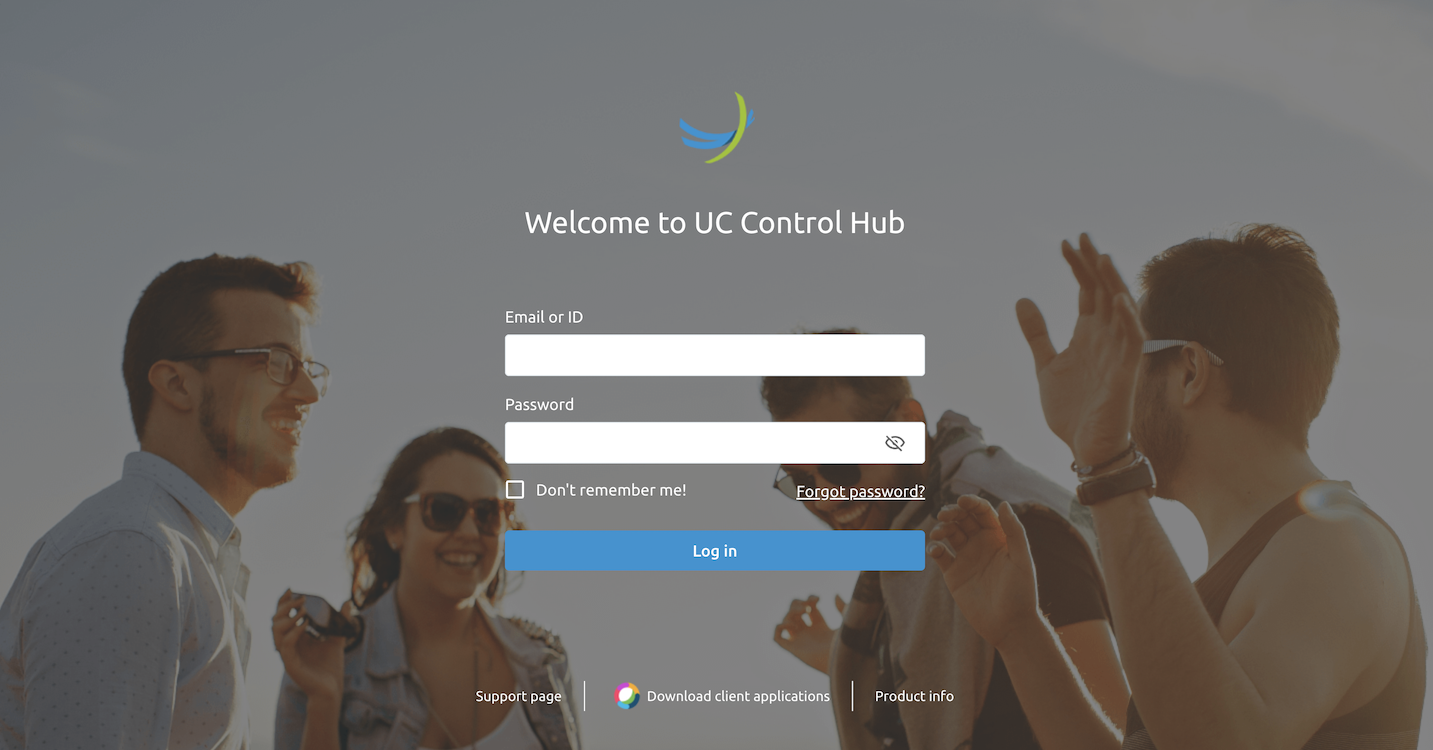
For logging into the portal, enter your email address or ID and your password and press the "Log in" button.
If you don't remember your password anymore, press the "Forgot password?" link and follow the instructions to recreate a new password. (You will receive an email containing a link to reset your password).
The links at the bottom of the page:
Support page: will redirect you to the Netaxis support information website.
Download client applications: will give you the ability to download the Cisco Webex client.
Product info: will redirect you to the Netaxis product information website.
The UC Control Hub
This chapter describes the different possibilities available on the UC Control Hub (self-care portal).
Home screen
When logging into the portal, the "Home" screen is shown as the landing page of the end users.
This screen immediately gives you an overview of how your account has been setup (which applications are active for your account, for example Webex, which features are activated, your contact/phonebook, how many registered devices you have, etc....)
The screenshot below shows the "Home" screen when logging into the application as an End User.
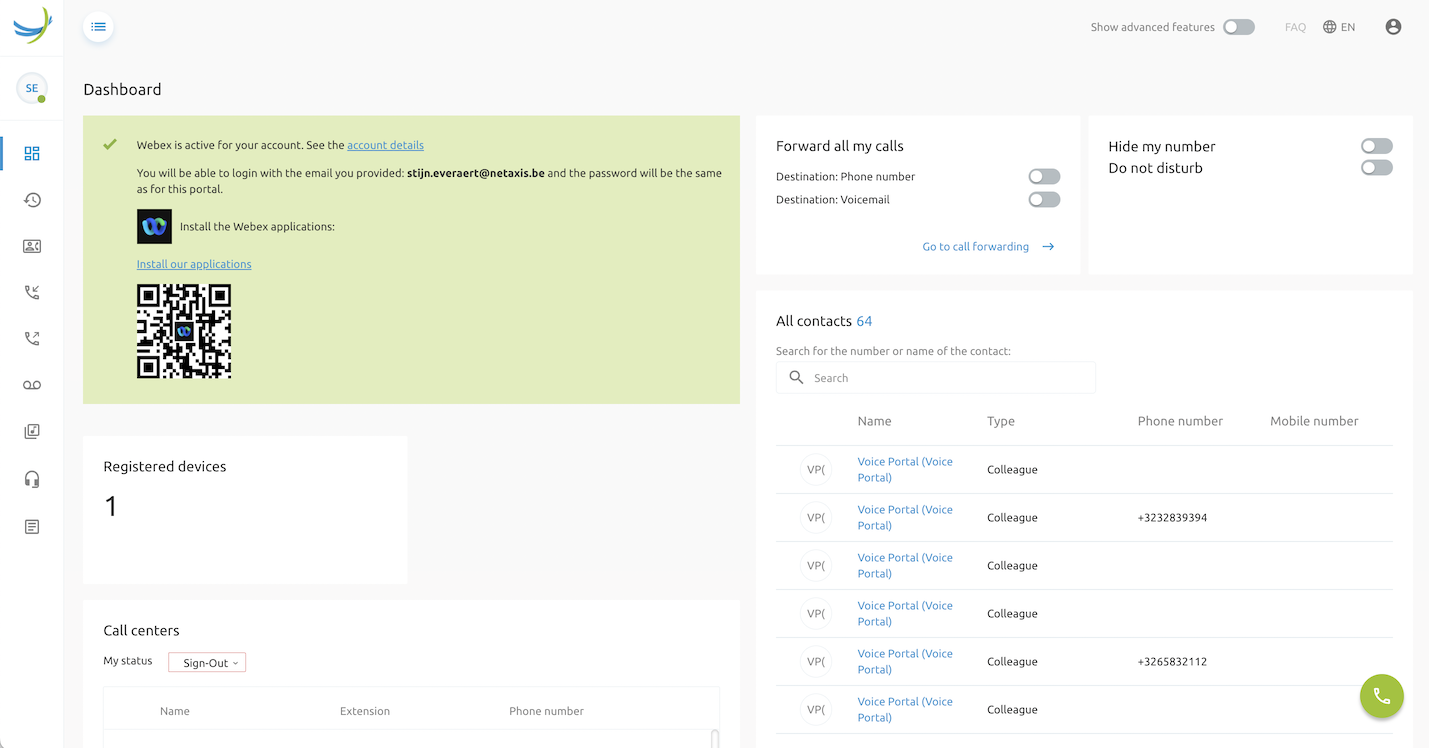
How many items you can see on the dashboard depends on the zoom percentage of your browser.
Home screen building block
The screenshots below explain the different widgets, building blocks and icons shown on your "Home" screen or Dashboard.
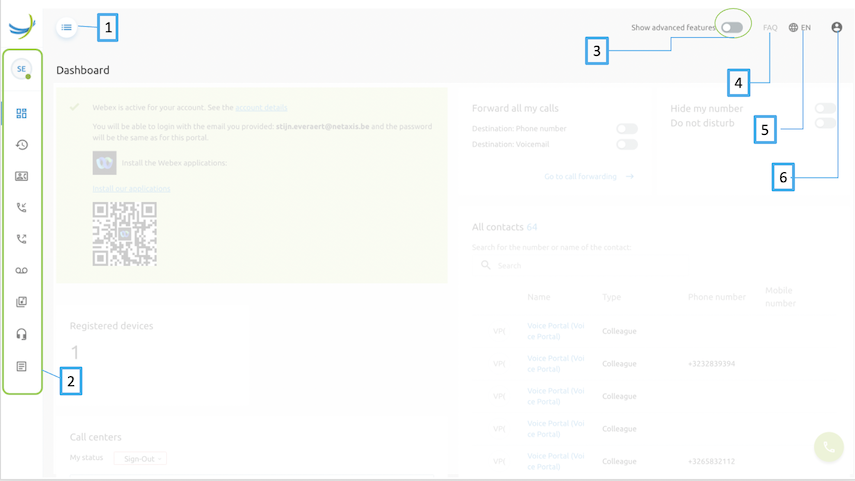
The Dashboard includes:
Button to unfold the description next to the service icons.
Service icons
This slide shows more advanced features for some of the services.
Not yet available.
Change the language of the portal view.
Change your password for the portal and/or log out of the portal.
The Dashboard -- detail 2
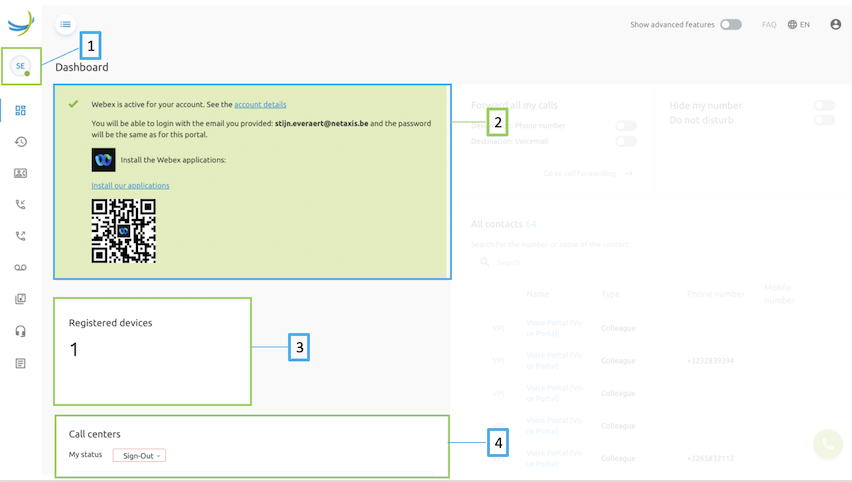
This screenshot includes:
Gives more information about your account. Possibility to set yourself in an "Available" or "Do not disturb" state by clicking on the green dot.
Showing additional functionalities active on your account. These depend on the service pack defined for your account.
Indicates how many devices are registered on your account (for example: a fix phone, a mobile subscription (Webex)).
Gives more information about the status of your account in a Call Center environment. You can adapt this setting if your account or number is assigned in the call center configuration.
The Dashboard -- detail 3.
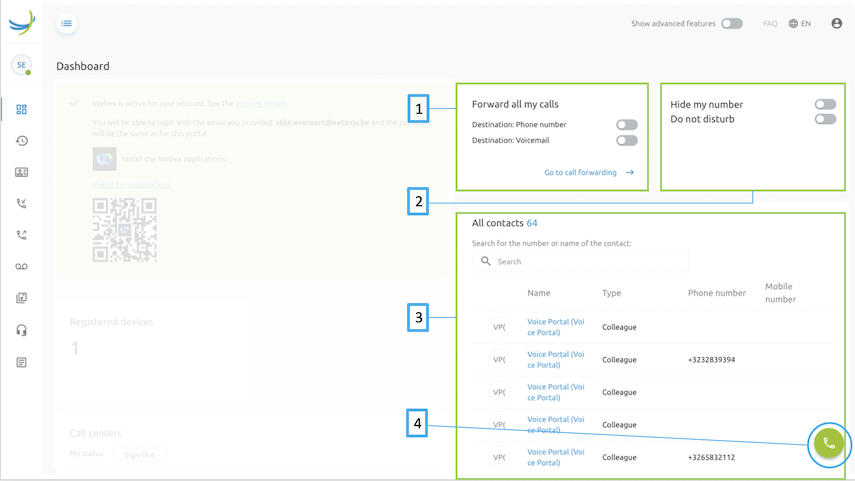
This screenshot includes:
Activate forward settings on your calls. The configuration of the forwarding is done in the Incoming Calls service
Activate the Hide my number feature, which allows hiding your number for the called party. Instead, they receive the main number of the company or a "Private Number" indication.
Shows a few of your contacts and a link to the site directory, being a combination of your personal phonebook and an enterprise directory.
Clicking this icon opens a dialer screen used for dialing numbers.
Services
The services available for you appear on the left in the "Home screen". Unfolding the service icons' left side panel, displays labels briefly indicating what each service is about.
The following services are defined for the end users.
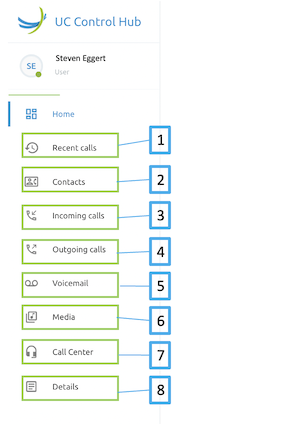
With the following explanaiton of the services:
Gives an overview of your call history.
Shows your personal and company phonebook.
Allows configuring what needs to be done with incoming calls.
Allows configuring what needs to be done with outgoing calls.
Configure your voicemail settings
Configure (personal) messages, announcements
Configure your call center settings (if assigned via licenses)
Gives information about your account (phone number, language, email address, feature access codes)
Recent Calls
The "Recent Calls" service gives a view on your call log (call history), showing you:
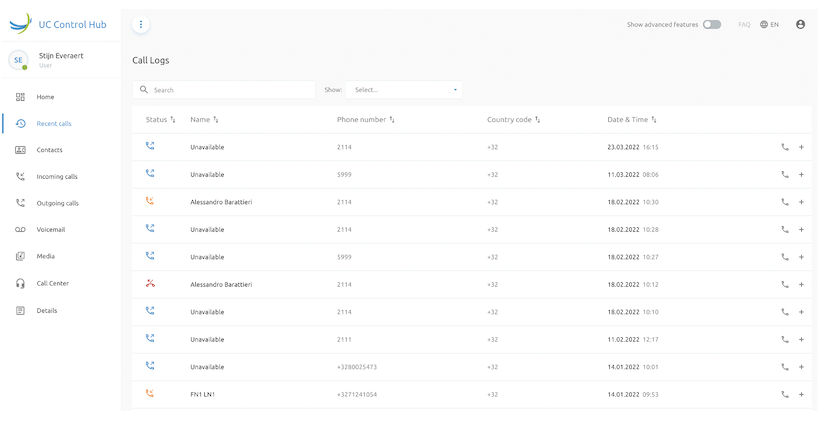
The table below shows the "Recent calls" legend
| Column | Description | |
|---|---|---|
| Status |  | Outgoing call |
 | Incoming call | |
 | Call Rejection (no answer) | |
| Name | The name of the caller if available in your contacts. If not “Unavailable” is shown. | |
| Phone Number | The internal or external phone number of the caller. If the caller doesn’t send out his phone number, “Unavailable” is displayed. | |
| Country code | The country code from where the call has been made. | |
| Date & Time | The date and time on which the call has been placed. | |
| 2 actions can be made on each number: | ||
| Call Back |  | Call back the phone number that is displayed |
| Add to contact |  | Add the phone number and name to your contacts |
Contacts
The "Contacts" service gives a view on all your and the company's contacts. It gives you the phone book of your system.
The Search function allows filtering the display field. You can filter between 'All' the contacts, 'My own' contacts, 'My Colleagues' and 'Call Flows'. The type 'Call Flows' are mainly (dummy) numbers that are being used to generate a certain service, like for example an Automated Attendant on the main number, or a greeting message when calling a certain department within the company, etc....
As an End User, you can create a personal phone book (add your own contacts), which are displayed as "User Contact" in the 'Type' column. You can edit these contacts yourself. (modify name and/or number, delete).
The types, that group company contacts like 'Colleagues' and 'Call Flows', cannot be edit by the End User. You need to have the correct rights to make this action.
The End User can take the following actions: (see the action bar on the figure below)
Bulk Action: upload new contacts or update existing contacts in batch mode
Download all: generates a .csv file with all the existing contacts
Delete contact: removes the contact from your contact list (you must select the contact for the function to become active.)
Add contact: creates a new contact and adds it to your personal contact list.
Hovering over some icons on the Call log window can provide more explanation about the icon and/or the function.

- The action bar on the Contacts service.
When selecting (click on) a phone number, an additional action screen pops up showing various actions what you can do with that number.
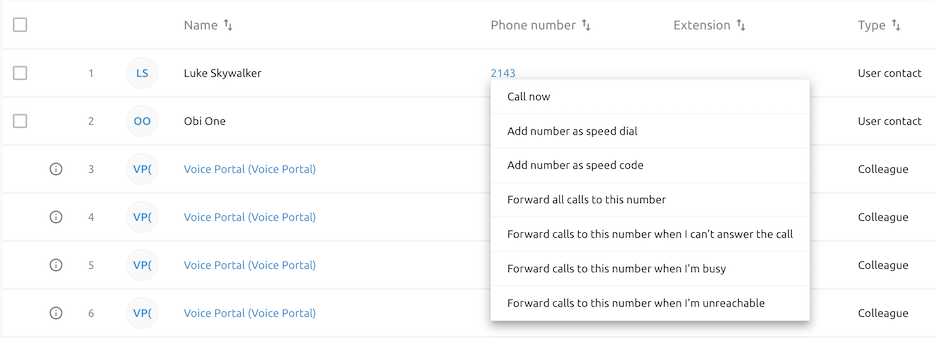
Call now
Selecting the Call now action starts a call to that specific number.
Add number as speed dial
You can add the selected number to be used as a "speed dial" number.
"Speed dial" numbers allow dialing a configured number using a single-digit code associated with a string of digits (0-9, *,#). Once defined, you can dial this single digit instead of the full string.
The screenshot below shows adding a speed dial.
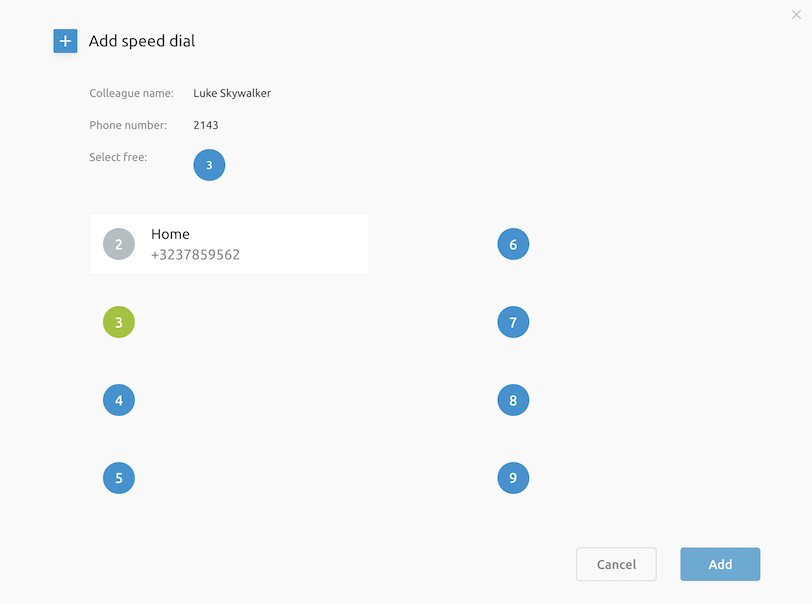
In the example above, you have defined the number "3" as being the speed dial key to dial automatically Luke Skywalker. When you select Add, Luke Skywalker will appear next to the number "3". Dialing that number '3' automatically starts a call to Luke Skywalker's number (2143).
Add number as speed code
When adding the selected number as 'speed code', the solution allows dialing a configured number using a double-digit code associated with a string of digits (0-9, *, #). Once defined, you can dial the speed code prefix followed by both digits instead of the full string.
The screenshot below shows adding a speed code.
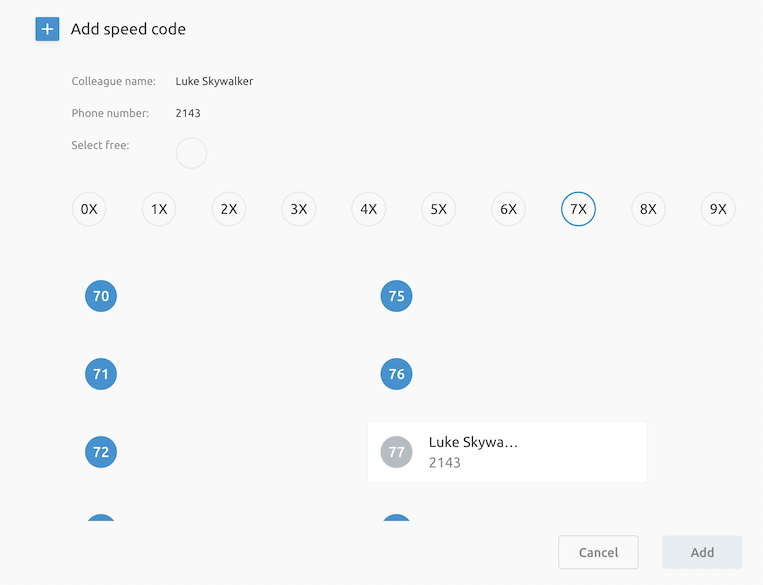
In the above example the user Luke Skywalker is configured on the number '77'. To call this user, just dial #77 and the system automatically starts a call to Luke Skywalker.
Forwarding Rules
The following actions in the list are rules you can setup to manage the routing of incoming calls. The table below explains each action.
Table 2: Forwarding Rules
| Action | Definition |
|---|---|
| Forward all calls to this number | All incoming calls will immediately be routed to this number. |
| Forward calls to this number when I can't answer the call | Incoming calls that are not answered within a certain time will be routed to this number. |
| Forward call to this number when I'm busy. | Incoming calls are routed to this number when I'm already on the phone (and I don't have the possibility to accept a second call) |
| Forward call to this number when I'm unreachable | My device is unregistered (I am not logged in on the system), or my device cannot be reached (for example, connectivity problem). |
Show advanced features
When the "Show advanced features" option is active, additional menus will become available in the Contacts screen.
The screenshot below has the "Show advanced features" activated.
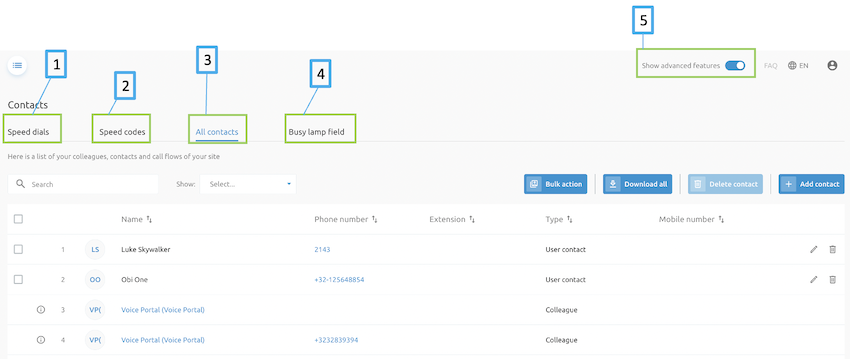
The screenshot has the following elements selected:
Showing more information about the speed dials configured for this user.
Gives information about the configured speed codes configured for this user.
Showing all the contacts from this user.
Showing the status of preconfigured users.
Showing that the advanced feature view is active.
Busy Lamp Field
The Busy Lamp Field (BLF) service allows monitoring the status of a colleague (available, or offline, or busy, etc.) from your SIP device. Depending on his/her status, the corresponding LED or button will look different on your phone.
The screenshot below shows the "Busy Lamp Field".
 .
.
This service/feature is often used by persons at the reception or in assistant configurations. With the BLF, you can immediately see if the person you want to reach is available or not.
Incoming Calls
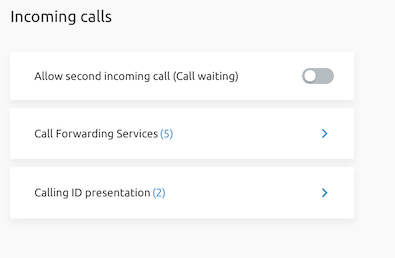
The "Incoming Calls" service allows defining what needs to happen when you receive an incoming call. When the 'Show advanced features' is not active, you can:
Allow a second incoming call.
Define your Call forwarding services
Configure your Calling ID presentation
The screenshot below shows the Incoming Calls service.
Allow second incoming call
This allows receiving a second call on your phone system when you are already in another call. If you have a fixed phone or a softphone, an additional button appears on the screen. When toggling between the 2 calls, one call is put on hold. The caller will then receive music on hold (MoH). This configuration is defined by your IT or System administrator.
Call forwarding Services
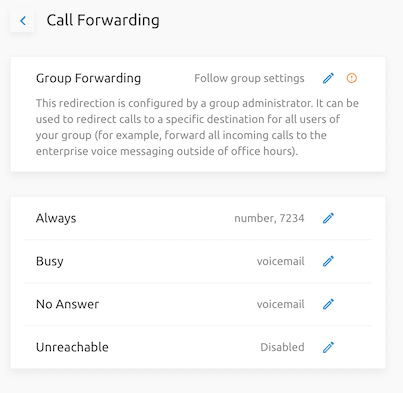
Here you can configure your call forward destinations. Depending on what is configured and on the status of your phone line (busy, no answer), the call will be forwarded to the number you configure here.
You can also set Group Forwarding, which allows following the group settings defined within your company for a group of extensions. This can be for example:
forwarding all your calls to the voicemail system outside of business hours,
forwarding all the calls from the salespersons to the sales reception when the sales are on the phone or when they are offline.
In the example below:
The extension will follow the group settings (defined by the administrator)
Calls will be routed to the number 7234 when the Forward all calls feature is active (see Home screen)
Calls will go to the voicemail system when the End User is on the phone or when he doesn't answer the call. Through the voicemail menu he can then listen to the message that is been left on his voicemail box.
The "Unreachable" function is not configured (is disabled).
The screenshot below shows the Call Forwarding.
Calling ID presentation
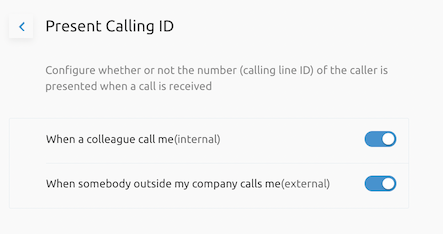
This service allows configuring whether the number (calling line ID) of the caller is presented when a call is received. There is a difference between an internal call and external calls. Switching off the calling ID presentation is available for external calls, but our recommendation is to leave it active.
The screenshot below shows the "Present Calling ID"
Show advanced features
When activating Show advanced features on the Incoming calls screen, additional services become configurable for the End User.
The screenshot below indicates the function of each additional service.
The screenshot below shows the features that become visible when activating the "Show advanced features".
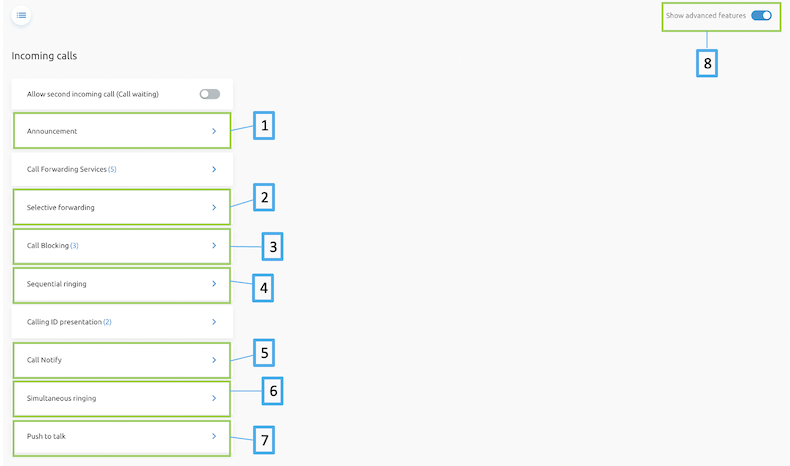
The screenshot includes:
Allows playing an audio or video announcement to callers before the call is connected.
Setting up call forwardings that will only be applied during certain time periods or on specific days. It is even possible to only enable them for specific callers.
Create blocking lists to avoid receiving calls from certain numbers.
Defining a "find me" list of phone numbers and URL's which are alerted sequentially upon receiving an incoming call that matches a set of criteria.
Gives the possibility to send an e-mail when a call comes in.
Defining a "find me" list of phone numbers and URL's which are alerted simultaneously upon receiving an incoming call. It is possible to define rules to only trigger this behavior at certain days, hours or for specific callers.
Allows determining whether other users can reach you via a push-to-talk or intercom call. Push-to-talk calls are answered automatically. If desired you can configure who may, and may not, reach you in this way.
Showing that the advanced feature view is active.
Some of the services follow a very intuitive wizard to add specific users or functions to the service. You just need to follow them through to setup these advanced features in no time!
Outgoing Calls
This section allows configuring your outgoing calls. You can configure some settings and your calling plan.
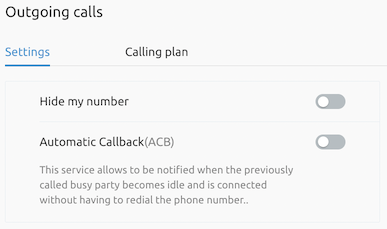
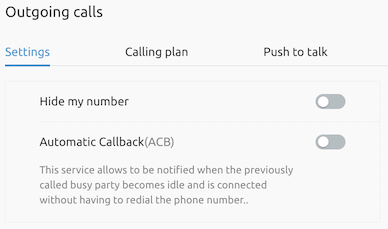
The screenshot below shows the Outgoing calls
Settings
In the Settings configuration, you can activate:
The Hide my number functionality -- Your number is masked for the caller party.
The Automatic Callback (ACB) functionality - This service allows notifying when the previously called busy party becomes idle and is connected without having to redial the phone number.
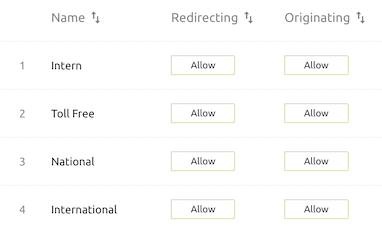
Calling Plan
Outgoing Calling plan allows viewing the calling plan rules for outgoing calls. Only an administrator can change which call types are permitted.
The screenshot below shows the "Calling Plan"
Showing advanced features
When activating the Showing Advanced features functionality, an additional service, Push to Talk, appears.
The screenshot below shows the "Outgoing Calls advanced features".
Push to Talk
This service provides intercom functionality.
To make an intercom call, you must enter the appropriate function code, followed by the number or extension of the user you wish to reach. The chosen extension will be prompted to answer the call automatically.
Please note that the recipient may have disabled this functionality.
Voicemail
This section allows configuring your voicemail settings.
The screenshot below shows the "Voicemail" service.

The voicemail service includes:
- Switching ON/OFF your voicemail box (inbox).
You can:
See your Inbox -- a list presenting you who has called, at which time and if a message has been left.
Define your Settings -- how you want to receive your voicemail messages (Send to email)
Check your Announcements -- set different rules and flows which need to be used in general when you are busy and when you do not answer.
Set your Voice Portal Pin code -- reset the pin code used to access your company's voice portal. Through the voice portal, you can manage your services and listen to your voicemail.
Media
The Media service allows setting the sound file used for announcements:
Upload a media file
Record an announcement
Select one from our library
The media file is used on different places in the Portal. A few examples are:
the announcement sub-service at the incoming call service, to define a Pre-alerting message
the Voicemail configuration. Here you can define a custom announcement. Different media files are offered.
The screenshot below shows the "Media" service.

Call Center
The Call Center service allows setting your agent status depending on what you have to do in the Contact Center.
When in the role of a call center agent, you can select one of the statuses below:
The table below shows the Call Center statuses and definitions.
| Status | Definition |
|---|---|
| Available | You are ready to receive calls form the contact center. |
| Unavailable | You cannot receive calls. This status can be used for example when taking a break. |
| Wrap-up | You cannot receive calls for a certain time after you have handled your call. This 'wrap-up' time is foreseen to do administrative work after you have closed a call with a customer. |
| Sign-in | You log in into the contact center queue and start receiving calls. |
| Sign-out | You log-out of the contact center queue and will not receive any calls from the contact center. |
Details
The Details service gives more details about your account.
It shows:
Internal and external number
user-id
the language is associated to your account
your email address (used in other services already described above)
your time zone - important in case of an international company.
You can check the Phone Numbers associated to your account, where Extension is your internal number, and Outgoing CLI the number that you send out when placing external calls.
You can also check if additional numbers have been assigned to your account.
You can verify the Feature access codes available on the system. Feature access codes are codes you can use to activate / deactivate a feature via your phone without using (Graphical) User Interface. The checkbox in front of the feature access code allows selecting which one you would like to download in the .csv file.
If you want to use for example the Push to talk feature, you can activate it through the portal or pick up the phone and dial the digits *50 to activate it.
Show advanced features
If you activate the Show advanced features, you will receive additional information about your account. On top of the information described above, you will receive the following extra tabs:
Licenses: shows which licenses are associated to your account
User IDs: shows the user Identification numbers assigned to your account. This can be required for some support purposes.
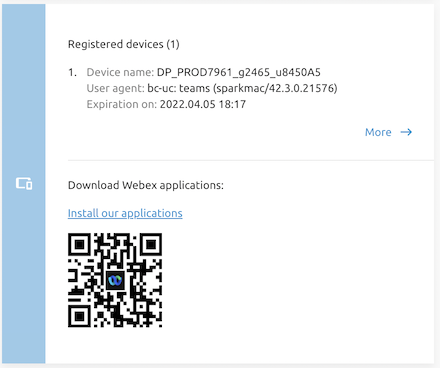
Webex account: shows your Webex account information (if the Webex functionality is active for your account). Through this tab, you can download and register yourself on the Webex application.
The screenshots below show examples of a Webex account information.
The screenshot below shows the "Webex account".
Advanced Features
When you activate the Show advanced features view on the Home page of the portal, you have noticed that additional services become available on the left side of the screen.
The next sections explain these additional services in more details.
The screenshot below shows the "Advanced feature view".
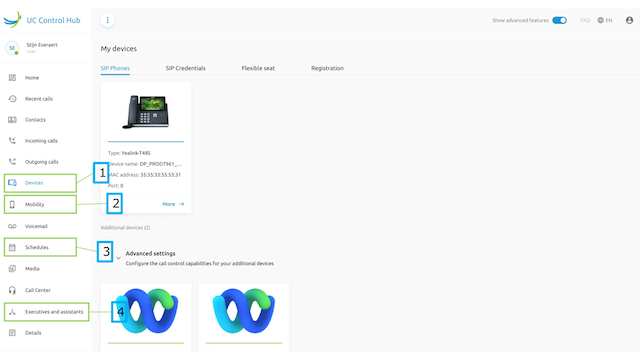
It includes:
Devices: Giving an overview of "My Devices".
Mobility: Showing the different mobility features are available on the account.
Schedules: Allows creating time schedules and holiday tables.
Executives and assistants: setting different call flow rules between executives and their assistants.
Devices
The screenshot below shows "My devices" overview.
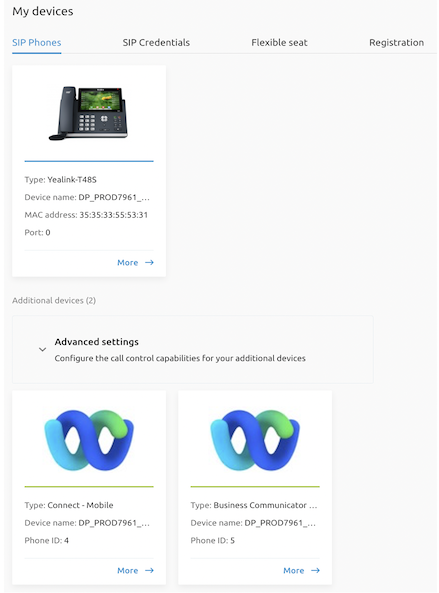
SIP Phones
The first tab gives an overview of the devices that are used by your account. It can be a physical phone or a Webex softphone application on a PC (desktop or laptop) or a Webex softphone application on a mobile device.
Details about the type of phone, device name, mac address, ... are displayed on this page.
When selecting the "More " function at each of the devices, more detailed configuration is possible.
The screenshots below explain how to set up these configurations.

When selecting the "More" option at the bottom of your SIP Phones device, you will be able to configure your line-keys of the physical phone via the 'Device' tab.
Depending on how your IT administrator has defined the standard setup of the line keys, some keys cannot be changed.
The screenshot below shows the "Phone line-key configuration".
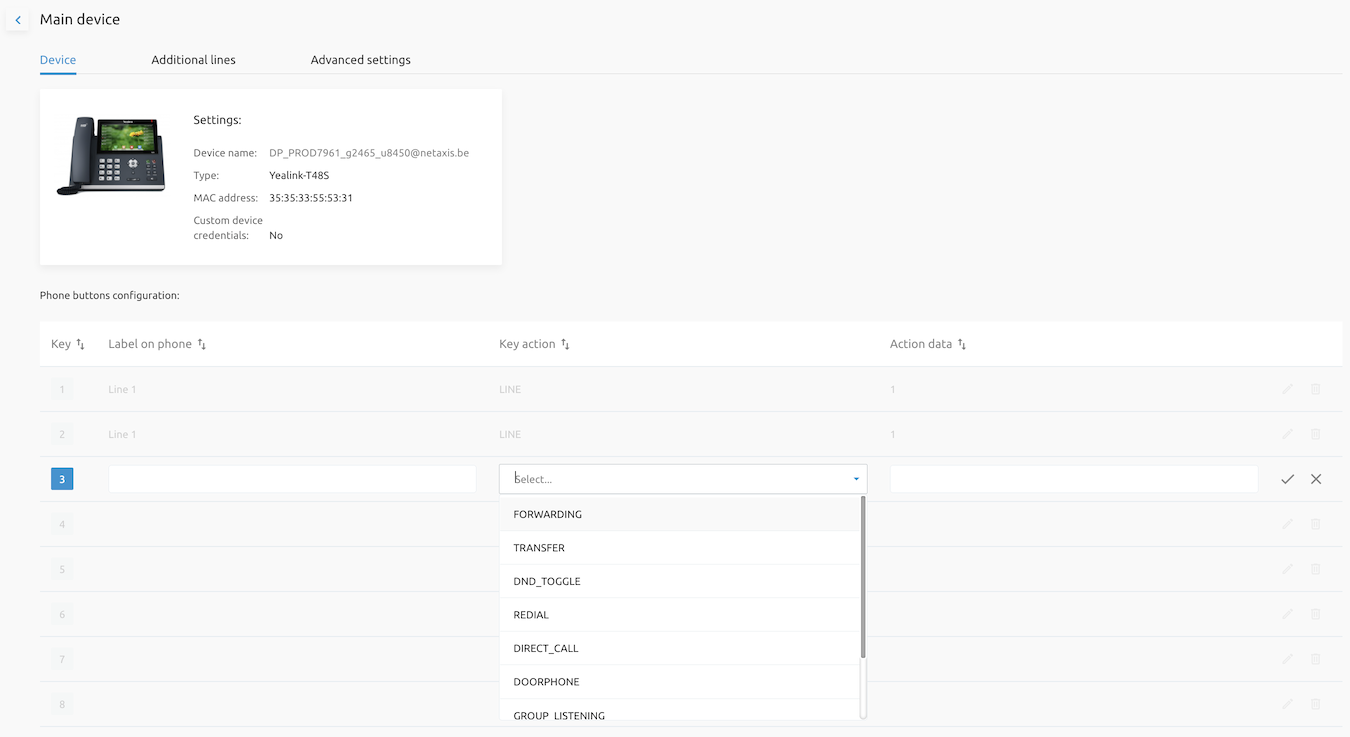
In the screenshot above, the 3^rd^ key of the Yealink-T48S will be configured with one of the function keys from the drop-down menu.
For more information about the functions and/or the way your phone has been setup, please contact your IT administrator.
Additional lines show additional (phone) lines from colleagues which you could have configured. Perhaps you also want to see incoming calls to a colleague and answer those calls.
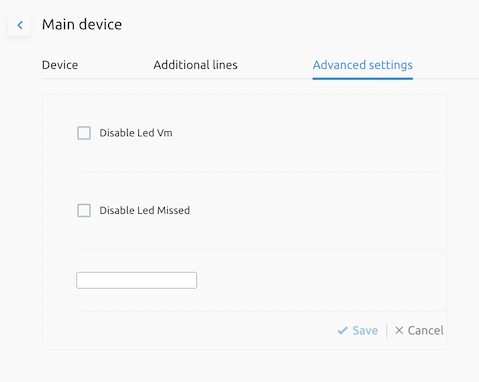
Using the Advanced settings, you can disable the light of your voicemail box, indicating you have a new voicemail message, and/or the light of the 'missed call indication' (would light on if you have missed a call).
The screenshot below shows the "Phone Advanced settings" configuration.
The screenshot below shows some "Additional Devices.
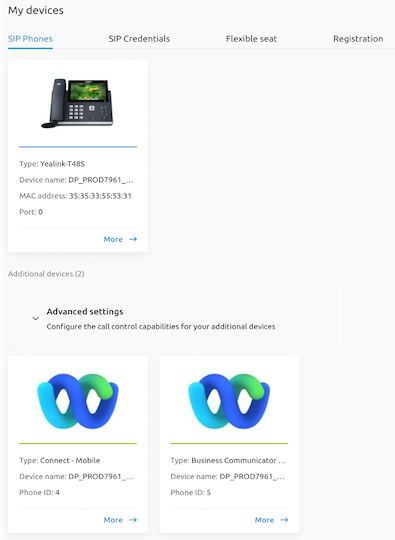
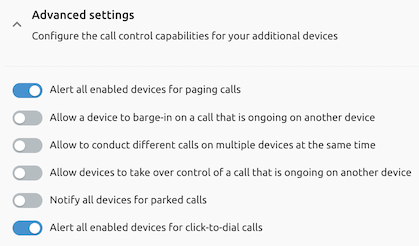
Unfolding the "Additional Devices" (little arrow next to the Advanced settings in the screenshot above) allows configuring the call control capabilities for your additional devices.
The screenshot below shows the Advanced settings of the Additional Devices.
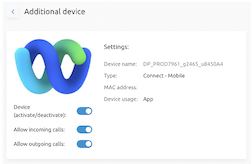
When selecting the "More " option on the Additional Devices (see screenshot above), you can activate or deactivate the softphone and allow incoming and/or outgoing calls.
The screenshot below shows the "Softphone settings and actions".
The screenshot below shows the "My Devices "Home" screen"
SIP Credentials
In the SIP Credentials tab, you can set (change) the password that your phone uses to logon to the network. If you don't remember your password, please contact your IT Administrator to have it replaced.
Flexible seat
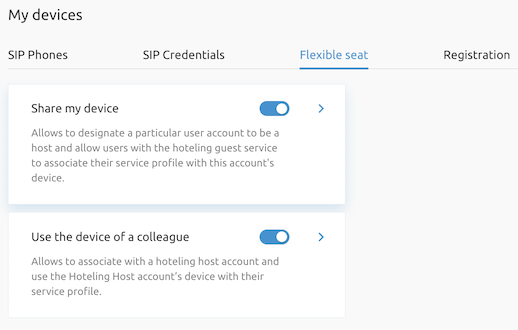
On the Flexible seat tab, you can activate / deactivate:
the possibility to [share]{.underline} your phone with a colleague. "Sharing" means that a colleague who has the hoteling feature activated on his account can logon to your phone.
the hoteling feature on your account.
Registration
In the registration tab, you can find more information about the registering of your device. This can be useful for support reasons.
3.3.2 Mobility
The Mobility service allows linking one or more personal numbers (for example your mobile, your private land line, ...) to your business account.
The screenshot below shows the "Mobility settings"
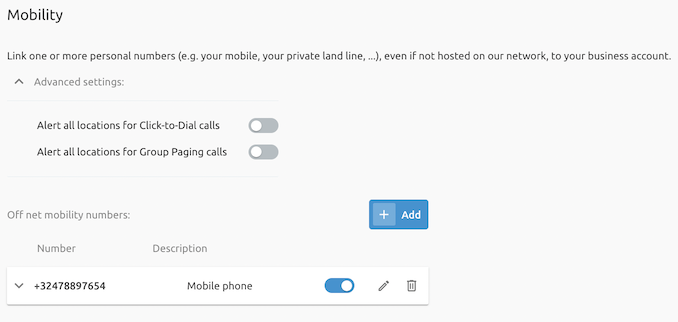
When adding a number, the system asks you additional information about how you want to use that number.
The screenshot below shows the "Advanced settings when adding a number".
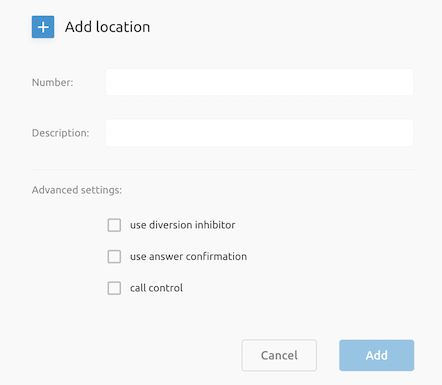
Advanced settings in this pop-up screen are:
User diversion inhibitor -- Provides the option to prevent calls that are redirected by a user to be redirected again by the called party to their voice mail.
Use answer confirmation -- If checked, you will be prompted for a response before a call is transferred to your Anywhere device. This selection is useful if you wish to screen which calls you accept and which you want to go to voicemail.
Call control -- Allows the system to control your call control functions instead of the call control associated with individual devices.
Schedules
The Schedules service allows creating timetables and holiday tables, which can then be used in other services requiring a Time or Holiday input.
Executives and assistants
The Executives and assistants service creates a 'link' between an executive and his/her assistant(s). Call towards the executive can be handled by the assistant(s).
On the main screen of the service, you can configure assistants and executives.
The screenshot below shows the main screen of the Executives and assistants service
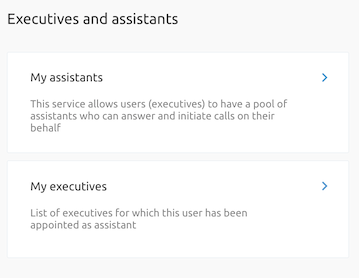
My assistants
In this tab, you can setup the configuration of the assistants.
The screenshot below shows the assistants configuration in the My assistants service.

In the first tab, you need to define the assistant(s). Use the Add button to create a list of assistants.
Using the switch, you can temporarily stop the call handling service for all the assistants.
In the Call routing tab, you define which calls you want to divert from the executive towards the assistant.
the screenshot below shows the call routing configuration in the My assistants service.
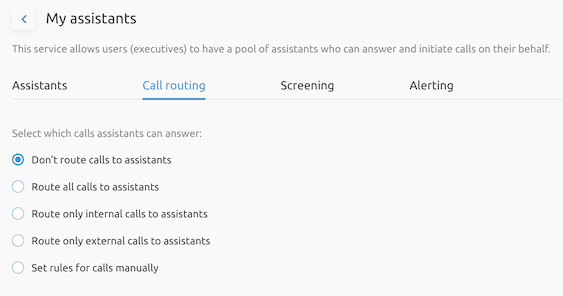
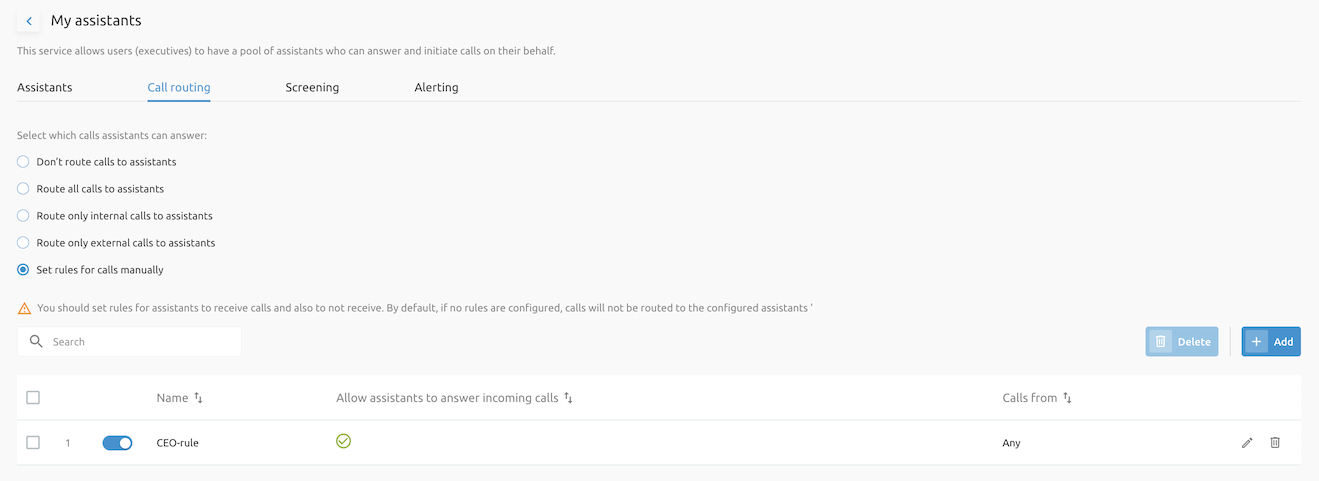
Creating the rules manually allows customizing the call routing. When adding a customized rule, an intuitive wizard will guide you through the configuration.
The screenshot below shows the Call routing, and more specific 'Set rules for calls manually".
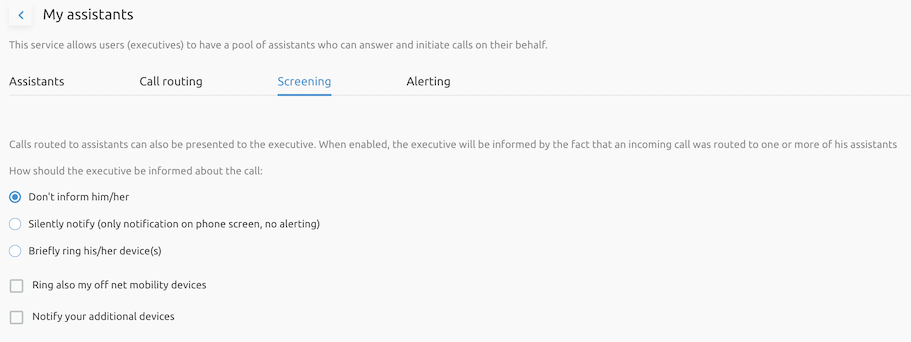
In the Screening tab, you can define if the executive needs to be informed or not about incoming calls.
The screenshot below the screening configuration in the My assistants configuration.
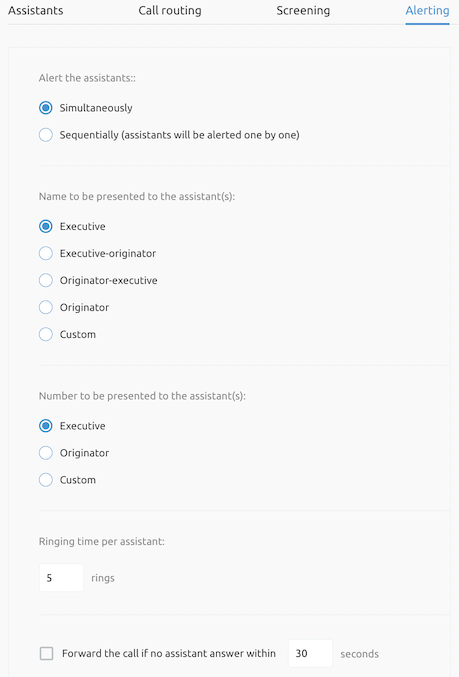
In the Alerting tab, you can define how the call is presented to the assistants and what needs to be done if an executive has more than one assistant.
The screenshot below shows the alerting configuration in the My assistants service.
My Executives
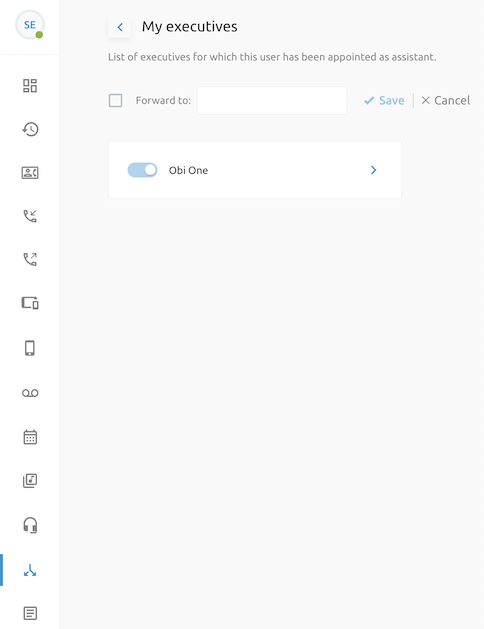
In the Executives tab, you can make a list of executives for which you are appointed as an assistant.
In the example below, it's on the user account of Steven Eggert where I can see the list of executives and make some call flow rules (unfolding the screen from the executive).
The screenshot below shows "My executives service of Steven Eggert".
This figure shows that Obi One is the executive of Steven Eggert.
And when going into the executive screen (unfolding it via the little arrow), you can set additional rules for that specific executive.
The screenshot below shows the "Executive Obi One" configuration
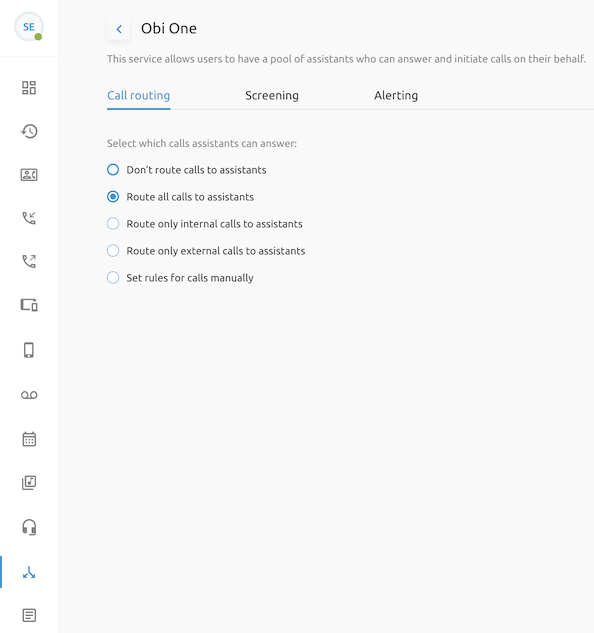
The configuration can be set for the call routing, screening and alerting (for more information see the explanation of the My assistants service.)
What's new on release 3.0
The main new features for the end user delivered in the release 3.O are described in this section.
Automatice Hold & retrieve
This service is commonly used by receptionists or operating attendant consoles. When a call terminates on the attendant console, the receptionist answers the call, gathers information from the caller, and then transfers the call to a dedicated station with the Automatic Hold/Retrieve service enabled. The call is automatically put on hold and the caller is played Music on Hold while waiting.
The receptionist then communicates with the person who should handle the call and provides him/her with the extension against which the call is held. That person calls the extension and retrieves the call.
If the call is not answered within a specified time, the receptionist is being recalled.
Only one call can be held at a station at any given time.
Usually the parking station, that is, a user account with the Automatic Hold/Retrieve service assigned, should not have any device associated with it due to the calling limitations. For example, calls cannot be made or received and services, that put calls on hold, cannot be invoked from such a device. The emergency and maintenance calls cannot go through, and feature access codes don't work on this user account.
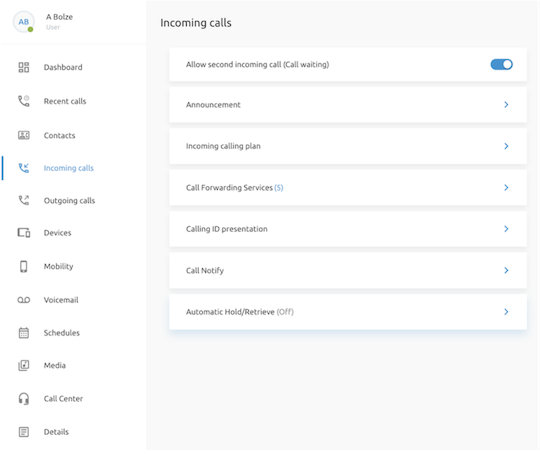
The service is accessible by the Group administrator and is put in the incoming calls service of a user.
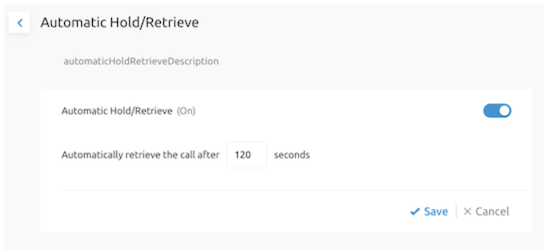
With regards to the configuration of the Automatic Hold/Retrieve feature, it is just enabling the feature and setting a timer on which the call will be automatically retrieved (that it goes back to the receptionist or attendant console).
Custom Ringback tone
This feature allows a user to configure a specific ringback tone.
The feature can be made visible for a user on the incoming calls service. The user must have it "show advanced features" enabled.
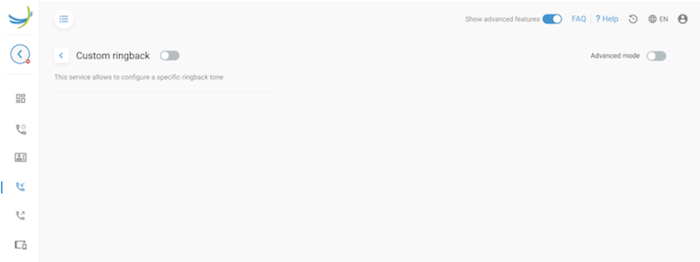
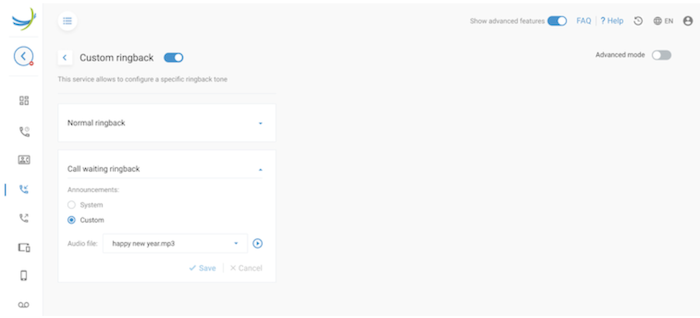
There is a possibility to enable and disable the custom ringback tone as shown on the screen below.
Enabling the feature will give the possibility to choose an announcement - system or custom - to the ringback tone.
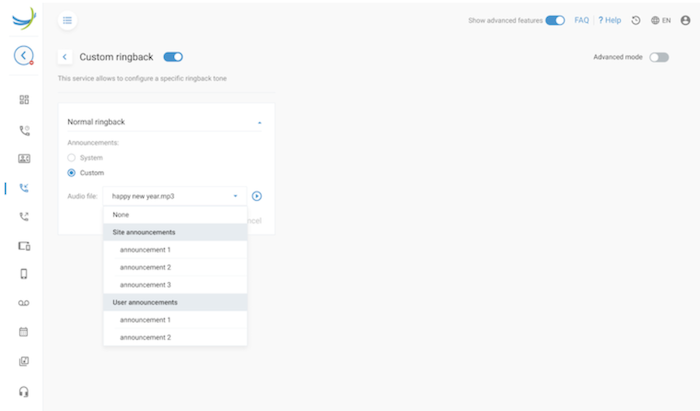
This feature also gives the possibility to generate call waiting ringback tones. Again, you can choose between the system -- and custom ringback tones. The custom ringback tone allows adding a specific audio file to the call waiting ringback tone.
Enabling the Advance mode (upper right corner) of this feature will give the possibility to create different ringback tone for specific numbers and/or timings.
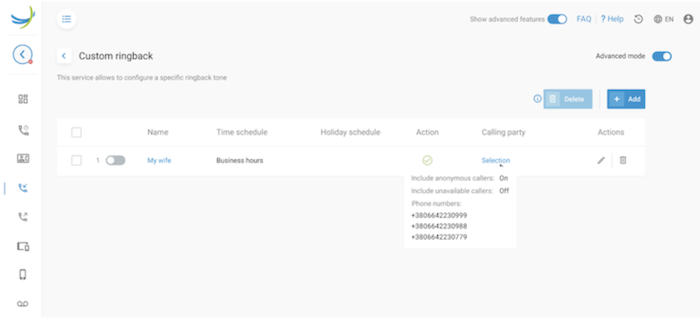
These custom ringback tones can then be enable / disabled separately, and customized one by one.
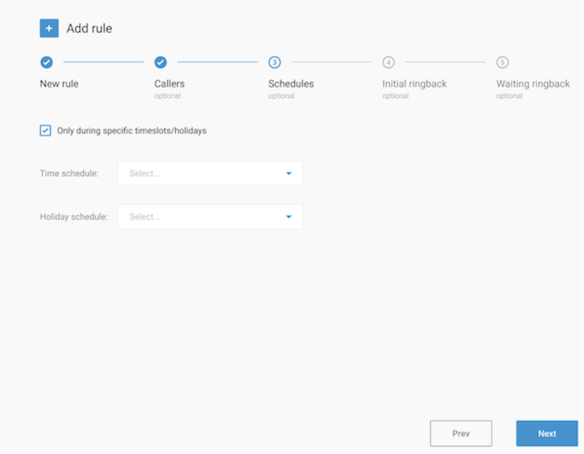
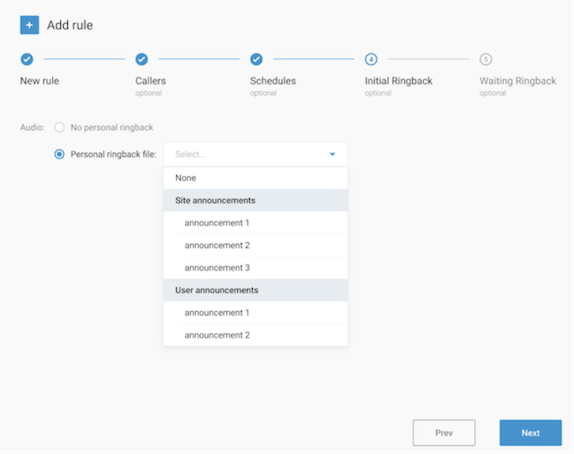
When adding a new ringback tone, a wizard will pop up with the different configuration steps to follow:
- First a name needs to be provided to the ringback rule and you need to define the action (play a custom ringback tone or not).
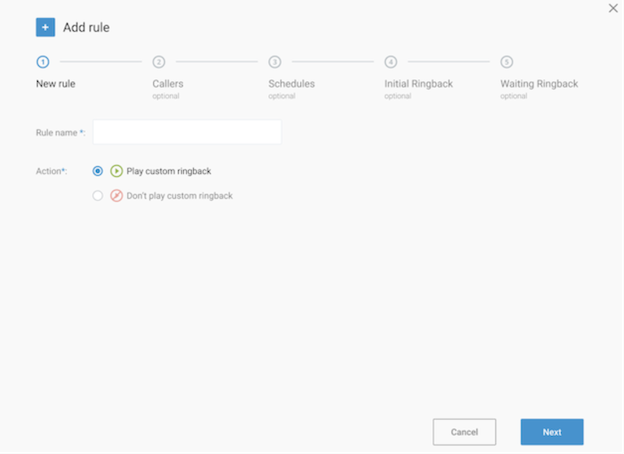
The following steps are optional.
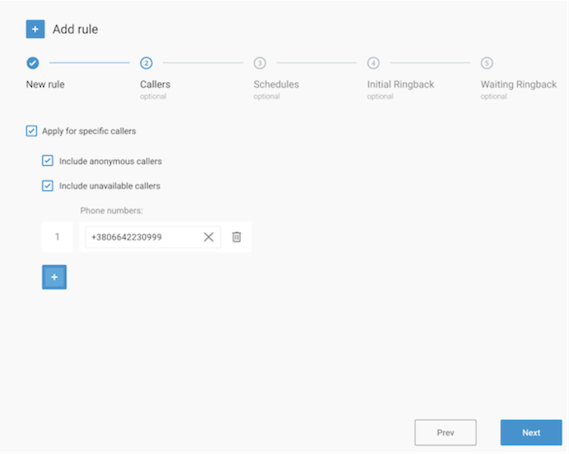
- Select for which callers you want to apply the custom ringback tone.
- Define when the custom ringback tone needs to be generated (during which Time schedule and /or Holiday schedule)
- Adding an announcement to the initial ringback tone (a personal announcement or no announcement)
- Selecting and configuring waiting ringback tone or not.
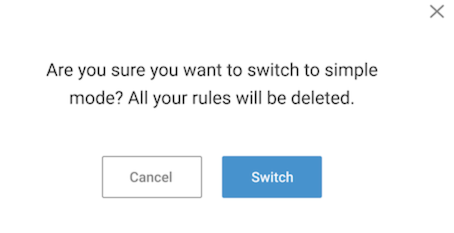
When moving back to the "simple" mode (no custom ringback), all the rules that were created will be deleted. The self-care portal clearly shows you this message.
Call Recording
The service gives the ability to the customer to record calls.
This is the "main" call recording service. Without these service, external call recording applications cannot be assigned.
Call records can be replayed by the user who has initiated the call recording, they can be stored by the user who has initiated the call recording.
An Administrator can move the call record to an external storage system if the call record was stored locally and the administrator can remove the call record if needed.
Call recording option is included in a (separate) service pack. Not all users/End users will have the ability to record calls. The correct service pack is needed to do so.
When the service is activated for the user, a new "recording icon" will be displayed in the service menu on the left side of the page. The recording page will look as follow:
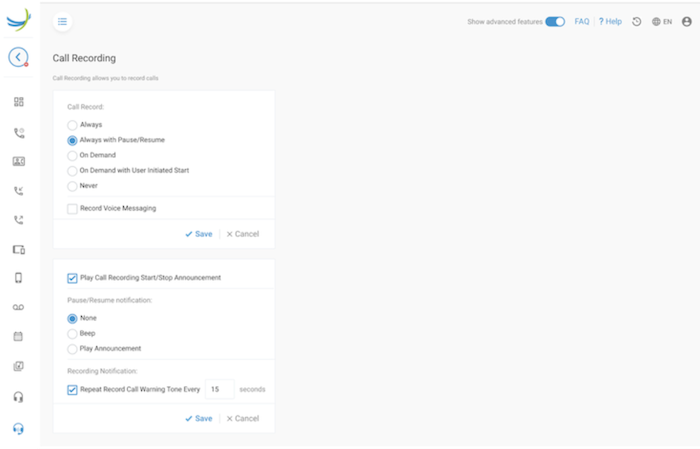
Depending on the regulations, a notification needs to be played to indicate that call recording in ongoing. This can also be configured.
Barge-in exempt
Barge-in means breaking in on an active call.
When a user has the Barge-in Exempt service enabled, another user from the same Group (using the Directed Call Pickup with Barge-in service) cannot barge in on his active calls.
If a user has Barge-in Exempt disabled and has a single alerting call, the call can be picked up by another user (from that same Group) using the Directed Call Pickup with Barge-in service.
Barge- in Exempt does not block pickup attempts.
The service is accessible on the details page of an end-user under the advanced setting tab.
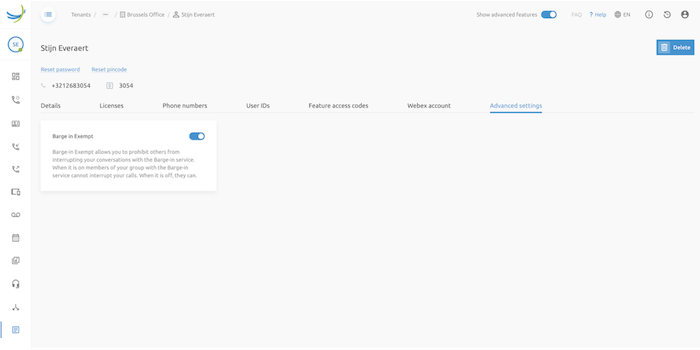
The service can be disabled and enabled.
What's new on release 3.1
The main new features for the end user delivered in the release 3.1 are described in this section.
Do not disturb (DND)
The service "Do not disturb" is an Incoming Calls service which was only accessible via one of the cards of the User Dashboard.
With this improvement the service is also shown and accessible via the incoming call configuration settings of an end-user.
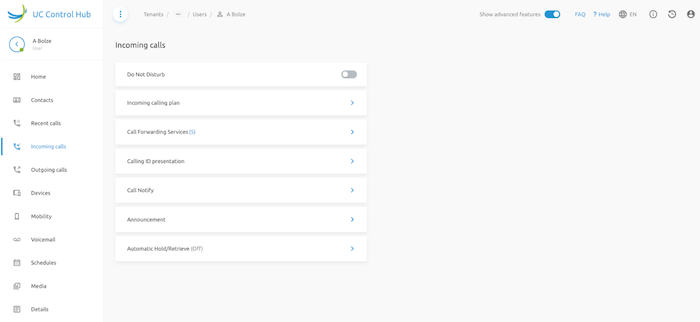
Activating the DND button here on the Incoming calls service screen, will also activate the button on the Dashboard (of course) and visa versa.
What's new on release 3.2
The main new features for the end user delivered in the release 3.2 are described in this section.
Mobile number can be adapted
With the "Bulk users" creation, it is possible to include the mobile number of the user. This mobile number can be seen by other users of the same group in the contact details, but once it is created it is not possible to change it via the self-care portal.
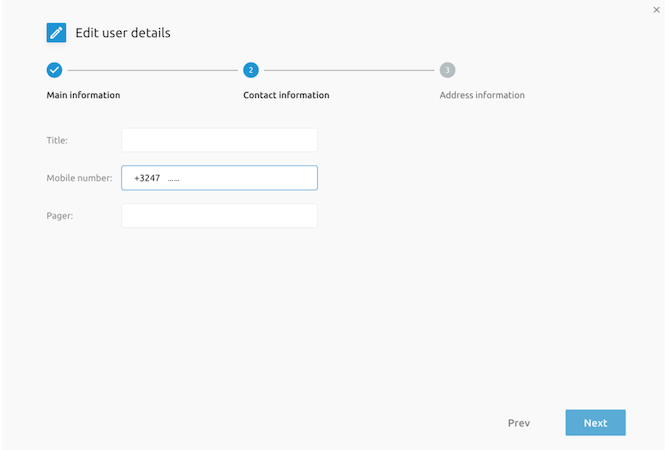
As from this release, the end-user can change and/or remove his mobile number.
The figure below shows the user detail information wizard. In the contact information page, there is now the possibility to add/change or remove the mobile number which appears on the details page overview of the user.
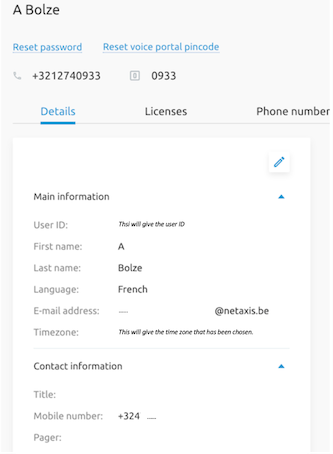
The figure below shows the details page overview of the user.
Editing (clicking on the pencil icon) this user allows changing and/or removing the mobile number again.
What's new on release 3.3
The main new features for the end user delivered in the release 3.2 are described in this section.
Business ON/OFF
This service is a project specific service requested by one of our customers.
The service is disabled by default and needs to be enabled during the implementation phase of the project for those customers who would like to make use of this service.
It relies on project specific workflows implementing the API end points used by this feature.
The Business ON/OFF is a Fixed Mobile Convergence (FMC) feature where when it is assigned to a user, it can have 2 mode:
- Business ON
- Business OFF
When the user is in Business ON mode, the following will happen:
When the user makes a call with his mobile phone, the called party will see his fixed number (business number) and not his mobile number.
When the user receives a call on his fixed number (business number), both his mobile phone and his fixed phone will ring.
When the user is in Business OFF mode, the following will happen:
When the user makes a call with his mobile phone, the called party will see his mobile number.
When the user receives a call on his fixed number (business number), only his fixed phone will ring.
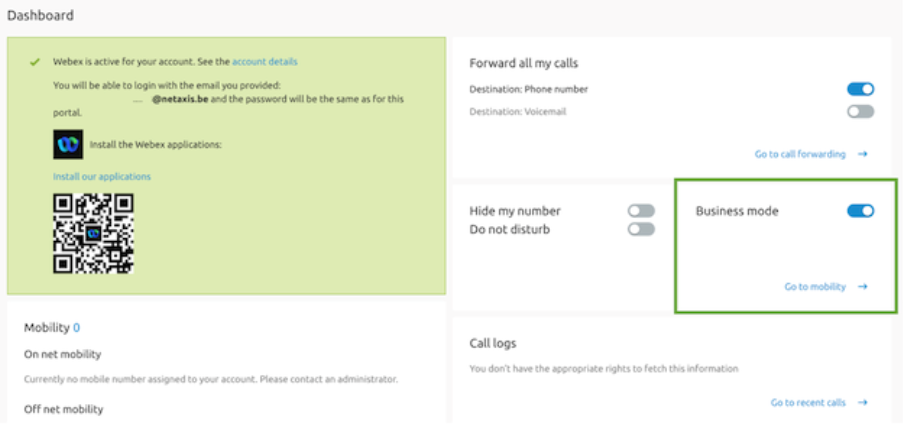
On the dashboard of an end-user there will be a "Business mode"switch displayed to easily switch on/off the service. The figure below shows how it looks.
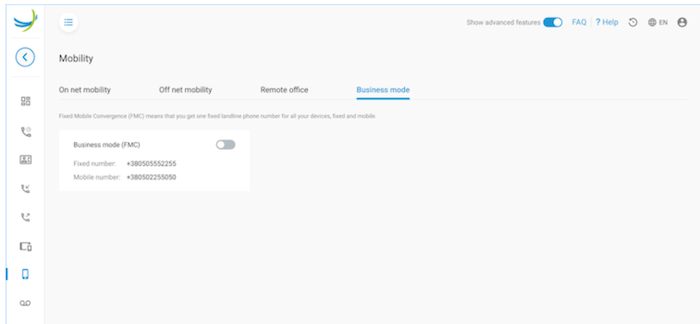
On the Mobility service of the account or end-user, an additional service has been added (Business mode) where you can activate and de-active the service - this gives you the same functionality as on the dashboard - and where you can see the fix- and mobile number of the user.
Note: The service makes use of the BroadWorks Shared Call Appearance (SCA) feature for linking the fix number and the mobile number of the user. The configuration of that number in the SCA feature is done via an API call during the setup of the customer or the end user.
