Fusion Portal
The Fusion for BroadWorks (F4B) solution by Netaxis, with its UC Control Hub (UCCH) selfcare portal, is a robust and adaptable solution tailored specifically for Cisco Broadworks environments. It encompasses all essential Broadworks functionalities, enabling service providers to offer a modern self-care experience while phasing out outdated self-care platforms. Built with a keen focus on end-user experience, the solution excels not only in its user interface (UI) design but also in automating complex technical provisioning tasks, such as managing service dependencies for standard users. Fully branded, the Fusion for BroadWorks solution can be deployed either on-premises or as a cloud service.
In addition to its core functionalities, the F4B solution offers numerous add-on modules for seamless integration with third-party services like Webex, Dubber, and Microsoft Teams. It also includes in-house solutions such as a number management system, a number portability module, and call analytics.
This document will guide you through various configuration options and features offered by the out-of-the-box solution that should be considered during deployment stage.
Architecture
The Fusion for BroadWorks deployment comprises three fundamental components:
Fusion Portal Application (UCCH):
- Built as a single-page application (SPA) in React, the UC Control Hub dynamically updates the web page with data from the server without reloading the entire page. After the initial load, the server delivers all necessary HTML, allowing the browser to manage subsequent updates. This approach ensures a fluid and scalable user experience, with rapid interactions as the application communicates seamlessly with the server.
APIO Core:
- Serving as an orchestration layer, APIO Core processes incoming requests from the F4B selfcare portal, directing them to the appropriate gateway. Some requests are abstracted and run through pre-built workflows in this orchestration layer, adding customised business logic necessary for automation. APIO Core is crucial for the solution's scalability and redundancy.
Broadworks Gateway:
- This component exposes APIs on the northbound interface and communicates using OCI-P on the southbound interface with Broadworks.
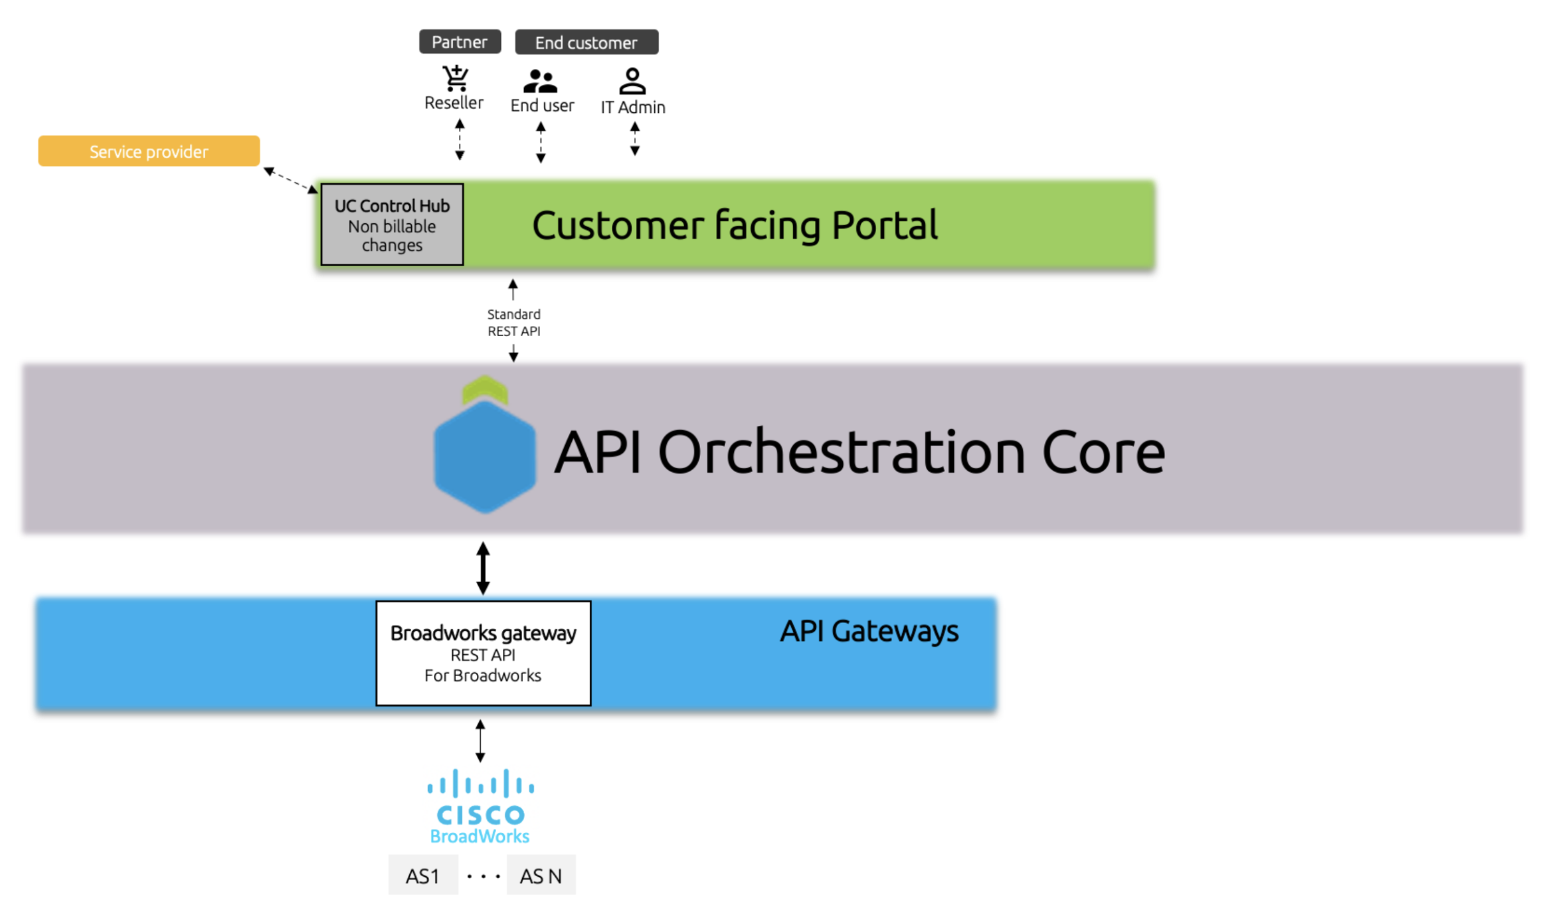
Additionally to the base deployment there are of the shelf extension modules that can be purchased as addons. Some of them require addition software installation, others require extra hardware. They will all be described in more detail in the subsequent chapters of this document.
- Webex for Broadworks Module (Full API mode only integration)
- Microsoft Teams Module
- LDAP/AD Synchronization Module
- Mutare Voice Mail
- Dubber Call Recording Module
- Single Sign-On (SSO) through OpenID Connect or SAML (Admin Only – Tenant and Above)
- Call Analytics and CDR (NEMO) Module
Stay informed about Netaxis’s ongoing innovations, as new features and modules are continually in development. Checking the Netaxis roadmap can provide insights into upcoming enhancements..
Multi AS Cluster support
A simple deployment of a Fusion for BroadWorks involves managing a single Cisco Application Server (AS) cluster. However, customer setups could involve multiple AS clusters and Netaxis solution can facilitate this by deploying multiple gateways talking to a single APIO core. APIO core can then redirect a user after login to the correct proxy endpoint linked to a specific gateway.
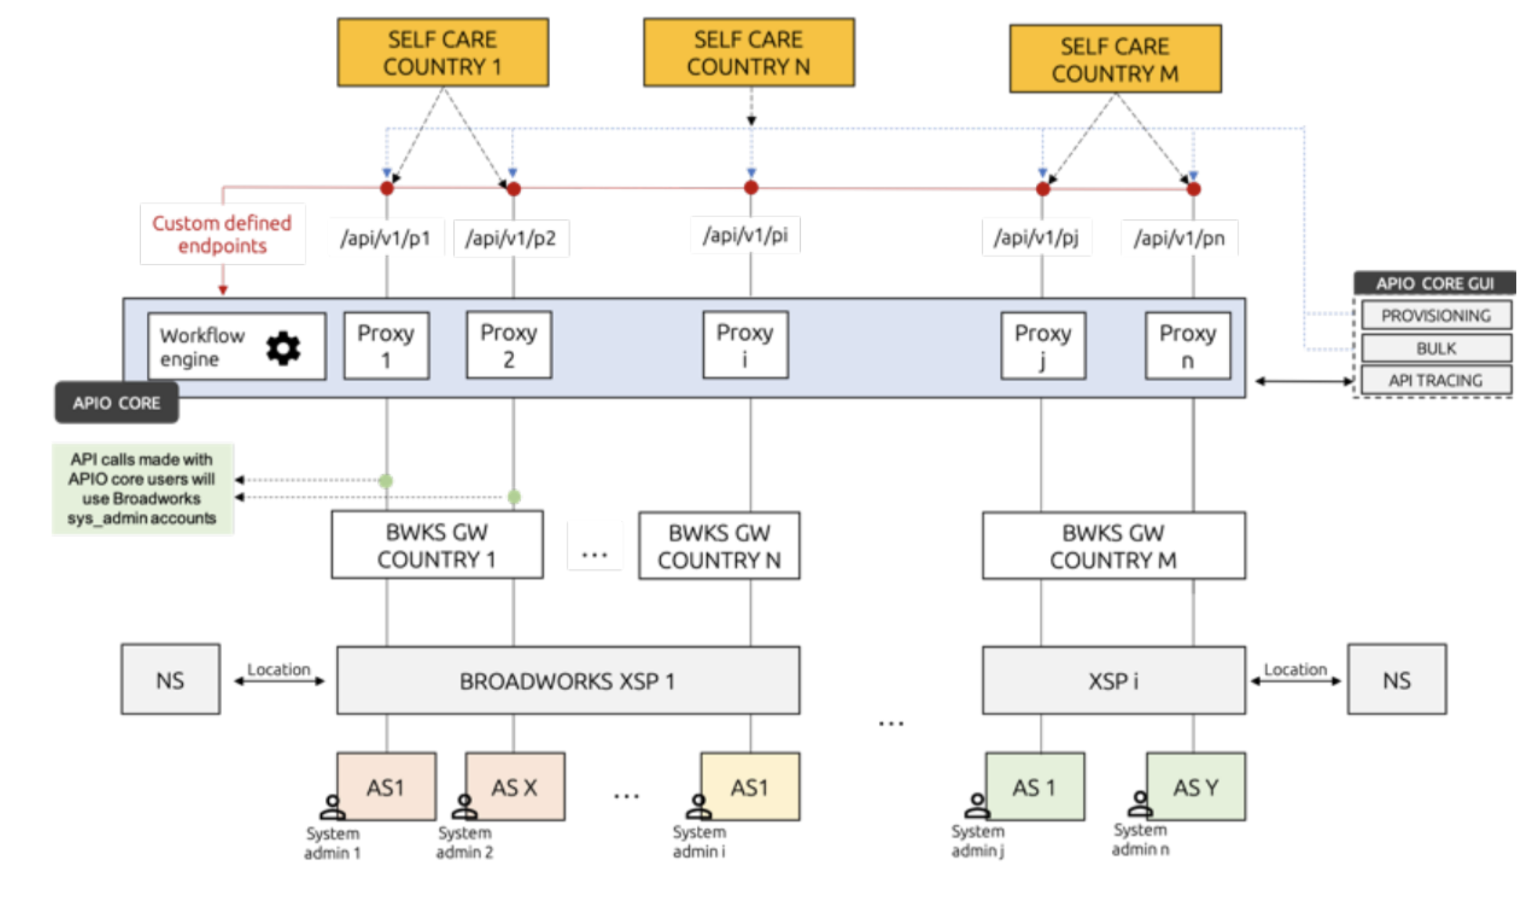
Second possibility is to use a single gateway and configure multiple backends (AS clusters). This options is only available if all AS clusters have the same configuration. Meaning they all are configured with the same system/default domain, have some end user device profiles and so on. In this scenario all clusters are accessible via a single gateway and share the same F4B configuration. The APIO core, after user login, will select the appropriate backend to which the given user must talk to. This also allows APIO Core users having access to tenants on all clusters via a single GUI, making management much easier.
Redundancy
Achieving redundancy in the Fusion for BroadWorks solution can be accomplished through various methods. In this chapter, we will describe the different redundancy models recommended by Netaxis. Before diving into these models, it’s important to understand some key redundancy principles.
Data Center Redundancy: Deploy at least two data centers to host instances of each critical node. This setup prevents hardware-level single points of failure.
Separate Nodes for Applications: For production environments, host each of the following components on separate nodes:
- UC Control Hub
- APIO Core
- Database Server
- Additional nodes for functionalities such as NIMS, NPACT, and Call Statistics.
High-Availability Proxy: Deploy an HA proxy in front of the frontend servers hosting the UC Control Hub application to ensure a seamless single point of access for end-users. Netaxis recommends using a load balancer to achieve this, emphasising session persistence.
SPA Communication with backend:
- The UC Control Hub is a single-page application downloaded as a static file from the frontend web server (Nginx).
- Once running in the client’s browser, it communicates with the backend through API calls.
- Nginx on the frontend nodes proxies these API calls to the APIO Core interface, ensuring efficient and reliable interactions.
By adhering to these principles and deploying the recommended redundancy models, service providers can ensure a robust and fault-tolerant Fusion solution.
Below are the Netaxis recommended and approved redundancy models.
Silos Model

Full Mesh Model
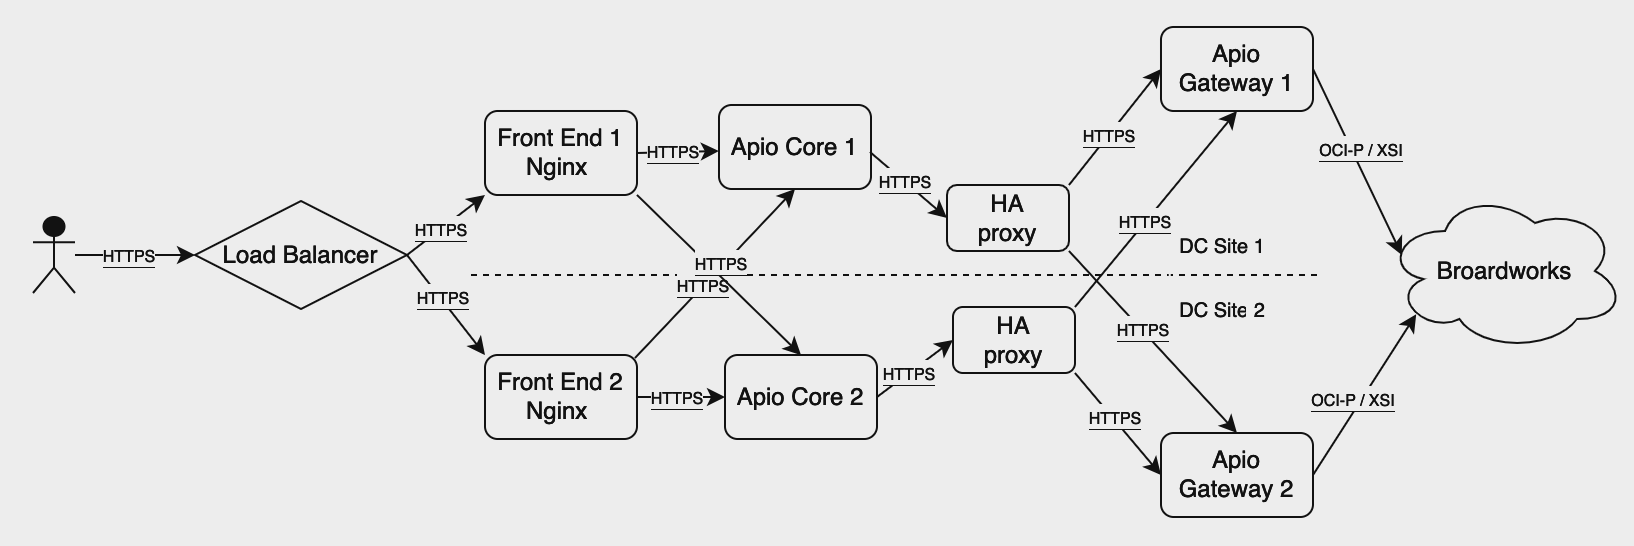
APIO Database
It is crutial to mention here that both APIO Core and BroadWorks Gateway, sometimes called APIO Gateway, use an external SQL database to store configuration, transaction information and local user end data. The above redundancy models don't depict due to complexity of both diagrams. Netaxis recommends for this purpose to use PostgreSQL database in active / standby redundancy mode.
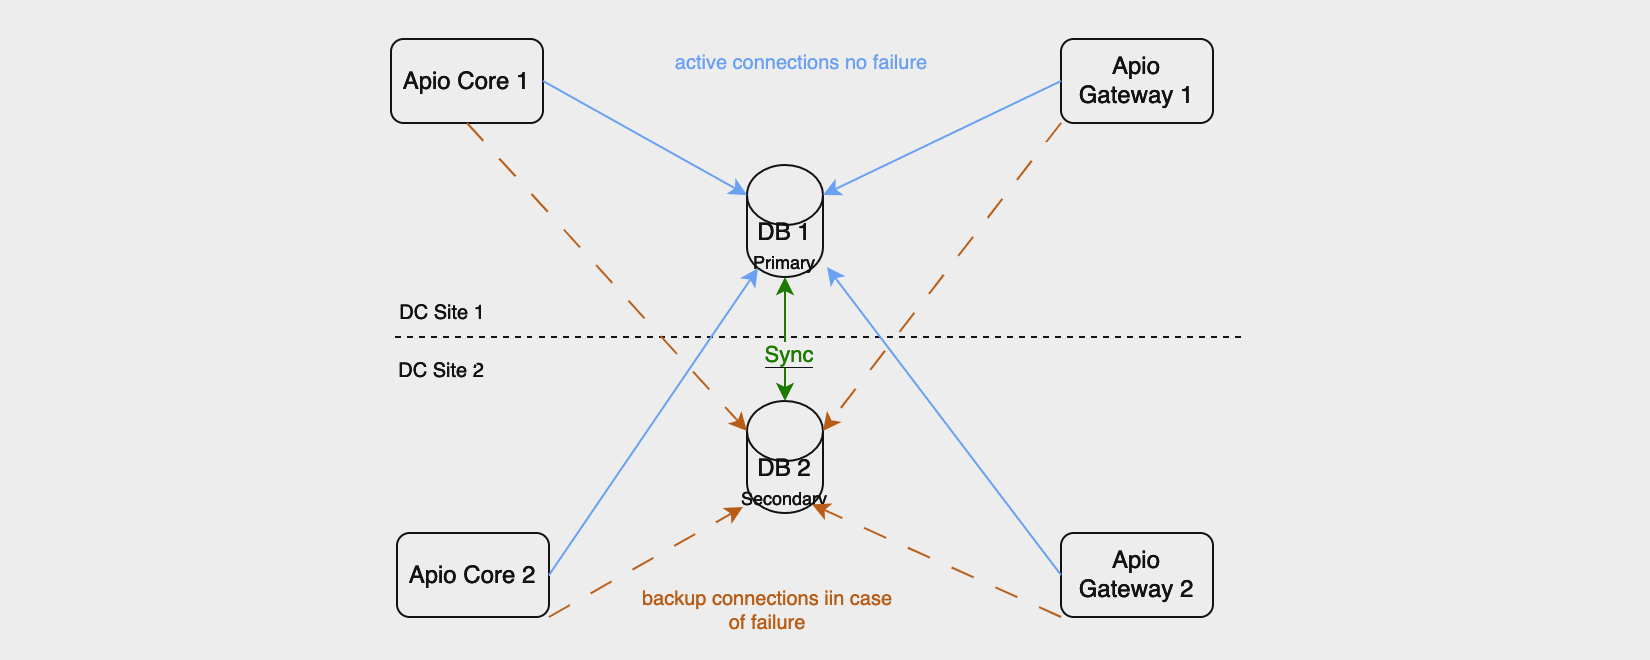
Note that all nodes connect and use the primary node at all times. In case of fault and a need to switch over to secondary database node a manual intervention is needed. It is possible to implement a paid 3rd party active-active model.
System Requirements
This section describes APIO OS and hardware requirements.
Hardware
Fusion for Broadworks hardware requirements for all APIO core nodes are derived from the number of end users that the platfrom will be serving. Below we provide example hardware requirements for most common deployments.
Lab (internal service provider use only)
| Node | vCPU | RAM | HDD |
|---|---|---|---|
| UCCH - Selfcare Portal | 1 | 4 | 50 |
| APIO Core | 2 | 8 | 50 |
| APIO/BWKS GW | 2 | 8 | 50 |
| Database | 2 | 8 | 200 |
Up to 50K users
| Node | vCPU | RAM | HDD |
|---|---|---|---|
| UCCH - Selfcare Portal | 4 | 4 | 100 |
| APIO Core | 4 | 16 | 100 |
| APIO/BWKS GW | 4 | 16 | 100 |
| Database | 4 | 16 | 250 |
Up to 100K users
| Node | vCPU | RAM | HDD |
|---|---|---|---|
| UCCH - Selfcare Portal | 4 | 8 | 100 |
| APIO Core | 4 | 16 | 100 |
| APIO/BWKS GW | 4 | 16 | 100 |
| Database | 4 | 16 | 500 |
Up to 150K users
| Node | vCPU | RAM | HDD |
|---|---|---|---|
| UCCH - Selfcare Portal | 4 | 8 | 100 |
| APIO Core | 8 | 16 | 100 |
| APIO/BWKS GW | 8 | 16 | 100 |
| Database | 8 | 16 | 1000 |
Up to 250K users
| Node | vCPU | RAM | HDD |
|---|---|---|---|
| UCCH - Selfcare Portal | 8 | 16 | 100 |
| APIO Core | 8 | 32 | 100 |
| APIO/BWKS GW | 8 | 32 | 100 |
| Database | 8 | 32 | 2000 |
Supported OS and 3rd Party Applications
OS
| Node | CentOS Ver | Alma | Redhat |
|---|---|---|---|
| APIO Core | 7 | 8,9 | 7,8,9 |
| APIO/BWKS GW | 7,8 | 8 | 7,8 |
| UCCH - Selfcare Portal | 7,8 | 8 | 7,8 |
| Database | 7,8 | 8,9 | 7,8,9 |
3rd Party Applications
| Node | PostgreSQL | ||
|---|---|---|---|
| APIO Core | 7 | 8,9 | 7,8,9 |
| APIO/BWKS GW | 7,8 | 8 | 7,8 |
| UCCH - Selfcare Portal | NA | 8 | 7,8 |
| Database | 7,8 | 8,9 | 7,8,9 |
Partitioning
During the Linux installation, the custom partitioning option shall be used. Some APIO nodes do require specific partitioning, please see below tables for reference. Netaxis advise to use LVM, to allow any resizing if needed.
Fusion Portal
LVM-based partitioning
| Mount point | FS type | Partition Size |
|---|---|---|
| /boot | 2GB | |
| Swap | 2xRAM | |
| / | ext4 | Rest of free space |
APIO Core
LVM-based partitioning
| Mount point | FS type | Partition Size |
|---|---|---|
| /boot | 2GB | |
| Swap | 2xRAM | |
| / | ext4Rest of free space |
APIO Gateway
LVM-based partitioning
| Mount point | FS type | Partition Size |
|---|---|---|
| /boot | 2GB | |
| Swap | 2xRAM | |
| / | ext4 | Rest of free space |
Database
LVM-based partitioning
| Mount point | FS type | Partition Size |
|---|---|---|
| /boot | 2GB | |
| Swap | 2xRAM | |
| data | minimum 50GB - consult with Netaxis | |
| /opt/ | ext4 | 10GB |
| / | ext4 | Rest of free space |
The amount of disk space for data partition depends on the amount of data which the administrator wants to store in terms of requests logs.
Network Requirements
This section lists network services required by APIO solution to function.
| Service | Usage | Notes |
|---|---|---|
| DNS | Name resolution | Provided by Netaxis in cloud deployments |
| NTP | Time synchronisation | Provided by Netaxis in cloud deployments |
| SMTP server | Customer must provider mail relay for the solution to be able to send welcome/password reset emails | APIO supports TLS and standard SMTP authentication if needed, however mTLS is not supported. |
| Load balancer | Balance traffic, redundancy, security | Recommended to front the Fusion portal |
Communication Matrix
The ports shown in the table below are used by the Fusion for BroadWorks solution.
| Source | Destination | Interface | Protocol/Port | Usage |
|---|---|---|---|---|
| Internet | UCCH - Selfcare Portal | HTTPS | HTTPS(443) | Access self-care portal |
| UCCH - Selfcare Portal | Internet | Webservice (REST) | HTTPS(443) | Actions on self-care portal trigger calls towords backend |
| DNS server | DNS | UDP(53) | Name resolution | |
| NTP server | NTP | NTP(123) | Time synchronization | |
| Backend (all nodes) | DNS server | DNS | UDP(53) | Name resolution |
| NTP server | NTP | NTP(123) | Time synchronization | |
| APIO Core | SMTP server | STMP | SMTP(25) | E-mail delivery |
| Database (peer) | PostgreSQL | TCP(5432) | DB access and sync | |
| APIO/BroadWorks GW | Broaworks XSP | OCI-P | TCP 2208/2209 | Broadworks provisioning |
| Broaworks XSP | XSI | HTTPS(443) | Broadworks actions | |
| Database (peer) | PostgreSQL | TCP(5432) | DB access and sync |
Portal Configuration Options
In this section we will focus on the base configuration options for the out of the box solution and describe what are the configuration possibilities that come with a standard product that should be considered during the design phase.
Branding
The selfcare portal can be branded to meet the brand identity of any service provider or reseller: colours, background images, fonts, favicon, help texts and labels. A branded version for resellers can be setup fairly quickly, including branded welcome and reset password mails. There is no limit on the number of branded versions the platform can support from a technical perspective.
Selcare portal branding is archived thorough creation of a new branding directory and configuration of virtual host in Ngnix. Depending on the requirements virtual hosts can be FQDN or ip/port based.
A new branding is created under /branding/<your_branding>/ and the default files must be copied over from /branding/default/* and be adjusted. The below table presents the directory/file structure for each branding toghether with some explaining content.
| Directory/File | Description |
|---|---|
| config | This directory holds functional configuration meaning what is being displayed and how the portal behaves. In this directory you should find two files names app.config.json and app.routes.json. |
| theme.config.json | This files allows to customise look and feel and contain value CSS values for certain elements rendered by the Fusion portal application |
| img | This directory holds image files, such as background images and logs |
| favicon | This directory holds favicons used by the portal |
| locale | This directory holds all the language label files |
| fonts | This directory holds files with TTF definitions that can be replaced to change the portal fonts |
The next sections will go more into details of what each directory represents and how files in those diectories can be modified to achieve desirable branding effect.
Config directory
The config directory holds two main configuration files. Their names and configuration functions are explained below.
app.config.json: this file usually contains basic configuration that is needed for the non-logged pages, the rest of the configuration will usually be put in a configuration object to be more easily modifiable (see later)
app.routes.json: this file controls what pages and what elements on those pages are displayed at different levels.
app.route.json
The configuration app.routes.json file found in /branding/<your_branding>/configs/ allows controling what page (UI) elements are visible to the end user. This configuration only applies to pages, tabs and widgets (functional blocks) and not to base elements such as a buttons, text boxes or tables.
The full app.route.json configuration file with all possible configuration options can be found here app.route.json
app.config.json
The configuration app.config.json file found in /branding/<your_branding>/configs/ allows enabling and disabling certain functionalities as well as configuring basic parameters for a given branding.
Note: Below example is missing navLink configuration element that allows to configure the order of links in the main navigation menu of the selcare portal and tabsOrder element that allows configuring the order of tabs on different pages. This has been left out intentionally as it very large and very rarely used.
The full app.config.json configuration file with all possible configuration options can be found here app.config.json
theme.config.json
Changes to CSS of the portal can be applied via the theme.config.json file. Through this file adjusting the colors of the selfcare portal to your brand is done. The full file can be found here theme.config.json
Img Directory
There are number of images that can be replaced as part of the branding process. Their names should be self explanatory in terms of what images on the portal are affected.
The table below shows the list of image files that can be changed on the portal.
| Filename | Type | Dimensions | Recommended Format |
|---|---|---|---|
| bg_404_page.png | PNG | 1440 x 952 | 8-bit/color RGBA, non-interlaced |
| bg_home-page.png | PNG | 1440 x 1024 | 8-bit/color RGBA, non-interlaced |
| bg_login.png | PNG | 1440 x 1024 | 8-bit/color RGBA, non-interlaced |
| bg_mobile-menu.png | PNG | 710 x 611 | 8-bit/color RGB, non-interlaced |
| logo-signIn.png | PNG | 154 x 156 | 8-bit/color RGBA, non-interlaced |
| logo.png | PNG | 154 x 156 | 8-bit/color RGBA, non-interlaced |
| welcome-company-logo.svg | SVG | ||
| welcome_modal.png | PNG | 1440 x 1024 | 8-bit/color RGB, non-interlaced |
WARNING
The filenames must remain unchanged. It is crucial to preserve the file types: an SVG must remain an SVG, and a PNG must remain a PNG. Additionally, it is recommended to use images of the same size, or at least maintain the same aspect ratio, to avoid quality degradation or stretching by the browser.
Fonts Directory
The fonts that are displayed on the portal can be changed. This is done by providing a TTF definition. If a service provider does not own their font, there are many free fonts available on the internet that can be used. A good place to start would be https://fonts.google.com/.
The font definitions that are understood by the portal are of ttf format. Portal expects the following ttf files to be present.
- Font-Bold.ttf
- Font-Light.ttf
- Font-Medium.ttf
- Font-Regular.ttf
ID Generation Rules
The F4B Self-Care Portal can automate various tasks, including the generation of different IDs. To ensure consistency and avoid issues, it is recommended to define rules that enforce a standard naming convention. Additionally, it is advisable to decouple IDs from phone numbers and extensions, as these may change over time, potentially causing cascading updates or conflicts with existing IDs.
The following id's can be auto generated by the Fusion for BroadWorks solution:
- Hunt Group ID
- Call Center ID
- Auto Attendant ID
- User ID
- User Main Device Name
- User Main Device Line/Port
- User Extra Device Name (SCA)
- User Extra Device Line/Port (SCA)
In order to allow a flexible generation, the F4B configuration accepts a number of build in functions listed below for dynamic generation of values.
| Function | Description |
|---|---|
| RND_x | RND_x where x is a number: random number of x digits. Available in all rules. |
| phone_number_e164 | The phone number in E164 format |
| country_code | The country code of the phone number |
| national_no_0 | The national number, without leading 0 of the phone number |
| domain | The domain |
| tenant_id | The tenant id |
| group_id | The group id |
| user_id | The user part (aka left part) of the user id |
| extra_phone_id | The extra phone ID |
A full configuration with example values is presented below:
"APIO_OBJECT_CREATION": {
    "GENERATED_ID_DATA": true
}
"AUTOMATIC_ID_RULES": {
    "MAX_ATTEMPTS" : 50,

    "TENANT_ID_AUTO_GENERATE": false,
    "TENANT_ID_RULE" : "{{RND_4}}"
    "GROUP_ID_AUTO_GENERATE": true,
    "GROUP_ID_RULE": "{{tenant_id}}_{{RND_4}}",
    "USER_ID_AUTO_GENERATE": true,
    "USER_ID_RULE": "{{group_id}}_u{{RND_4}}@{{domain}}",

    "OVERWRITE_ALLOWED": false
    "SUID_CALL_CENTER_AUTO_GENERATE": true,
    "SUID_CALL_CENTER_RULE": "{{group_id}}_cc{{RND_4}}@{{domain}}",
    "SUID_HUNT_GROUP_AUTO_GENERATE": true,
    "SUID_HUNT_GROUP_RULE": "{{group_id}}_hg{{RND_4}}@{{domain}}",
    "SUID_AUTO_ATTENDANT_AUTO_GENERATE": true,
    "SUID_AUTO_ATTENDANT_RULE": "{{group_id}}_aa{{RND_4}}@{{domain}}",
    "SUID_MEET_ME_CONF_AUTO_GENERATE": true,
    "SUID_MEET_ME_CONF_RULE": "{{group_id}}_mm{{RND_4}}@{{domain}}",
    "SUID_ROUTE_POINT_AUTO_GENERATE": true,
    "SUID_ROUTE_POINT_RULE": "{{group_id}}_rp{{RND_4}}@{{domain}}"

    "GROUP_DEVICE_NAME_RULE": "{{group_id}}_{{RND_4}}"

    "GENERIC_DEVICE_NAME_RULE": "DP_{{RND_36}}",

    "USER_MAIN_DEVICE_NAME_OVERWRITE": true,
    "USER_MAIN_DEVICE_NAME": "{{group_id}}_{{RND_4}}",
    "FALLBACK_USER_MAIN_DEVICE_NAME": "device_{{user_id}}"
    "LINE_PORT_USER_MAIN_DEVICE": "{{phone_number_e164}}@{{domain}}",
    "FALLBACK_LINE_PORT_USER_MAIN_DEVICE": "{{user_id}}@{{domain}}",
    "DECT_DEVICE_NAME": "{{group_id}}_{{mac_address}}",
    "FALLBACK_DECT_DEVICE_NAME": "DECT_User_{{mac_address}}"
    "USER_EXTRA_DEVICE_NAME": "DP_{{phone_number_e164}}A{{extra_phone_id}}",
    "FALLBACK_USER_EXTRA_DEVICE_NAME": "DP_{{user_id}}A{{extra_phone_id}}",
    "LINE_PORT_USER_EXTRA_DEVICE": "LP_{{phone_number_e164}}A{{extra_phone_id}}@{{domain}}",
    "FALLBACK_LINE_PORT_USER_EXTRA_DEVICE": "LP_{{user_id}}A{{extra_phone_id}}@{{domain}}",
    "USER_EXTRA_DEVICE_NAME_OVERWRITE": true,

    "LINE_PORT_TRUNK_USER": "{{phone_number_e164}}@{{domain}}",
    "FALLBACK_LINE_PORT_TRUNK_USER": "{{puser_id}}@{{domain}}",

    "URI_BLF_AUTO_GENERATE": true,
    "URI_BLF_RULE": "{{user_id}}_BLF@{{domain}}"

    "SUID_FLEX_SEAT_AUTO_GENERATE": true,
    "FLEX_SEAT_USER_ID_RULE": "{{group_id}}_fs{{RND_4}}@{{domain}}",
    "FLEX_SEAT_DEVICE_NAME_RULE": "dp_{{group_id}}_fs{{RND_4}}"
}
Password Rules
In general, APIO relies on BroadWorks to enforce password policies and generates passwords based on the rules defined in the BroadWorks AS. However, in certain scenarios where APIO is responsible for password generation, it is possible to configure minimum password rules. These rules ensure that generated passwords meet a baseline level of security, particularly if the password policies defined in the AS are deemed insufficiently secure.
- user password resets.
- user (end user, group admin, …) created without password where a password needs therefore to be generated.
- trunk user created without password where a password needs therefore to be generated.
- generating a reproducible password for SSO users who will have a dedicated user in the AS.
- hidden end users (such as for hoteling
- device credentials if needed to be generated by APIO.
- the Voice Mail account password
Configuration of password rules in APIO is presented below:
"NEW_PASSWORD_RESET_GEN": true,
"PASSWORD_RULES": {
    "PASSWORD_SPECIAL_CHARACTERS": ["!", "$", "%', '@", "?"],
    "PASSWORD_MIN_UPPERCASE_LETTERS": 1,
    "PASSWORD_MIN_LOWERCASE_LETTERS": 1,
    "PASSWORD_MIN_DIGITS": 1,
    "PASSWORD_MIN_SPECIAL_CHARACTERS": 1,
    "PASSWORD_MIN_LENGTH": 16,
    "SPECIAL_CHAR_VM" : null,
    "SPECIAL_CHAR_DEVICE": null,
    "SPECIAL_CHAR_TRUNK_USER": null
},
 "MINIMUM_PASSWORD_RULES": {
     "END_USER" : {
         "PASSWORD_MIN_SPECIAL_CHARACTERS": 1,
         "PASSWORD_MIN_UPPERCASE_LETTERS": 1,
         "PASSWORD_MIN_LOWERCASE_LETTERS": 1,
         "PASSWORD_MIN_DIGITS": 1,
         "PASSWORD_MIN_LENGTH": 8
     },
     "ADMIN": {
         "PASSWORD_MIN_SPECIAL_CHARACTERS": 1,
         "PASSWORD_MIN_UPPERCASE_LETTERS": 1,
         "PASSWORD_MIN_LOWERCASE_LETTERS": 1,
         "PASSWORD_MIN_DIGITS": 1,
         "PASSWORD_MIN_LENGTH": 8
     },
     "DEVICE": {
         "PASSWORD_MIN_SPECIAL_CHARACTERS": 0,
         "PASSWORD_MIN_UPPERCASE_LETTERS": 1,
         "PASSWORD_MIN_LOWERCASE_LETTERS": 1,
         "PASSWORD_MIN_DIGITS": 1,
         "PASSWORD_MIN_LENGTH": 8
     }
 }
INFO
The length of the generated passwords will be the minimum length defined in the config above.
Licenses
The Fusion for BroadWorks selfcare portal delivers an improved and highly customisable hierarchy service management model that is exposed to the end customer. It allows defining dependencies that set the rules for the selfcare portal regarding which combinations of services and service packs can be assigned to end-users.
This flexibility is achieved through configuration, defined per branding or/and per AS cluster. The example hierarchy below illustrates the relationship between base service packs and their optional add-ons:
INFO
The Self-Care Portal adheres to these basic rules for all license management. Service packs or optional service packs, which are not authorised at the tenant or site level in Broadworks, will not be displayed.
Service Packs
Service pack definition is a mandatory step during the configuration of the F4B selfcare portal. Just like in Broadworks each service pack is a collection of Broadworks services and is configured on the APIO/BroadWorks gateway. When a Broadworks Enterprise customer is created via the APIO Core or via API's, the selected pre configured service packs are then configured on BroadWorks AS.
The configuration is for each service pack is stored in APIO/BroadWorks gateway database and is stored in JSON format. An example structure is provided below.
{
     "services": [
"Advice Of Charge",
"Alternate Numbers",
"Anonymous Call Rejection",
"Authentication",
"Automatic Callback",
"Automatic Hold/Retrieve",
"Barge-in Exempt",
.
.
.
"Video On Hold User",
"Virtual On-Net Enterprise Extensions",
"Voice Messaging User",
"Voice Messaging User - Video"
    ]
}
Licensing in Self-Care Portal
As mentioned at the beginning of this chapter, the F4B selfcare portal needs to be configured allowing hierarchy rules that apply to license management. This configuration reflects the possible combinations of services and ways the service provider would like to bundle them to their end customers. Again this configuration is stored in APIO/BroadWorks Gateway database and is usually applied for a given proxy (AS Cluster).
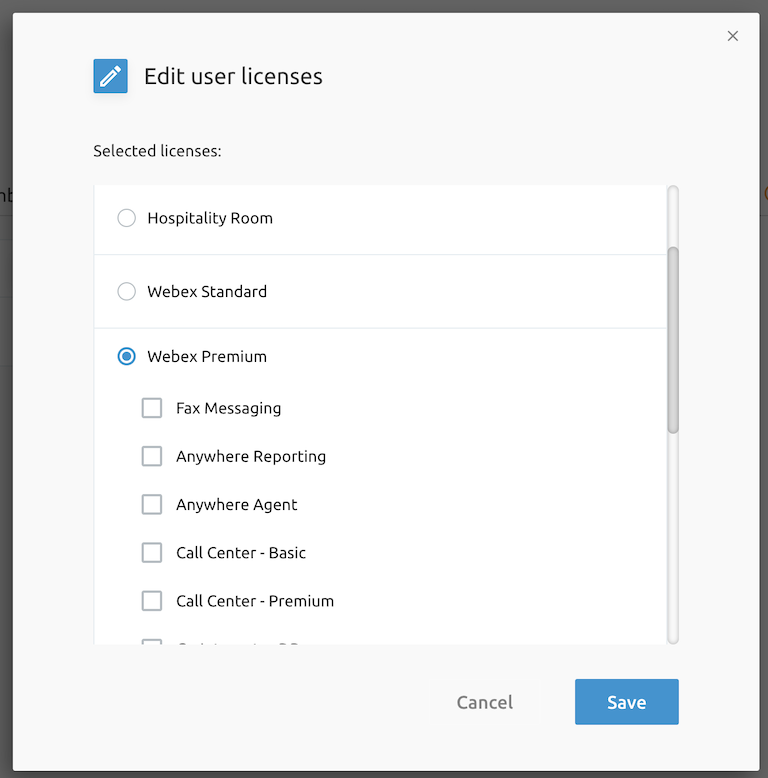
Configuration is performed using a JSON element, an example structure of such JSON is presented below.
{
   "ref_data": [
 {

 {
            "name": "Base SP A",
            "options": [
			    {"name": "Anywhere Reporting"},
                {"name": "Anywhere Agent"},
                {"name": "Call Center - Basic"},
                {"name": "Call Center - Premium"},
				{"name": "Optional SP1"},
				{"name": "Optional SP2"},
				{"name": "Optional SP3"},
            ]
        },
 {
            "name": "Base SP B",
            "options": [
			    {"name": "Anywhere Reporting"},
                {"name": "Anywhere Agent"},
                {"name": "Call Center - Basic"},
                {"name": "Call Center - Premium"},
				{"name": "Go Integrator DB"},
				{"name": "Shared Call Appearance 5"},
				{"name": "Shared Call Appearance 10"},
				{"name": "Do Not Disturb"},
				{"name": "Busy Lamp Field"},
				{"name": "Call Forwarding Selective"},
				{"name": "Fax Messaging"},
				{"name": "Flexible Seating Guest"},
				{"name": "Directed Call Pickup with Barge-in"},
				{"name": "Sequential Ring"},
				{"name": "Priority Alert"},
				{"name": "Music On Hold User"},
				{"name": "BroadWorks Anywhere"},
				{"name": "Intercept User"},
				{"name": "Executive"},
            ]
        },
 {
            "name": "Base SP C",
            "options": [
			    {"name": "Anywhere Reporting"},
                {"name": "Anywhere Agent"},
				{"name": "Call Recording 30d"},
				{"name": "Call Recording 60d"},
				{"name": "Call Recording 1yr"},
				{"name": "Call Recording 2yr"},
				{"name": "Call Recording 5yr"},
				{"name": "Call Recording 7yr"}
            ]
        }
  ]
}
As one can notice, it is a list of base service packs that each contain a list of options. As demonstrated in the example above options can be other service packs or individual Broadworks licenses.
Templates
The Fusion for BroadWorks solution offers templating mechanism that allows to automate some basic functions of the provisioning portal as well as extend the API's.
This templating mechanism is composed of two concepts:
Default values: will be used to enrich the original input data if the same parameter is not present yet. It must be noted that it has been designed for optional parameters only. Therefore this is applied after the validation of the JSON structure.
Actions: Are commands played before or after the main command of the end point. The list of possible actions is extended regularly.
The templates are organised by template categories, each category being virtually linked to a specific obcjet type. This allows to use the same template name (For example - Basic) for different objects (such as Tenant and Group).
Default values The default values can be enriched with dynamic values taken from the url parameters (only if present), such as:
: Tenant ID: Group ID: EndUser ID as it is: EndUser ID without domain: EndUser ID with domain: instance name (e.g. schedule name): sub-instance name (e.g. period name of a schedule)
Note that all the occurrences of a dynamic default value will be replaced with the corresponding value.
This mechanism is enabled by a configuration setting:
"TEMPLATE_ENRICH_DEFAULT_VALUES": falseThe default vakue is false, because this mechanism has a cost and therefore it has to be explicitly enabled.
Provisioning Template Categories
The table below provides a list of available provisioning template categories for use in the Fusion for BroadWorks solution. These categories represent all the objects for which templates can be created and utilized. Note: The names listed below must be used exactly as specified.
| Category Name | Method | Description |
|---|---|---|
| tenant | POST | This category will host templates that are applicable when creating a tenant |
| group | POST | This category will host templates that are applicable when creating a group |
| user | POST, PUT | This category will host templates that are applicable when creating or updating a user |
| ivr | POST, PUT | This category will host templates that are applicable when creating or updating a Auto Attendant |
| call_center | POST, PUT | This category will host templates that are applicable when creating or updating a Call Center |
| hunt group | POST, PUT | This category will host templates that are applicable when creating or updating a Hunt Group |
| trunk_group | POST, PUT | This category will host templates that are applicable when creating trunk group |
| trunk_user | POST, PUT | This category will host templates that are applicable when creating trunk user |
| group_intercept | PUT | This category will host templates that are applicable when updating group intercept service |
| meet_me_conf | POST | This category will host templates that are applicable when creating a meet-me conferencing instance |
| route_point | POST | This category will host templates that are applicable when creating a route point |
Template Definitions
Template definition can be created and modified via the Provisioning UI, which is the APIO Core selfcare portal. As part of F4B deployment,Netaxis will define the initial templates for the customer.
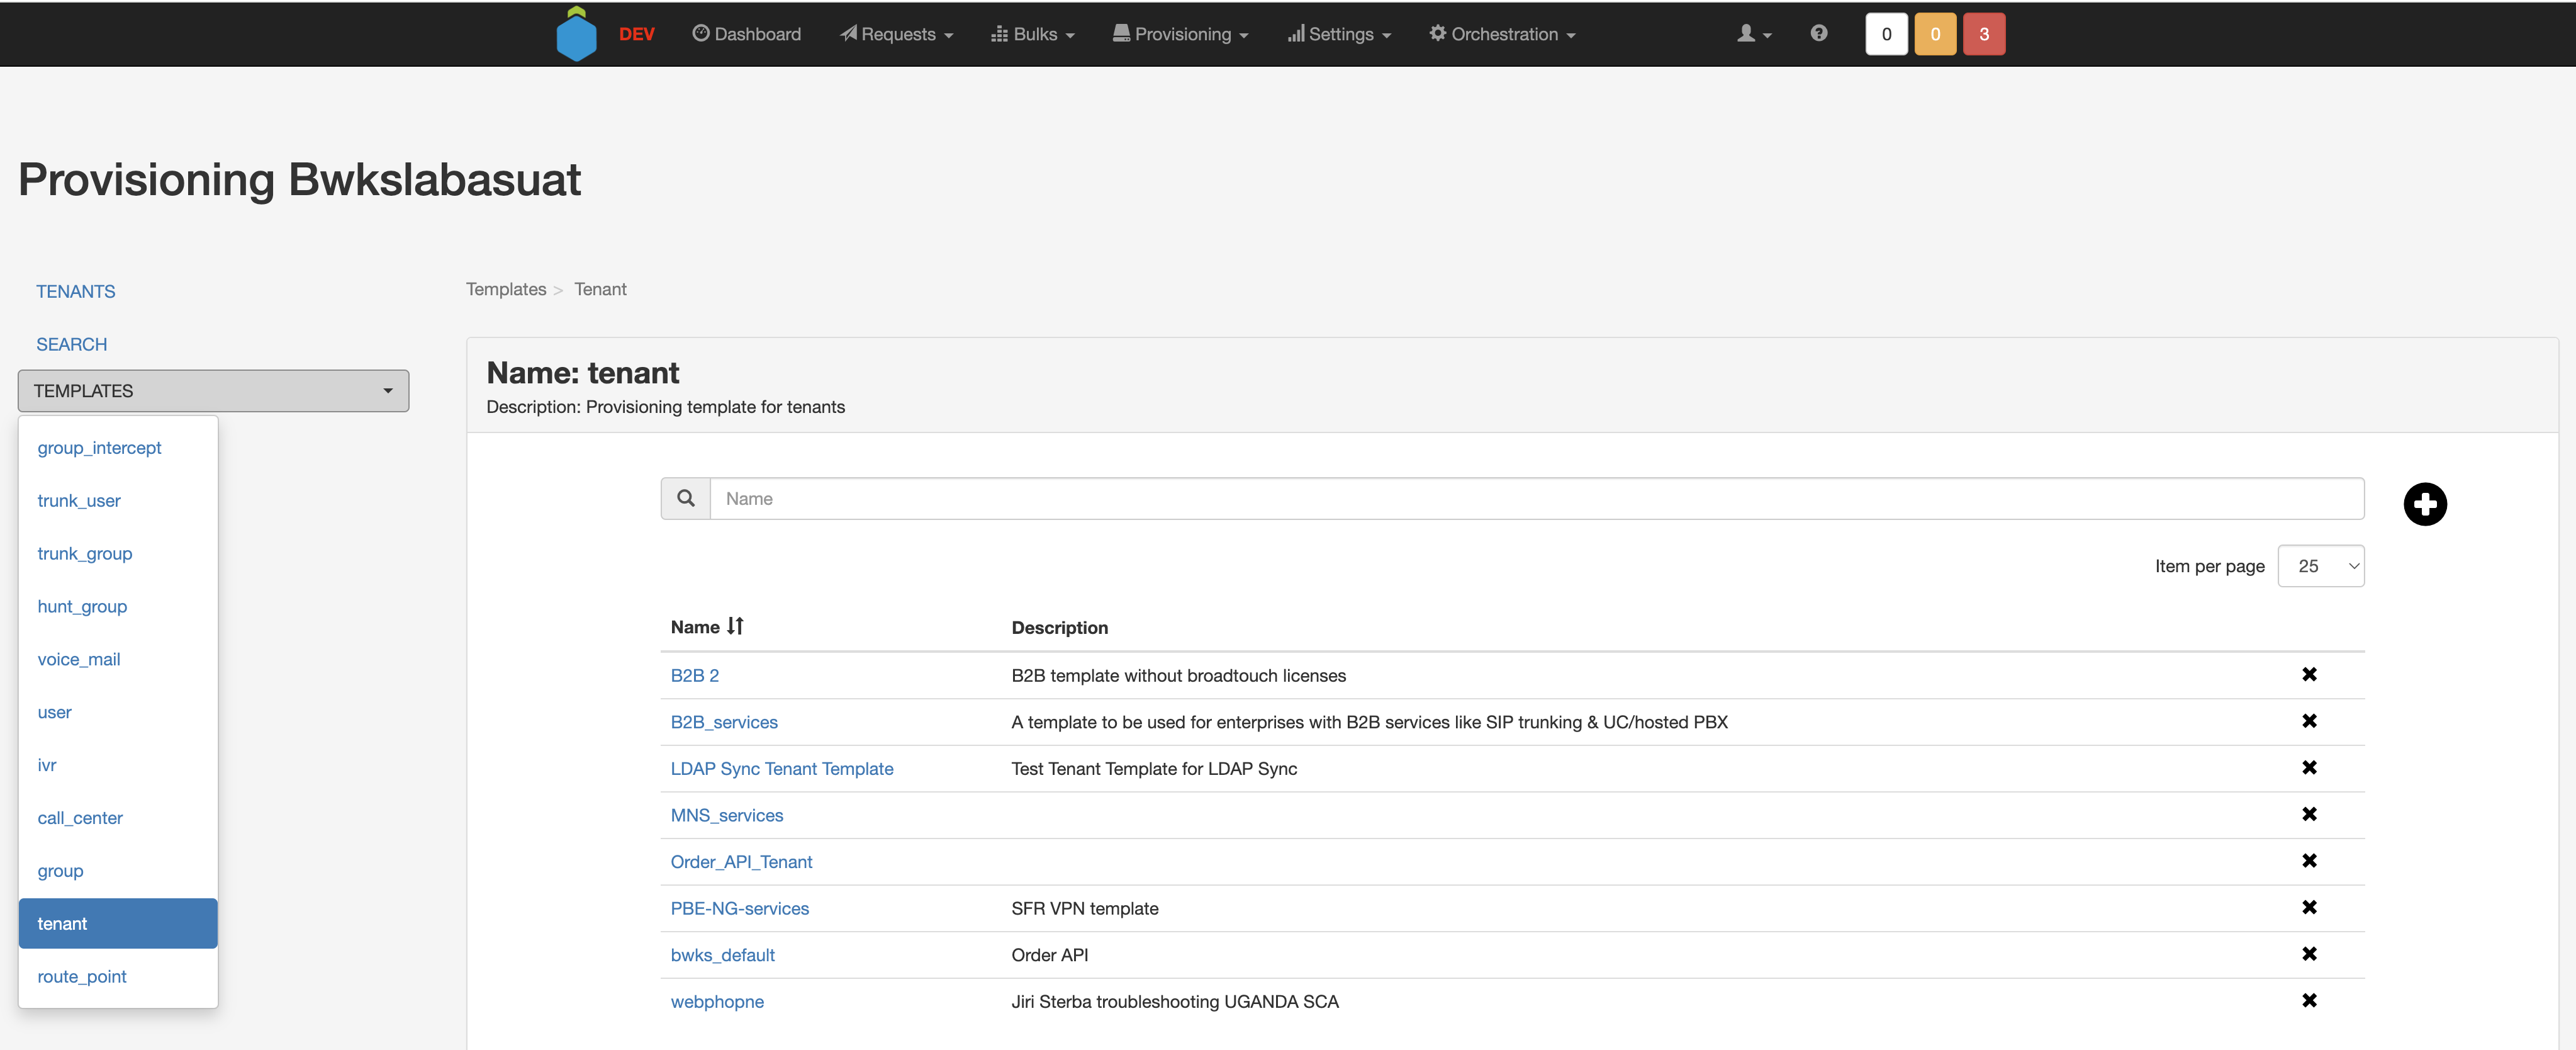
As mentioned above, templates must be created under a template category and must have a unique name. Templates contain template data, which is basically a list of actions to be executed for relevant methods. Those actions, with default values, will be added to the relevant requests if not yet present in these requests. Below an example of a group template is presented. The data structure is in JSON format.
{
    "actions": [
        {
            "authorize_services_group": {
                "data": {
                    "groupServices": [
                        {"name": "Call Capacity Management", "allocated": {"unlimited": true}},
                        {"name": "Emergency Zones", "allocated": {"unlimited": true}},
                        {"name": "Incoming Calling Plan", "allocated": {"unlimited": true}},
                        {"name": "Intercept Group", "allocated": {"unlimited": true}},
                        {"name": "Inventory Report", "allocated": {"unlimited": true}},
                        {"name": "LDAP Integration", "allocated": {"unlimited": true}},
                        {"name": "Outgoing Calling Plan", "allocated": {"unlimited": true}},
                        {"name": "Preferred Carrier Group", "allocated": {"unlimited": true}},
                        {"name": "Trunk Group", "allocated": {"unlimited": true}},
                        {"name": "Voice Messaging Group", "allocated": {"unlimited": true}}
                    ],
                    "userServices": [
                        {"name": "Advice Of Charge", "allocated": {"unlimited": true}},
                        {"name": "Authentication", "allocated": {"unlimited": true}},
                        {"name": "Barge-in Exempt", "allocated": {"unlimited": true}},
                        {"name": "Basic Call Logs", "allocated": {"unlimited": true}},
                        {"name": "Calling Line ID Delivery Blocking", "allocated": {"unlimited": true}},
                        {"name": "Calling Name Delivery", "allocated": {"unlimited": true}},
                        {"name": "Calling Name Retrieval", "allocated": {"unlimited": true}},
                        {"name": "Calling Number Delivery", "allocated": {"unlimited": true}},
                        {"name": "Calling Party Category", "allocated": {"unlimited": true}},
                        {"name": "Call Waiting", "allocated": {"unlimited": true}},
                        {"name": "Connected Line Identification Presentation", "allocated": {"unlimited": true}},
                        {"name": "Connected Line Identification Restriction", "allocated": {"unlimited": true}},
                        {"name": "Customer Originated Trace", "allocated": {"unlimited": true}},
                        {"name": "External Calling Line ID Delivery", "allocated": {"unlimited": true}},
                        {"name": "Intercept User", "allocated": {"unlimited": true}},
                        {"name": "Internal Calling Line ID Delivery", "allocated": {"unlimited": true}},
                        {"name": "Malicious Call Trace", "allocated": {"unlimited": true}},
                        {"name": "Physical Location", "allocated": {"unlimited": true}},
                        {"name": "Preferred Carrier User", "allocated": {"unlimited": true}},
                        {"name": "Privacy", "allocated": {"unlimited": true}},
                        {"name": "Third-Party MWI Control", "allocated": {"unlimited": true}},
                        {"name": "Third-Party Voice Mail Support", "allocated": {"unlimited": true}},
                        {"name": "Zone Calling Restrictions", "allocated": {"unlimited": true}}
                    ]
                },
                "only_for_method": ["post"]
            }
        },
        {
            "assign_group_services": {
                "data": [
                    {"name": "Call Capacity Management"},
                    {"name": "Emergency Zones"},
                    {"name": "Incoming Calling Plan"},
                    {"name": "Intercept Group"},
                    {"name": "Inventory Report"},
                    {"name": "LDAP Integration"},
                    {"name": "Outgoing Calling Plan"},
                    {"name": "Preferred Carrier Group"},
                    {"name": "Trunk Group"},
                    {"name": "Voice Messaging Group"}
                ],
                "only_for_method": ["post"]
            }
        },
    ],
    "default_values": {
        "userLimit": 999999,
        "defaultDomain": "sip.netaxis.be",
        "timeZone": "Europe/Brussels"
    }
}
Template Actions
| Action | Data description | Category |
|---|---|---|
| authorize_services_tenant | Applicable data can be taken from API PUT /api/v1/tenants/(string:tenant_id)/licenses/ | Tenant |
| tenant_call_process_policies | Applicable data can be taken from API PUT /api/v1/tenants/(string:tenant_id)/services/call_processing_policies/ | Tenant |
| tenant_feature_access_codes | Tenant | |
| tenant_trunk_group_call_capacity | Applicable data can be taken from API PUT /api/v1/tenants/(string: tenant_id)/features/trunk_groups/ | Tenant |
| tenant_assign_ncos | The applicable data is not the one from related API as this API is an orchestrated. The structure of this data is as follows. | Tenant |
| tenant_password_rules | Applicable data can be taken from API PUT /api/v1/tenants/(string: tenant_id)/password_rules/ | Tenant |
| tenant_routing_profile | Applicable data can be taken from API PUT /api/v1/tenants/(string: tenant_id)/routing_profile/ | Tenant |
| authorize_services_group | Applicable data can be taken from API PUT /api/v1/tenants/(string:tenant_id)/groups/(string:group_id)/licenses/ | Group |
| assign_group_services | Applicable data can be taken from API POST /api/v1/tenants/(string:tenant_id)/groups/(string:group_id)/services/ | Group |
| group_call_process_policies | Applicable data can be taken from API PUT /api/v1/tenants/(string:tenant_id)/groups/(string:group_id)/call_processing_policies/ | Group |
| group_trunk_group_call_capacity | Applicable data can be taken from API PUT /api/v1/tenants/(string: tenant_id)/groups/(string: group_id)/features/trunk_groups/ | Group |
| assign_ivr_menus | Group | |
| group_assign_ncos | Applicable data can be taken from API POST /api/v1/tenants/(string: tenant_id)/groups/(string: group_id)/networkclassofservice/ | Group |
| modify_group_routing_profile | The data are, e.g.: { "routingProfile": "routing" } | Group |
| group_assign_domains | Applicable data can be taken from API PUT /api/v1/tenants/(string: tenant_id)/groups/(string: group_id)/domains/ | Group |
| group_extensions_length | Applicable data can be taken from API PUT /api/v1/tenants/(string: tenant_id)/groups/(string: group_id)/extensions_length/ | Group |
| assign_user_services | Applicable data can be taken from API POST /api/v1/tenants/(string:tenant_id)/groups/(string:group_id)/users/(string:user_id)/services/ | User, Call Center, Hunt Group, IVR |
| unassign_user_services | Applicable data can be taken from API DELETE /api/v1/tenants/(string:tenant_id)/groups/(string:group_id)/users/(string:user_id)/services/ | User, Call Center, Hunt Group, IVR |
Devices
This section outlines the key stages of IP phone provisioning for Fusion for BroadWorks, ensuring seamless integration with the Cisco BroadWorks call control platform. Fusion caters to a subset of the IP Phone Provisioning process and is designed to streamline device setup, configuration, and ongoing management for both administrators and end users.
1. Devices Initial Configuration Download (DTAF & Device Profiles)
In BroadWorks, the Device Type Archive File (DTAF) is a mechanism used to import or build Identity/Device Profile Types. Once these device profile types are established, an individual Identity/Device Profile is then created from a selected Identity/Device Profile Type to represent an actual instance of a device in the network. Fusion for BroadWorks does not contribute to this process.
2. Devices Zero Touch Provisioning (ZTP)
Zero-Touch Provisioning (ZTP) is an automated process that enables network devices, such as desk phones, to be configured and deployed with minimal human intervention. The ZTP-enabled device "calls home" to a provisioning server (e.g., Yealink Redirection and Provisioning Service (RPS) or Cisco Device Activation (CDA) to retrieve configuration details. Fusion for BroadWorks contributes to this process by configuring the device vendor's provisioning server (via API) with the identifier of the device (MAC address) and the call control platform (Cisco BroadWorks DMS)
The typical end-to-end deployment process for ZTP-enabled phones involves the following steps:
- Ship the device to the user.
- Assign the device to the user via the Self Care Portal (SCP).
- Connect the device to the network.
- The device becomes fully operational without any additional configuration.
For BroadWorks deployments, this is usually accomplished through the following approach:
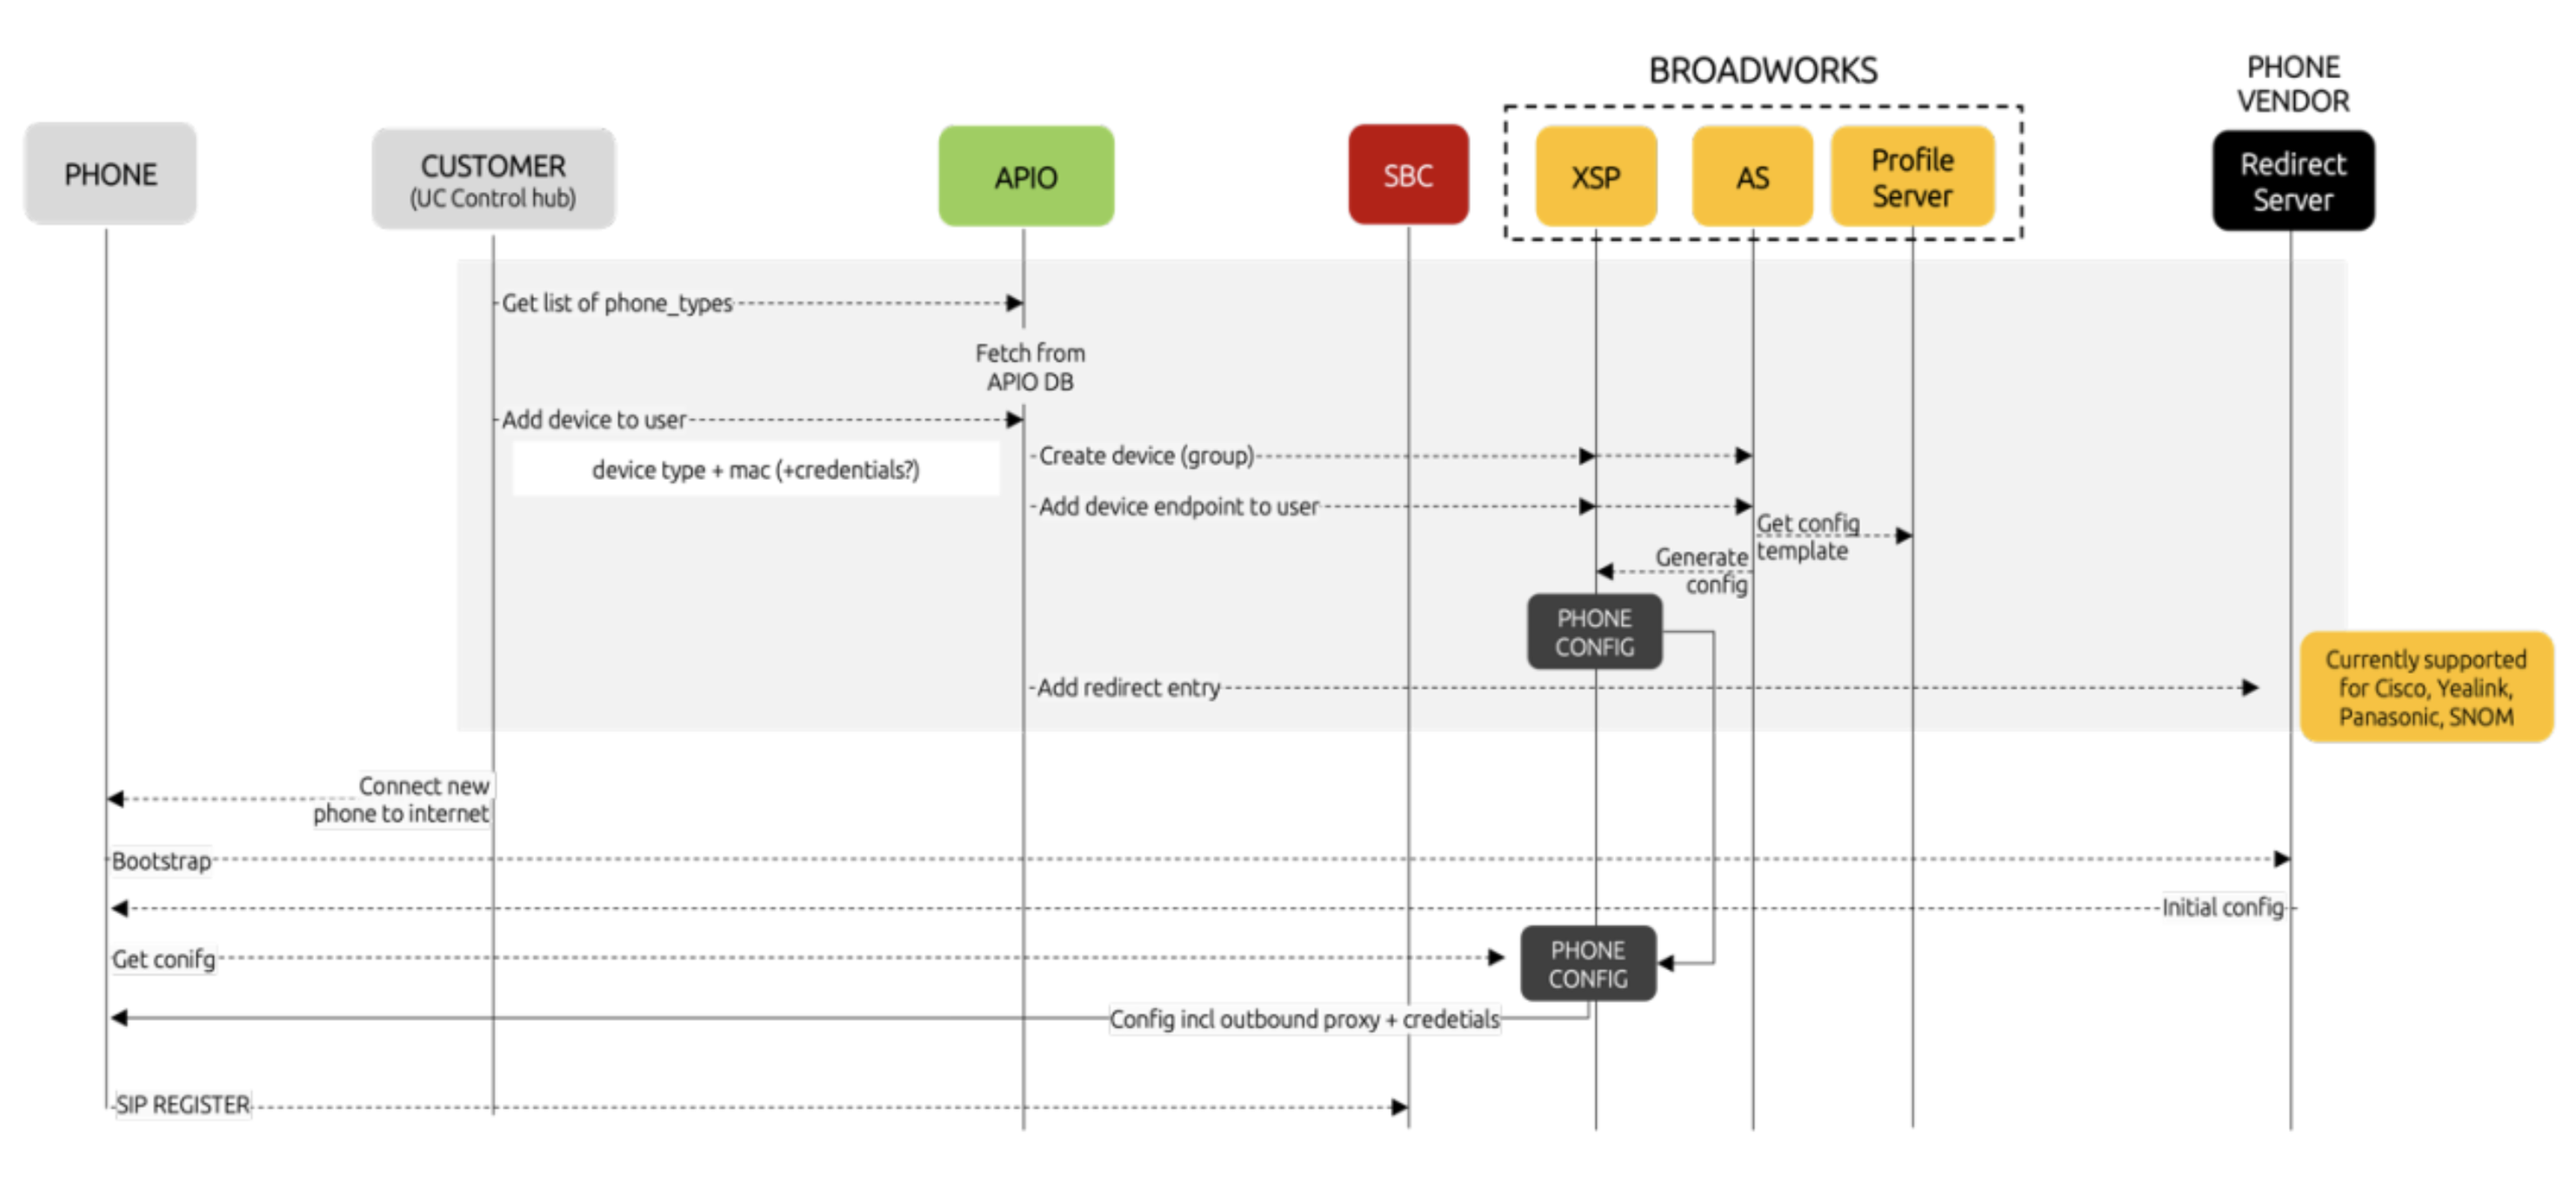
The Fusion for BroadWorks solution supports the integration of the following Vendors to achieve Zero-Touch Provisioning from the F4B selfcare portal:
- Cisco
- Yealink
- Polycom
- Snom
- Panasonic
- Grandstream
Integration
For the supported phone vendors the ZTP capability is integrated directly in the BroadWorks gateway. This means that the BroadWorks gateway will make the API calls to the provisioning server of the phone vendor.
Enabling ZTP requires:
- On time setup:
- Setup the phone vendor backend to connect to the provisioning service of the phone vendor
- Make sure all users (system) and user profiles (tenant/group/user) that can do device provisioning have the phone vendor backend assigned
- Per device type
- Create a provisioning profile (or similar) on the phone vendor’s provisioning platform
- Link the phone type in the BroadWorks gateway to a phone vendor backend and configure the provisioning profile to be used on the phone vendor’s provisioning service
Pre-Requisites
The phone vendor provisioning platform typically expose their services on port 443 (HTTPS). It is advised to open connectivity to these IP addresses both from APIO Core and the Broadworks gateway.
| Vendor | Port | Webservice |
|---|---|---|
| Yealink | 443 | https://api-dm.yealink.com:8443/xmlrpc |
| Panasonic | 443 | https://provisioning.e-connecting.net/redirect/xmlrpc |
| Snom | 443 | https://secure-provisioning.snom.com/ |
| Poly | 443 | https://api.ztp.poly.com/ |
| Cisco | 443 | https://apx.cisco.com/ |
| Grandstream | 443 | https://fm.grandstream.com/ |
Note: It is possible to connect through an outbound proxy.
Snom Integration
As mentioned above the integration is done directly in APIO/BroadWorks GW and this task will need to be performed by Netaxis. Netaxis will need to create and populate a phone vendor backend with the api connection details provided by you.
If you don’t have a provisioning account at Snom yet, you can signup using https://sraps.snom.com/registration. The platform will request details of your company. Finally, you will be able to logon to the administration portal where you will have to search for the unique ID of your company and API keys. With that information, Netaxis will configure the backend connection data object and setup the integration.
"Snom": {
  "company": "**YOUR_COMPANY_NAME**",
  "id": "**YOUR_COMPANY_ID**",
  "key": "**YOUR_API_KEY**"
  "url": "https: //secure-provisioning.snom.com/",
  "timer": 5,
  "sslVerif": false,
}
Yealink Integration
Yealink integration is done directly in APIO/BroadWorks GW and this task will need to be performed by Netaxis. Netaxis will need to create and populate a phone vendor backend with the api connection details provided by you.
Get in touch with your Yealink sales or support representative to get access to https://dm.yealink.com/. Fusion currently supports XML API which requires just a username and password with the correct accesses to use this API. This can be setup in the Sub Account Management section of the Yealink Management Cloud Service portal.
** Note:* APIO does not yet leverage the JSON API which requires a dedicated access setup in the yealink portal
"Yealink" : {
  "user": "**YOUR_USERNAME**",
  "password": "**YOUR_PASSWORD**",
  "url": "https://api-dm.yealink.com:8443/xmlrpc",
  "sslVerif": true,
  "proxy": {
    "http": "http://192.168.1.123:1234",
    "https": "https://192.168.1.123:1235"
  },
  "version": 1.6
}
Panasonic Integration
Panasonic integration is done directly in APIO GW and this task will need to be performed by Netaxis. Netaxis will need to create and populate a Phone Vendor backend with the api connection details provided by you.
Get in touch with your Panasonic sales or support representative to get access to the provisioning platform, to populate the connection data we will need your username and password as this allows to use their API's.
"Panasonic": {
  "user": "**YOUR_USERNAME**",
  "password": "**YOUR_PASSWORD**",
  "url": "https://provisioning.e-connecting.net/redirect/xmlrpc",
  "sslVerif": true
}
Polycom Integration
Polycom integration is done directly in APIO GW and this task will need to be performed by Netaxis. Netaxis will need to create and populate a Phone Vendor backend with the api connection details provided by you.
Get in touch with your Panasonic sales or support representative to get access to the provisioning platform, to populate the connection data we will need your API key.
"Polycom": {
    "url": "https://api.ztp.poly.com/preview",
    "timer": 5,
    "sslVerif": true,
    "key": "ToBeChanged"
}
To use the poly provisioning service, first reach out to your Poly sales representative or mail to DL-ZTPInfo@poly.com. They need to onboard you as partner on the platform. The platform itself is available on: https://partner.ztp.poly.com/
Once you are able to login, go to Integrations > Zero Touch Partner API, click on Manage and get API-Key needed for integration.
Cisco Integration
Polycom integration is done directly in APIO GW and this task will need to be performed by Netaxis. Netaxis will need to create and populate a Phone Vendor backend with the api connection details provided by you.
Getting access to the Cisco provisioning service is quiet complex if you don't already have access to CDA you can register on this page for a new Cisco account. Once you have an account you will need to enable API access and generate a Client ID and Secret thats needed for the integration. This can be done through the following link https://anypoint.mulesoft.com/apiplatform/apx/#/portals using your CDA account.
"Cisco": {
    "url": "https://commerce.cisco.com/",
    "tokenUrl": "https://id.cisco.com/oauth2/default/v1/token",
    "client_id": "ToBeChanged",
    "client_secret": "ToBeChanged"",
    "newAPIs": true,
    "timeout": 5,
    "sslVerif": true
}
Grandstream Integration
Grandstream integration is done directly in APIO GW and this task will need to be performed by Netaxis. Netaxis will need to create and populate a Phone Vendor backend with the api connection details provided by you.
Get in touch with your Grandstream sales or support representative to get access to the provisioning platform, to populate the connection data we will need your user and password for their APIs. Note the account must have API access enabled.
"Grandstream": {
    "url": "https://fm.grandstream.com",
    "user": "ToBeChanged",
    "password": "ToBeChanged@2022",
    "timeout": 5,
    "sslVerif": true,
    "byod": false
}
3. Devices Self-Care Device Management
Self-care device management empowers:
- Day 2 Self-Care Service: Administrators (system, reseller, tenant or group administrators) to assign devices to a user. This can be done either during user creation or afterwards.
- Visual Device Management (VDM): Users and administrators to manage phone settings post-provisioning, ensuring flexibility and ease of use.
Day 2 Self-Care Service
When an Administrator creates a new user, or assigns a new device to a user, the selfcare portal (SCP) is not proposing all device types known in BroadWorks, but just a limited subset.
Despite the fact that BroadWorks comes with hundreds of built-in device types, the Fusion for BroadWorks solution will only allow to add devices that are explicitly listed in the configuration database of the BroadWorks Gateway and this because service providers usually limit this list to a few vendors and/or device types to reduce maintainance, testing and troubleshooting costs. When the administrator selects the device type of choice, the portal will query again the backend to find out the device’s capabilities. These capabilities are also stored as a configuration object in the BroadWorks gateway. This way the portal will find out:
- Whether or not a mac address is required
- Custom device credentials must be generated/requested
- Zero-touch-provisioning is supported or not
Based on this information, the selfcare portal (SCP) will request the required information from the user before sending the data to the backend.
Upon receiving the device assignment request, APIO will:
- Create a new device (group level)
- Assign a device endpoint to the user in question
- Provision the redirect server of the phone vendor (if configured)
Visual Device Management (VDM)
The Self-Care Portal enables end-users to configure their phone buttons and other features, such as LEDs, phone GUI, admin passwords, and more, through an intuitive visual interface. Fusion for BroadWorks supports devices vendors such as Yealink Txx and Cisco MPP (contact Netaxis Presales for more information)
Setting up F4B Visual Device Management requires the following prerequisites:
- A fully configured and operational Cisco BroadWorks Device Management system for the phones in question.
- A thorough understanding of phone features, including their capabilities and configuration options.
- Properly configured templates, ensuring the correct set of tags is accurately placed for seamless functionality.
This setup ensures users can manage their phone settings effortlessly while maintaining optimal device performance.
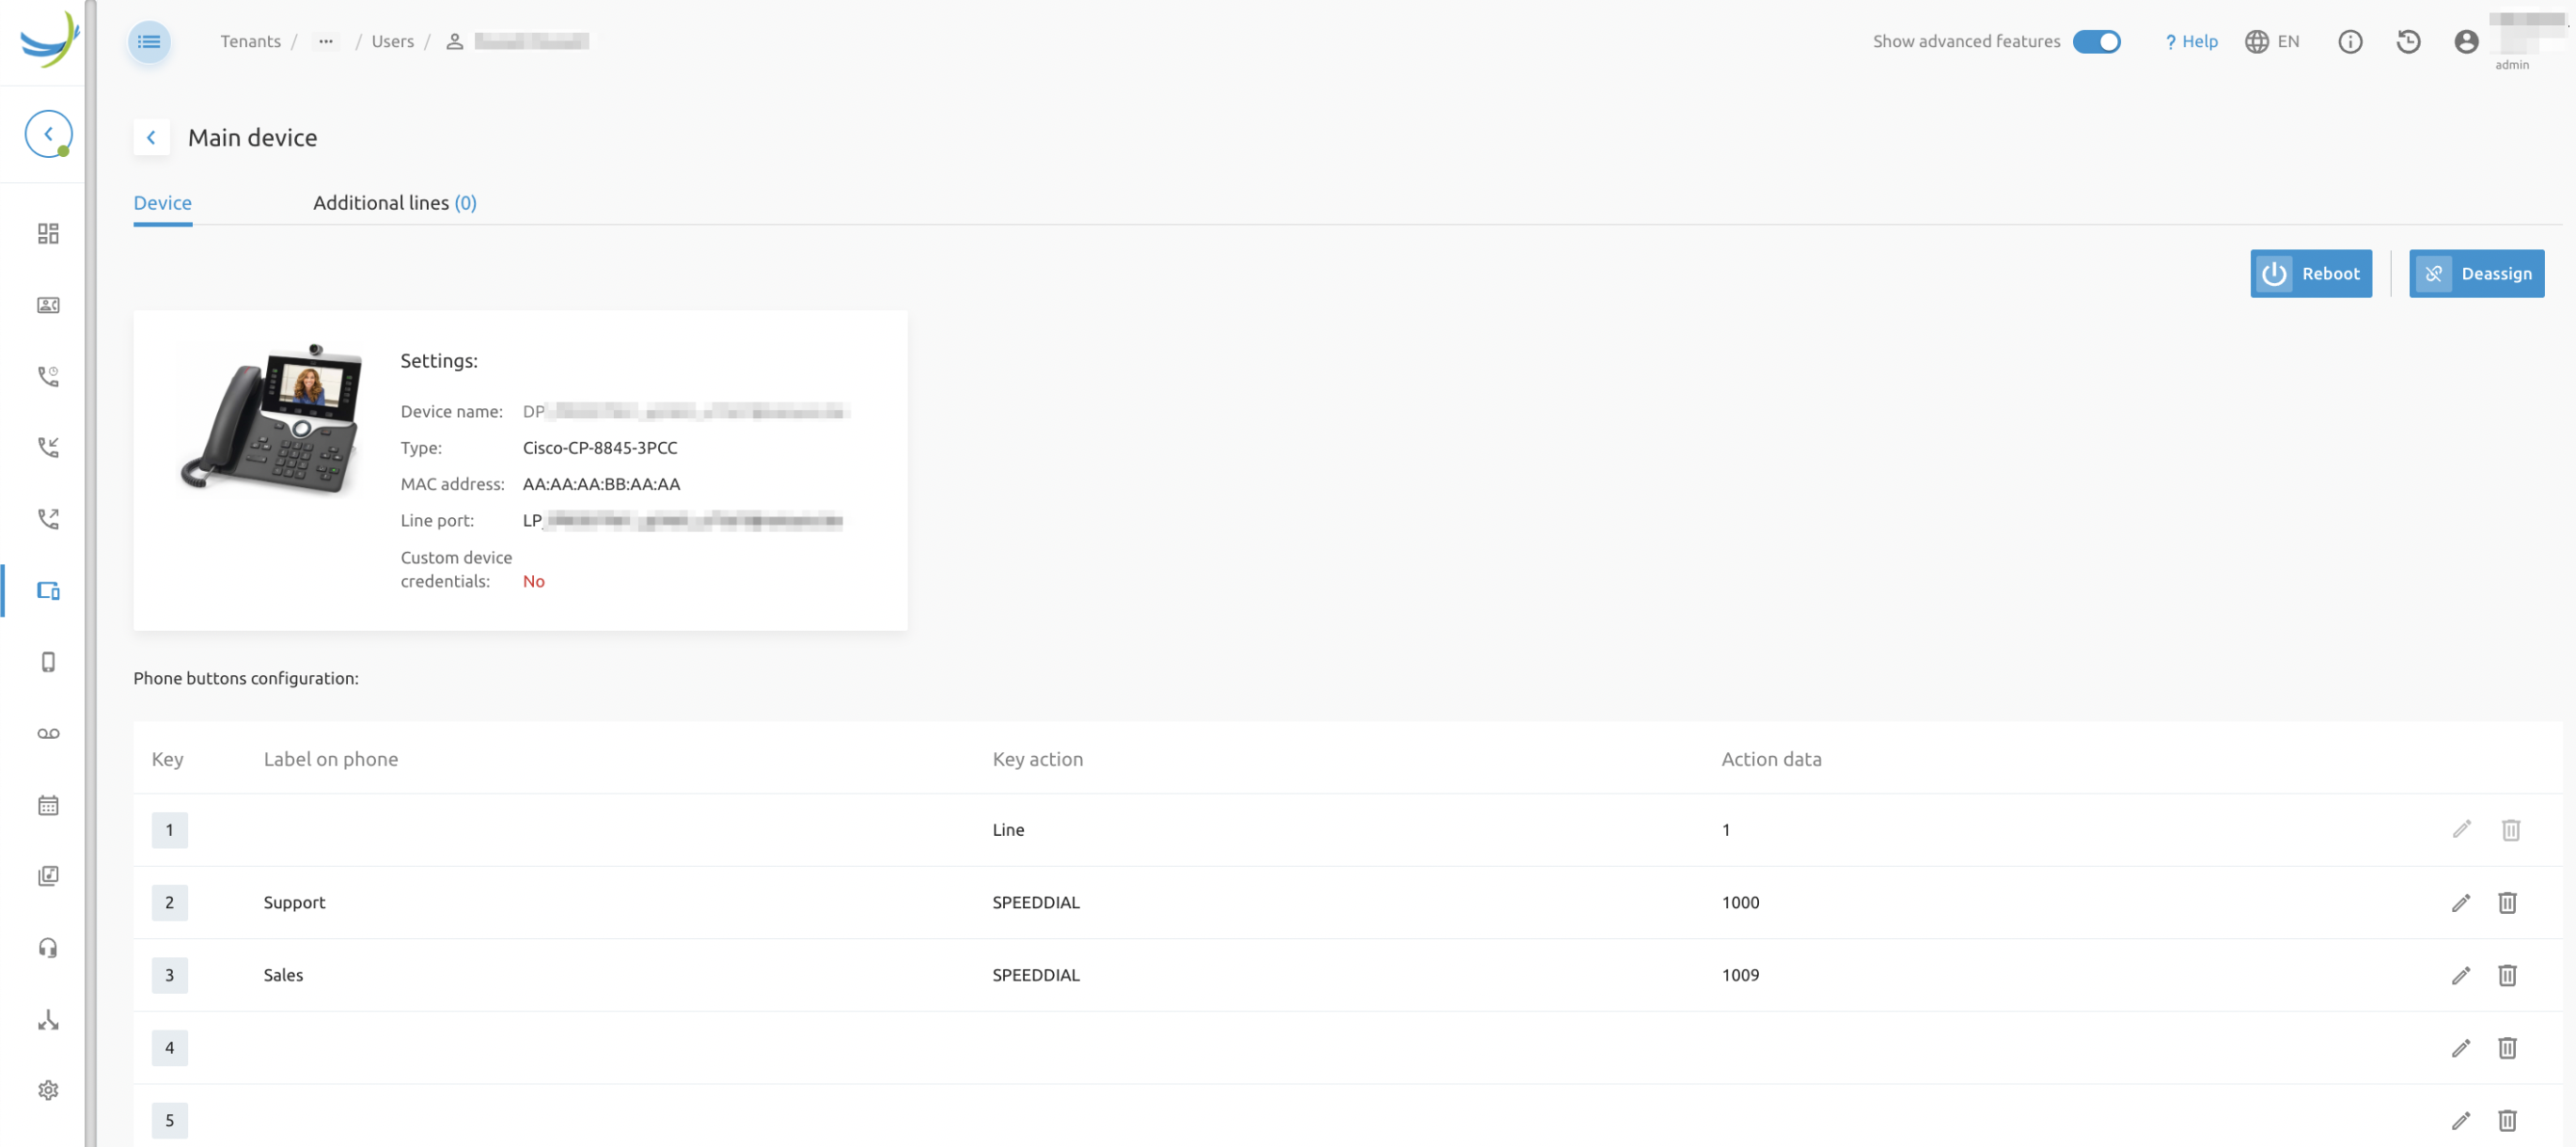
Example exposed configuration of the phone GUI admin password.

The Visual Device Management feature of the Fusion for BroadWorks solution operates by reading and provisioning custom tags for the device. These tags update the device configuration files, which are then fetched by the phone to apply the changes. As a result, this solution is highly versatile and can support virtually any phone from a visual device management perspective.
INFO
Cisco phones have a very particular way of managing phone buttons. Better support for Cisco Phones will be added in the near future.
The complete end-to-end process is as follows:
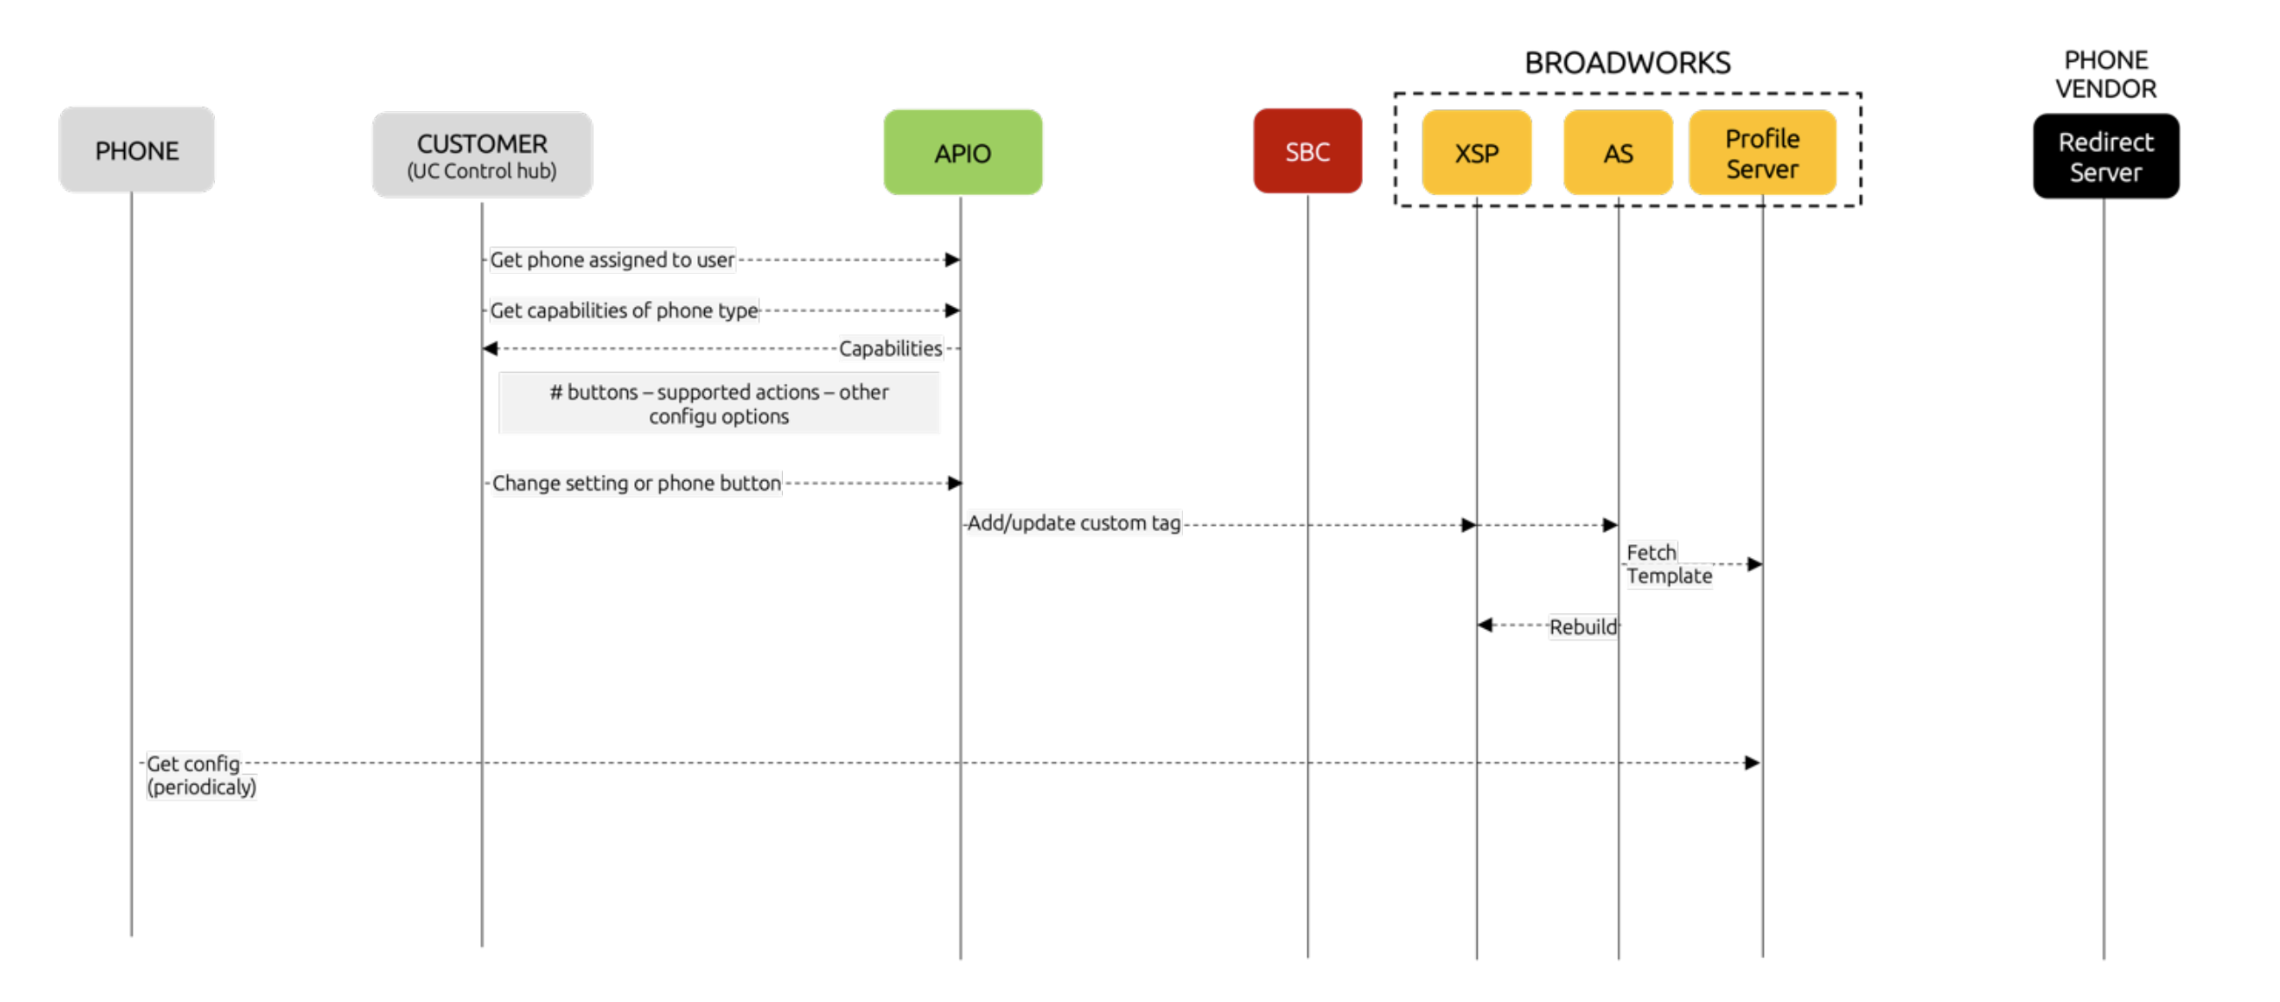
A good understaning of Cisco Broadworks Device Managment system will greatly help with initial setup of this feature.
Configuration
As outlined in the previous section, custom tags are essential for enabling Visual Device Management. It is critical to add a device profile type with a fully functional and thoroughly tested configuration template. This template must include custom tags in all areas where the portal is expected to generate content.
For example, if you want to allow configuration of the phone's web interface credentials, custom tags must be placed in the relevant sections of the configuration file where these credentials are defined.
This feature is set up on the APIO/BroadWorks Gateway by the Netaxis team as part of the deployment process and covers the number of devices specified in the purchase order (PO).
Note that the solution does not come with hard coded values for the custom tags. Instead a very flexible mechanism has been implemented:
- In the Broadworks gateway, under phone types, it is possible to define the phone capabilities:
- How many buttons does the device have?
- What are possible actions that you can configure?
- Which of those actions requires a value?
- What are the additional settings that you can configure (e.g. phone web interface credentials)
- The selfcare portal reads these capabilities and builds the GUI dynamically
- When the user makes a change on the selfcare portal, the portal will update the capabilities and setting through API. APIO will then configure the corresponding custom tags and ask Broadworks to recalculate the templates.
Phone Buttons Setup
Phone bottons and actions that can be assigned to them are configured on the APIO/BroadWorks GW for each phone type in the phone buttons sections. This configuration is done in JSON format. An example is presented below:
{
"MANAGED_KEYS": [0,1,2, 3, 4, 5, 6, 7, 8, 9, 10, 11,12,13,14,15,16,17,18,19,20,21,22,23], //defines number of managed buttons
"TAGS": { // defines tag's to be used for Label, value and action against the button
  "ACTION": "%FLEX_KEY_ACTION_{}%",
  "PARAM": "%FLEX_KEY_VALUE_{}%",
  "LABEL": "%FLEX_KEY_LABEL_{}%"
},
"ACTIONS": [ // Specifies possible actions
  "Use line",
  "Transfer incoming call",
  "Speed dial",
  "Call back",
  "Push to talk",
  "Show status + speed dial"
],
"VENDOR_ACTIONS": { // Maps actions to vendor actions
  "Use line": "line",
  "Transfer incoming call": "smart_transfer",
  "Speed dial": "speed",
  "Show status + speed dial": "BW-ServerBLF",
  "Push to talk": "p2t",
  "Call back": "callback"
},
"FORCED_KEYS": {
  "0": ["Use line", "1", "Line 1"] // Lock line under button 0, can not be changed from GUI
},
"PHONE_NUMBER_REQUIRED": [ // Specifies fields that require phone number as a value input.
  "Transfer incoming call",
  "Speed dial"
],
"CONSTRAINTS": {
  "MAX_LABEL": 99,
  "MAX_ARG": 99,
  "MAX_PHONE_NUMB": 99
},
"PARAMETER_2_DEFAULT": {
  "DIRECT_CALL": "1"
},
  "LINE_ID_REQUIRED": ["Use line"],
}
Most important configuration elements are:
- MANAGED_KEYS: list of key-ids that can be used on the phone (so 0, 1, 2, ...)
- TAGS: for each key, APIO is able to generate a label for the action, 1 for the value and 1 for the label. The tag will contain the key-id
- ACTIONS: is a list of "actions" that must be shown on the portal. You can type here anything you want. This is what the user sees and what the portal will use on the API
- VENDOR_ACTIONS: this maps an action to the name of the action in phone’s config file. Most of the time the vendor actions are quite technical and not user friendly.
- FORCED_KEYS: allows to specify which of the keys is fixed and cannot be changed by the user. The API will pre-create these tags, auto-populate them on the API (GET) and refuse to update them (PUT)
- PHONE_NUMBER_REQUIRED: indicates which of the actions requires also a "value" (e.g transfer to <number>)
- LINE_ID _REQUIRED: indicates which of the actions requires also a "value" (line id is the value)
Other Configurations
To configure additional phone settings, information must be added under the "Additional Data" section. Unlike phone buttons, these settings typically involve isolated configurations where each input in the portal corresponds to a single custom tag.
To enable this functionality, a key must be defined for each parameter you want to expose. Each key is an object that specifies the parameter's type and potential value. The supported types are:
- Integer
- String
- Boolean
- Password (two input fields will be displayed in the portal for confirmation)
For proper operation, you must map each parameter to a specific custom tag. The Self-Care Portal (SCP) will collect the input and send the information via an API to the APIO/BroadWorks Gateway, which generates the corresponding custom tags.
Below is an example configuration for managing the GUI admin username and password settings.
....
"sections":{ // defines sections and input fields in each
  "Phone web UI": [ "phoneAdminGUI_username", "phoneAdminGUI_password" ]
},
"phoneAdminGUI_username": { // Defines input field
  "enabled": true,
  "type": "String",
  "default": ""
},
"phoneAdminGUI_password": { // Defines input field
  "enabled": true,
  "type": "Password",
  "default": ""
},
"TAGS": { // Maps tags agains input fields.
  "phoneAdminGUI_username": "%SNOM_HTTP_USER%",
  "phoneAdminGUI_password": "%SNOM_HTTP_PASS%"
},
"BOOLEAN_VALUES": {
  "True": "1",
  "False": "0"
}
....
Reseller Support
Typically, Cisco BroadWorks administrators manage a single object and its associated entities. For instance, an enterprise administrator can oversee the entire enterprise, including all its groups and users. The Fusion Reseller functionality enhances this by enabling the creation of APIO users with administrative rights to manage multiple enterprises and/or groups across different enterprises. This provides a broader level of management, allowing for more flexibility in handling complex multi-enterprise environments.
Example of reseller setup:
*Note: APIO users are not know by the Application Server, they are provisioned on and authenticated by APIO core. The core and gateway will then use shared user credentials for the Application Server to grant appropriate access rights.
The reseller functionality can be configured with the following two parameters. They specify at what level reseller feature is applied, it can also be enabled work in mixed mode, both tenant and group levels like for the above example.
"RESELLER_GROUP": true,
"RESELLER_TENANT": true
Single Sign On
The standard method for a user to access the UC Control Hub portal involves entering their credentials (username and password) on the login page, where APIO validates the credentials and initiates the session.
However, in certain scenarios, it may be required that specific user types (such as Tenant, Reseller, and System/Provisioning admins) use Single Sign-On (SSO) for authentication. In this case, the users are not authenticated by APIO directly, but by an authentication system managed by the operator. This system is typically used across various applications within the operator's network.
APIO supports the following SSO protocols:
- OpenID Connect (e.g., Google, Microsoft)
- SAML (e.g., Okta, ClearLogin)
- WebSeal
- SOAP Token
- BroadSoft (used for BroadWorks user authentication)
Classical Mechanism
In the classical (non SSO) mechanism the user can either be authenticated by Broadworks or by the APIO (local APIO Core users).
When the user is authenticated in Broadworks the APIO sends/proxies the credentials of the user over OCI, Broadworks authenticates the user and provides his level and the relevant "ids" (user id, group id, tenant id). This mechanism is classically used for End Users, Group Admins and Tenant Admins. (Due to security by default BroadWorks System/Provisioning administrator are not allowed to login)
In that case the user is created (if it was not yet the case) with minimal information inside the APIO DB for allowing additional features (non Broadworks features) configuration afterwards.
When the user is authenticated by the APIO Core, it must be created first in the APIO Core, the APIO validates internally the provided credentials and then open an OCI session in Broadworks using a shared account. This mechanism is classically used for System Administrators. The reason it is done that way is that Broadworks does not allow, yet, to create System Admins via API calls: you can create an AS Admin via OCI command but then you need to define him also in the NS and this can be done only via bwcli interface.
SSO Mechanism
The SSO mechanism is more complex because the user is authenticated by an external system (IDP) but afterwards a session needs to be opened in Broadworks for this user.
We have then 2 main use cases depending on the type of user:
The SSO user is not known in Broadworks but only in APIO and APIO uses a shared user in Broadworks to open an OCI session
- This can only be done for System level users
The SSO user is a user known in Broadworks and with a level lower than System(Tenant,Group Admin or End User) and therefore a restriction on the resources he can manage.
- Currently the APIO supports this for Tenant Admin and Group Admin
- The support of End User is on the roadmap but relies on a Broadworks feature that does not work yet correctly.
In addition to this there is a need to make the correlation between the user in the SSO authentication server and the user in the APIO/Broadworks solution(typically userID or alternativeID). Depending on the cases it can be managed by configuration in the APIO or it will requires the development of some project specific code as there is no standard for this: the SSO protocols usually define the messages but not the profiles themselves.
SSO Mechanism for APIO users
In the case of local APIO users (with shared Broadworks account) the APIO is master of the password, therefore the SSO logic in the APIO can handle fully internally the authentication. It means that these users will still be able to connect also via the classical mechanism if they know their APIO credentials (which is not necessarily the case) in addition of the SSO login.
SSO Mechanism for Broadworks users
APIO authenticates users via the SSO mechanism and retrieves their username from BroadWorks. However, to open an OCI session for the user, additional steps are required depending on the type of user:
- For Admins (Tenant Admins or Group Admins), it is not possible to establish an OCI session without knowing the user’s password.
- For End Users, it is theoretically possible to establish an OCI session without knowing the password by using special OCI commands. However, this mechanism has not been successful in any BroadWorks setups tested by Netaxis so far, which is why it is not yet supported.
Currently, APIO generates strong passwords at the time of user creation using predictable algorithms. This approach is only supported for users created through APIO, not directly in BroadWorks.
The limitation of having APIO generate the password means that the user does not know the generated password, making it impossible for them to use the traditional login mechanism. This solution is not suitable for End Users, as they need to know their credentials to access integrated applications. However, this setup is acceptable for Admins, and APIO currently supports it for Tenant Admins and Group Admins.
Modules
The list of enabled modules is configurable. It is done via thee branding config file. In this section we will focus on what each module is delivering and what is required for its setup.
Call Statistics and CDR's
The Fusion portal can be configured to consume APIs exposed by Nemo (see Nemo User Guide that is configured to act as CDR repository and reporting server and convert them into graphs for tenants and groups as well as pull CDR data for users.
Charts & KPIs include:
- Evolution of max & average sim calls over time
- Call minutes per day in function of time
- National and international distribution of calling and called parties - Termination reason distribution
- Insights in the typical call durations and how it changes over time
- Call analytics
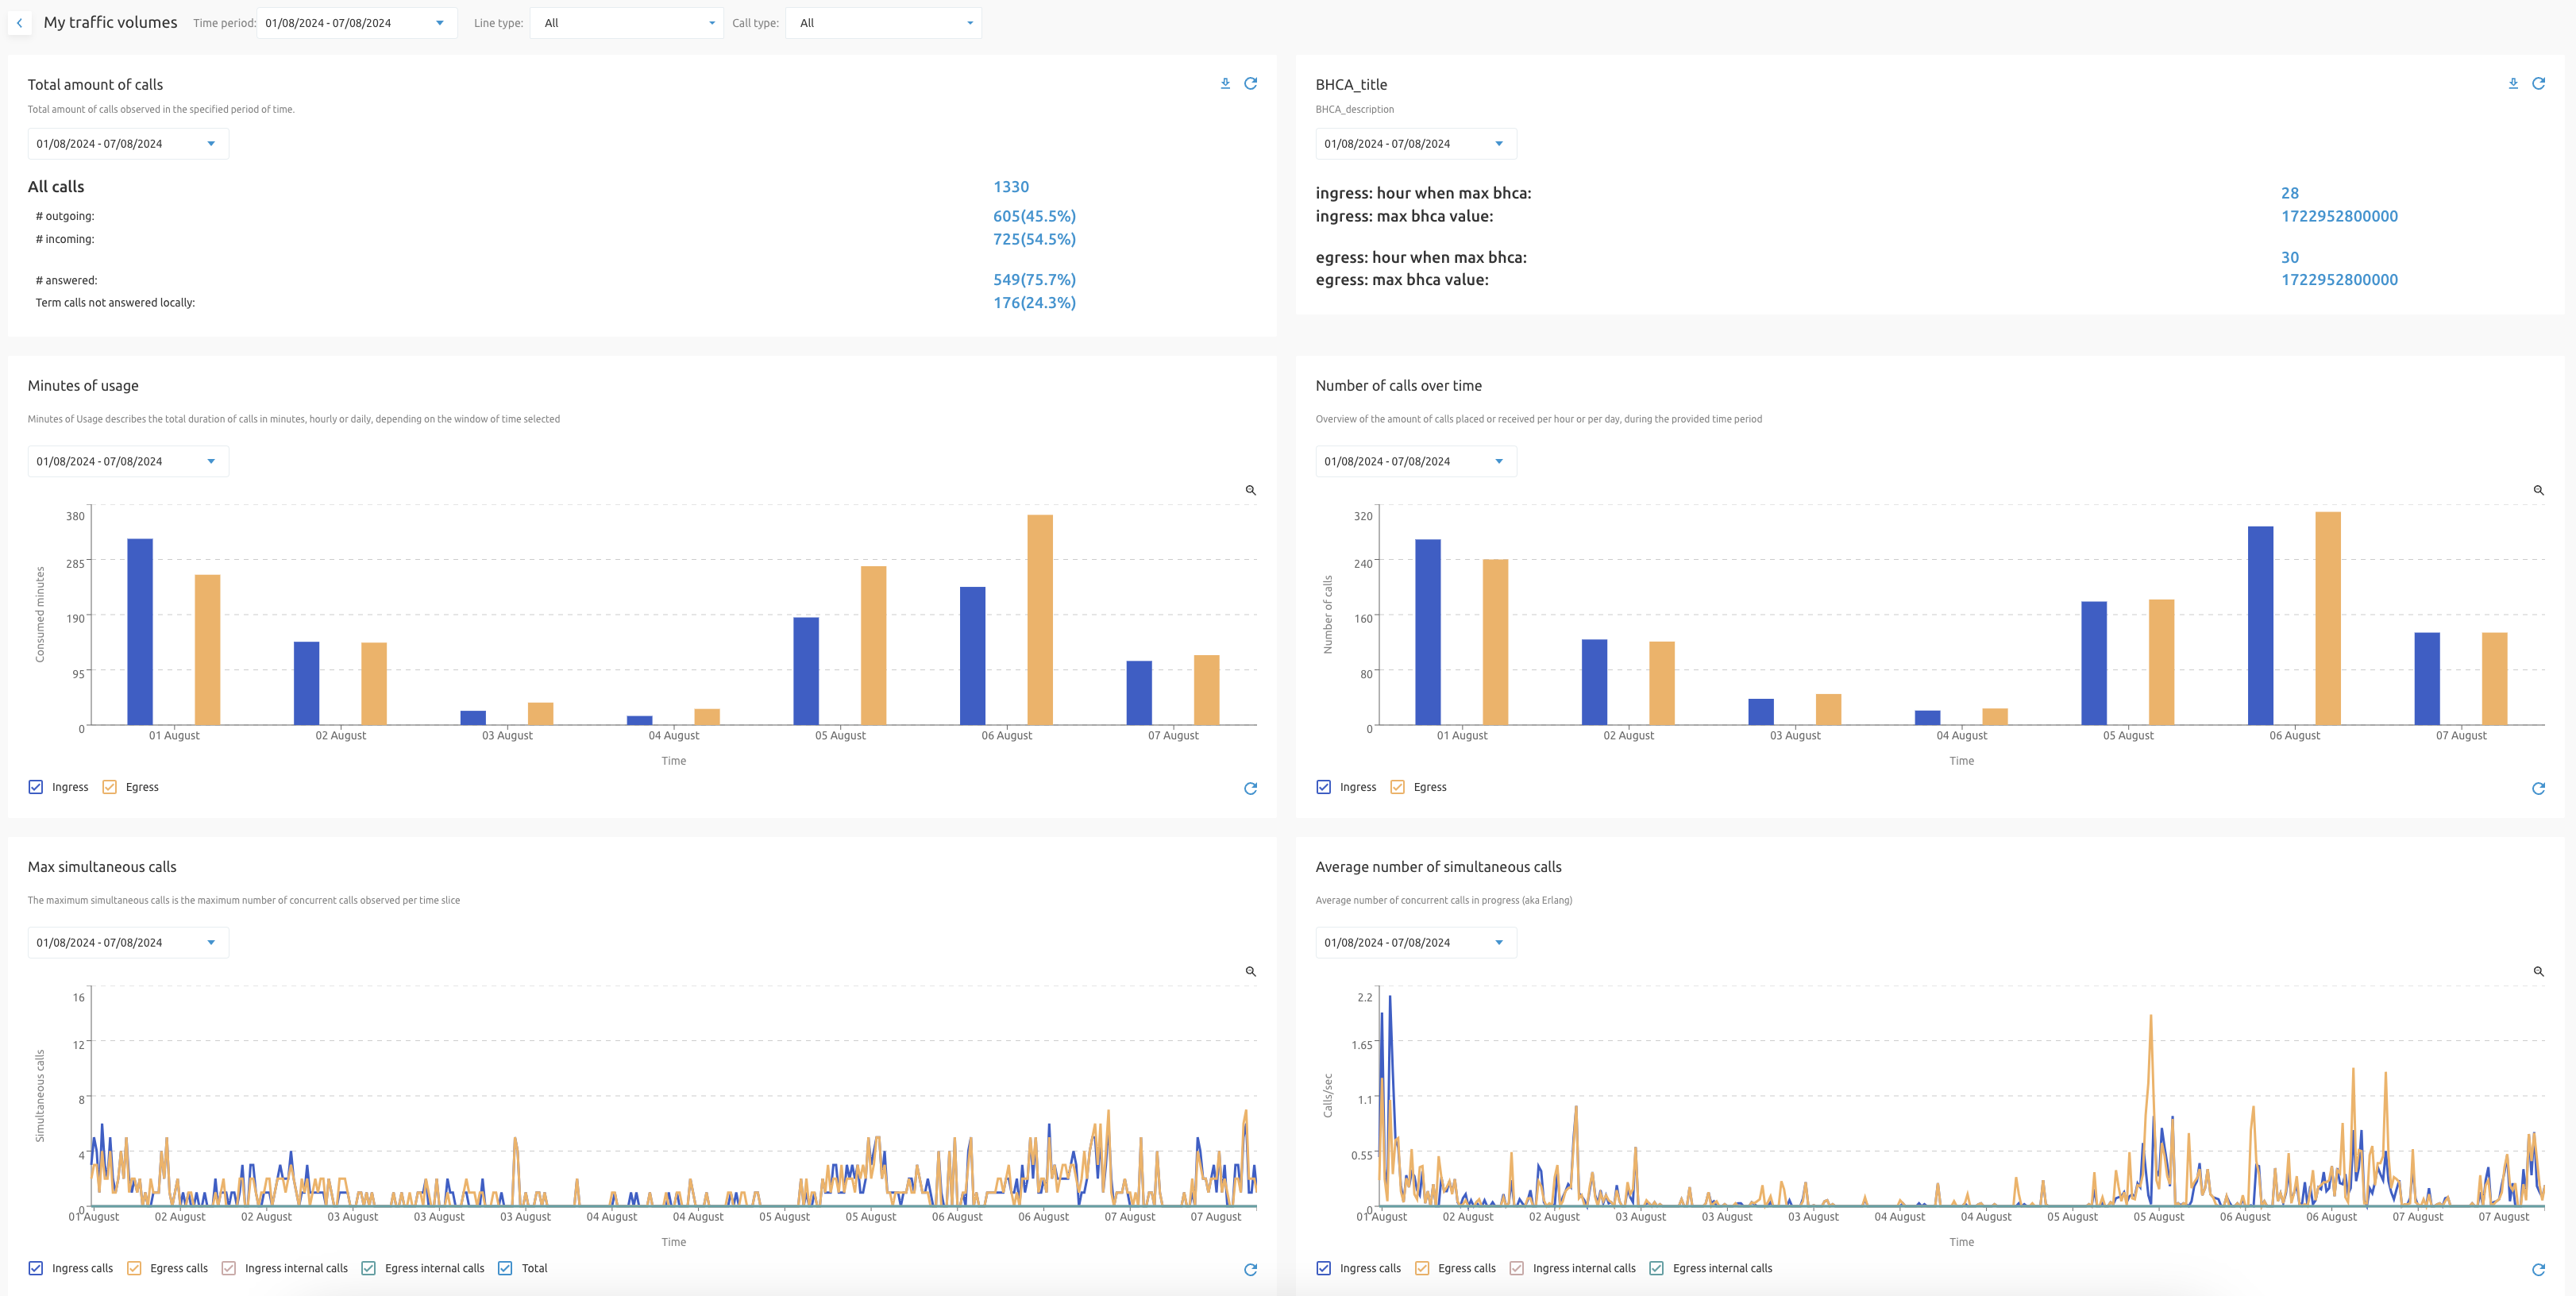
This data is available to enterprise and group admins and relevant for the objects that they manage. Besides the charts and KPIs that concern entire groups and enterprises, the KPIs on the level of users, call centers, IVRs and hunt groups are also available in the users statistics. The Fusion portal can also give you insights into KPIs such as number of calls received & placed, total inbound minutes, total outbound minutes, typical call duration.
INFO
Nemo requires BW Collector licenses for this feature to work.
Nemo Hardware Requirements
Nemo needs to be deployed on a dedicated hw/virtual machines, for redundacy purposes two nodes will be needed. As general reference, the administrator should consider 4 Cores, 2.4+ GHz clock speed and 16 GB RAM. The amount of disk space depends on the amount of data (also retention period) the administrator wants to store, also Netaxis advises to use LVM, to allow any resizing if needed.
Netaxis can deliver an estimation of the partitions' size if the following information are shared in advance:
- Number of CDRs per day
- CDR retention (in days)
- BW CDR type (CSV/XML)
- Stats retention (in days)
- Traffic type (business, residential, mixed)
The sizes shown in the table below are the minimum suggested.
| Mount point | FS type | Partition Size |
|---|---|---|
| / | ext4 | 10 GB |
| /opt/nemo | ext4 | 5 GB |
| /var/log/nemo | ext4 | 5 GB |
| /data/db | ext4 | 50 GB |
| /data/cdr | ext4 | 20 GB |
| /data/backup | ext4 | 50 GB |
| Swap | 1.5xRAM | |
| /boot | 2GB |
Integration
As stated above Fusion portal integrates with Nemo Restful APIs' to pull all revelant data to be displyed. For this integration to work Netaxis will deploy dedicated Nemo workflows on APIO Core and enable this integration in the environment.

Additionally Nemo will need to be supplied with CDR from Broadworks. It is up to service provide to create a script that puts Broadworks CDR's (from both AS nodes Primary and secondary) into /data/cdr/ftp directory for Nemo processing. Netaxis recommends creating a cron job and use ssh for transfer of the CDR's.
Webex
Cisco Webex exposes a set of public APIs that enable service providers to incorporate Webex user management into their existing workflows/tools. Netaxis Webex module leverages those API's through a dedicated gateway that can be installed and configured on APIO Core node. This module comes with pre-build workflows and Portal UI extensions that hide the complexities of Webex provisioning behind a simple service pack management.
INFO
Netaxis Webex module works in full API mode and doesnt support provisioning adaper or moxed mode. We do however support migrating from provisioning adapter to full API integration.
Provision, deleting and updating subscribers on the WebEx platform. This includes subscriber and Webex person management keeping Webex organisation clean from any leftovers.
Webex prebuilt workflows automatically create SCA's for Webex applications running on PC, Mobile and tables once the user is successfully onboarded to Webex.
Has built in support for two onboarding models, trusted and untrusted email's. Note only one model can be enable per integration.
Provides a dashboard for the end user's guiding them through the process. A good example if the user is missing an email address and the onboarding can not be completed automatically the end user is able to provide their email directly on the UC Control Hub portal and reinitiate onboarding themself without involving the Service Provider.
Can send email to end users upon onboarding completion informing them of their new capabilities.
Supports all types of WebEx licenses as well as switching between them. Detects the highest Webex licenses associated to a service pack assigned by a user, making sure an appropriate Webex licenses is configured.
In case of deletion of the user or the de-assignment of the license, the Webex account is removed permanently along with the Cisco person making sure the cloud data is clean.
Integration
As stated above Netaxis Webex gateway integrates with Webex Restful API. Gateway acts on behalf of one of the admins of Service providers WebEx partner org and keeps alive the connection with Webex by regularly refreshing tokens.
In a standard deployment where a service provider has a single Webex organisation (this covers 99% of deployments) for redundancy reasons a single Webex gateway instance is deployed on each APIO Core node, meaning that for each gateway a separate integration is needed.
Integration setup requires an account on developer.webex.com and it is strongly recommended but not necessary that service providers create and mange such an account in their name. This is a Cisco service specifically designed to configure Webex integration and allows generation of client id and client secret to be used for the integration. In a final step a link is auto generated that when opened by Webex partner admin allows to you to authorise this integration and generate the first token so that Webex gateway can establish a session specific for your partner organisation in Webex.
Configuration
Configuration of has two parts to it, configuration of provisioning method and configuration of service packs trigger provisioning of Webex against a user.
Proviosning Method
Fusion supports Cisco provisioning for trusted and untrusted emails as per Cisco solution guide [documentation] (https://help.webex.com/en-us/article/no4dlj3/Webex-for-Cisco-BroadWorks-Solution-Guide). This configuration as well as the provisioning template id to be used for provisioning is configured via APIO Core env variables.
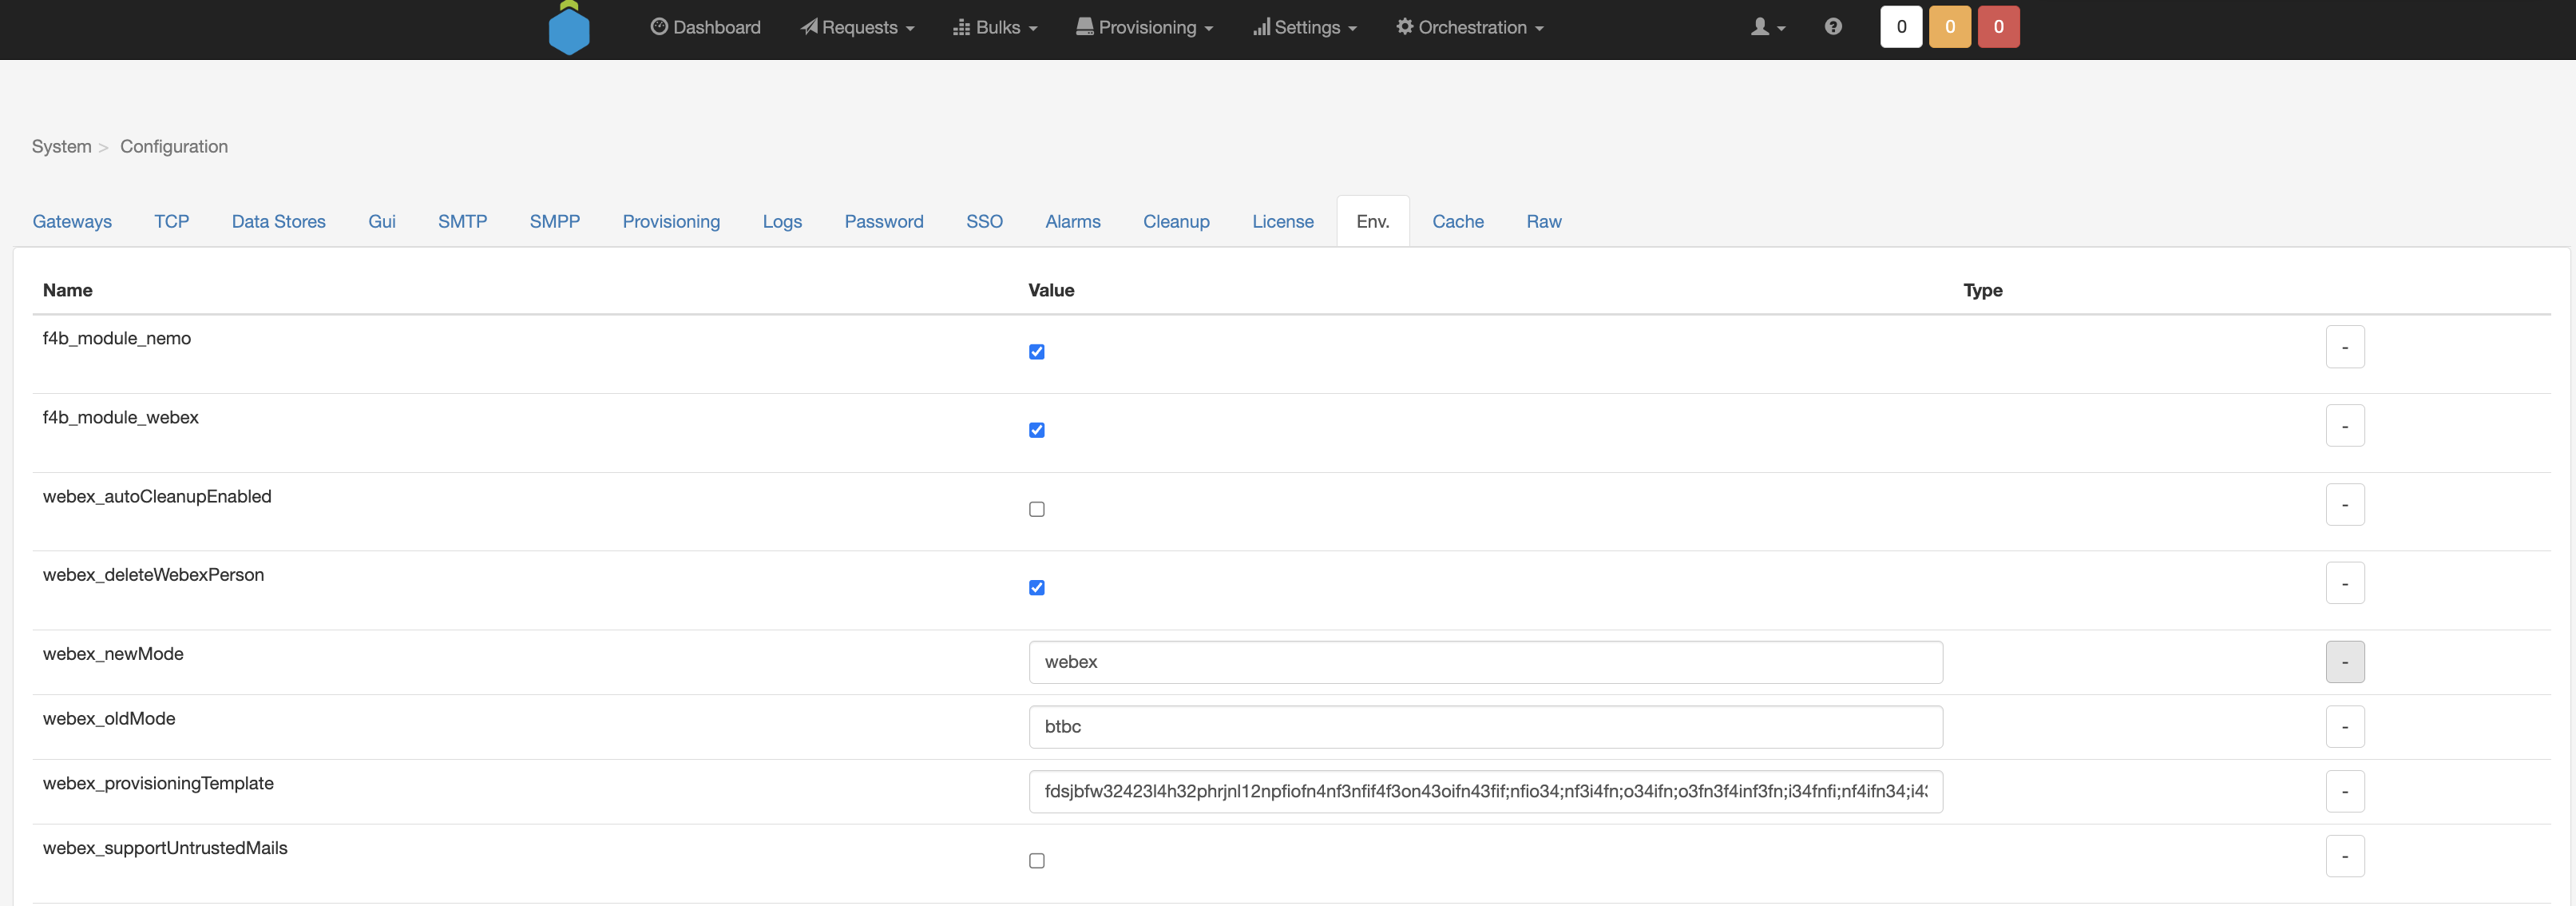
- package indicates the Webex license to be provisioned against the user. Possible values match Cisco Webex licenses and are as follows: softphone, basic, standard, premium; As mentioned before, this module will automatically provision a Webex account for a user upon service pack assignment. To configure the Webex license that will be assigned to a user, service pack definition need to be extended with this information. This part of configuration is done by netaxis as part of the deployment of the gateway. It is configured in the integrated client section of the service pack definition as in the example below.
{
      "mode": "webex",
      "package": "premium",
      "package_level" : 3
}
Where:
- mode indicates this is Webex enabled service pack
- package indicates the Webex license to be provisioned against the user. Possible values match Cisco Webex licenses and are as follows: softphone, basic, standard, premium;
- package_level this is for internal APIO use, it indicates Webex license level in order to always assign the highest Webex license if multiple Webex service packs are assigned to the user. In essence values should be mapped as follows softphone = 0, basic = 1, standard = 2, premium = 3
Dubber
Dubber is a cloud service providing call recording platform service for Broadworks. Netaxis module simplifies integration making it seamless for the end-user administrators and hiding the complexity of setup behind a simple assignment of a service pack.
Dubber module preforms the follow automations:
- assignment of service pack marked as requiring dubber integration is detected by the APIO Gateway that will automatically creates dub point for a user in the Dubber service.
- un-assignment of all service packs marked as requiring dubber integration service is detected by the APIO Gateway that automatically deletes the dub point dubber side.
- this module support configuring coloration between Dubber products and service pack. Dubber product defines the type of dub point that will bee created for a user, this for example can set the retention period for the recording.
Integration
Integration is done via REST API interface exposed by Dubber. Unlike Webex it is fully transparent (supported by the APIO gateway) and does not require addition software installation. A simple call recording backend definition is required on the gateway and selection of Service Packs for which provisioning must occur.
The following mapping:
An APIO Tenant is a Group in Dubber that will be a Sub-Group of the Main Group defined in the Dubber backend configuration
An APIO Group is an Account in Dubber inside the Group create for the APIO Tenant
The End Users are a combination of User + Dub Point in Dubber
Example dubber backend configuration looks as follows
{
  "Dubber":  {
  "url":  "https://api.dubber.net/sandbox/v1/",
  "mainGroup":  "<Dubber main group>",
  "clientId":  "<client ID>",
  "clientSecret":  "<client secret>",
  "username":  "<user name>",
  "password":  "<password>",
  "timeout":  5,
  "sslVerif":  true,
  "saveSession":  true
  }
}
INFO
Above connection details and API credentials is something that a service provider would have to obtain from Dubber as part of their paid service.
Marking the service packs as dubber enabled is done via additional data field in the service pack definition. And has the following structure.
{
  "call_recording":  {
  "mode":  "Dubber",
  "product":  "Reserved7y",
  "retention":  {
  "period":  7,
  "units":  "years"
  }
  }
}
INFO
Product and retention parameters are optional. If none are provided then a default values will be applied.
Defaults for this integration can be set in configuration settings on APIO Gateway. An example would be a default dub point product to be used if service pack additional info did not contain one. Default configuration setting structure is presented below.
{
  "address":  {
  "address":  "Rue du Trône 60/b5",
  "suburb":  "Bruxelles",
  "state":  "BRU",
  "postcode":  "1050",
  "country":  "BE"
  },
  "phone":  "31023450000",
  "product":  "Reserved5y"
}
Mutare
Mutare is a cloud service providing voice mail transcription platform for Broadwork. Mutare module enables Portal UI extensions and simplifies integration making it seamless for the end-user administrators and hiding the complexity of setup behind a simple assignment of a service pack.
The end users voice mail configuration page is enhanced with fields allowing to specify destination email address where the transcribed voice messages are to be delivered.
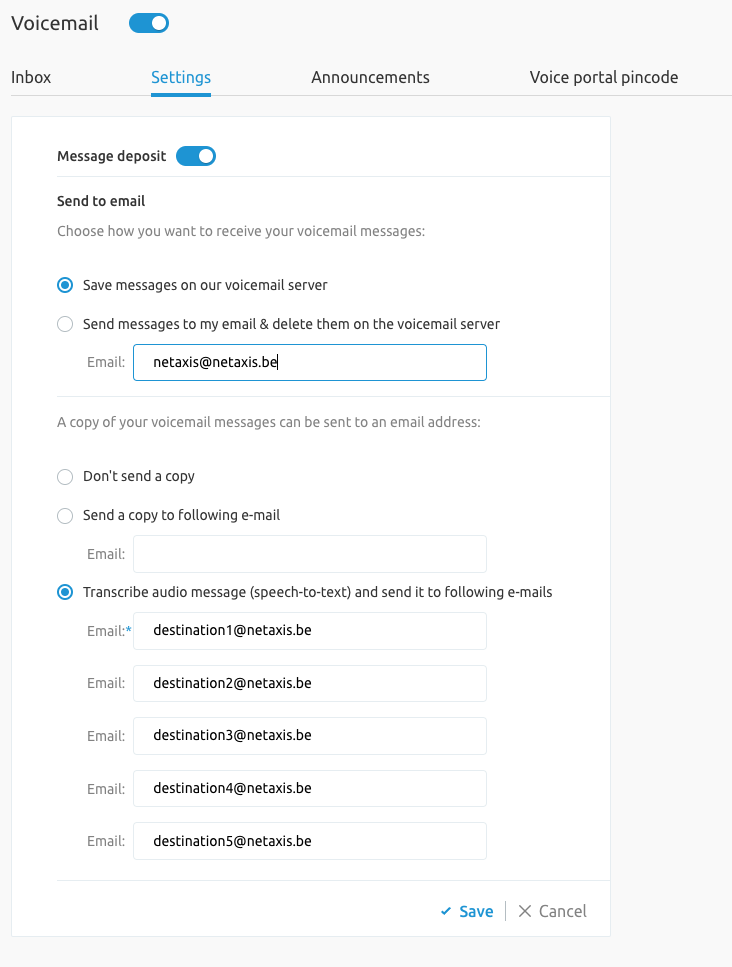
INFO
Transcribe feature is not available with the "Third-Party Voice Mail Support"
Integration
Integration is done via REST API interface exposed by Mutare. Just like Dubber it is fully transparent and does not require addition software installation. A simple backend definition is required on the gateway and selection of Service Pack for which provisioning must occur.
When the transcribe feature is active, the voiceMessageCarbonCopyEmailAddress is set to the email address of the Mutare server.
When the transcribe feature is inactive or not assigned, the voiceMessageCarbonCopyEmailAddress contains the real address of the end user.
Example mutare transcription backend configuration looks as follows
{
  "Mutare":  {
  "url":  "https://balthazar.mutare.com/",
  "accountId"  :  "youraccount",
  "accountToken":  "yourpassword",
  "systemId":  "8",
  "groupId":  "16",
  "deviceId":  "21",
  "multiDevices":  5,
  "serverEmail":  "anEmail@mutare",
  "timeZone":  "Central Europe Standard Time",
  "sslVerif":  false,
  "timeout":  3,
  }
}
INFO
Above connection details and API credentials is something that a service provider would have to obtain from Mutare as part of their paid service.
Marking the service packs as dubber enabled is done via additional data field in the service pack definition. And has the following structure.
{
  "transcribe":  {
  "mode":  "Mutare"
  }
}